Can You Use 3/4 Inch Plywood for Subfloor
Many people starting home projects wonder, “Can You Use 3/4 Inch Plywood for Subfloor?” It’s a common question because picking the right subfloor material is super important for a strong, lasting floor. Sometimes, the technical stuff can seem tricky, but don’t worry! We’ll make it simple.
This guide will walk you through everything you need to know, step by step, so you can feel confident about your choice. Let’s get your project off to a great start.
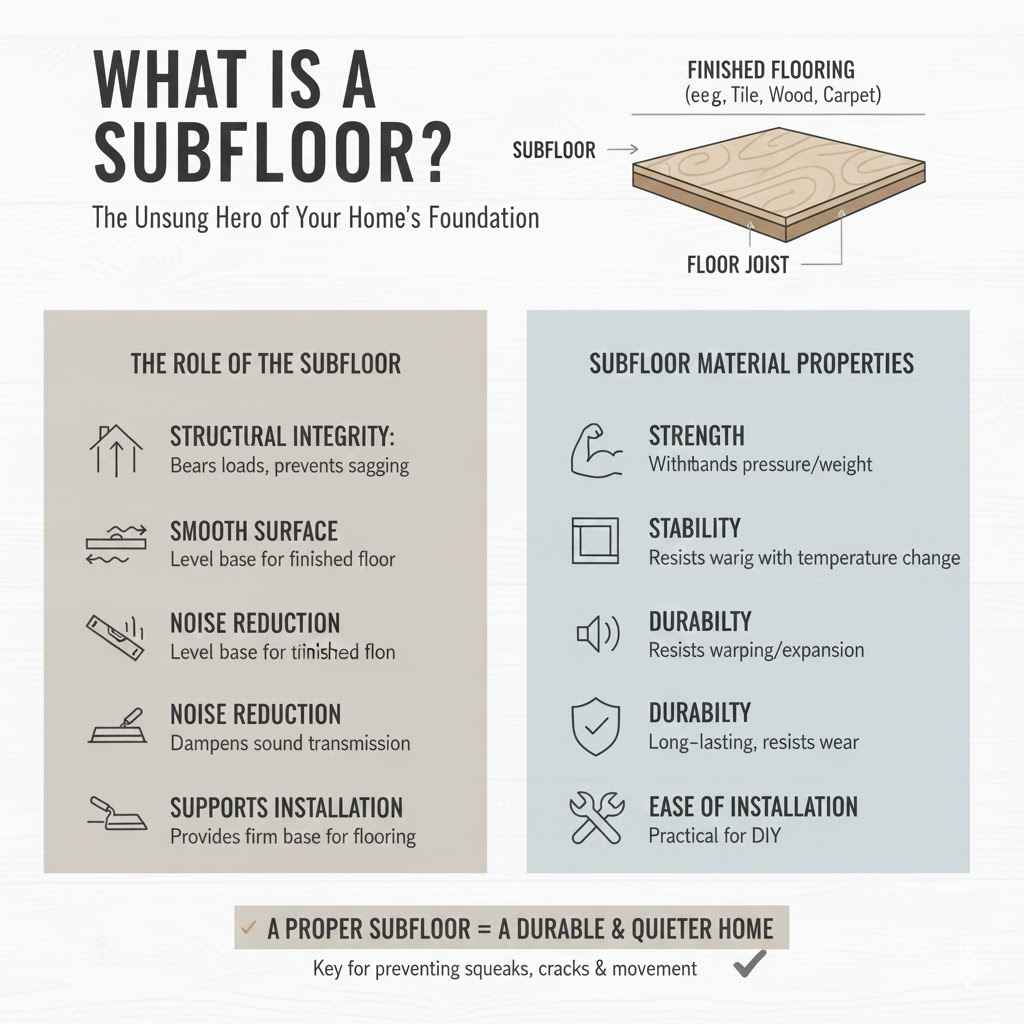
What Is A Subfloor And Why Does It Matter
A subfloor is the foundation layer beneath your finished flooring, like carpet or tile. It sits on top of the floor joists, which are the structural beams that support the entire floor system. The subfloor’s main job is to create a flat, stable surface for your final floor covering.
It also helps distribute weight evenly across the joists and adds to the overall strength and rigidity of the floor. A good subfloor prevents squeaks, minimizes flexing, and protects your finished floor from damage.
The Role Of The Subfloor
Think of the subfloor as the unsung hero of your flooring. Without a proper subfloor, your beautiful new hardwood or elegant tile could crack, sag, or become uneven. It acts as a critical link between the structural frame of your house and the visible flooring.
It’s the base that needs to be solid for anything you put on top to perform well and last a long time.
- Provides structural integrity. The subfloor adds significant strength to the floor system, helping it to bear loads from furniture, people, and everyday life without bending or breaking. This is especially important in areas with wider joist spacing.
- Creates a smooth surface. It covers the rough tops of the floor joists, offering a level plane for installing your chosen flooring material. Any imperfections in the subfloor will show through in the final floor.
- Reduces noise. A well-installed subfloor, often combined with an underlayment, helps to dampen sound transmission between floors, making your home quieter.
- Supports flooring installation. Many types of flooring require a firm, flat base for proper adhesion and stability. For example, vinyl flooring needs an exceptionally smooth surface to avoid showing any bumps or imperfections from below.
Subfloor Material Properties
When choosing subfloor materials, several properties are key. Strength is paramount, meaning the material must be able to withstand pressure and weight without deforming. Stability is also crucial; the material shouldn’t warp, expand, or contract significantly with changes in humidity or temperature.
Durability ensures the subfloor lasts for years, resisting wear and tear. Finally, ease of installation is a practical consideration for many DIYers.
Different materials offer varying levels of these properties. For instance, some engineered wood products might be more dimensionally stable than traditional lumber, while concrete offers superior strength but is harder to work with. The goal is to find a material that balances these needs for your specific project.
Can You Use 3/4 Inch Plywood for Subfloor
This is a question many homeowners and builders ponder. The simple answer is yes, you absolutely can use 3/4 inch plywood for a subfloor, and it’s a very common choice. It’s often the go-to material for many construction projects because it offers a great balance of strength, stability, and cost-effectiveness.
Understanding why it works so well, and what makes it a good option, is important for ensuring your flooring project is a success. We will explore what makes this thickness suitable.
Understanding Plywood Grades and Types
Not all plywood is created equal. When selecting plywood for a subfloor, the grade and type are very important. Plywood is made by layering thin sheets of wood veneer, called plies, with the grain of each ply oriented at a right angle to the ply beneath it.
This cross-graining technique gives plywood its strength and stability.
The grading system for plywood typically uses letters. For subflooring, you’ll often see grades like “CDX.” The “C” and “D” refer to the veneer quality on the faces, with “C” being better than “D.” The “X” stands for “construction grade,” meaning it’s suitable for general construction purposes like subflooring. It’s important to use construction-grade plywood, not decorative grades, as they are designed for structural applications.
- CDX Plywood
CDX is a common type of construction plywood. The ‘C’ face has fewer defects than a ‘D’ face, which might have knots or small splits. The ‘X’ designation signifies it’s suitable for exterior use, meaning it has glue that can withstand moisture better than interior-grade plywood. For subflooring, this water resistance is a valuable feature, even if the subfloor itself isn’t exposed to the elements long-term. - Structural I Plywood
This is a higher-strength grade of plywood. Structural I plywood is manufactured with all plies being of a stronger grade, meaning they have fewer defects and can bear more load. The cross-graining is also optimized for strength. If your floor joists are spaced wider than standard, or if you need extra assurance of load-bearing capacity, Structural I might be a better choice. It’s designed specifically for structural applications where strength is a primary concern. - AC or BC Plywood
These grades might also be suitable depending on specific project needs. ‘A’ and ‘B’ faces indicate a smoother, more blemish-free veneer. While these might look nicer, for subflooring, the structural integrity and glue bond are more critical than surface appearance. Always check the manufacturer’s specifications to ensure any grade is rated for subfloor use.
Why 3/4 Inch Thickness Is Ideal
The 3/4 inch thickness for plywood subflooring is considered a standard for good reason. It provides a strong, stable platform that can handle the stresses of daily living. This thickness offers a good balance between stiffness, which prevents floor flexing, and manageable weight, making it easier to handle during installation.
Thicker plywood would be overkill for most standard joist spacing and unnecessarily heavy, while thinner plywood might not offer enough rigidity and could lead to a bouncy or squeaky floor.
The thickness also plays a role in sound dampening. A thicker subfloor, when properly installed, can help reduce the transfer of impact sounds from one room to another. It contributes to the overall acoustic performance of your floor system.
When paired with appropriate underlayment and finished flooring, 3/4 inch plywood forms a solid, reliable base.
- Structural Rigidity
The 3/4 inch thickness provides excellent structural rigidity. This means the floor will feel solid underfoot, without excessive bouncing or deflection. This is especially important when you have finished flooring like tile or hardwood, which can crack or delaminate if the subfloor is too flexible. The thickness helps distribute the load from your finished floor and occupants evenly across the floor joists. - Load Bearing Capacity
This thickness can handle significant loads. For typical residential floor joist spacing (like 16 or 19.2 inches on center), 3/4 inch plywood can easily support the weight of furniture, appliances, and people. It prevents the finished floor from sagging between joists, which is a common problem with inadequate subfloor thickness. - Screw and Nail Holding Power
The greater thickness allows screws and nails to get a good grip. This is crucial for securely fastening the plywood to the joists. A well-fastened subfloor is less likely to squeak or shift over time. The depth also helps prevent fasteners from pulling through, which can happen with thinner materials under stress. - Compatibility with Flooring
3/4 inch plywood is compatible with a wide range of finished flooring materials. Whether you’re installing carpet, vinyl, laminate, engineered wood, or tile, this thickness provides a stable base. For some materials, like high-gloss vinyl or thin engineered woods, a smooth subfloor is paramount, and 3/4 inch plywood, when installed correctly, achieves this.
A study by the Forest Products Laboratory found that increasing subfloor thickness significantly increases stiffness and reduces floor vibration. For example, moving from 1/2 inch to 3/4 inch subflooring on 16-inch joist spacing can reduce deflection by as much as 50%, leading to a much more stable and comfortable floor.
Joist Spacing Considerations
The distance between your floor joists plays a significant role in determining the required subfloor thickness. Standard residential construction often uses joist spacing of 16 inches or 19.2 inches on center (OC). For these common spacings, 3/4 inch plywood is typically the recommended thickness.
If your joist spacing is wider, say 24 inches OC, you might need thicker plywood or even consider adding blocking between joists for extra support. Conversely, if your joists are closer together, you might be able to get away with a slightly thinner subfloor, though 3/4 inch remains a reliable and often preferred choice for its overall performance. Always consult local building codes and manufacturer recommendations.
| Joist Spacing (On Center) | Recommended Subfloor Thickness | Notes |
|---|---|---|
| 12 inches | 1/2 inch to 5/8 inch | Thinner materials may suffice, but 3/4 inch offers superior stability. |
| 16 inches | 3/4 inch | Standard for most residential applications. |
| 19.2 inches | 3/4 inch | Common in newer construction; 3/4 inch is generally recommended. |
| 24 inches | 1 inch or 3/4 inch with blocking | Thicker plywood or added support is usually required. |
The table above provides general guidelines. For critical applications or when in doubt, it is always best to consult structural engineering guidelines or your local building codes. These codes ensure safety and performance standards are met for your home.
Installing 3/4 Inch Plywood Subfloor Correctly
Knowing that 3/4 inch plywood is a good choice is only half the battle. Proper installation is critical for its performance. Even the best materials will fail if not installed correctly.
This section will walk you through the essential steps to ensure your subfloor is solid, durable, and ready for your finished flooring. Attention to detail here will prevent future problems.
Preparation Of The Joists
Before you lay any plywood, the floor joists must be in good condition. Ensure they are clean, dry, and free of any debris, old nails, or staples. Any high spots or unevenness in the joists should be leveled.
You can use shims to raise low spots.
It’s also a good time to check for any structural issues. If you find any damaged or sagging joists, they need to be repaired or reinforced before proceeding. A strong foundation starts with strong joists.
- Cleanliness is Key
Remove all sawdust, wood scraps, and any other debris from the tops of the joists. This ensures the plywood sits flat and makes it easier to place fasteners accurately. - Leveling Surfaces
Use a straightedge or a long level to check the tops of the joists. If there are high spots, you can shave them down. Low spots can be shimmed to create a perfectly level surface. This is vital for a flat final floor. - Inspect for Damage
Look for any signs of rot, insect damage, or excessive sagging in the joists. These issues must be addressed by a qualified professional before you continue. A compromised joist can lead to serious structural problems. - Ensure Dryness
The joists should be completely dry. Moisture can cause the plywood to swell and warp, leading to a damaged subfloor.
Fastening Methods And Spacing
Proper fastening is crucial for a squeak-free and strong subfloor. You’ll want to use screws designed for wood, which offer superior holding power compared to nails. Ring-shank nails can also be used, but screws are generally preferred for subflooring.
The spacing of your fasteners is just as important as the type. For 3/4 inch plywood, you should typically place screws or nails every 6 inches along the edges of the plywood panels and every 12 inches in the field (the interior areas of the panel). This ensures the plywood is held firmly to the joists across its entire surface.
When attaching the plywood, aim to drive the fasteners so they are slightly countersunk, just below the surface of the plywood, but not so deep that they break through the veneer. This prevents them from snagging the finished flooring.
A common mistake is not fastening enough. This leads to the subfloor moving against the joists and the finished flooring, causing squeaks and potential damage over time. Think of it as securing each piece of plywood to every joist it crosses.
Industry standards recommend a minimum of a 2-inch edge distance for all fasteners, meaning the fastener should be at least 2 inches from the edge of the panel. This prevents the edges of the plywood from lifting or splitting.
- Apply subfloor adhesive to the top of the joists before placing each panel. This adhesive creates a strong bond between the plywood and the joists, further reducing squeaks and increasing rigidity.
- Lay the first panel of 3/4 inch plywood, ensuring it aligns with the edges of the joists.
- Fasten the panel using wood screws, spaced 6 inches apart along the edges and 12 inches apart in the field.
- Continue laying panels, staggering the end joints like you would with bricks. This means no four corners of four adjacent panels should meet at the same point.
- Ensure a small gap (about 1/8 inch) is left between all adjacent plywood panels. This expansion gap allows the wood to expand and contract with changes in humidity without buckling.
- Drive screws so they are slightly countersunk, creating a smooth surface.
Expansion Gaps And Staggered Joints
Wood naturally expands and contracts with changes in temperature and humidity. Failing to account for this can lead to buckling or cracking of your subfloor and finished flooring. Therefore, it is essential to leave a small expansion gap between all edges of the plywood panels, typically about 1/8 inch.
This small space gives the wood room to move.
Staggering the end joints of the plywood panels is also critical. Imagine laying out four rectangular panels in a grid; if the end of one panel meets the end of another panel directly across from it, you create a weak line. By staggering the joints, similar to how bricks are laid in a wall, you create a stronger, more continuous surface.
This distributes weight more evenly and prevents the floor from developing weak spots.
- Why Expansion Gaps Matter
Wood is hygroscopic, meaning it absorbs and releases moisture from the air. This causes it to swell when humid and shrink when dry. Without an expansion gap, the pressure from this movement can cause the panels to push against each other, leading to buckling, warping, or even structural damage to your floor system. - Creating the Gap
You can use a spacer, such as a few nails or a thin piece of scrap wood, to consistently create the 1/8 inch gap between panels. Ensure the gap is maintained along all edges – where panels meet each other and where they meet the walls. - The Importance of Staggering
Staggered joints ensure that the load is not concentrated on any single seam. This creates a more cohesive and stronger subfloor structure. It prevents the floor from having a “rhythm” of weakness that can develop if joints align too frequently. - Achieving Staggered Joints
Start the first row of panels with a full panel. For the second row, cut the first panel in half and use that to start the row. Then, use full panels and cut the last panel of the row to finish it. This ensures the end joints in the second row fall in the middle of the panels in the first row.
Alternatives To 3/4 Inch Plywood Subflooring
While 3/4 inch plywood is a fantastic and common choice, it’s not the only option for a subfloor. Depending on your project needs, budget, and local building codes, other materials might be considered. Understanding these alternatives can help you make the most informed decision for your specific situation.
Each has its own set of advantages and disadvantages.
Oriented Strand Board OSB
Oriented Strand Board (OSB) is another engineered wood product commonly used for subflooring. It’s made from compressed strands of wood glued together in a specific pattern. OSB is often less expensive than plywood and can offer comparable strength when used in the correct thickness and installed properly.
For subflooring, 3/4 inch OSB is a widely accepted alternative to 3/4 inch plywood.
One key difference is how they handle moisture. Plywood’s layered veneer construction generally makes it more resistant to swelling and edge degradation when exposed to moisture compared to OSB. However, modern OSB products have improved moisture resistance.
It’s crucial to use a subfloor-grade OSB, often marked as “OSB/TG-1” or similar, which signifies tongue-and-groove edges for a tighter fit.
- Cost-Effectiveness
OSB is typically more affordable than plywood of the same thickness, making it an attractive option for budget-conscious projects. This price difference can add up on larger renovations. - Strength and Stability
When installed correctly, 3/4 inch OSB provides excellent strength and stability for subflooring. It has a uniform structure, which can sometimes mean fewer voids than in plywood. - Moisture Sensitivity
While improved, OSB can still be more susceptible to swelling and damage from prolonged moisture exposure than plywood. It’s essential to protect it during construction and ensure the area is dry. - Installation
OSB subflooring often comes with interlocking tongue-and-groove edges. This makes installation quicker and can create a tighter seam, reducing the need for as much adhesive.
A homeowner in a recent renovation project reported saving over $500 on materials for a 1,000-square-foot basement by choosing 3/4 inch OSB over 3/4 inch plywood for their subfloor. The installer noted that the tongue-and-groove edges made installation faster, further contributing to cost savings.
Particleboard and Medium Density Fiberboard MDF
Particleboard and MDF are also engineered wood products but are generally not recommended for subflooring, especially in areas prone to moisture or significant structural load. These materials are made from wood particles or fibers, respectively, bound together with resins.
While they can create a smooth surface, they are typically less structurally sound and much more susceptible to moisture damage than plywood or OSB. They can swell, warp, and lose their integrity when wet, making them unsuitable for the demanding environment of a subfloor. There are specialized versions of these products for flooring underlayment, but they are not direct substitutes for structural subflooring.
- Moisture Vulnerability
Both particleboard and MDF absorb moisture readily and will swell and degrade significantly. This makes them very risky for a subfloor, which can be exposed to spills, leaks, or high humidity. - Structural Limitations
They are not designed for the same structural loads as plywood or OSB. They can be more prone to breaking or deforming under weight, especially over time. - Smooth Surface Potential
These materials can offer a very smooth surface, which might seem appealing for certain types of finished flooring. However, this benefit is outweighed by their structural and moisture weaknesses for subfloor applications. - Cost
They are often cheaper than plywood, but their unsuitability for subflooring makes them a false economy in the long run. The cost of repair or replacement would far exceed any initial savings.
Concrete Slab As A Subfloor
In many homes, especially those built on a slab foundation, the concrete itself acts as the subfloor. A properly poured and finished concrete slab provides a strong, stable, and durable base for nearly any type of finished flooring. However, concrete has its own set of considerations, such as the need for moisture barriers and its inherent hardness.
When a concrete slab is the subfloor, it must be level, smooth, and free of cracks. If the slab is uneven, it may need to be ground down or covered with a self-leveling compound. Moisture testing is also crucial, as concrete can wick moisture from the ground, which can damage certain flooring types like hardwood or laminate.
A vapor barrier is often recommended over concrete slabs.
- Durability and Strength
Concrete is incredibly strong and durable, able to withstand heavy loads and constant foot traffic. It’s a very long-lasting base. - Moisture Concerns
Concrete is porous and can transmit moisture vapor from the ground. This requires careful moisture testing and often the installation of a vapor barrier before installing finished flooring, especially wood or laminate. - Leveling Requirements
For a successful finished floor installation, the concrete slab must be perfectly level and smooth. Grinding, self-leveling compounds, or overlays may be necessary to achieve this. - Insulation and Comfort
Concrete is a hard surface and can feel cold underfoot. Additional underlayment or insulation might be needed to improve comfort and thermal properties, especially in basements or ground-level floors.
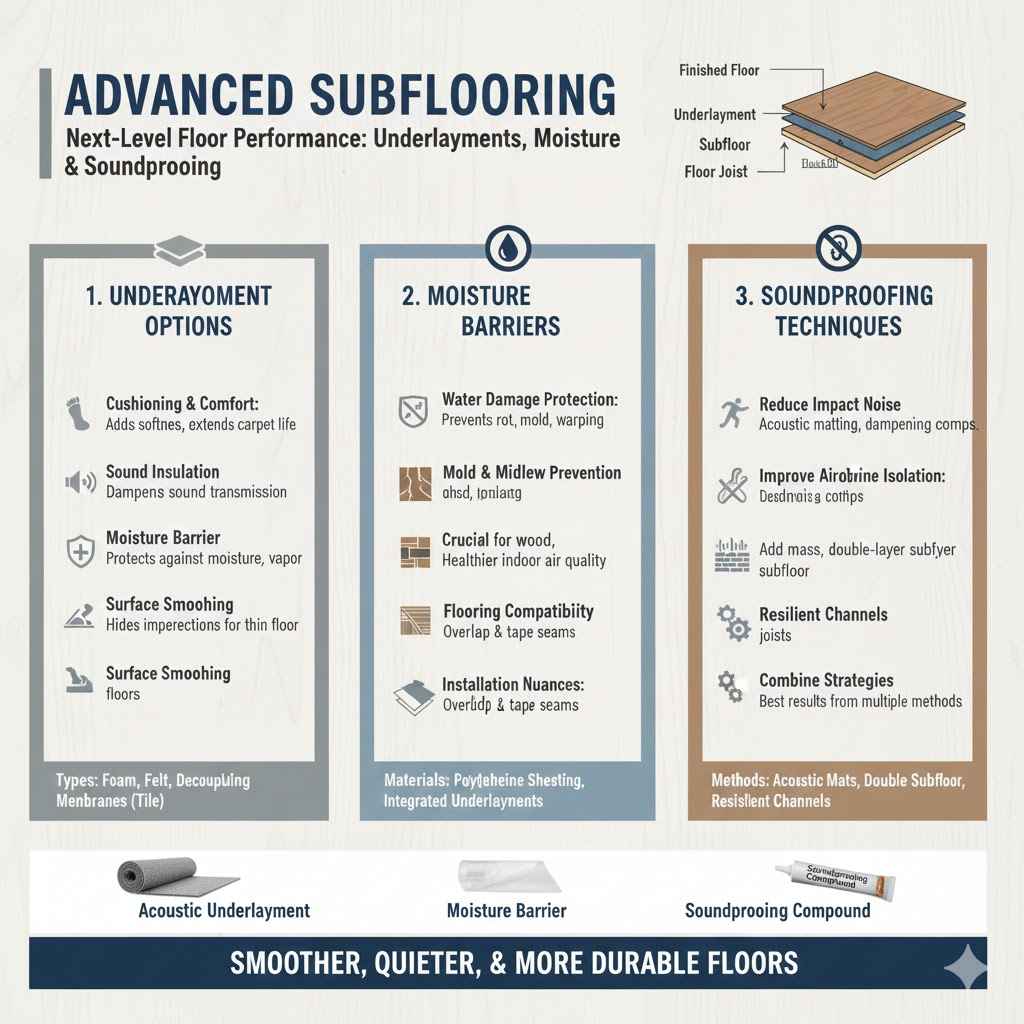
Advanced Considerations For Subflooring
Beyond the basic installation of 3/4 inch plywood, there are a few advanced considerations that can further enhance the performance and longevity of your subfloor. These include underlayment options, moisture barriers, and soundproofing techniques. Implementing these can make a significant difference in the final feel and function of your floor.
Underlayment Options
Underlayment is a layer installed between the subfloor and the finished flooring. It serves multiple purposes, including cushioning, sound dampening, and providing a smoother surface. While not always required, it’s highly recommended for many types of flooring.
For carpet, a thick foam or felt underlayment adds comfort and extends the carpet’s life. For laminate and engineered wood flooring, specialized underlayments offer moisture protection, sound reduction, and a bit of cushioning. For tile, a decoupling membrane acts as an underlayment, preventing cracks in the tile from stress transferred from the subfloor.
- Cushioning and Comfort
Underlayment adds a layer of softness underfoot, making your finished floor more comfortable to walk on. This is especially noticeable with hard surfaces like laminate or tile. - Sound Insulation
Many underlayments are designed to absorb sound, reducing impact noise (like footsteps) and airborne noise. This can significantly improve the acoustics within a room and between floors. - Moisture Barrier
Certain underlayments include a built-in vapor barrier, which is essential when installing flooring over concrete or in basements to prevent moisture damage. - Surface Smoothing
Even a well-installed subfloor might have minor imperfections. Underlayment can help bridge these small gaps and provide a perfectly smooth surface for sensitive flooring materials like vinyl or thin laminates.
Moisture Barriers And Vapor Retarders
Moisture is the enemy of many flooring materials and subfloors. In areas prone to dampness, such as basements, bathrooms, or kitchens, a moisture barrier is crucial. This can be a plastic sheeting (polyethylene) laid over the subfloor or incorporated into the underlayment.
A vapor retarder is used to control the rate of moisture vapor diffusion. This is particularly important in colder climates or over concrete slabs. The specific type and thickness of the barrier will depend on the potential moisture source and the type of finished flooring.
- Protecting Against Water Damage
A moisture barrier prevents spills, leaks, or high humidity from reaching and damaging the subfloor and finished flooring materials, which can lead to rot, mold, or warping. - Preventing Mold and Mildew
By keeping moisture out, you also prevent the growth of mold and mildew, which can be harmful to indoor air quality and the health of occupants. - Compatibility with Flooring
Some flooring, like hardwood or certain laminates, is highly sensitive to moisture and requires a robust vapor barrier. Others, like tile, are more tolerant but still benefit from protection. - Installation Nuances
When installing a vapor barrier, it’s important to overlap seams and tape them securely to create a continuous, unbroken shield against moisture.
Soundproofing Techniques
For homeowners or builders concerned about noise transmission, especially in multi-story homes or apartments, soundproofing the subfloor is a valuable step. This can involve using specialized acoustic underlayments, adding mass to the floor, or using resilient channels.
One effective method is to install a layer of specialized acoustic matting over the subfloor before the finished flooring. Another approach is to use a double layer of subfloor, with a sound-dampening adhesive or compound between the two layers. These techniques add mass and vibration-dampening properties to the floor assembly, significantly reducing sound transfer.
- Reducing Impact Noise
Techniques like using resilient underlayments or adding a second layer of subfloor with adhesive help absorb the shock of footsteps, reducing the noise transmitted to the room below. - Improving Airborne Sound Isolation
Adding mass to the floor assembly, such as with denser underlayments or a double-layer subfloor, makes it harder for airborne sound (like voices or music) to pass through. - Resilient Channels
For maximum soundproofing, resilient channels can be installed below the joists to decouple the ceiling from the floor structure, greatly reducing vibration transfer. While this is a more involved process, it offers significant benefits. - Combining Strategies
Often, the best soundproofing results come from combining multiple strategies, such as using an acoustic underlayment with a well-sealed, double-layer subfloor.
Frequently Asked Questions
Question: Is 3/4 inch plywood better than OSB for subflooring?
Answer: Both 3/4 inch plywood and 3/4 inch OSB are excellent choices for subflooring. Plywood is generally more resistant to moisture damage and edge swelling, while OSB is often more cost-effective and can have a more uniform structure. The best choice can depend on your budget, local climate, and specific project requirements.
Question: How thick should my subfloor be if my joists are 24 inches apart?
Answer: If your joists are 24 inches apart on center, 3/4 inch subflooring may not be sufficient on its own. It is often recommended to use 1 inch thick plywood or OSB, or to install 3/4 inch subflooring with added blocking between the joists to provide adequate support.
Question: Can I use thinner plywood like 1/2 inch for my subfloor?
Answer: For most residential applications, 1/2 inch plywood is too thin for a subfloor, especially with standard joist spacing of 16 or 19.2 inches. It can lead to a bouncy, squeaky floor and may not provide adequate support for your finished flooring, potentially causing it to crack or delaminate.
Question: Do I need to put an underlayment over 3/4 inch plywood subfloor?
Answer: While not always strictly required, an underlayment is highly recommended for most finished flooring types. It adds comfort, helps with sound dampening, and can provide a moisture barrier. The type of underlayment depends on the finished flooring you plan to install.
Question: What is the best way to prevent subfloor squeaks?
Answer: To prevent subfloor squeaks, ensure the subfloor is well-fastened to the joists using screws spaced correctly. Using subfloor adhesive between the plywood and the joists before fastening is also highly effective. Staggering the joints and leaving small expansion gaps also helps.
Final Thoughts
Using 3/4 inch plywood for your subfloor is a solid, reliable choice for most home projects. It provides the necessary strength and stability for a long-lasting floor. By ensuring proper installation, including correct fastening, expansion gaps, and staggered joints, you create a superior foundation for any finished flooring.