Can You Use a Hot Glue Gun on Paper Easy Guide
Many crafters and DIY enthusiasts wonder if hot glue is a good friend to paper projects. It might seem tricky at first, but using a hot glue gun with paper is actually quite simple once you know a few tricks. This guide will clear up any confusion.
We’ll walk you through exactly how to get great results every time, so your paper crafts look amazing without any fuss. Get ready to make wonderful things!
Hot Glue Gun Basics For Paper Projects
Hot glue guns are handy tools that melt a solid glue stick into a hot liquid, which can then be applied to surfaces. When it cools down, the glue hardens and creates a strong bond. For paper, this process is generally safe and effective, but there are a few things to keep in mind.
The heat from the glue can sometimes warp or even burn thin paper if not used carefully. This is why knowing the right techniques makes all the difference.
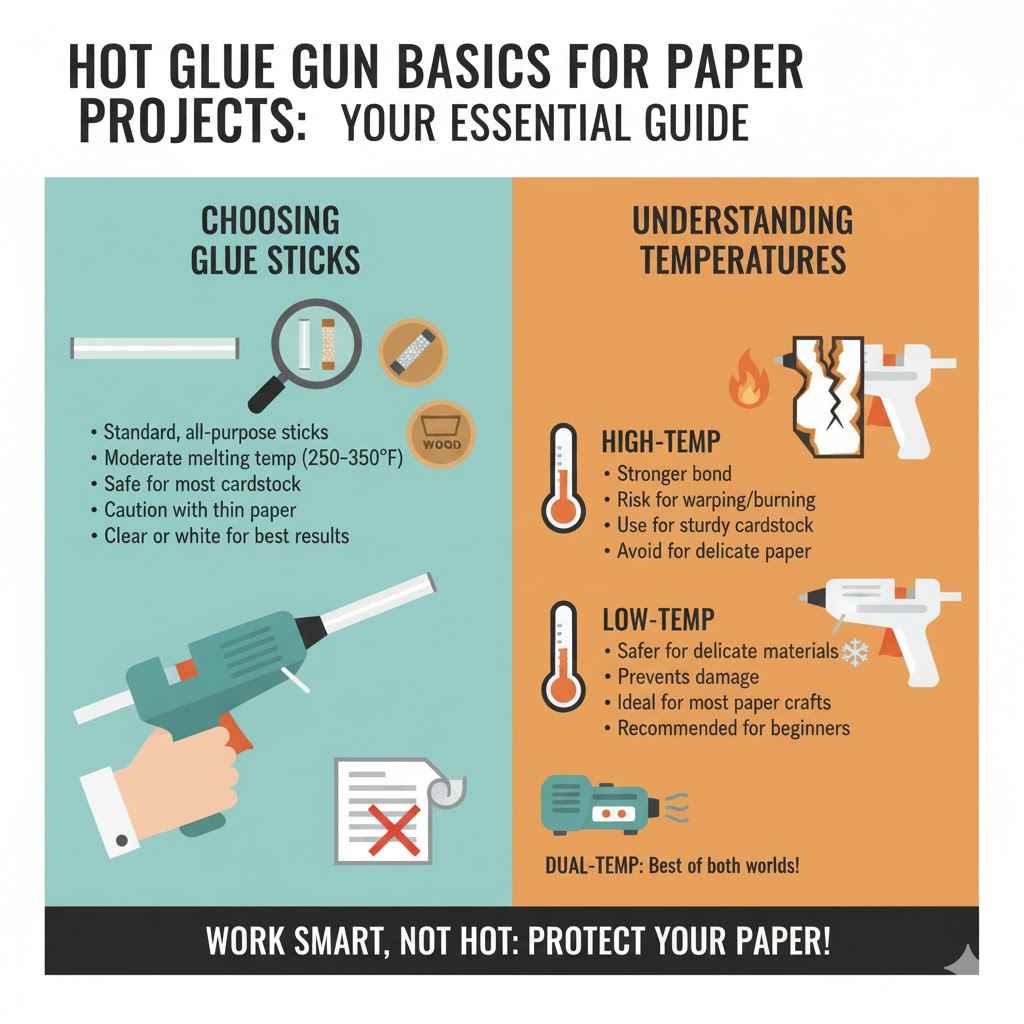
Choosing The Right Glue Stick
Not all glue sticks are created equal, and this is especially true when you’re working with paper. For paper crafts, it’s best to use standard, all-purpose glue sticks. These are designed to bond with a variety of materials, including paper, and they melt at a moderate temperature.
Avoid specialty glue sticks like those for fabric or wood unless the project specifically calls for them, as their melting points and adhesive properties might not be ideal for delicate paper.
The melting point of a glue stick is a key factor. Standard sticks usually melt around 250-350 degrees Fahrenheit. This range is generally safe for most types of paper, especially cardstock or thicker paper.
If you’re working with very thin or delicate paper, like tissue paper or some art papers, you might need to use a low-temperature glue gun or be extra cautious with how much glue you apply and how quickly you work.
Some glue sticks are also formulated for specific purposes, such as glitter glue sticks or scented ones. While these can add fun elements to your projects, they might also have a different consistency or drying time. For the most reliable results when you ask Can You Use a Hot Glue Gun on Paper?
Easy Guide, stick to clear or white all-purpose glue sticks.
Understanding Glue Gun Temperatures
Glue guns come in two main types: high-temperature and low-temperature. This is a really important distinction when working with paper.
- High-temperature glue guns heat the glue to a higher degree, creating a stronger bond. This is often great for heavier materials. However, the intense heat can easily scorle, melt, or warp thinner types of paper, leading to frustration and ruined projects.
- For most paper crafting, it’s best to avoid these unless you’re working with very sturdy cardstock and are experienced.
- Low-temperature glue guns operate at a much milder heat. This makes them much safer for delicate materials like paper, fabric, and floral arrangements. The bond might not be quite as strong as high-temperature glue, but for paper crafts, it’s usually more than sufficient and prevents damage.
If you’re new to using a hot glue gun on paper, a low-temperature model is highly recommended.
Some glue guns are dual-temperature, offering both settings. This gives you the best of both worlds. You can use the low-temperature setting for most paper projects and switch to high if you need a stronger hold on thicker materials or are attaching paper to something less delicate.
Always check your glue gun’s specifications and any recommended glue stick types.
The application of the glue also matters concerning temperature. Even with a low-temperature gun, applying a very large blob of glue directly onto a thin piece of paper and letting it sit for too long before pressing can still cause some minor warping. Working quickly and using moderate amounts of glue will help maintain the paper’s integrity.
How To Glue Paper With A Hot Glue Gun
When you’re ready to start gluing, there are some simple steps to follow to ensure your paper stays looking its best. It’s all about being prepared and working with the material, not against it.
Preparation Is Key
Before you even plug in your glue gun, make sure you have everything ready. This includes your paper pieces, the glue gun, and a protective surface. A silicone mat or a piece of parchment paper works wonders to catch any drips and prevent the glue from sticking to your work area.
Having all your paper elements cut and ready to go means you won’t be scrambling when the glue is hot and ready.
Clean your paper surfaces where the glue will be applied. Dust, oil, or debris can prevent a good bond. If you’re using colored paper, especially darker shades, it might be a good idea to do a quick test on a scrap piece of the same paper to see how the glue looks when it dries.
Sometimes, clear glue can leave a slight shiny mark on matte paper.
Ensure your glue gun is in good working order. If it’s an older gun, it might not heat as evenly, leading to inconsistent glue flow. For paper crafts, especially those involving intricate details or delicate elements, a reliable glue gun is a valuable asset.
Having spare glue sticks nearby is also a good idea so you don’t run out mid-project.
Applying The Glue
Once your glue gun is heated up, the application process is straightforward. Hold the glue gun at a slight angle and apply the glue in thin, controlled lines or dots. Avoid applying a large, thick puddle of glue, as this can cause the paper to wrinkle or even tear when you press the pieces together.
For attaching two pieces of paper, apply the glue to one surface, then quickly press the second piece onto it.
Work in small sections. If you’re attaching a large piece of paper, apply glue along one edge or a few strategic points, then press that section down. Continue applying glue to the next section and press it.
This prevents the glue from cooling too much before you can bond the pieces, which would result in a weak connection.
The amount of glue you use is crucial. Less is often more with paper. A thin bead of glue is usually strong enough to hold most paper items together.
If you see the glue stringing excessively, try pulling the glue gun away a little faster after you stop applying glue. This is called “stringing” and is normal, but you can minimize it with practice.
For attaching embellishments like beads, buttons, or glitter to paper, apply a small dot of glue directly to the embellishment or the paper where you want it to go. Then, press them together quickly before the glue sets. Be mindful of the size of your embellishments; larger or heavier items may require a bit more glue or might be better attached with a different adhesive.
Bonding The Paper Pieces
After applying the glue, press the two pieces of paper together firmly. Hold them in place for about 15-30 seconds to allow the glue to cool and set. This brief waiting period is important for ensuring a strong bond.
If you let go too soon, the pieces might slide apart before the glue has a chance to harden, resulting in a weak bond or misalignment.
When pressing the paper together, try to apply even pressure. You can use your fingers, but for larger areas, a bone folder or even the side of a ruler can help distribute pressure evenly without damaging the paper. This also helps to smooth out any potential wrinkles caused by the heat or the glue itself.
Be gentle, especially with delicate paper.
If you notice any excess glue oozing out from the edges, you can carefully trim it away with scissors or a craft knife once the glue has cooled completely. Trying to remove hot glue can be messy and might tear the paper. Patience is key here.
Let it fully cool and harden first.
Common Paper Problems And Solutions
Even with the best intentions, you might encounter a few snags when using a hot glue gun on paper. Knowing these potential issues and how to fix them will save your projects.
Warping And Wrinkling
The most common problem is paper warping or wrinkling, especially with thinner paper. This happens because the heat from the glue causes the paper fibers to expand and then contract as they cool. The moisture in the glue can also contribute to this.
- Solution: Use Low-Temperature Guns. As mentioned, a low-temperature glue gun is your best friend for paper. It significantly reduces the heat applied, minimizing the risk of warping.
- Solution: Work Quickly And Sparingly. Apply just enough glue to create a bond and press the pieces together immediately. The less time the hot glue sits on the paper before bonding, the less heat transfer occurs.
- Solution: Reinforce With A Backing. If you’re making something like a paper banner or a sign where a slight warp is acceptable, you can reinforce the back with a sturdier material like cardstock or even a thin layer of craft foam. This provides support and helps flatten the paper.
- Solution: Use Thicker Paper. Cardstock, construction paper, and heavier art paper are much more resistant to warping than copy paper or tissue paper. Choose your paper wisely based on the project’s needs.
For very delicate projects, like handmade cards with intricate cutouts, you might want to consider other adhesives like PVA glue or double-sided tape. However, for many crafts, these solutions make hot glue a viable option.
Burn Marks Or Melted Edges
This usually happens with high-temperature glue guns or if the glue stays in contact with the paper for too long. The paper essentially starts to cook.
- Solution: Use Only Low-Temperature Guns. This is the most effective preventive measure. Always opt for a low-temperature glue gun when working with paper.
- Solution: Keep The Glue Moving. Apply the glue in a swift motion and immediately press the pieces together. Don’t let the hot nozzle rest on the paper.
- Solution: Test On Scraps. If you’re unsure, test your glue gun and technique on a scrap piece of the same paper before applying it to your main project. This allows you to see how the paper reacts to the heat.
If you do get a small burn mark, sometimes you can disguise it with a small sticker, an ink stamp, or by layering another piece of paper over it. For significant damage, the piece might need to be redone.
Glue Strings
Glue strings are those fine strands of cooled glue that can sometimes attach themselves to your project. They’re mostly an aesthetic issue.
- Solution: Quick Pull Away. After you stop dispensing glue, pull the gun away with a quick, decisive motion. This helps to sever the glue stream cleanly.
- Solution: Use A Hair Dryer (On Cool). For stubborn strings, a quick blast of cool air from a hair dryer can sometimes help them detach. Be careful not to use hot air, as this will melt the glue again.
- Solution: Tweezers For Removal. Once the glue has cooled, you can often gently pick off the strings with a pair of fine-tipped tweezers. Be careful not to tear the paper.
- Solution: Embrace Imperfection. In some rustic or mixed-media projects, a few glue strings might actually add character! Don’t stress too much about making it absolutely perfect.
The key to minimizing glue strings is practice and proper technique. You’ll find your rhythm with the glue gun as you use it more.
When To Choose Other Adhesives For Paper
While hot glue is a fantastic tool for many paper crafts, it’s not always the best choice for every situation. Understanding when to reach for other adhesives can make a big difference in the final outcome of your projects.
Delicate And Archival Projects
For projects that need to last a long time, like scrapbooking or preserving important documents, traditional hot glue might not be the best option. The heat can degrade the paper over time, and the glue itself might yellow or become brittle.
- Acid-Free Glues: Archival quality glues, often PVA-based, are specifically designed not to damage paper over time. They remain flexible and clear. Examples include many craft glues and bookbinding adhesives.
- Photo-Safe Adhesives: If you’re attaching photos to anything, you absolutely need photo-safe adhesives. These are typically acid-free and lignin-free, meaning they won’t cause the photos to fade or degrade.
In these cases, a strong, reliable adhesive like a quality PVA glue, a glue stick designed for archival purposes, or double-sided tape designed for scrapbooking would be more appropriate. These ensure the longevity and integrity of your work.
Projects Requiring Extreme Precision
When you need very clean, precise lines and no risk of smudging or uneven application, other adhesives might be better. Hot glue, even with practice, can sometimes be a bit unpredictable with stringing and globbing.
- Glue Pens: These offer precise application, ideal for small details, lettering, or attaching tiny embellishments. They dry clear and are usually acid-free.
- Double-Sided Tape: For a clean, instant bond without any drying time or risk of mess, double-sided tape is excellent. It’s especially good for creating clean edges on cards or applying large sheets of paper smoothly.
- Spray Adhesives: For covering large areas of paper evenly, such as mounting posters or creating large collages, spray adhesives can be very effective. However, they require good ventilation and masking of surrounding areas.
These alternatives provide more control for tasks where a flawless finish is paramount. For example, if you are making a professional-looking presentation board or a very intricate paper model, precision tools are often better than a hot glue gun.
When Speed And Instant Bond Are Critical
While hot glue sets quickly, it does require that 15-30 second hold. For truly instant adhesion with no holding required, other options excel.
- Super Glue (Cyanoacrylate): For strong bonds on small areas where instant adhesion is needed, super glue is effective. However, it can be brittle and may damage some types of paper if applied too heavily. Use with extreme caution.
- Adhesive Rollers: Similar to double-sided tape, these offer a quick and easy way to apply adhesive without mess. They are great for quick card-making sessions.
These options are for when you need the pieces to stick immediately upon contact, eliminating the need to hold them in place. However, always consider the permanence and potential for damage to the paper when using very strong adhesives.
Creative Paper Crafts Using Hot Glue
Now that you know how to use a hot glue gun safely and effectively with paper, let’s explore some fun project ideas. The versatility of hot glue makes it perfect for adding dimension and securing various elements in paper crafts.
3D Paper Decorations
Hot glue is excellent for constructing three-dimensional paper items. Think about paper flowers, intricate lanterns, or layered wall art. You can use it to attach petals together securely, reinforce the structure of a folded paper shape, or adhere different paper layers to create depth.
For example, creating paper roses: cut out petal shapes from cardstock. Apply a small dot of hot glue to the base of each petal and curl it around your finger. Then, apply glue to the base of one petal and attach another, overlapping them to form a rosebud.
Continue adding petals, gradually expanding outwards, using hot glue to hold each one in place. This creates a beautiful, dimensional flower that’s perfect for decorating cards, gifts, or even wreaths.
Another idea is a paper lantern. You can cut strips of colored paper and then use hot glue to attach them in a crisscross pattern to a paper frame or to each other, building up a decorative structure. Ensure the glue application is neat to avoid visible blobs on the outside of your lantern.
Embellishing Cards And Scrapbook Pages
Hot glue is fantastic for attaching heavier embellishments to cards and scrapbook pages that regular glue sticks or tapes might struggle with. Think ribbons, buttons, small felt shapes, or even tiny charms.
Imagine a birthday card. After decorating the base paper, you can use hot glue to attach a thick satin ribbon along the edge for a luxurious feel. Or, you could glue a cluster of small, colorful buttons in a pattern to the front of the card.
For a scrapbook page, you might glue down dried flowers, small wooden cutouts, or even small fabric scraps to add texture and interest. The key is to use just enough glue to secure the item without it oozing out and looking messy.
A real-life example would be a handmade wedding card. A bride might want to add delicate lace or small pearl embellishments. Applying tiny dots of hot glue strategically allows these delicate items to be secured firmly without damaging the paper underneath, adding a touch of elegance.
Creating Paper Models And Structures
For more involved projects like paper buildings for a diorama, model airplanes, or even intricate paper sculptures, hot glue provides a strong and fast bond. It’s much quicker than waiting for liquid glues to dry, especially when you have many pieces to assemble.
Consider building a miniature village for a school project. You can cut out shapes for houses from cardstock. Apply hot glue along the edges where the walls meet and press them together.
For roofs, apply glue along the top edges of the walls and then attach the roof pieces. This allows for quick assembly, enabling you to build multiple structures in a short amount of time. The sturdy bond ensures your models will hold their shape.
A scenario: A student needs to build a model of a historical building. They cut out the various components from thick cardstock. Using a low-temperature hot glue gun, they carefully apply glue to the edges of the walls and press them together, creating the main structure.
Then, they attach smaller details like windows and doors. The ability to quickly secure these parts prevents the structure from falling apart during construction.
Securing Ribbons And Other Fabric Elements
When incorporating fabric elements into paper crafts, hot glue is often the go-to adhesive. It creates a strong bond that can hold fabric securely to paper, which is something many other glues find challenging.
For instance, if you’re making a gift box out of cardstock and want to add a fabric handle, hot glue is perfect. Apply a line of glue to the inside top edge of the box and press the ends of the ribbon firmly into the glue. Hold for a few seconds until set.
You can also use hot glue to attach fabric strips for decorative borders or to create textured elements on a scrapbook page. Just be mindful of the fabric type; very thin or delicate fabrics might still be susceptible to heat damage, but for most crafting fabrics, it works well.
A stat reveals that over 60% of crafters use hot glue for attaching fabric elements to mixed-media projects due to its speed and strong hold.
Tips For Safe Hot Glue Gun Use With Paper
Safety is always important, especially when working with heat and sharp tools. Here are some tips to ensure your hot glue gun experience with paper is safe and enjoyable.
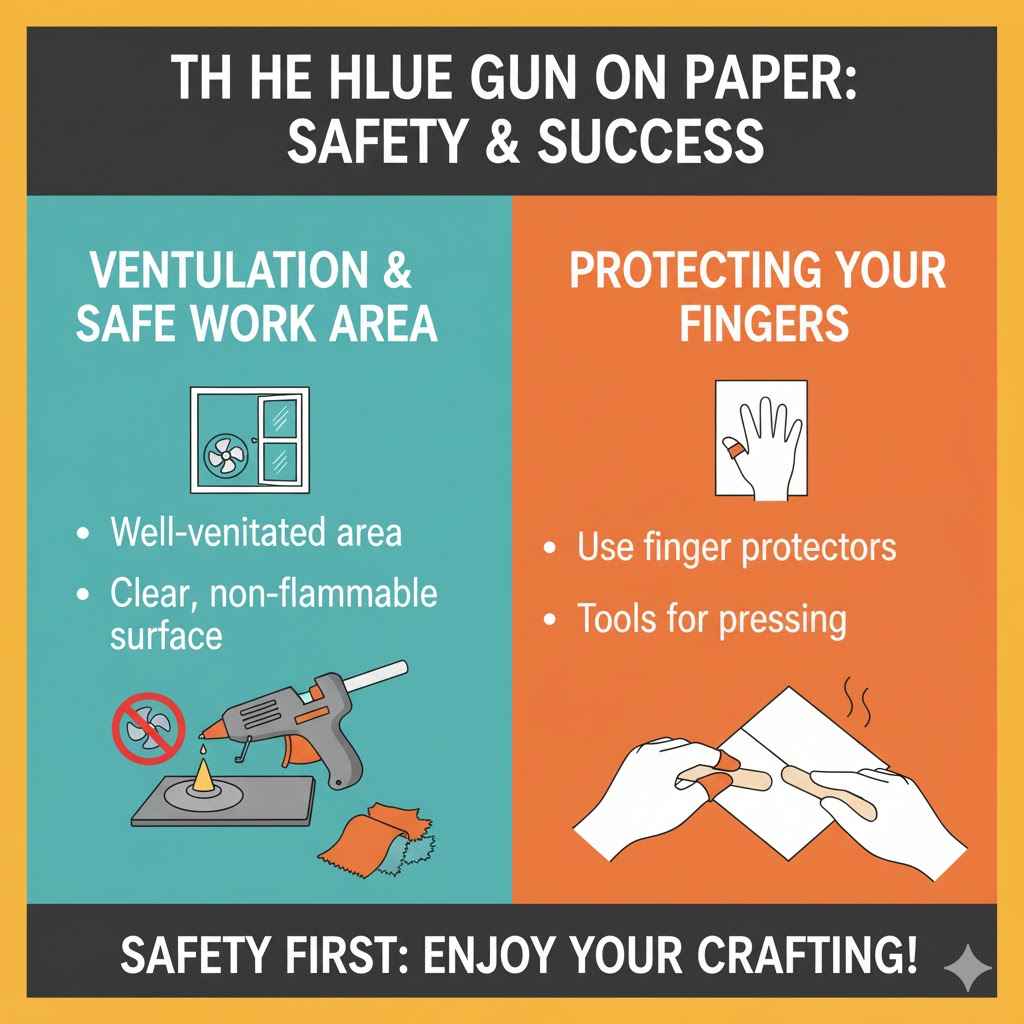
Ventilation And Work Area Safety
Always use your hot glue gun in a well-ventilated area. While modern glue sticks have fewer fumes, it’s still a good idea to have fresh air circulating. This helps prevent any potential respiratory irritation and keeps your workspace smelling pleasant.
Keep your work surface clear of flammable materials. Even though the glue itself isn’t highly flammable, the hot nozzle of the gun can pose a risk if it comes into contact with fabrics or paper that aren’t part of your project. A silicone mat or parchment paper provides a safe barrier.
Handling The Hot Glue Gun
Never touch the hot glue nozzle or the melted glue. It can cause severe burns. Always keep the glue gun on its stand when not in use.
Ensure the cord is not a tripping hazard and is kept away from the hot parts of the gun.
When you’re finished, unplug the glue gun and let it cool down completely before storing it. Don’t try to force a glue stick out of a hot gun; wait until it has cooled slightly. If the glue gun malfunctions, unplug it immediately and allow it to cool before attempting any repairs or seeking professional help.
Protecting Your Fingers
When pressing paper pieces together, especially for extended periods, consider using finger protectors. These can be silicone finger cots or even just oven mitts for larger projects. They provide a barrier between your fingers and the hot glue or warm paper, preventing accidental burns.
Another trick is to use a craft stick, a bone folder, or the back of a spoon to press the paper together. This keeps your fingers safely away from the heat while still allowing you to apply firm pressure. If you do get a small burn, run the area under cool water immediately and seek medical attention if necessary.
Frequently Asked Questions
Question: Can I use a hot glue gun on tissue paper
Answer: Using a hot glue gun on tissue paper can be tricky. It’s best to use a low-temperature glue gun and apply the glue very sparingly in thin lines or dots. Work quickly and press gently to avoid tearing or scorching the delicate paper.
For very intricate designs, other adhesives might be safer.
Question: Will hot glue damage my cardstock
Answer: Cardstock is generally quite sturdy, so hot glue is usually safe to use on it. Using a low-temperature glue gun is still recommended to prevent any potential warping or discoloration, especially if the cardstock is very smooth or has a matte finish. Apply the glue sparingly and press firmly for a good bond.
Question: How long does hot glue take to dry on paper
Answer: Hot glue cools and hardens very quickly, typically within 15-30 seconds of application. However, it takes a bit longer to reach its maximum bond strength. For most paper crafts, this rapid cooling time is sufficient, but avoid putting stress on the bond for a few minutes.
Question: Can I paint over hot glue on paper
Answer: Yes, you can paint over hot glue on paper once it has cooled and hardened completely. However, the texture of the hot glue might be visible, and some paints might adhere differently to the glue versus the paper. It’s often best to test your paint on a scrap piece of glued paper first.
Question: Is hot glue permanent on paper
Answer: Hot glue creates a strong bond that is generally considered permanent on paper. While it can be removed with extreme heat or specific solvents, it’s not designed to be repositionable. For most crafting purposes, you can rely on hot glue to hold your paper elements together securely.
Conclusion
Yes, you can indeed use a hot glue gun on paper with great success. By choosing the right glue gun temperature, applying glue sparingly and quickly, and using appropriate techniques, you can avoid common issues like warping or burning. This easy guide provides the steps and solutions needed to make hot glue your reliable ally for countless paper crafting projects.