Deck Railing Ideas Wood: Proven Designs
Explore beautiful, durable wood deck railing ideas perfect for beginners. Discover simple yet stylish designs, understand material choices, and learn key installation tips to create a safe and attractive outdoor space with confidence.
Are you looking to upgrade your deck and make it safer and more beautiful? Choosing the right deck railing is a big part of that! Sometimes, finding the perfect wood deck railing ideas can feel a bit overwhelming, especially if you’re new to DIY projects. You want something sturdy, stylish, and something you feel confident building. Don’t worry! In this guide, I’ll walk you through some proven, beginner-friendly wood deck railing designs that are both practical and visually appealing. We’ll cover everything you need to know to get started and create a deck you’ll love.
Why Wood Deck Railings Are a Great Choice for Beginners
Wood is a fantastic material for deck railings. It’s relatively affordable, easy to work with using common tools, and offers a warm, natural look that complements most homes. For beginners, wood’s forgiving nature means small mistakes are often easily corrected. Plus, the satisfaction of building something beautiful with your own hands from wood is truly rewarding. Safety is also key, and wood can provide strong, reliable support when installed correctly.
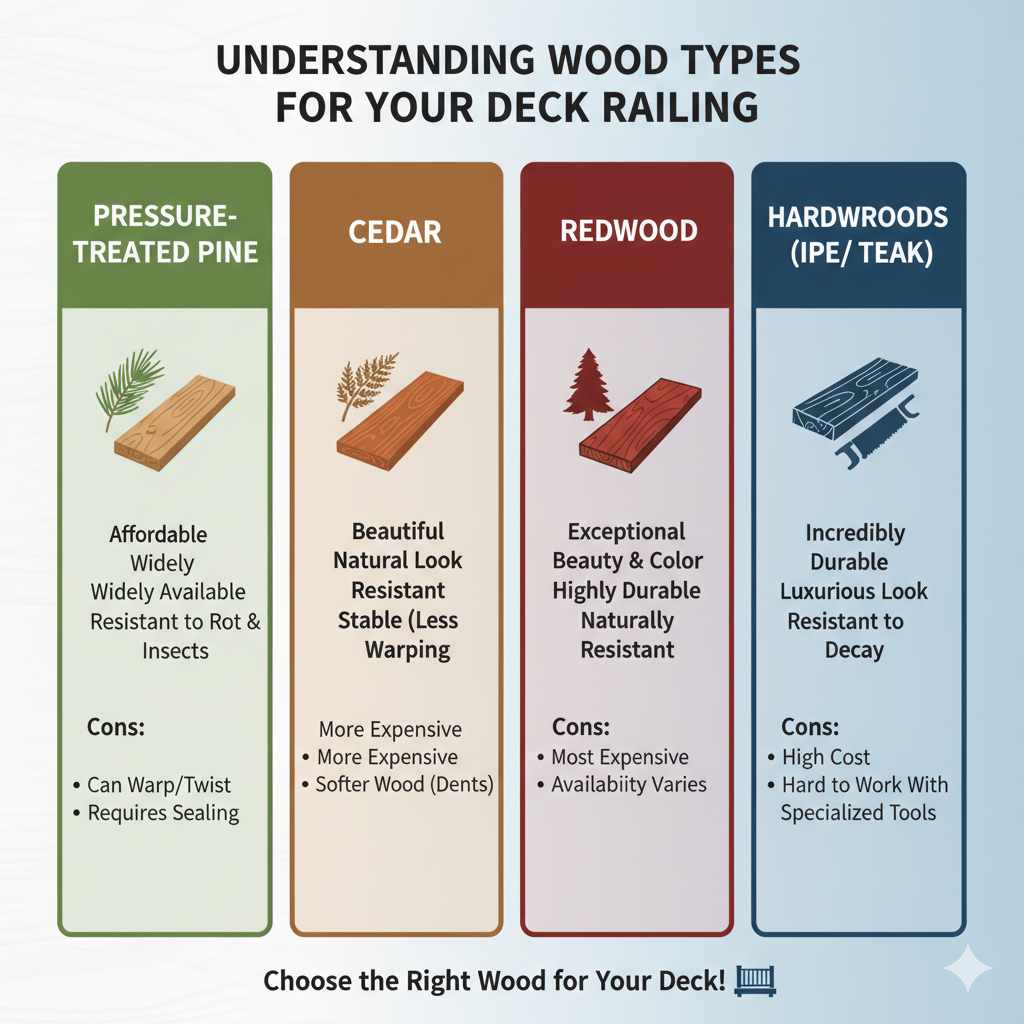
Understanding Wood Types for Your Deck Railing
The type of wood you choose will impact the look, durability, and cost of your railing. Here’s a look at some popular options:
Pressure-Treated Pine
This is a very common and budget-friendly choice. Pine is treated with chemicals to resist rot, decay, and insect infestation. It’s readily available and easy to work with.
- Pros: Affordable, widely available, good protection against elements.
- Cons: Can warp or twist if not properly dried or maintained, may require staining or sealing for best appearance.
Cedar
Cedar is a naturally beautiful wood with a lovely aroma and rich color. It’s naturally resistant to rot and insects, which means it holds up well outdoors. It’s a bit more expensive than pressure-treated pine but offers a more premium look.
- Pros: Beautiful natural appearance, naturally resistant to rot and insects, stable (less likely to warp).
- Cons: More expensive than treated pine, softwood (can dent more easily).
Redwood
Similar to cedar, redwood is a premium choice known for its stunning color and excellent natural resistance to decay and insects. It’s very durable and looks gorgeous, but it comes with a higher price tag.
- Pros: Exceptional beauty and color, highly durable, naturally resistant to rot and insects.
- Cons: Most expensive option, availability can vary.
Hardwoods (like Ipe or Teak)
While beautiful and incredibly durable, hardwoods are generally not recommended for absolute beginners due to their hardness, cost, and the specialized tools sometimes needed to work with them. They are a fantastic long-term investment but can be challenging for a first-time project.
Basic Deck Railing Components
Before we dive into designs, let’s quickly go over the main parts of a wood deck railing:
- Posts: The vertical supports that anchor the railing to the deck. These are crucial for stability.
- Rails: The horizontal pieces that run between the posts. There’s usually a top rail and a bottom rail.
- Balusters (or Spindles): The vertical elements between the rails that prevent people (and pets!) from falling through. Spacing is important for safety codes.
- Newel Posts: Larger, stronger posts often found at the ends and corners of a railing section.
Proven Wood Deck Railing Designs for Beginners
These designs focus on simplicity, common materials, and straightforward construction, making them perfect for getting started. Remember, safety regulations often dictate baluster spacing (typically no more than 4 inches apart) and railing height (usually 36-42 inches). Always check your local building codes!
1. The Classic Picket Railing
This is the most traditional and one of the easiest designs to build. It features vertical balusters spaced evenly between a top and bottom rail, all attached to sturdy posts.
Why it’s great for beginners:
- Simple Cuts: You’ll mostly be cutting straight pieces of wood.
- Easy Assembly: Attaching the balusters with screws or nails is straightforward.
- Material Availability: All components are readily available at lumberyards.
- Cost-Effective: Uses standard lumber sizes.
Key Steps:
- Install Posts: Securely attach 4×4 posts to your deck frame, typically every 4-6 feet. Ensure they are plumb (perfectly vertical).
- Attach Rails: Cut and attach top and bottom rails (often 2x4s or 2x6s) between the posts. Leave a small gap between the bottom rail and the deck for drainage.
- Cut Balusters: Cut your balusters (usually 2x2s or 1x4s) to the desired length.
- Attach Balusters: Fasten the balusters vertically between the top and bottom rails. Use a spacer to ensure consistent gaps (remember that 4-inch rule for safety).
2. The Continuous Top Rail with Square Balusters
This design offers a slightly more modern look while still being very beginner-friendly. Instead of a separate top and bottom rail, it uses a single, wider board as the top rail, often with some space between the bottom of the top rail and the deck boards.
Why it’s great for beginners:
- Fewer Pieces: Streamlines the rail system.
- Modern Aesthetic: Looks clean and less fussy than a double rail.
- Easy to Grip: A wider top rail is comfortable to hold.
Key Steps:
- Install Posts: Same as the classic picket.
- Attach Top Rail: Use a wider board (like a 2×6 or even a 2×8) for the top rail, attaching it securely to the posts.
- Add Balusters: Attach square balusters (often 2x2s) vertically beneath the top rail. You might attach them directly to the underside of the top rail or to a hidden lower support for a “floating” baluster look (though direct attachment is simpler for beginners).
3. The Simple Horizontal Railing
This design uses horizontal boards for a more open and contemporary feel. It’s visually striking and can make a smaller deck feel more spacious. It’s important to check local codes, as some areas have restrictions on horizontal railings due to climbing concerns, especially if children are present.
Why it’s great for beginners:
- Minimal Cuts: Primarily long, straight cuts for the horizontal pieces.
- Quick Installation: Fewer individual balusters to attach.
- Stylish Appearance: Offers a clean, modern look.
Key Steps:
- Install Posts: As usual, ensuring they are strong and plumb.
- Attach Rails: Install a sturdy top rail (e.g., 2×4 or 2×6) and a bottom rail or support.
- Attach Horizontal Boards: Screw horizontal boards (like 1x4s or 2x4s) to the inside face of the posts, spacing them evenly. Ensure the spacing still meets safety requirements – this is crucial for horizontal designs. Some designs use a mesh insert for added safety. For simpler construction, focus on closely spaced horizontal boards.
4. The Minimalist Modern Profile Railing
This design uses slimmer, often thicker lumber (like 2x4s or 2x6s) for both the top rail and vertical elements, creating a sleeker, less visually heavy appearance than traditional pickets.
Why it’s great for beginners:
- Clean Lines: Offers a sophisticated, uncluttered look.
- Easy to Fabricate: Uses readily available lumber sizes like 2x4s and 2x6s.
- Less Wood, More View: Can feel less intrusive than bulky railings.
Key Steps:
- Install Posts: Secure and plumb 4×4 or larger posts.
- Attach Top Rail: A comfortable 2×4 or 2×6 top rail attached to the posts.
- Create Infill: Instead of thin balusters, use vertical 2x2s or even narrow 2x4s, spaced according to code. You could also adapt this to use sleek horizontal pieces, similar to design #3, but with a more intentionally refined lumber choice.
Essential Tools for Installing Wood Deck Railings
Having the right tools makes the job much easier and safer. Here’s a list of essentials for beginners:
- Measuring Tape: For accurate measurements.
- Pencil: For marking cuts and positions.
- Circular Saw or Miter Saw: For making straight, precise cuts on your lumber. A miter saw is excellent for repeatable angle cuts, but a circular saw works well for straight cuts with a guide.
- Drill/Driver: For pre-drilling holes and driving screws. Make sure it has enough power.
- Drill Bits: Various sizes for pre-drilling and pilot holes.
- Level: Crucial for ensuring your posts and rails are plumb and level. A long level (4-foot) is very handy.
- Speed Square: For marking straight lines and 90-degree angles.
- Hammer: If you opt for nails, though screws offer better holding power.
- Screws: Use exterior-grade screws, specifically designed for deck construction. Stainless steel or coated screws prevent rust.
- Safety Glasses: Always wear these when cutting or drilling!
- Work Gloves: To protect your hands.
- Clamps: Helpful for holding pieces in place while you fasten them.
Best Fasteners for Deck Railings
Using the right fasteners is critical for the safety and longevity of your deck railing. You don’t want your railing coming loose!
- Exterior-Grade Screws: Look for deck screws made from stainless steel or coated to resist corrosion. These will hold much better than nails over time. Common sizes are #8 or #10 in lengths appropriate for your lumber dimensions (e.g., 2.5-inch screws for joining 2x4s).
- Lag Screws/Bolts: For attaching posts to the deck frame, especially if you can’t access the joists directly from below, you might need larger lag screws or carriage bolts.
Key Considerations for Safety and Durability
Beyond the design, a few critical points ensure your railing is safe and lasts for years:
Post Stability
This is paramount! Your posts must be securely anchored. For most decks, posts should be attached to internal blocking or directly to the deck joists. Using appropriate bolts or structural screws is essential. A loose post is a major safety hazard. For guidance on secure post mounting, resources like the Fine Homebuilding guide on deck railings offer excellent practical advice.
Baluster Spacing
Building codes typically require balusters to be spaced so that a 4-inch sphere cannot pass through. This prevents small children from getting stuck or falling through the railing. Measure your gaps carefully!
Railing Height
Most building codes mandate a minimum railing height, commonly 36 inches for residential decks. Some areas or higher decks might require 42 inches. Always verify your local requirements.
Maintenance
Wood railings need regular care. Cleaning, inspecting for loose fasteners or rot, and re-applying stain or sealant every few years will keep your railing looking great and performing safely.
DIY Deck Railing Cost Comparison (Estimated)
Pricing can vary significantly by region and material choice, but here’s a rough idea to help you budget for a typical 50-foot railing section.
| Material Type | Estimated Cost per Linear Foot | Notes |
|---|---|---|
| Pressure-Treated Pine | $15 – $30 | Most budget-friendly, requires sealing/staining. |
| Cedar | $25 – $50 | Naturally beautiful, good durability, requires sealing. |
| Redwood | $40 – $70 | Premium look, excellent durability, can be pricey. |
Note: These are rough estimates and do not include labor costs if you were to hire a professional. These figures are meant to give a beginner an idea of material budget differences.
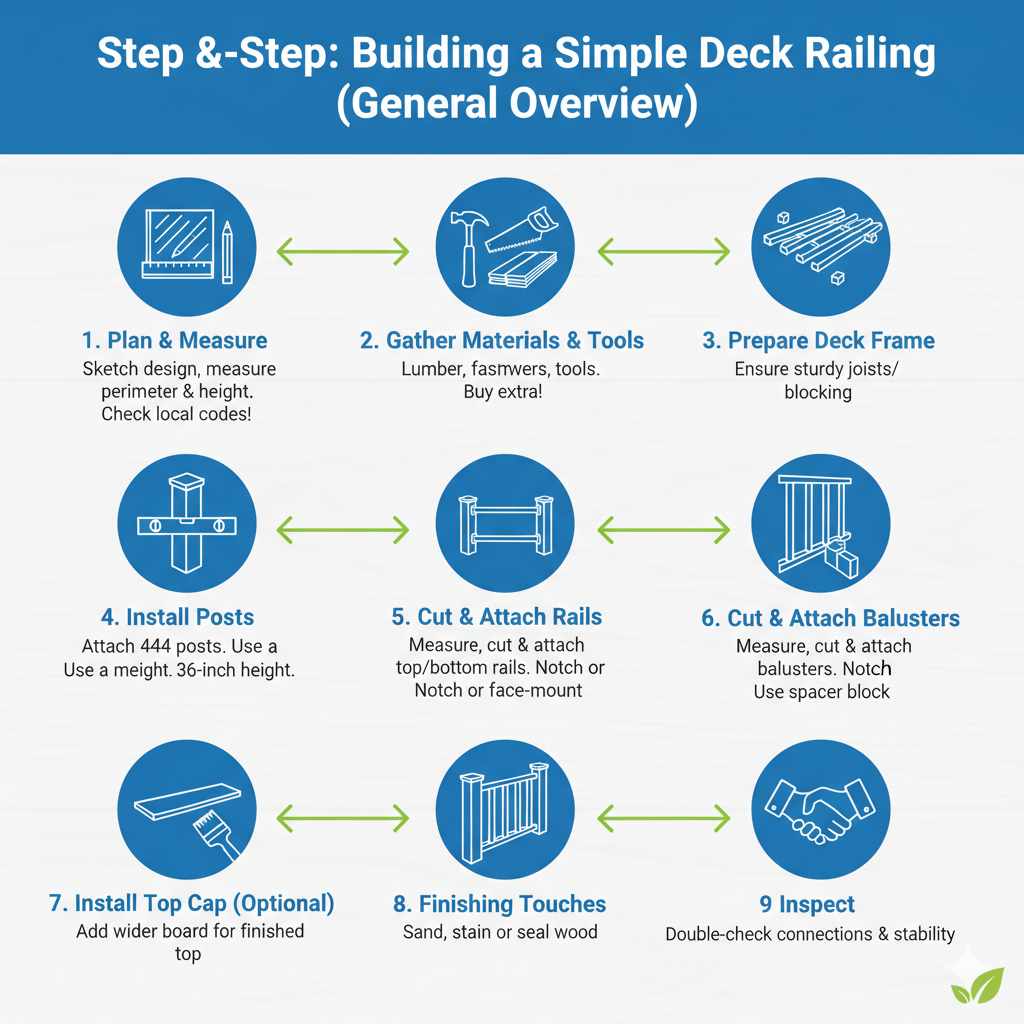
Step-by-Step: Building a Simple Deck Railing (General Overview)
While specific designs vary, here’s a generalized workflow that applies to most beginner wood deck railing projects:
- Plan & Measure: Sketch your design, measure your deck perimeter, and determine railing height and post spacing. Check local codes!
- Gather Materials & Tools: Purchase your chosen lumber, fasteners, and ensure you have all necessary tools. It’s often best to buy slightly more lumber than you think you’ll need.
- Prepare Deck Frame: Ensure the deck joists or blocking are accessible and sturdy where you plan to attach posts.
- Install Posts: Securely attach your 4×4 posts. Use a level to ensure they are perfectly plumb. For a standard 36-inch railing height, the top of the post might extend a few inches above the railing for decorative caps or just to the correct height for your top rail.
- Cut & Attach Rails: Measure and cut your top and bottom rails to fit between posts. For a strong connection, you can notch the posts to receive the rails, or simply attach the rails to the face of the posts using sturdy screws. Ensure the bottom rail is set a few inches above the deck boards.
- Cut & Attach Balusters: Measure and cut your balusters. Use a spacer block to ensure consistent gaps between each baluster. Attach them securely to the top and bottom rails (or directly to the underside of the top rail in some designs).
- Install Top Cap (Optional): Many designs add a wider board (like a 2×6) as a comfortable, finished top cap over the basic top rail.
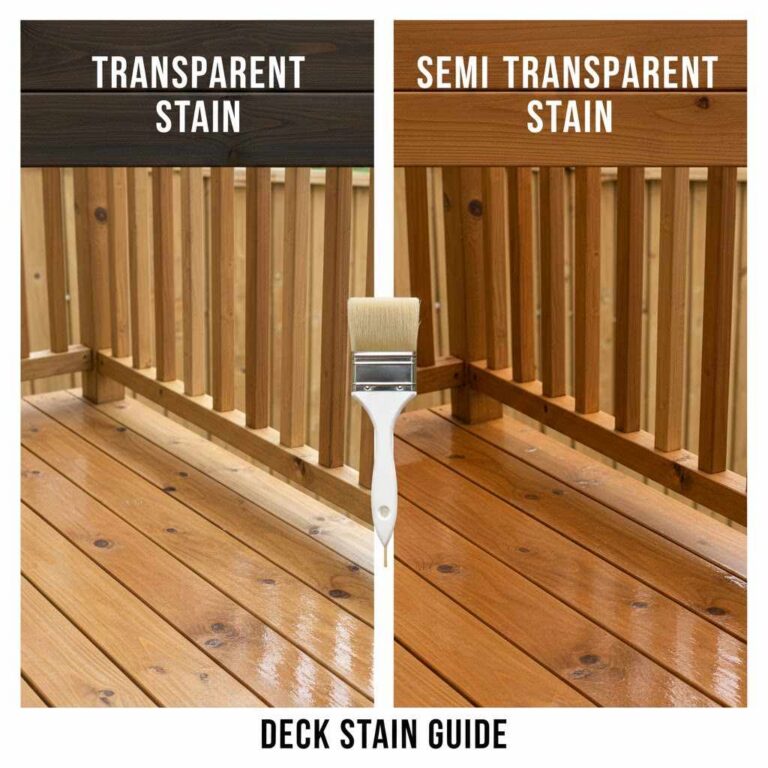
- Finishing Touches: Sand down any rough edges. Apply a quality exterior wood stain or sealant to protect the wood and enhance its beauty.
- Inspect: Double-check all connections for tightness and stability.
Frequently Asked Questions About Wood Deck Railings
Q1: How high should my deck railing be?
A: Most local building codes require deck railings to be at least 36 inches high from the deck surface. For some applications or higher decks, 42 inches may be required. Always check with your local building department.
Q2: What is the standard spacing for deck balusters?
A: For safety, balusters should be spaced so that a 4-inch sphere cannot pass through. This means the gap between each baluster should typically be no more than 4 inches.