Do-It-Yourself Well Drilling: A Beginner’s Step-by-Step Guide
Thinking about a Do-It-Yourself Well Drilling Guide? It’s a common idea for people who want their own water source, but it can seem a little tricky at first. Don’t worry, though! It doesn’t have to be hard. This guide will take you step-by-step through the process. We’ll break down the whole project into easy parts, so you can learn exactly how to do it yourself. Get ready to explore everything, from planning to actually getting water!
Planning Your Well: Before You Begin
Before you even think about grabbing a shovel, you need a solid plan. Good planning makes a huge difference in the success of your project. This includes knowing your local laws about well drilling, checking the ground, and figuring out what kind of well you need. This section will help you cover all these things to get started right. This early work will save you time and money. It also helps to prevent problems later on. Careful planning sets the foundation for a successful well project.
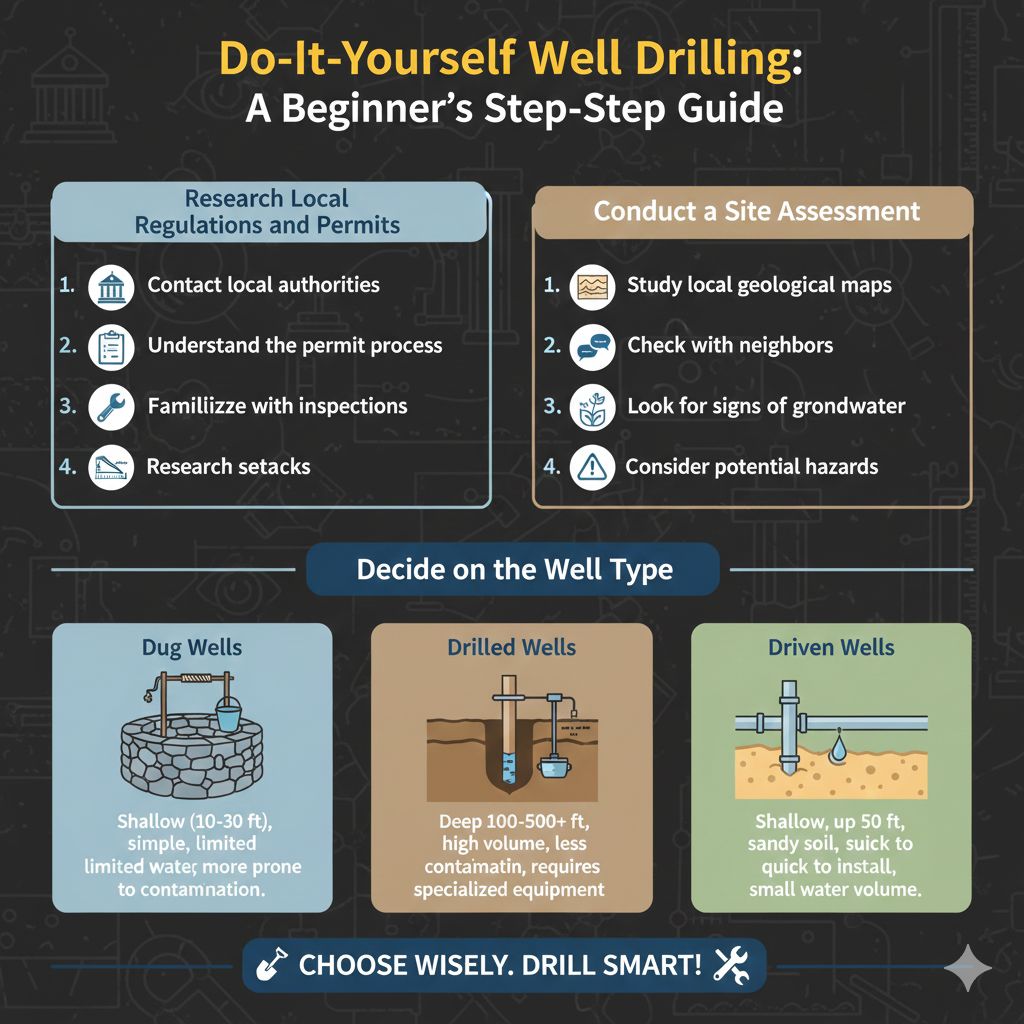
Research Local Regulations and Permits
The first step in any Do-It-Yourself Well Drilling Guide is understanding the rules. Many places have rules about digging wells. These rules are in place to keep the water safe and ensure it is managed correctly. You’ll need to check with your local government to find out the specific regulations in your area. This usually means looking into permits. Permits ensure your well is built according to local health and safety standards. There may also be rules on how far your well needs to be from things like septic systems or other potential pollution sources.
- Contact your local health department or environmental agency. They can give you information about permits, required inspections, and any specific rules for your area. These agencies are the best sources of up-to-date, accurate information about well drilling regulations.
- Understand the permit application process. This usually involves filling out forms, providing information about your property, and sometimes paying a fee. Be ready to provide details like the proposed well location, depth, and anticipated water usage. The application process might also require geological reports or water quality tests.
- Familiarize yourself with any required inspections. After the well is drilled, local officials will often inspect it to make sure it meets all the rules. This might include checking the well casing, the pump installation, and the water quality. The inspections help make sure your well is working right and that your water is safe.
- Research setbacks. Setbacks are the minimum distances your well must be from potential sources of contamination like septic systems, livestock areas, and roads. Following setback requirements helps protect your water source from pollution and ensures public health.
Conduct a Site Assessment
Choosing the right spot for your well is key for success. Before you start digging, you need to find a place where water is likely to be found. A good site assessment involves looking at the area’s geology, the water table, and potential hazards. Understanding the landscape can help you make smart choices. This will reduce problems down the road. It ensures a more reliable water supply.
- Study local geological maps. These maps show the types of rocks and soil in your area. This helps you figure out how deep you might need to drill to reach water. They can also show you areas where underground water is likely. You can often get these maps from your local geological survey or library.
- Check with neighbors. Ask your neighbors about their wells. Find out how deep their wells are and how much water they get. Knowing this helps you understand what to expect on your property. This can provide valuable clues about the water table depth and possible water quality issues.
- Look for signs of groundwater. Check for signs like springs, wet areas, or lush vegetation. These can indicate the presence of groundwater near the surface. These clues can suggest the best location for your well. This is because they show where water naturally comes to the surface.
- Consider potential hazards. Be aware of underground utilities like power lines, gas lines, and water pipes. Call your local utility companies to have the area marked before you start digging. Stay away from areas prone to flooding or erosion. These hazards could damage your well or contaminate your water supply.
Decide on the Well Type
There are different kinds of wells, and the best choice for you depends on your area and needs. The two main types are dug wells and drilled wells. Dug wells are the oldest form, made by digging a wide hole by hand or with machinery. Drilled wells are made with specialized drilling equipment. This section covers the features of each to help you choose the right one for your Do-It-Yourself Well Drilling Guide.
- Dug Wells: Dug wells are the simplest and cheapest to build, but they’re also shallow, usually 10-30 feet deep. Because of their shallow depth, dug wells are more likely to be affected by surface contamination. They provide a limited amount of water, which is often enough for a small garden or a single-family house. Building one yourself involves digging a large-diameter hole, lining it with stone or concrete, and then installing a pump to bring the water to the surface.
- Drilled Wells: Drilled wells are made by drilling a narrow hole into the ground using specialized equipment. They are usually deeper (100-500 feet or more) and can access water from deep underground. This makes the water less likely to be contaminated by surface pollution. Drilled wells can provide a higher volume of water. This makes them good for households, farms, and other large water needs.
- Driven Wells: Driven wells are another option. A driven well involves pounding a pipe with a well point into the ground. These are used in areas with sandy soil and shallow water tables. They’re quick to install and cost less than drilled wells, but they’re not suitable for all locations. These wells are usually less deep, and they provide a smaller amount of water compared to drilled wells.
- Consider your water needs. The amount of water you use each day is a key factor. If you only need a little water for a garden, a shallow dug well might be enough. If you need water for a whole house or for a lot of irrigation, a drilled well is usually a better choice.
Gathering Your Gear: Tools and Materials
Once you’ve done your planning, it’s time to get the equipment you need. You’ll need different tools and materials depending on the type of well you’re building. This section of your Do-It-Yourself Well Drilling Guide covers what you need. From drill bits to well casing, knowing the right tools helps make the process smoother and safer. Having everything ready to go keeps you from making extra trips to the store.
Essential Drilling Equipment
Drilling a well needs some important tools. You’ll need specialized equipment to create the well hole and get water. The right tools can make the job easier, safer, and more effective. This is an important step in your Do-It-Yourself Well Drilling Guide. The tools you choose will depend on the type of well you’re building and the soil in your area. Using the correct tools helps make sure you drill a good well. This means a reliable water source that lasts for a long time.
- Drilling Rig: This is the main machine that digs the hole. There are different types, including rotary rigs and percussion rigs. The type you need depends on the soil and the depth of the well. Rotary rigs use a rotating drill bit, while percussion rigs use a hammering action.
- Drill Bits: Drill bits are used to break up the soil and rock as you dig. They come in different sizes and shapes, depending on the type of soil and the well’s depth. Common types include tri-cone bits for hard rock, drag bits for soft soil, and auger bits for drilling through soft soil or clay.
- Drill Rods: Drill rods connect the drill bit to the drilling rig. They are long, sturdy pipes that you add to as you drill deeper. These rods need to be strong enough to handle the weight and pressure of drilling through the earth.
- Casing: Well casing is a pipe that lines the drilled hole. It prevents the sides of the hole from collapsing and keeps out dirt and contaminants. Casing is usually made of steel or PVC and must be the right size and strength for the well.
Materials for Well Construction
Besides the main drilling tools, you will need other materials to build your well. These materials ensure your well is safe, reliable, and provides clean water. Choosing the right materials is essential for long-term success. Always be sure to check local regulations for any special requirements for materials in your area. This ensures your well meets all health and safety standards.
- Well Casing: As mentioned above, casing is essential for well construction. Choose materials suitable for your area. For example, PVC casing is good for shallow wells and is resistant to corrosion. Steel casing is stronger and is suitable for deeper wells and areas with tough soil.
- Gravel Pack: A gravel pack is a layer of gravel that surrounds the well screen. It helps to filter out sediment and keeps it from entering your well. The gravel pack improves water quality and helps extend the life of your pump.
- Well Screen: The well screen is a special section of casing with slots or openings. This is installed at the bottom of the well, and it allows water to enter while keeping out sand and other particles. The right screen size is crucial for preventing clogging and ensuring good water flow.
- Grout: Grout is used to seal the space between the well casing and the drilled hole. It helps prevent surface water and contaminants from getting into the well. The grout also keeps the casing stable and protects it from erosion.
Safety Gear and Accessories
Safety is key when drilling a well. The process involves heavy machinery and can be dangerous if you’re not careful. This section of your Do-It-Yourself Well Drilling Guide highlights the safety gear you should wear. This is to protect yourself from injuries. Proper safety measures help you get the job done safely. This provides peace of mind while drilling and reduces the risk of accidents.
- Safety Glasses or Goggles: Always wear eye protection to shield your eyes from flying debris and dust. Safety glasses or goggles are a must when working with drilling equipment. These are simple yet effective to keep your vision safe.
- Gloves: Wear work gloves to protect your hands from cuts, abrasions, and other injuries. Gloves also give you a better grip on tools and materials. Choose gloves that are made of durable material and fit well.
- Hard Hat: Protect your head from falling objects or impacts. A hard hat is particularly important when working around heavy machinery. Make sure your hard hat is in good condition and fits properly.
- Steel-Toe Boots: Protect your feet from heavy objects or crushing injuries. Steel-toe boots can prevent serious foot injuries. They are an essential part of your safety gear when working with heavy equipment and materials.
- Hearing Protection: Drilling equipment can be noisy. Wear earplugs or earmuffs to protect your hearing from damage. Choose hearing protection that fits well and reduces noise to a safe level.
The Drilling Process: Step-by-Step Instructions
Now, let’s explore the actual well-drilling process. This is the main part of your Do-It-Yourself Well Drilling Guide, so follow each step closely. The way you drill will vary depending on the type of well you are making, but the basic steps are similar. We’ll cover the core steps, including how to start the hole, keep it straight, and deal with any issues that come up. Following these steps helps make sure your well is drilled correctly.
Initiating the Drill Hole
The first step involves setting up your equipment and beginning the digging. Getting this right is very important. It sets the direction for your well and affects the whole process. Care and precision at this stage can prevent issues like a crooked well or problems down the road. Use the right equipment and methods to get it right from the beginning.
- Positioning the Rig: Place your drilling rig over the marked well location. Level the rig to make sure it is stable and vertical. Properly positioning your rig ensures your well is straight and that drilling is done safely.
- Attaching the Drill Bit: Select the correct drill bit for the soil type in your area. Attach the bit to the drill rods securely. This is a critical step, as the right bit helps you drill efficiently. A secure connection between the drill bit and the rods is essential for transmitting the drilling force effectively.
- Starting the Drill: Slowly begin drilling. Apply gentle pressure at first to keep the hole from wandering. Monitor the drill’s progress, and adjust the speed and pressure as needed. This prevents damage to the equipment and ensures a smooth start.
- Maintaining the Hole’s Alignment: Make sure the hole stays straight. Regularly check the drill’s alignment. Adjust as needed to prevent it from veering off course. A straight hole is essential for the long-term integrity and efficiency of your well.
Progressing Through Different Soil Types
As you dig deeper, you will likely hit different layers of soil and rock. Each layer requires different drilling methods. Adjusting your technique based on the ground conditions will help you get through these changes. Understanding how to handle different soil types is a key part of your Do-It-Yourself Well Drilling Guide. Adapting to the conditions makes the process more effective and allows you to drill your well efficiently.
- Dealing with Soft Soil: Soft soil can be easy to drill through but may also cause the hole to collapse. Use a drill bit designed for soft soil, and remove the cuttings frequently. If the hole starts to cave in, you might need to install temporary casing to keep it open.
- Managing Clay: Clay can be sticky and can cling to the drill bit, making it hard to drill. Use a clay-specific drill bit, and add water to the hole to make it easier to remove the clay cuttings. Proper management of clay helps prevent the drill bit from getting stuck.
- Navigating Through Sand and Gravel: Sand and gravel can be loose, which makes it hard to keep the hole from collapsing. Use a bit designed for abrasive materials. Drill slowly. You may also need to use a temporary casing or a drilling fluid to stabilize the hole.
- Drilling Through Rock: Rock is the most challenging material. You’ll need a specialized drill bit, like a tricone or a diamond bit. Drill slowly and apply steady pressure. You will also need to remove the rock cuttings regularly. Drilling through rock requires patience and the right equipment.
Reaching the Water Table
The goal is to reach the water table. This is the level below the surface where the ground is saturated with water. Reaching the water table is a milestone in the drilling process. Knowing when you reach this level requires careful observation and experience. The right techniques will help you know when you’ve found the water and when to stop digging. This will help you get a steady water supply.
- Recognizing Water Indicators: Keep an eye out for signs of water. This could be moisture in the cuttings or a sudden change in the drilling progress. Sometimes, you’ll see a noticeable increase in the water level in the hole as you drill.
- Drilling into the Aquifer: Once you find the water table, drill a little further into the water-bearing layer (aquifer). This helps ensure a good water supply. The aquifer is where water is stored underground. Drill through enough of the aquifer to make sure your well has good water production.
- Measuring the Water Level: After drilling, measure the water level in your hole to determine the static water level. The static water level is the depth where the water naturally settles. The water level will fluctuate depending on the season and use. This measurement is important for sizing your pump.
- Conducting a Water Yield Test: Perform a water yield test to estimate the amount of water your well can produce. This helps you figure out if the well will meet your water needs. You can do this by pumping water from the well for a certain time. After the water test, you can know how well the well is working.
Well Casing and Development
Once the drilling is done, it’s time to build the well itself. This means installing the well casing. Casing is the lining for your well. This important step helps to ensure that your well is sound and that it delivers clean, safe water. Developing the well means getting rid of any sediment and improving water flow. This stage, covered in your Do-It-Yourself Well Drilling Guide, is essential for a well that provides a reliable water source.
Installing the Well Casing
Putting in the casing is a crucial step after you’ve drilled the hole. The casing keeps the well walls from caving in and protects the water from surface contamination. Careful installation ensures that the casing is positioned correctly. This keeps the well strong and safe. Proper casing installation is key to the long life and effectiveness of the well.
- Choosing the Right Casing: Select casing material that’s suitable for your well and local regulations. The choice of casing material should be based on factors like depth of the well and type of soil. PVC casing is common for shallow wells. Steel casing is often used for deeper wells.
- Lowering the Casing into the Hole: Carefully lower the casing into the drilled hole. Make sure the casing is centered in the hole. This helps to prevent any problems with the pump. Be sure the casing goes all the way down to the bottom of the drilled hole.
- Joining the Casing Sections: If you’re using multiple sections of casing, connect them securely. There are different ways to join them, like threading or using couplings. The joints must be watertight to stop water and contaminants from getting into the well.
- Securing the Casing: The casing must be installed correctly. The casing must be held in place with grout. Grout creates a seal around the casing. This protects the well from surface contamination and strengthens the well structure.
Gravel Packing and Well Screen Installation
After putting in the casing, you’ll likely need to install a gravel pack and a well screen. The gravel pack is a layer of gravel surrounding the well screen, and the well screen allows water to enter. These steps are part of the process, covered in your Do-It-Yourself Well Drilling Guide. They are important for water quality and well performance. Using the right materials and methods is key for a well that is clean and long-lasting.
- Installing the Gravel Pack: Put the gravel pack around the well screen to filter out sediment. The gravel pack prevents fine particles like sand from entering the well. Choose gravel that’s the right size. This will depend on the type of soil and the well screen’s slot size.
- Selecting the Well Screen: Choose the well screen with openings that let water in while keeping sand and other particles out. The slot size is based on the grain size of the soil around the well. It should be small enough to stop the sand but big enough to allow water to flow.
- Installing the Well Screen: Lower the well screen into the well. It should be positioned in the area with the best water flow. Make sure the screen is installed at the proper depth. This placement is key for effective water intake.
- Sealing the Annulus: Seal the gap (annulus) around the well screen and gravel pack. This prevents surface water and contaminants from entering the well. The seal is usually created using a bentonite clay or grout. Proper sealing is essential to protect the water quality.
Well Development and Water Testing
After installing the casing, gravel pack, and screen, you need to develop the well. This clears the well of any drilling residue. It prepares it for use. After development, you test the water. Water testing ensures that the water meets health and safety standards. This final stage of your Do-It-Yourself Well Drilling Guide helps you enjoy a reliable and safe water source.
- Methods for Well Development: Well development improves water flow and removes any dirt that may have built up. Common methods include surging and pumping. Surging involves moving a surge block up and down in the well to loosen debris.
- Surging and Pumping: Surging pushes water in and out of the well screen to clean it out. Pumping removes the water and any debris that has been loosened. Continue the process until the water runs clear. Make sure the water has a high flow rate and is free of sediment.
- Testing for Water Quality: Have your water tested to ensure it is safe to drink and use. The tests often check for bacteria, chemicals, and other contaminants. Contact your local health department or a certified lab for water testing.
- Addressing Water Quality Issues: If testing reveals contamination, take action to fix the problem. You might need to shock chlorinate the well to kill bacteria. If there are chemical issues, you might have to install water treatment equipment, such as filters or softeners. Address issues quickly to make sure your water is safe.
Pump Installation and Water System Setup
After drilling and developing your well, you need to set up the system to get the water to your home or property. This involves installing a pump, pressure tank, and all the necessary pipes and wiring. This section of your Do-It-Yourself Well Drilling Guide covers the installation and setup. The right installation of these parts ensures reliable water access.
Selecting the Right Water Pump
Choosing the correct water pump is important for getting water from your well. The type and size of the pump affect the flow and pressure of your water. Choosing the right pump is essential for a reliable water supply. Knowing your water needs and the well’s depth is key to making the best choice.
- Submersible Pumps: Submersible pumps are placed deep inside the well, below the water level. These pumps are quiet and efficient, and they’re ideal for deep wells. Select a submersible pump. Make sure it can handle the well’s depth and your water flow needs.
- Jet Pumps: Jet pumps are above the ground, usually in a well house. They’re cheaper to install and maintain than submersible pumps. However, they are less efficient, and work best in shallow wells. Jet pumps are a good option for shallow wells and when ease of maintenance is a priority.
- Pump Sizing: You must determine the size of the pump. The size must match your water needs, the well’s depth, and the diameter of the well casing. A pump that is too small might not be able to deliver enough water. One that is too big could damage the well.
- Pump Specifications: Review the pump’s flow rate (gallons per minute or GPM) and pressure (pounds per square inch or PSI). These specifications will determine the pump’s performance. The specifications need to match your household’s water requirements.
Installing the Pump and Piping
The installation of the pump and piping is key to connecting your well to your water system. Correct installation ensures that water flows efficiently. It also protects your equipment. Following these guidelines ensures that your water supply system works as expected.
- Lowering the Submersible Pump: For submersible pumps, lower the pump into the well. Do this carefully. Attach it to the well casing. Use a safety cable to prevent the pump from falling. The pump should be positioned above the well screen to avoid sucking up sediment.
- Installing the Piping: Connect the pump to the water lines that will bring water to your home. Make sure the pipes are the right size and type for your needs. Use the proper fittings and connectors to prevent leaks. The pipes should be buried below the frost line to avoid freezing.
- Wiring the Pump: Run electrical wiring from the pump to your home’s electrical panel. Hire a licensed electrician to handle electrical connections to ensure safety and compliance with codes. Use a control box and a pressure switch to manage the pump’s operation.
- Priming the Jet Pump: If you’re using a jet pump, you must prime it. This involves filling the pump with water to help it create suction. Follow the manufacturer’s instructions. This step is essential to get the pump running properly.
Setting Up the Pressure Tank and Controls
A pressure tank and the proper controls help to give a steady water supply. The pressure tank stores water under pressure. This provides water on demand. The controls manage the pump’s operation and protect the system. Setting up these components correctly is critical for an efficient and dependable water supply.
- Installing the Pressure Tank: Connect the pressure tank to the water line coming from the pump. The pressure tank helps regulate the water pressure. The tank holds a supply of water under pressure, which is released when you open a tap.
- Setting the Pressure Switch: The pressure switch turns the pump on and off to maintain the right water pressure. Set the pressure switch to turn the pump on when the pressure drops below a certain level. Set it to turn off when the pressure reaches a certain level.
- Checking for Leaks: After setting up the system, check all connections and fittings for leaks. Leaks reduce water pressure and waste water. Repair any leaks promptly to keep the system working properly.
- Testing the System: Turn on the pump and test the water flow at different taps and fixtures in your home. Check that the water pressure is consistent. Make sure the pump cycles on and off as it should. Adjust the pressure switch settings, as needed, to achieve the desired water pressure.
Ongoing Maintenance and Care
After your well is installed, it is essential to take care of it. Regular maintenance keeps your well working efficiently and your water safe. This part of your Do-It-Yourself Well Drilling Guide covers everything. This ranges from regular inspections to water testing. Following these steps can help extend the life of your well and reduce problems down the road. Regular care is critical to ensure that your well remains a dependable water source for your home.
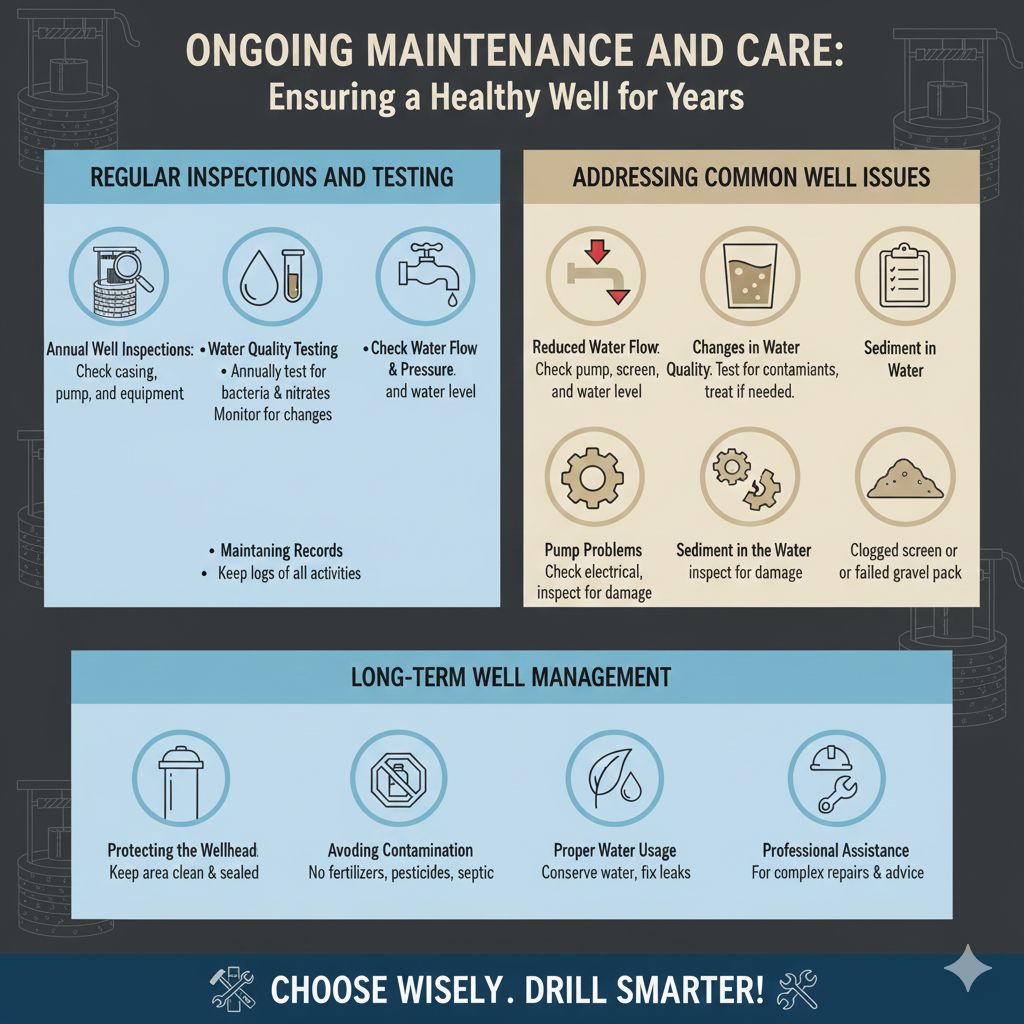
Regular Inspections and Testing
To keep your well in good working order, do routine inspections and tests. These tests can identify potential problems before they get worse. Regular monitoring keeps your water source reliable and safe. This will give you peace of mind.
- Annual Well Inspections: Do yearly inspections of your well system. Check the well casing, pump, and all related equipment. Look for any signs of damage, wear, or leaks. An inspection can catch small problems.
- Water Quality Testing: Do a water quality test every year. This will ensure that your water is safe to drink. Test for bacteria, nitrates, and other contaminants. Contact a certified lab for testing to ensure the best results.
- Checking Water Flow and Pressure: Keep an eye on the water flow and pressure in your home. Any changes may signal a problem with the well or pump. If you notice any drop in flow or pressure, you should investigate.
- Maintaining Records: Keep detailed records of all inspections, tests, and maintenance activities. This will help you keep track of your well’s history and identify any recurring issues. These records can also be helpful if you ever need to have the well serviced.
Addressing Common Well Issues
Despite your best efforts, problems can still arise. Knowing how to handle common issues is essential. This portion of your Do-It-Yourself Well Drilling Guide will cover common well problems. This knowledge can help you resolve issues quickly and prevent major damage or water quality problems. Early detection is often the best solution.
- Reduced Water Flow: If you notice that your water flow is slowing down, there are a few possible causes. Check the pump for any blockages or damage. Inspect the well screen for sediment buildup. Make sure the water level in the well is adequate.
- Changes in Water Quality: Any change in water color, taste, or odor could be a sign of a problem. Test the water for contaminants. The water might need treatment, or the well might need to be cleaned. Have a professional evaluate the water quality issue.
- Pump Problems: If your pump stops working or is running strangely, check the electrical connections. Inspect the pump itself for damage or wear. Also, make sure the pump is properly sized for your well. Contact a professional for repairs if needed.
- Sediment in the Water: If you notice sediment in your water, the well screen could be clogged. It could also mean the gravel pack has failed. You might need to shock chlorinate the well. Consult a professional to clean or repair the well.
Long-Term Well Management
You can keep your well healthy and effective for years to come. With proper care and attention, your well can be a dependable water source. This is the last section of your Do-It-Yourself Well Drilling Guide. Follow these tips to keep your well working at its best. Taking care of your well can benefit your property and your water supply for many years.
- Protecting the Wellhead: Keep the area around your well clean and free of debris and contaminants. Make sure the wellhead is sealed correctly to prevent surface water from entering. Proper wellhead protection is important to maintain water quality.
- Avoiding Contamination Sources: Keep potential contaminants away from your well. This includes fertilizers, pesticides, and animal waste. Proper well placement, far from septic systems and livestock areas, is important. Protecting the area can ensure the water stays clean.
- Proper Water Usage: Use water wisely to avoid overworking the well. Fix any leaks promptly to conserve water and protect your well system. Use water-saving fixtures and appliances to reduce water usage.
- Professional Assistance: Don’t hesitate to get help from a professional when needed. Qualified well service technicians can handle complex repairs and maintenance tasks. They can also provide expert advice on keeping your well running well.
Frequently Asked Questions
Question: How deep should I drill my well?
Answer: The depth of your well depends on the water table level in your area. Contact your local health department or a well drilling expert for advice about the average depth in your area.
Question: Do I need a permit to drill a well?
Answer: Most areas require permits for well drilling. Contact your local authorities to learn about the specific regulations and permit requirements in your area.
Question: What’s the best type of well for my property?
Answer: The best type of well (dug, drilled, or driven) depends on several factors, including the soil type, water table depth, and your water needs. A site assessment will help you decide.
Question: How often should I test my well water?
Answer: It’s recommended that you test your well water at least once a year. Test your water more often if you notice any changes in the water quality or if there are local concerns about contamination.
Question: How can I prevent my well from freezing in winter?
Answer: To stop your well from freezing, bury the water pipes below the frost line. If your well is in an area prone to freezing, you may need to install insulation or a heat tape.
Final Thoughts
Drilling your own well can be a very rewarding project, giving you control over your water supply. This Do-It-Yourself Well Drilling Guide helps you explore all the key steps, from planning to installation and maintenance. Remember that careful preparation, following the rules, and getting the correct equipment are vital. With the information in this guide and a commitment to safety, you can drill your own well. This provides a dependable water source for years to come. Remember to learn about your local rules and always prioritize safety during the whole process. Best of luck with your well drilling project.