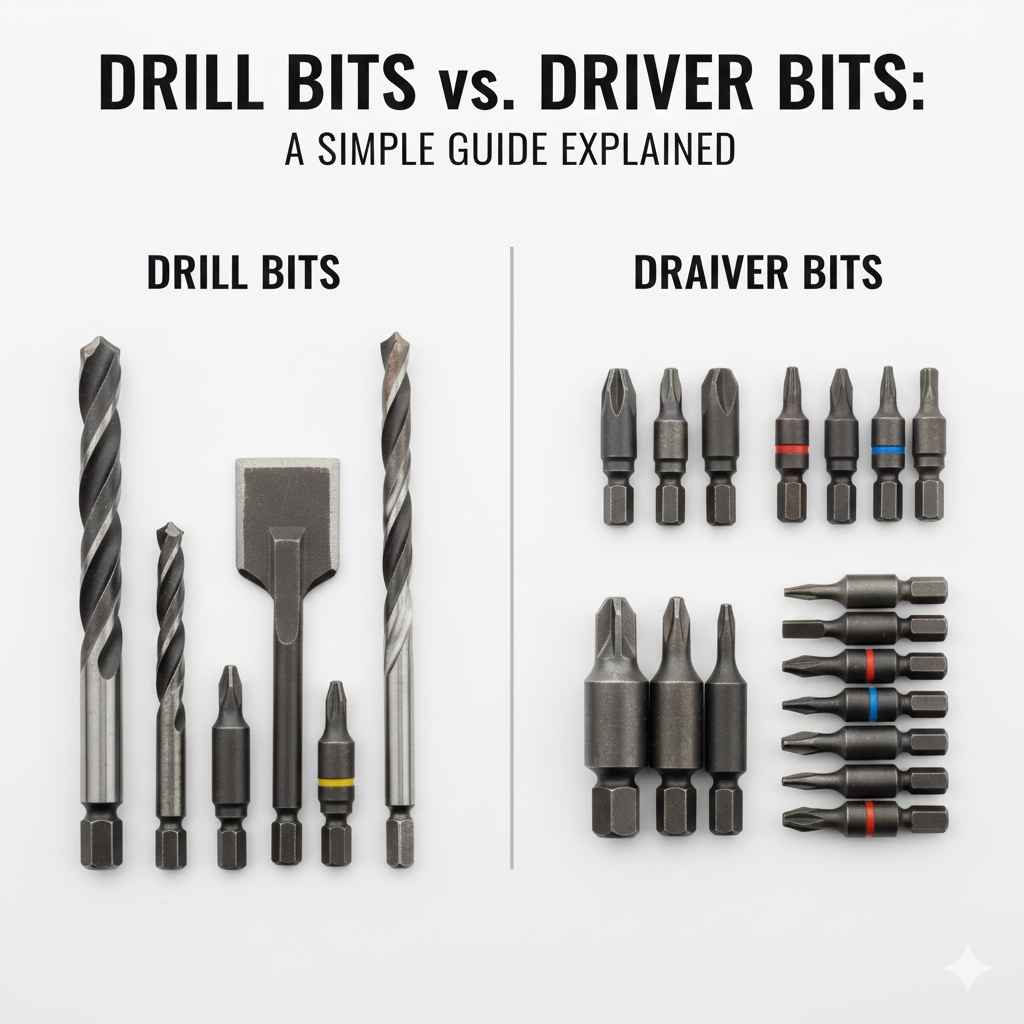
Drill Bits vs Driver Bits Simple Guide Explained
Figuring out the difference between Drill Bits vs Driver Bits: Simple Guide can be a tricky thing for anyone starting a home improvement project. Don’t worry, it’s totally normal to feel a bit lost at first! So many different tools and bits. where do you even begin? This guide will break it down into easy steps. We’ll cover the basics to make it super simple, so you can pick the right tool for the job. You’ll soon see how these tools work. Let’s get started!
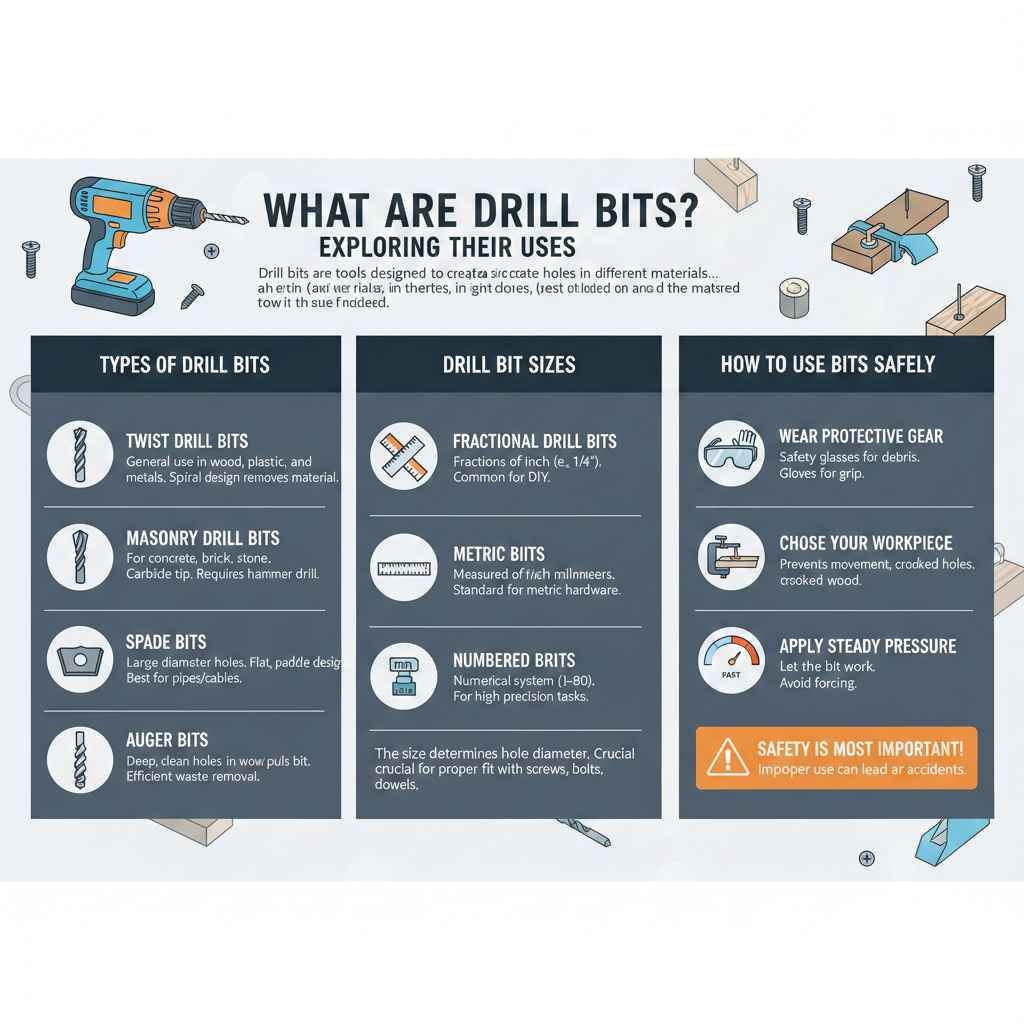
What Are Drill Bits? Exploring Their Uses
Drill bits are tools designed to create holes in different materials like wood, metal, and plastic. They work with a power drill to bore into a surface. Think of them as tiny, spinning knives that cut away material. The size and type of drill bit depend on the size of the hole you need and the material you’re working with. Getting to know drill bits is essential for any project involving making holes. The right bit makes the difference between a smooth, clean hole and a messy, splintered one. Many people often mistake drill bits for driver bits, but their purposes are distinctly different, as we will explore.
Types of Drill Bits for Various Materials
Different materials require different types of drill bits. Using the wrong bit can damage your project and, potentially, the drill itself. For example, trying to drill into metal with a wood bit will likely dull the bit and might not even create a hole. The most common types include twist drill bits, which are great for general use in wood and some metals. Masonry bits, with their specialized tips, are used for drilling into concrete and brick. Spade bits are perfect for quickly creating larger diameter holes in wood.
- Twist Drill Bits: These are the workhorses of the drill bit world. They’re excellent for a wide range of materials, including wood, plastic, and even some metals. They have a spiral design that helps remove material as the bit goes into the hole. Available in various sizes, from tiny to quite large, they are a must-have for any toolbox. Choosing the correct size is very important for a tight fit when using screws or bolts.
- Masonry Drill Bits: Designed to drill into hard materials like concrete, brick, and stone, these bits have a special tip. This tip is often made of carbide, which is very hard and can withstand the abrasive nature of masonry materials. They often have a fluted design to help remove dust and debris as the bit drills. These bits need a hammer drill to work correctly because they are designed to chip away at the masonry.
- Spade Bits: Also known as paddle bits, spade bits are perfect for quickly drilling large-diameter holes in wood. They have a flat, paddle-shaped design with a pointed tip to guide the bit. They are best for creating holes for things like pipes or cables. While effective, they can be a bit tricky to control, especially when starting the hole, so holding the drill steady is important.
- Auger Bits: Auger bits are designed for drilling deep, clean holes in wood, especially when a longer reach is needed. They have a screw tip that pulls the bit into the wood, and a spiral flute that removes the wood shavings. They are very effective at removing material, making them ideal for tasks like drilling through thick beams. Their design allows for efficient waste removal, preventing the bit from getting clogged.
Drill Bit Sizes and Their Impact
The size of a drill bit is crucial. It determines the diameter of the hole you’ll create. Drill bit sizes are often measured in fractions of an inch, millimeters, or with a number system. Selecting the correct size is essential for a proper fit when using screws, bolts, or dowels. Using a drill bit that is too small for a screw will make it very difficult to insert the screw, potentially stripping the screw head or even damaging the material. A bit too large might make the screw loose. Knowing the precise size allows for precise work.
- Fractional Drill Bits: These are measured in fractions of an inch, such as 1/8 inch, 1/4 inch, or 3/8 inch. They’re common for general woodworking and DIY projects. They’re very easy to understand because they directly represent the hole size you’ll get.
- Metric Drill Bits: Measured in millimeters, these are standard in many parts of the world and are often used when working with metric screws and hardware. They offer precision, and it’s essential to match the drill bit size to the screw or bolt size accurately.
- Numbered Drill Bits: Numbered bits use a numerical system (from 1 to 80), with higher numbers representing smaller diameters. These are commonly used for tasks that need high precision, like creating holes for tapping screws.
How to Use Drill Bits Safely
Safety is the most important part when using drill bits. Always wear safety glasses to protect your eyes from flying debris. Gloves can improve grip and protect your hands. Make sure the material you’re drilling is secured to prevent it from moving while you drill. Choosing the proper speed and applying the right amount of pressure are key to successful, safe drilling. Don’t force the drill, let the bit do the work. Improper use can lead to accidents and injuries.
- Wear Protective Gear: Safety glasses are essential to protect your eyes from debris, such as wood chips or metal shavings. Gloves provide grip and help protect your hands.
- Secure Your Workpiece: Always clamp or otherwise secure the material you’re drilling. This prevents it from moving and potentially causing an accident or a crooked hole.
- Choose the Right Speed: Different materials require different speeds. Soft materials like wood can usually be drilled at a higher speed, while harder materials like metal need a slower speed.
- Apply Steady Pressure: Don’t force the drill. Let the bit cut into the material. Applying too much pressure can damage the bit or cause it to break.
Unpacking Driver Bits: What Are They Designed For?
Driver bits are designed for driving screws. They’re used to turn screws into materials like wood, metal, or plastic. Unlike drill bits, driver bits don’t create holes; instead, they engage with the head of a screw, allowing you to tighten or loosen it. Many different types of driver bits exist to work with various screw heads, such as Phillips, slotted, Torx, and square drive. Knowing the right bit for the screw is very important to avoid stripping the screw head or damaging the material. Driver bits make the process of fastening items fast and efficient.
Different Types of Driver Bits and Their Applications
The variety of driver bits ensures that you always have the right tool for the job, no matter the screw type. These bits come in various shapes and sizes to fit different screw heads. It’s important to match the driver bit to the screw head to avoid damaging either the screw or the material. Some commonly used driver bit types are Phillips, slotted, square drive, and Torx (star) bits. Understanding their differences will ensure you have the right tool.
- Phillips Head Bits: Designed for Phillips head screws, they have a cross-shaped head. Phillips screws are very common and used in many DIY projects.
- Slotted Head Bits: Slotted head bits have a single, straight slot across the head of the screw. They are one of the earliest designs, but are still used.
- Square Drive Bits: These bits have a square shape. They are very efficient at driving screws and provide a good grip.
- Torx Head Bits: Also known as star bits, they have a star-shaped head. They offer a secure grip and reduce the chance of cam-out. They are popular in many industries.
Selecting the Right Driver Bit for the Screw
Choosing the correct driver bit is essential for a successful project. Using the wrong bit can strip the screw head, making it difficult to drive or remove the screw. Always match the driver bit to the screw head. If you are uncertain of the screw head type, try different bits until you find one that fits snugly. A good fit ensures proper torque transfer, reducing the risk of damage. You can also match the bit to the screw head by checking the markings on the screw or packaging.
- Examine the Screw Head: The screw head will tell you which driver bit you need. Look for a cross, a slot, a square, or a star shape.
- Test the Fit: Before driving the screw, make sure the bit fits snugly into the screw head. There should be little to no play. A snug fit reduces the chance of stripping the screw head.
- Consider the Torque: The type of screw and the material you’re working with will determine the amount of torque you’ll need. Make sure your driver bit can handle it.
- Read the Screw Packaging: Many screw packages indicate the required driver bit. This can be a very helpful reference, especially when you are starting.
Using Driver Bits Effectively
Using driver bits effectively means more than just matching the bit to the screw. It also means using the proper technique to ensure a secure and reliable hold. Applying even pressure and maintaining the right speed are essential. You also need to control the drill’s torque setting. Using the correct technique prevents damage to the screw and the material you are working with. Proper technique saves time and ensures a professional finish. It can also help to lengthen the life of your driver bits.
- Apply Even Pressure: Press firmly and steadily on the drill to maintain contact with the screw head.
- Use the Right Speed: Start slowly and increase the speed as needed. Too much speed can strip the screw head.
- Set the Torque: Many drills have a torque setting. Choose the right setting to avoid over-tightening the screw and damaging the material.
- Drive at a Straight Angle: Always drive the screw in at a 90-degree angle to the surface. This ensures a secure hold.
Comparing Drill Bits and Driver Bits
Drill bits and driver bits have very different functions, even though both are attached to drills. Drill bits create holes, while driver bits drive screws. Understanding the key differences can help you use the right tool for each task and improve your work. One of the main differences is their function; another is their design. Drill bits have sharp cutting edges, while driver bits have shapes designed to engage with screw heads. The right tool will make the project easier and result in better work. Knowing the details ensures better outcomes.
| Feature | Drill Bits | Driver Bits |
|---|---|---|
| Function | Create holes | Drive screws |
| Tip Design | Sharp, pointed tip with cutting edges | Designed to fit screw heads (Phillips, slotted, etc.) |
| Material | Made of hardened steel, carbide, or other materials suited for drilling | Made of hardened steel, often with a coating to increase durability |
| Common Use | Creating holes for screws, bolts, and other fasteners | Fastening screws into wood, metal, or plastic |
The table provides a simple way to visualize the differences between the two types of bits. This helps clarify their applications.
Functionality: Drilling vs. Driving
The primary difference lies in their function. Drill bits are used for making holes, while driver bits are designed to drive screws. One creates the necessary space for a fastener, and the other secures the fastener in place. The purpose dictates the design. You wouldn’t use a drill bit to drive a screw, nor would you use a driver bit to drill a hole. Understanding this basic difference is key to a successful project.
Design: How They Are Different
The design of the bit is what separates them. Drill bits have sharp, angled cutting edges to remove material and create a hole. Driver bits have a shaped tip to grip the head of a screw and transfer the rotational force. The specific shapes of driver bits are varied, with each designed to fit different types of screw heads. The designs reflect their respective functions.
Applications: When to Use Each
Knowing when to use each is important. Use drill bits when you need to make a hole for a screw or bolt to pass through. Driver bits should be used when you want to screw something in. You’ll typically use both on the same project. You’ll use a drill bit to make a pilot hole, and then use a driver bit to fasten the screw. This is common when working with wood.
- Building a Shelf:To build a shelf, you’d first use a drill bit to make pilot holes in the wood where the screws will go. Then, you’d use a driver bit to screw the shelf supports to the main board. This process combines both bits to achieve a finished product.
- Assembling Furniture:When putting together flat-pack furniture, you’ll use a drill bit to make the holes for screws (if they are not pre-drilled). After that, you’ll use the driver bit to drive the screws in. This ensures the furniture is correctly assembled.
How to Select the Right Bit for the Job
Selecting the right bit is essential for any project. You must consider the material you are working with and the task at hand. Selecting the right bit will also depend on the type of screw or bolt you plan to use, as well as the size of the hole you need to create. Properly matching the bit to the job will ensure a professional finish, prevent damage, and make the process easier. Knowing how to select the right bit will reduce the chances of errors and improve your skills.
Matching Bit to Material
The material you’re working with should dictate the type of bit you choose. Harder materials like metal need a metal drill bit, while softer materials like wood can use a wood bit. Using the right bit for the material will make the drilling or driving process much smoother. If you use the wrong bit, it might not cut efficiently, and the bit could even break. A mismatched bit can also damage the material. For example, if you are drilling into metal, select a high-speed steel bit, while wood projects will be best with a twist drill bit.
Matching Bit to Screw Type and Size
The screw you choose will determine the type of driver bit you need. The screw head will determine the correct bit. The size of the screw will dictate the hole size created by a drill bit. Knowing the screw type ensures a proper fit and minimizes the risk of stripping the screw head. For example, a Phillips head screw requires a Phillips head driver bit. The size of the hole must match the screw’s diameter. Correct matching ensures a secure hold and a professional finish.
Considering the Task and the Outcome
Think about what you’re trying to achieve. Do you need to make a hole, or do you need to drive a screw? Will the hole need to be wide or very precise? If the job is about drilling, consider the depth and diameter of the hole. If it involves driving screws, think about the level of torque required and the aesthetics. Considering the task and the outcome helps you choose the most appropriate bit for the best result. Consider what is necessary to finish the job correctly.
Advanced Techniques and Tips
Once you are comfortable with the basics, you can move onto advanced techniques that will improve the quality of your work. These involve controlling your drill speed, using the correct pressure, and more. Being skillful in these advanced techniques helps to avoid common issues. Also, it ensures the best possible outcome. Understanding how to execute advanced techniques will make your projects look more professional and make the process easier.
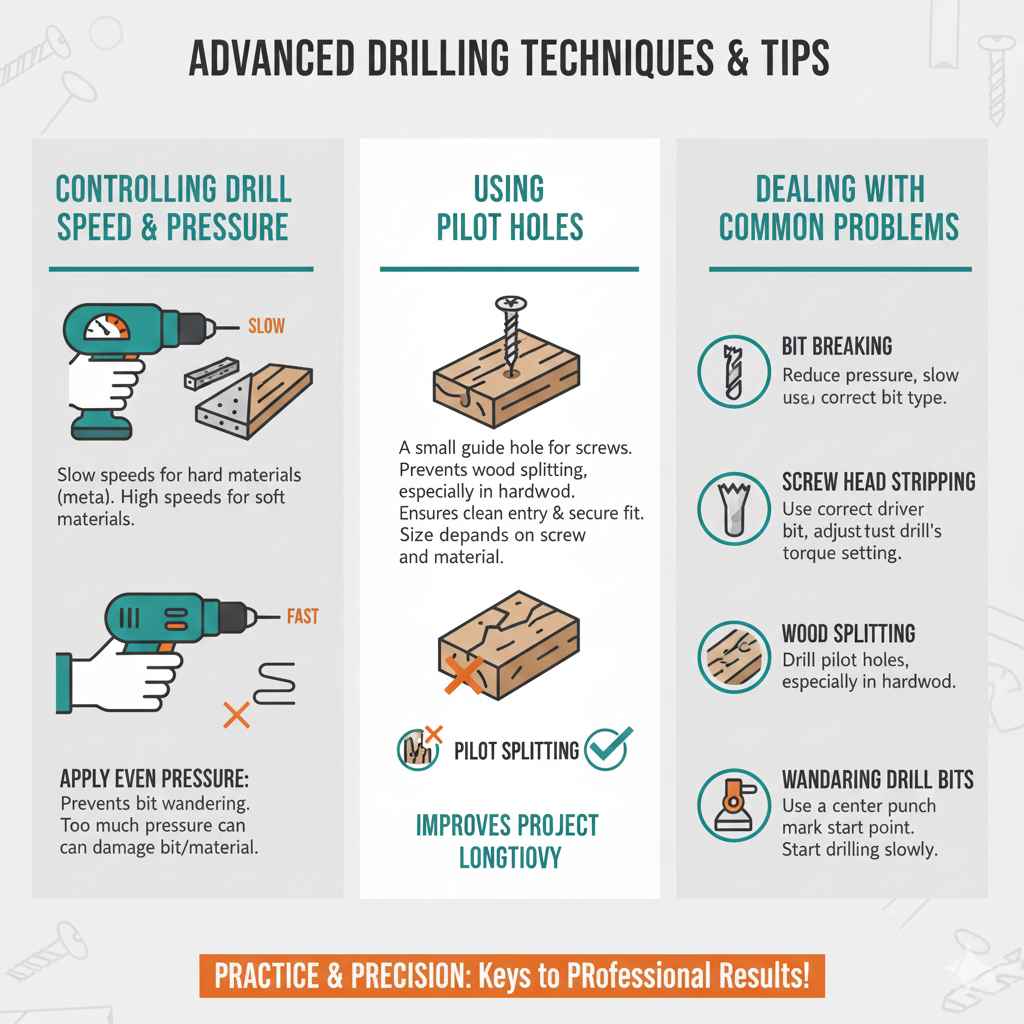
Controlling Drill Speed and Pressure
Knowing how to control drill speed and pressure is key to successful drilling. Slow speeds are best for hard materials like metal, while higher speeds are often suitable for soft materials like wood. Applying even pressure will stop the bit from wandering. Too much pressure can damage the bit or the material, while too little can make drilling difficult. Adjusting the speed and applying the right pressure is a skill that comes with practice, and it’s a key step to preventing errors. Being able to correctly control these two aspects is vital.
Using Pilot Holes
A pilot hole is a small hole drilled before inserting a screw. It helps to guide the screw, prevents splitting the wood, and makes driving the screw easier. The pilot hole size depends on the screw size and the material. A pilot hole is especially important when working with hardwood, which tends to split easily. Creating a pilot hole makes it easier to drive the screw. It also improves the look and the longevity of the project.
Dealing with Common Problems
Even with experience, there can be problems. The bit might break, the screw head might strip, or the material might split. Knowing how to solve these problems will save you time and frustration. If the bit breaks, try slowing down the drill speed or using a better bit. If the screw head strips, try a different bit or a manual screwdriver. If the wood splits, use a pilot hole. You will find that these problems can be solved with the right techniques.
- Bit Breaking: If the bit breaks, it could be due to excessive pressure, too high of a speed, or using the wrong type of bit for the material. Reduce pressure, slow the speed, and make sure you’re using the correct bit.
- Screw Head Stripping: If the screw head strips, it can be due to using the wrong driver bit or applying too much torque. Always use the right bit, and adjust the torque setting on your drill if available.
- Wood Splitting: This can be avoided by using pilot holes, especially when working with hardwood. Drilling a pilot hole allows the screw to enter the wood without splitting it.
- Wandering Drill Bits: If the drill bit wanders, it’s often due to starting the hole at an angle. To prevent this, use a center punch to mark the starting point, and start drilling slowly.
Frequently Asked Questions
Question: What’s the difference between a twist drill bit and a spade bit?
Answer: A twist drill bit is designed for general-purpose drilling in various materials, while a spade bit is used for quickly drilling large-diameter holes in wood.
Question: Can I use a driver bit for drilling?
Answer: No, driver bits are designed to drive screws. They do not have the cutting edges needed to create holes. Using them can damage both the bit and the material.
Question: What do I do if my screw head strips?
Answer: If the screw head strips, try using a different driver bit or a manual screwdriver. If that doesn’t work, you might need to use a screw extractor.
Question: How do I know what size drill bit to use for a screw?
Answer: As a general guide, the drill bit diameter should be slightly smaller than the core diameter of the screw. A pilot hole may be all that is needed.
Question: How can I make sure my drill bit doesn’t wander when I start drilling?
Answer: To prevent the drill bit from wandering, use a center punch to mark the starting point. Then, start drilling slowly and apply gentle pressure.
Final Thoughts
Now you understand the differences between Drill Bits vs Driver Bits: Simple Guide. These tools are often confused, but each has a specific job in any project. Drill bits make holes, and driver bits drive screws. You can now use the right bits for the right tasks! Remember that the material and screw type dictate which bits to choose. With a little practice, you’ll be able to work with these tools like a pro. With the right techniques and a little experience, you can get through any project. Keep practicing, and don’t be afraid to try new things!