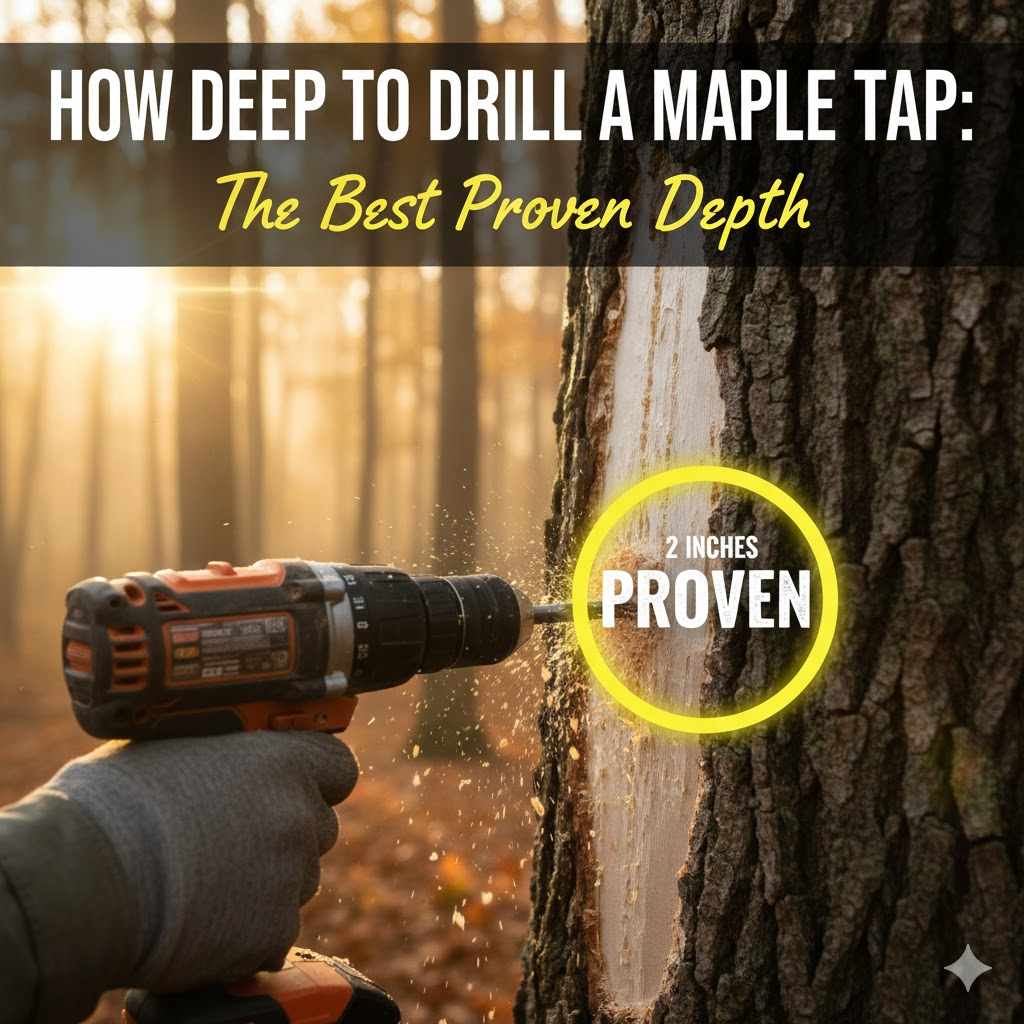
How Deep To Drill A Maple Tap: The Best Proven Depth
For most healthy maple trees, drill the tap hole 1.5 to 2 inches deep into the white wood, past the bark. For larger, older trees with thick bark, you might need to go as deep as 2.5 inches. The goal is to tap into the sapwood without hitting the tree’s core.
Tapping a maple tree for the first time feels a bit like magic. It’s a wonderful tradition that connects us to nature and ends with delicious, golden syrup. But one question can make even the most excited beginner pause: how deep do I drill? Drill too shallow, and you get a disappointing trickle of sap. Drill too deep, and you risk harming the very tree you want to thank.
Don’t worry. This is one of the most common questions, and there’s a simple, proven answer. I’m here to walk you through it, step by step. We’ll take the guesswork out of tapping so you can drill with confidence and get that sap flowing. Together, we’ll make sure you do it right for both your bucket and the tree.
Why Tap Depth is So Important
Getting the drilling depth right is the key to a successful maple sugaring season. It’s a balance between getting a great sap flow and protecting the long-term health of your tree. When you understand what’s happening inside the trunk, the “why” behind the depth makes perfect sense.
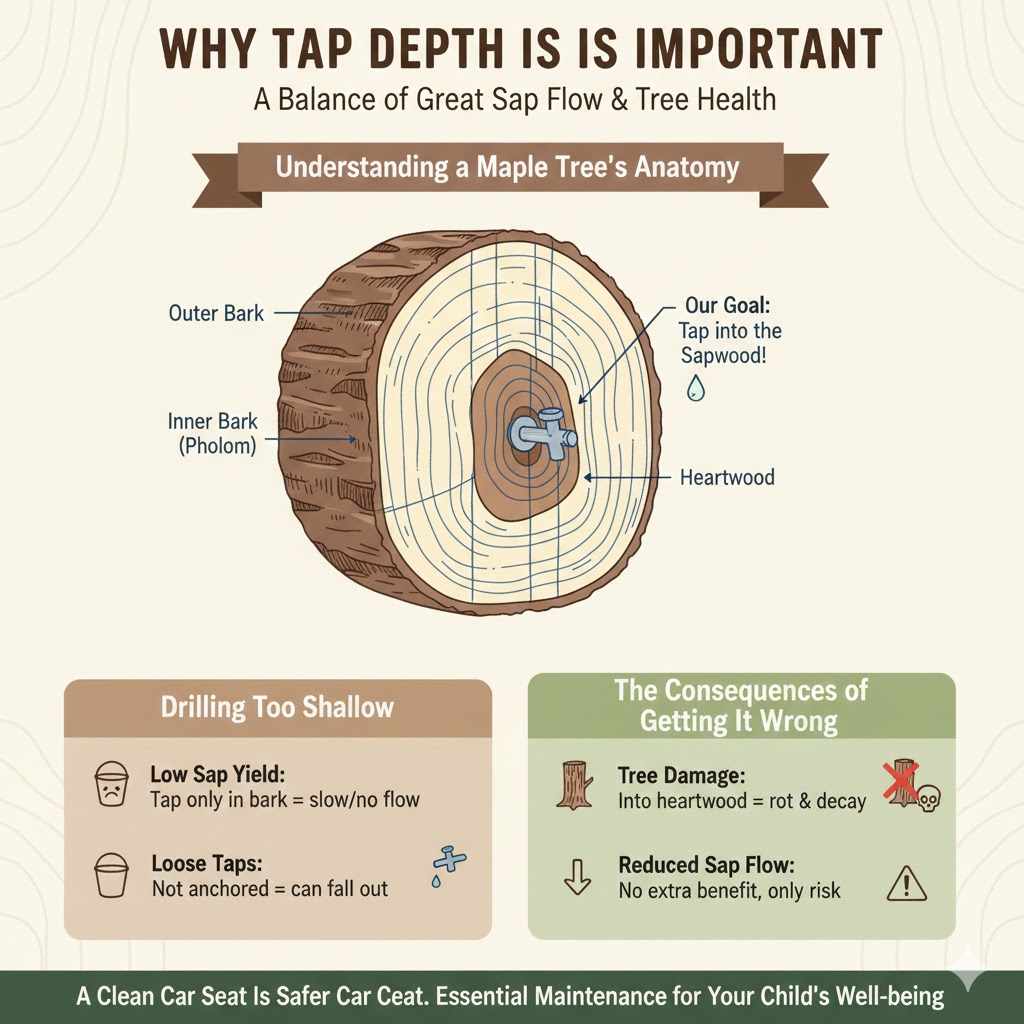
Understanding a Maple Tree’s Anatomy
Think of a maple tree trunk as being made of several layers, like an onion. For tapping, we only care about a few of them:
- Outer Bark: This is the tree’s tough, protective skin. Its thickness varies a lot depending on the tree’s age and species. This layer doesn’t produce sap.
- Inner Bark (Phloem): Just inside the rough outer bark, this layer carries sugars from the leaves down to the roots for storage.
- Sapwood (Xylem): This is the jackpot! The sapwood is a network of woody fibers that transport water and nutrients (the sap) from the roots up to the branches and leaves. This is the layer we need to reach with our tap.
- Heartwood: This is the dense, non-living center of the tree. It provides structural support but doesn’t transport sap. Drilling into the heartwood can introduce decay and permanently wound the tree.
Our goal is to drill through the outer and inner bark and place the tap securely within the sapwood. The sap flows best in the outermost layers of the sapwood, which is why we don’t need to drill all the way to the center of the tree.
The Consequences of Getting It Wrong
Drilling might seem simple, but the wrong depth can cause problems for both you and your tree.
Drilling Too Shallow:
- Low Sap Yield: If your tap is only in the bark or just barely grazes the sapwood, you won’t get much sap. The flow will be slow and might stop altogether, leaving you with an empty bucket and a lot of frustration.
- Loose Taps: A tap that isn’t anchored firmly in the sapwood can wiggle loose and fall out, especially on a windy day or as the bucket gets heavier.
Drilling Too Deep:
- Tree Damage: This is the biggest concern. Drilling past the sapwood and into the heartwood creates a wound that the tree cannot easily heal. This non-living wood is vulnerable to bacteria and fungi, which can lead to rot and decay over time.
- Reduced Sap Flow: Counterintuitively, drilling deeper doesn’t mean more sap. The most productive sap-carrying vessels are in the first couple of inches of sapwood. Drilling deeper provides no extra benefit and only adds risk.
The Proven Depth: Finding the Sweet Spot
So, what’s the magic number? The universally accepted standard is to drill 1.5 to 2.5 inches deep into the wood itself, not including the bark.
For a beginner, the safest and most effective target is 1.5 inches. This depth is almost always enough to get you firmly into the productive sapwood on most backyard sugar maples, red maples, or silver maples without risking damage.
How Tree Size Affects Drilling Depth
The main reason for the depth range (1.5 to 2.5 inches) is the variation in tree size and bark thickness. An old, mature maple tree can have very thick, shaggy bark, while a younger tree will have thinner, smoother bark.
You need to drill through the bark first before your drill bit even touches the sapwood. The 1.5-inch measurement begins where the wood starts. A good rule of thumb is to look for light-colored wood shavings. Once you see them, you know you’re in the sapwood, and you can drill another 1.5 inches from that point.
Here’s a simple table to help you decide how deep to go based on the tree’s diameter.
| Tree Diameter (at 4.5 ft high) | Typical Bark Thickness | Recommended Drilling Depth (into wood) | Total Depth (Bark + Wood) |
|---|---|---|---|
| 10-15 inches | Approx. 0.5 inch | 1.5 inches | Approx. 2.0 inches |
| 16-20 inches | Approx. 0.75 inch | 1.5 – 2.0 inches | Approx. 2.25 – 2.75 inches |
| 21+ inches | Approx. 1.0 inch or more | 2.0 – 2.5 inches | Approx. 3.0 – 3.5 inches |
Remember, these are guidelines. When in doubt, always aim for the shallower end of the range. A 1.5-inch deep tap in the sapwood is plenty for a great harvest.
Tools You’ll Need for the Job
Before you head out to the trees, let’s gather our tools. You don’t need anything fancy, just a few simple items to do the job correctly and safely.
- Cordless Drill: A battery-powered drill gives you the freedom to move around your property without worrying about extension cords.
- Tapping Drill Bit: This is a special bit designed for tapping. The most common size today is 5/16-inch, which creates a smaller, healthier wound for the tree than older 7/16-inch bits. Always match your bit size to the spiles (taps) you are using.
- Marking Tool: A piece of masking tape or a drill stop collar is essential for marking the correct depth on your drill bit.
- Hammer or Mallet: You’ll need this to gently set the tap into the tree. A small tapping hammer is ideal, but a regular household hammer works too—just use a light touch!
- Spiles (Taps): These are the spouts that you insert into the tree. Modern spiles are usually made of food-grade plastic or stainless steel.
- Collection System: This can be traditional buckets with lids, or more modern plastic bags that hang from the spile.
- Measuring Tape: To measure the diameter of your trees and ensure they are large enough to tap.
A Step-by-Step Guide to Drilling the Perfect Tap Hole
Ready to get started? Let’s walk through the process together. Take your time, and enjoy the experience of connecting with your trees.
Step 1: Choose a Healthy, Mature Tree
The first step is picking the right tree. Look for a maple tree that is at least 10 inches in diameter (about 31 inches in circumference). You can measure this easily with a flexible measuring tape at about 4.5 feet off the ground (chest height). According to the University of New Hampshire Extension, tapping trees smaller than this can stress them.
Choose a tree that looks healthy and strong, with no signs of major damage, disease, or decay. A full, well-formed crown is a good indicator of a healthy tree.
Step 2: Find the Best Spot on the Trunk
Once you’ve selected your tree, find the best place to drill. Ideally, you want to:
- Tap on the South Side: The south-facing side of the tree warms up first in the sun, which can encourage the sap to run earlier and more strongly.
- Avoid Old Tap Holes: Look for discolored circles or scars from previous years. You should drill at least 6 inches to the side and 24 inches above or below an old tap hole.
- Stay Clear of Burls and Branches: Find a section of smooth, healthy-looking bark away from large branches, burls, or any damaged areas. This ensures your drill goes in clean.
Step 3: Mark Your Drill Bit
This is the most important step for getting the depth right. Take your 5/16-inch drill bit and a ruler or measuring tape. Measure 1.5 inches from the tip of the bit and wrap a piece of brightly colored masking tape or electrical tape tightly around it. Alternatively, you can use a stop collar that clamps onto the bit.
This marker is your visual guide. When you drill, you’ll stop as soon as the edge of the tape reaches the tree’s bark. This simple trick removes all guesswork and guarantees a perfect depth every time.
Step 4: Drill the Hole
Now it’s time to make the hole. Hold your drill so it is perpendicular to the tree trunk. To help the sap flow out easily, tilt the drill at a very slight upward angle—just enough so gravity will help the sap drip out of the spile rather than run back into the hole.
Start drilling with a steady, firm pressure. Don’t force it; let the drill do the work. Drill straight into the tree until your tape marker touches the bark. You should see light-colored wood shavings coming out of the hole. This is a great sign that you’ve reached the sapwood!
Step 5: Clean the Hole and Insert the Tap
Once you’ve drilled to the correct depth, pull the drill bit straight out without wiggling it. You might need to blow gently into the hole to clear out any remaining wood shavings. A clean hole allows the tap to seat properly and the sap to flow freely.
Take your spile and insert the tapered end into the hole. It should fit snugly. Now, take your hammer and give the spile a few gentle but firm taps. You want to seat it securely, but not hammer it in with all your might. Listen for the sound to change from a dull thud to a higher-pitched, solid “thwack.” That’s the signal that it’s seated perfectly against the wood. Over-hammering can crack the wood and cause leaks.
Step 6: Hang Your Bucket and Wait
You did it! Hang your bucket or attach your bag to the hook on the spile. If the conditions are right (below freezing at night and above freezing during the day), you might even see the first clear drops of sap begin to drip immediately. Now, all that’s left to do is wait for nature to do its thing and fill your buckets.
Common Mistakes and How to Avoid Them
Even with the best instructions, it’s easy to make a small mistake. Here are a few common pitfalls for beginners and how you can easily sidestep them.
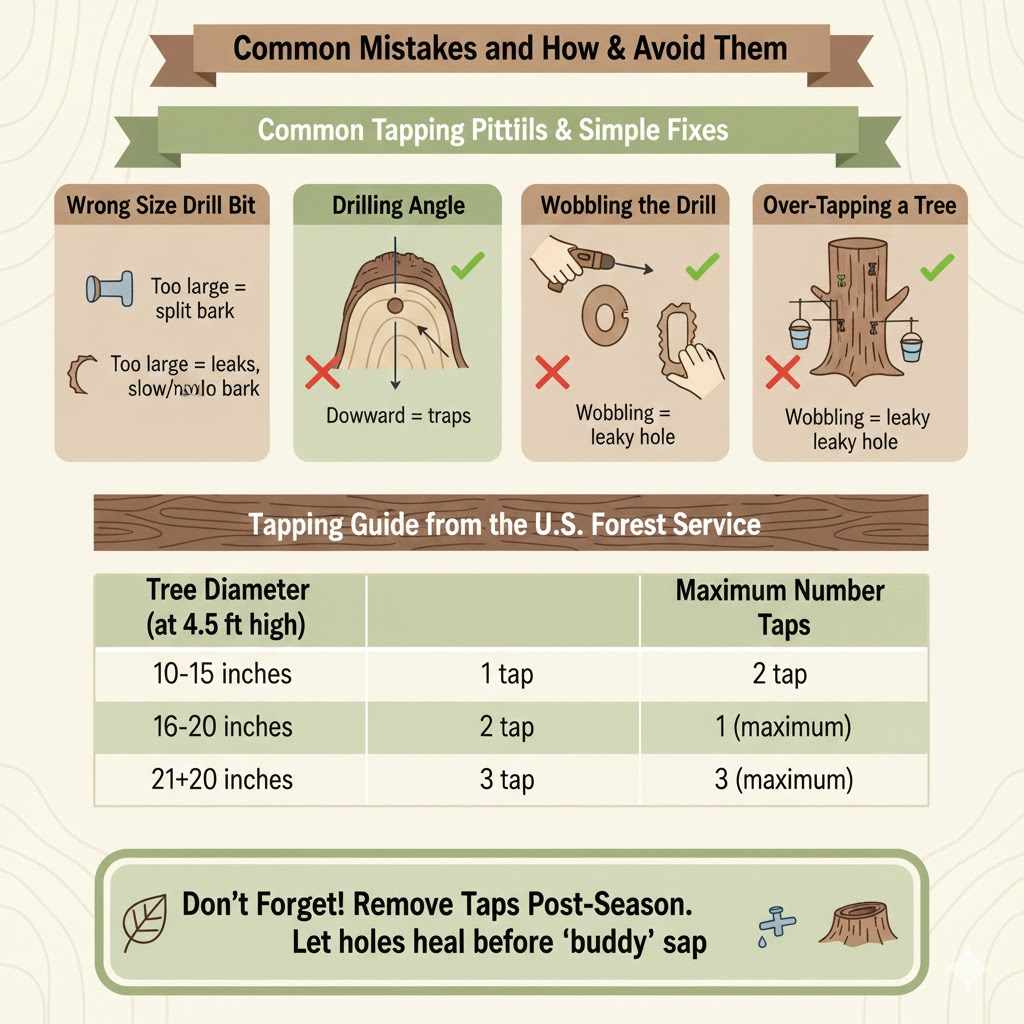
- Using the Wrong Size Drill Bit: Always match your drill bit to your spiles. A 5/16-inch spile needs a 5/16-inch bit. Using a bit that’s too large will create a leaky connection, and one that’s too small will require you to hammer the tap too hard, potentially splitting the bark.
- Drilling at a Downward Angle: A downward-sloping hole will trap sap, preventing it from flowing out. Always drill straight in or with a slight upward angle.
- Wobbling the Drill: Drilling a clean, round hole is key. Wobbling the drill as you go in or out can create an oblong hole, which will cause leaks around the spile. Keep a steady hand.
- Over-Tapping a Tree: It’s tempting to put lots of taps in a big, beautiful tree, but it’s important not to be greedy. A healthy tree can only support so many taps without being stressed. Use this guide from the U.S. Forest Service as a trusted standard.
Tree Diameter (at 4.5 ft high) Maximum Number of Taps 10-15 inches 1 tap 16-20 inches 2 taps 21+ inches 3 taps (maximum) - Forgetting to Remove Taps at the End of the Season: Once the weather warms and the tree buds begin to swell, the sap season is over. The sap will turn bitter or “buddy.” Be sure to remove your spiles promptly to allow the tap holes to begin healing over the summer.
Frequently Asked Questions (FAQ)
What size drill bit is best for tapping maple trees?
The modern standard is a 5/16-inch drill bit. This size creates a smaller wound that the tree can heal more quickly, and it has been proven to yield just as much sap as the older, larger 7/16-inch taps. Always buy spiles and a drill bit that match in size.
What happens if I drill too deep?
Drilling too deep, past the 2.5-inch mark, risks penetrating the heartwood at the center of the tree. Heartwood is non-living tissue, so damaging it opens the door for rot and disease to enter the structural core of the tree, which can cause long-term health problems.
Does tapping hurt the maple tree?
When done correctly on a healthy, mature tree, tapping is a sustainable practice that does not cause permanent harm. The tap hole is a small wound that the tree will naturally compartmentalize and heal. Following proper guidelines—like using the right size bit, not over-tapping, and drilling to the correct depth—ensures the tree stays healthy for generations to come.
When is the best time to tap maple trees?
The sap season, or “sugaring season,” typically runs from late winter to early spring. The ideal conditions are when nighttime temperatures drop below freezing (into the 20s F) and daytime temperatures rise above freezing (into the 40s F). This freeze-thaw cycle creates the pressure inside the tree that makes the sap flow.
Can I reuse the same tap hole next year?
No, you should never reuse an old tap hole. The tree spends the summer healing that wound, and it will no longer produce sap. Always drill a new hole each year, moving at least 6 inches horizontally and 24 inches vertically from any old holes.
What if no sap comes out after I tap the tree?
Don’t panic! It could just be the weather. Sap flow depends entirely on the right temperature cycle. If it’s too cold or too warm, the sap won’t run. Double-check that your tap is seated properly and isn’t leaking. If all looks good, just be patient and wait for a day with the perfect weather conditions.
What are the light-colored wood shavings I see when drilling?
That’s a great sign! Those light-colored, wet-looking shavings are from the sapwood. It’s confirmation that you have drilled through the darker bark and reached the sap-producing layer of the tree. This is exactly what you want to see.
Conclusion: Tap with Confidence and Enjoy the Sweet Reward
Tapping your own maple trees is a deeply rewarding experience that turns a cold winter into a season of sweet anticipation. And as you’ve learned, the question of “how deep to drill” has a simple and reliable answer: aim for 1.5 inches deep into the sapwood.
By marking your drill bit, choosing a healthy tree, and following a few simple steps, you can remove all the guesswork. You can drill with the confidence of knowing you’re not only setting yourself up for a successful harvest but also respecting and protecting the health of your trees.
So gather your tools, head outside on that first promising day, and enjoy the process. There’s nothing quite like the sound of the first plink, plink, plink of sap hitting the bottom of the bucket. Happy tapping!