How Does White Glue Work: Genius Tips
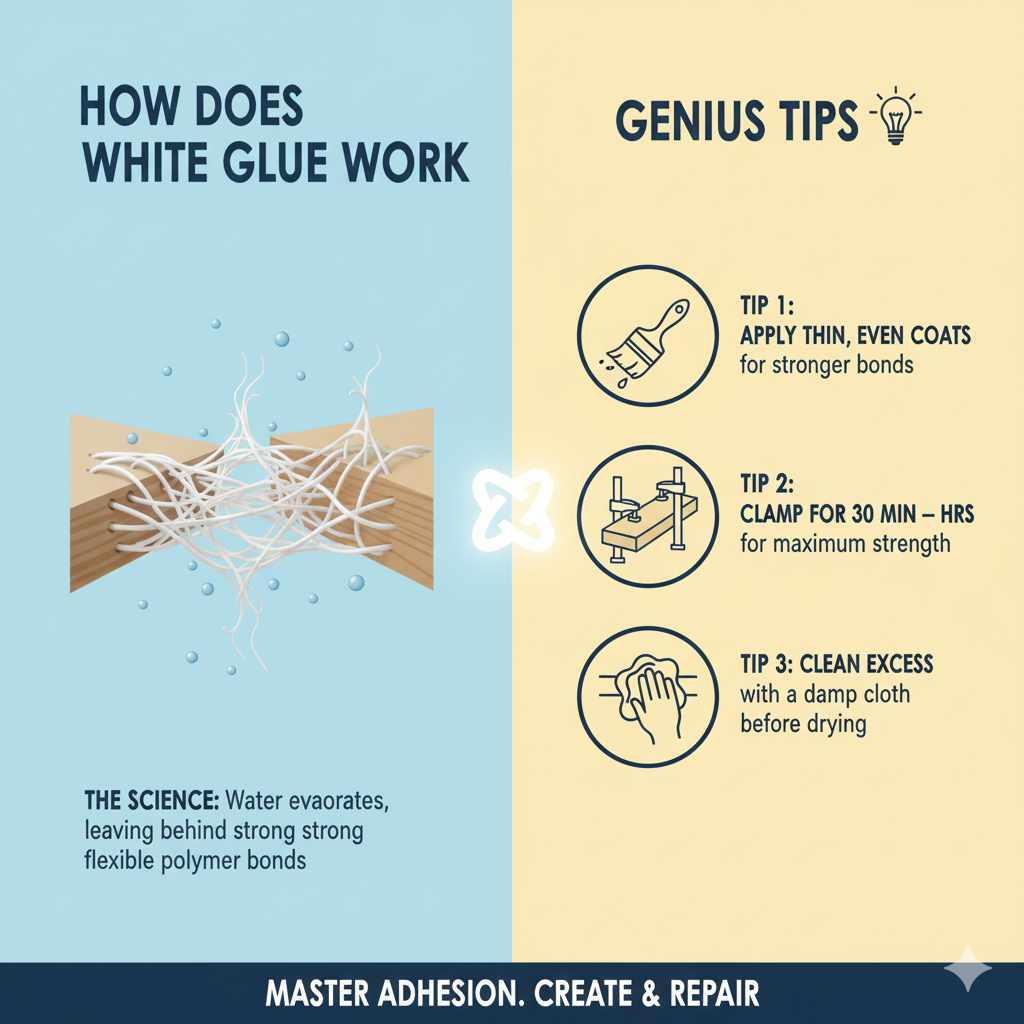
White glue works through a process of evaporation and adhesion, forming a strong bond as water leaves the glue and specialized polymers interlock with the surfaces being joined. It’s a chemical reaction where the liquid glue transforms into a solid, securing materials like wood, paper, and fabric.
So, you’ve got a project in front of you, maybe a quick fixer-upper or a fun craft, and you reach for that trusty bottle of white glue. It seems so simple, right? Just slather it on and stick things together! But have you ever stopped to wonder, scientifically speaking, how this everyday miracle actually happens? It’s not just magic; there’s some fascinating science happening right there in that plastic bottle. Understanding the “how” can make you a more confident crafter, ensuring your projects don’t just stick, but stick well. We’ll break down the simple science behind white glue and share some genius tips to get the best results every time. Let’s dive in!
The Incredible Science Behind White Glue
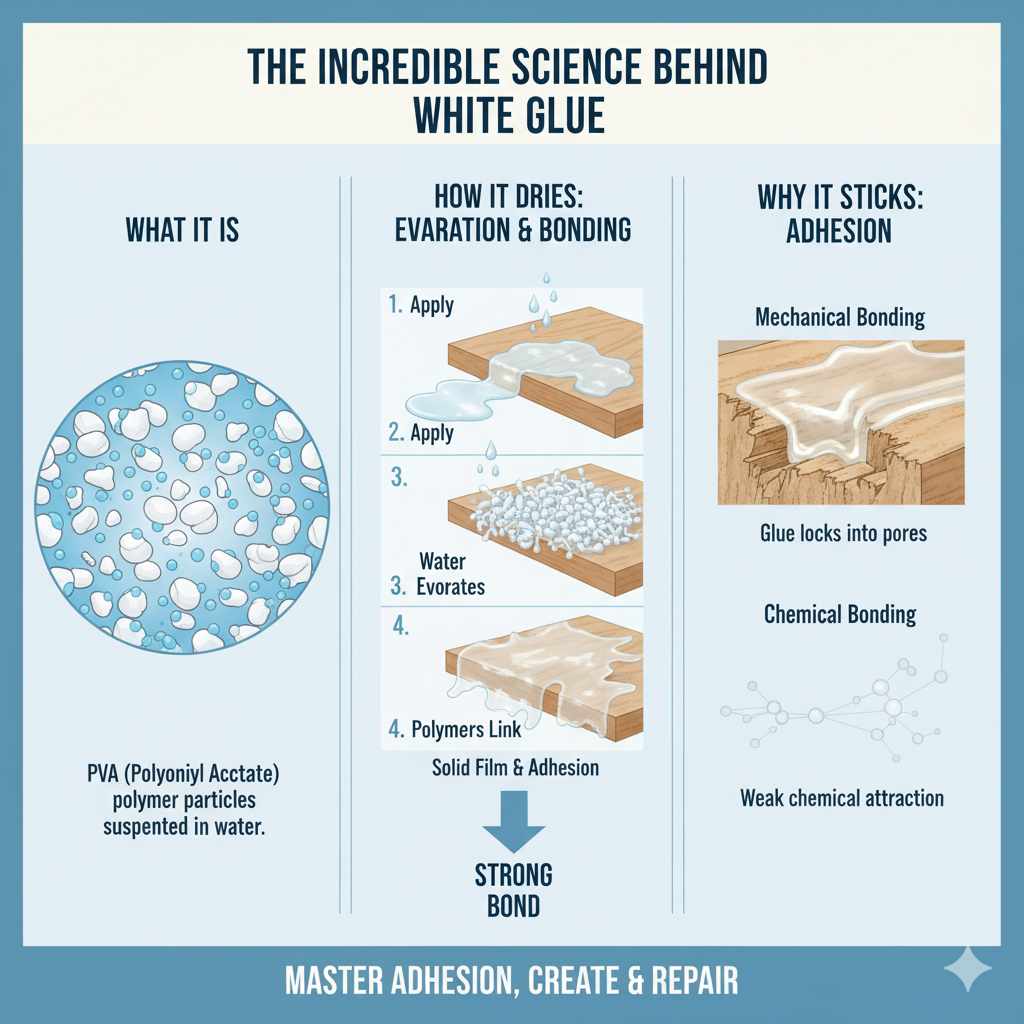
White glue, often called PVA (Polyvinyl Acetate) glue or school glue, is one of the most common adhesives we use. It’s versatile, affordable, and relatively safe, making it a favorite for countless DIY projects. But what’s really going on when you see two surfaces become one after applying it? It all comes down to evaporation and adhesion.
What is White Glue Made Of?
At its core, white glue is a liquid suspension of polymer particles. Think of it like tiny plastic beads floating in water. The main ingredient is Polyvinyl Acetate (PVA), a synthetic polymer that forms films. These polymers are suspended in water along with other ingredients like plasticizers (to keep it flexible), extenders (to bulk it up and control drying time), and tackifiers (to make it sticky).
When the glue is in its liquid state, the water acts as a carrier for these polymer particles. The particles are free to move around. This is why the glue is fluid and easy to spread.
The Evaporation Process: Drying and Bonding
The magic truly begins when you apply the glue and the water starts to disappear. This happens through evaporation, which is essentially the water turning into vapor and escaping into the air.
1. Spreading the Glue: When you spread white glue onto a surface, you create a thin layer.
2. Water Evaporates: As the glue is exposed to the air, the water begins to evaporate. This is sped up by air movement and warmth.
3. Polymers Come Together: As the water leaves, the suspended PVA polymer particles are no longer able to float freely. They get closer and closer together.
4. Film Formation: The particles begin to touch and fuse. They form a continuous, solid film. This film is the actual glue that creates the bond.
5. Adhesion: This newly formed polymer film has adhesive properties. It chemically and physically grips onto the surfaces it’s in contact with.
Think of it this way: Imagine a room full of tiny, bouncy balls (the polymer particles) swimming in water. As the water drains away, the balls bump into each other, then get squeezed together, and eventually form a solid, cohesive mass that sticks to the edges of the room.
The Role of Adhesion: Sticking Power Explained
Adhesion is the force of attraction between two different surfaces. For white glue, this happens in two main ways:
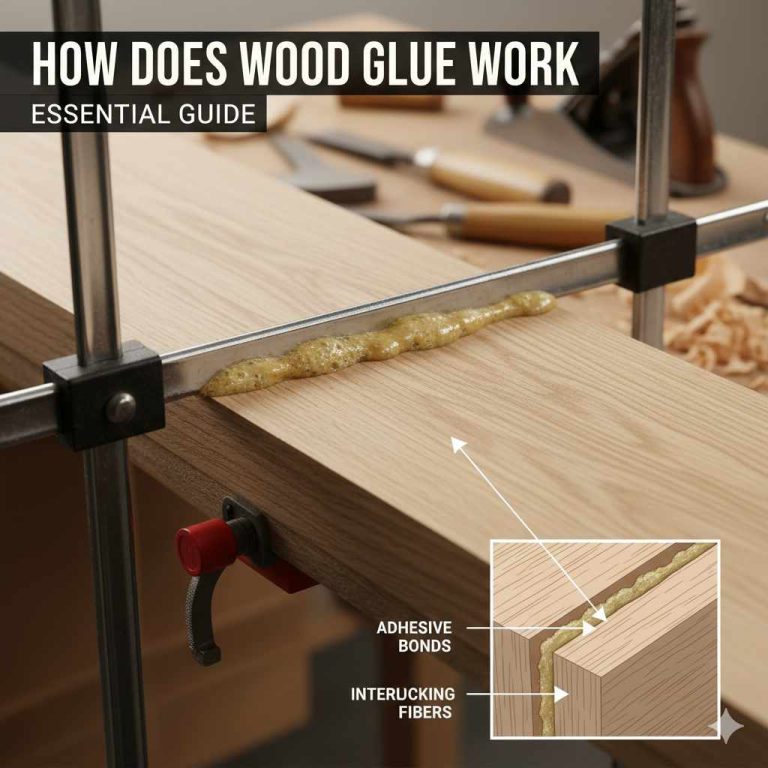
Mechanical Bonding: The liquid glue flows into the microscopic pores and irregularities of the surfaces being joined. As the glue dries and hardens, it physically locks into these tiny spaces, creating a strong mechanical interlock. This is especially important for porous materials like wood.
Chemical Bonding: The PVA polymers in the glue can also form weak chemical bonds with the molecules of the materials being glued. This adds to the overall strength of the bond.
The success of white glue relies heavily on the compatibility of the glue’s polymers with the surface materials. It works wonderfully on porous materials like wood, paper, and fabric because the glue can penetrate and grip them effectively.
Key Components of White Glue for Optimal Bonding
Understanding the main ingredients helps us appreciate its effectiveness and how to best utilize it.
Polyvinyl Acetate (PVA) Emulsion: This is the star player. It’s a water-based dispersion of tiny PVA polymer particles. When water evaporates, these particles coalesce (merge) to form a strong, flexible film.
Water: Acts as the carrier for the PVA particles, making the glue liquid and spreadable. Its evaporation is crucial for the bonding process.
Plasticizers: These are added to make the dried glue film flexible. Without them, the bond could become brittle and crack, especially with materials that might bend or move.
Tackifiers: These substances increase the “grab” or tackiness of the glue while it’s still wet. This means the surfaces can stick together immediately upon contact, giving you some working time to adjust them before the full bond sets.
Extenders: Often starches or clays, these are used to add bulk, control viscosity (thickness), and influence drying time, making the glue more economical and easier to work with.
When to Use White Glue (and When Not To!)
White glue is incredibly versatile for many common household and crafting tasks. Its ease of use and non-toxic nature make it a go-to for many.
Ideal Uses for White Glue:
Paper and Cardboard: Perfect for scrapbooking, model building, paper crafts, and general repairs.
Woodworking Projects (Light Duty): Excellent for simple wood assemblies, craft projects, and furniture repairs where the joint is not under significant stress. Think picture frames, small boxes, or jigs. For structural wood joints requiring high strength, stronger wood glues like Titebond II or III are often recommended.
Fabric Projects: Can be used for no-sew hems, fabric crafts, and temporary fabric adhesion. However, for items that will be washed frequently, specialized fabric glues are better.
Crafting: Its primary domain! Puppets, collages, school projects, and general creative endeavors.
Molding and Sculpting: Used in papier-mâché and some sculpting mediums.
When White Glue Might Not Be Your First Choice:
High-Stress Wood Joints: For load-bearing furniture, structural frame members, or anything that will experience significant pulling or bending forces, a dedicated woodworking glue like Titebond (available in different formulations for water resistance and strength) is a superior choice. You can find excellent options at reputable hardware stores or online retailers specializing in woodworking supplies.
Materials Requiring Waterproofing: Standard white glue is water-soluble. If your project will be exposed to moisture or used outdoors, you’ll need a waterproof or water-resistant adhesive.
Certain Plastics: White glue does not adhere well to all types of plastic, especially non-porous ones like polyethylene (e.g., water bottles) or polypropylene.
Heavy, Non-Porous Materials: For bonding glass, metal, or very smooth, non-porous surfaces, specialized adhesives like epoxy or super glues are generally more effective.
Choosing the right adhesive is key to a successful and lasting project. While white glue is a workhorse, knowing its limitations ensures you’re using the best tool for the job.
Genius Tips for Maximizing Your White Glue Bonds
Now that we know how it works, let’s talk about how to get the absolute best out of your white glue. These are the tricks I’ve learned over years of tinkering in the workshop that make a real difference.
Tip 1: Surface Preparation is King!
This is arguably the most critical step for any adhesive. For white glue, this means:
Cleanliness: Ensure surfaces are free from dust, dirt, grease, oil, or any residue. Wipe them down with a clean, damp cloth, and let them dry completely. For wood, a light sanding can also help create a better surface for the glue to grip.
Porosity Matters: White glue loves porous materials because it can soak in a little. If you’re gluing two non-porous surfaces, white glue might struggle.
Fit: For wood, make sure your pieces fit together snugly. Gaps are the enemy of glue!
Tip 2: Apply the Right Amount
Less is often more, but not always zero!
Thin, Even Coat: Apply a thin, consistent layer of glue. Too much glue can squeeze out excessively, create a mess, and even weaken the bond if it prevents the surfaces from coming into close contact.
Coverage: Ensure you have good coverage over the entire surface that will be joined. Don’t skimp, but don’t drown it.
“A Job For a Clamp” Rule: For wood, a common guideline is that if you can’t see a little bit of glue squeeze-out when you apply clamping pressure, you might not have used enough.
Here’s a quick comparison of glue application:
| Application Method | Pros | Cons | Best For |
|---|---|---|---|
| Too Little Glue | Less mess | Weak or no bond | Never use! |
| Thin, Even Coat | Good adhesion, minimal ooze | Requires careful spreading | Most projects, paper, light wood |
| Too Much Glue | Ensures coverage | Messy, can weaken bond if it prevents contact | When unsure, but be prepared for cleanup |
Tip 3: Apply Pressure and Clamp Properly
Glue needs pressure to work its best. As the water evaporates and the polymers coalesce, pressure forces them into intimate contact with the surfaces and consolidates the bond during the drying phase.
Clamps are Your Best Friends: For woodworking, clamps are essential. They hold the pieces tightly together while the glue cures. Even for paper crafts, pressing with your hands, a roller, or heavy books can suffice.
Even Pressure: Ensure the clamping pressure is evenly distributed across the glued joint. Clamps with wide pads are excellent for this. You can see widely recommended clamp types from organizations like the Forest Products Laboratory (FPL), a division of the U.S. Department of Agriculture, which provides extensive research on wood bonding.
Squeeze-Out: As mentioned, a little squeeze-out of glue is a good sign that you have enough glue and enough clamping pressure.
Tip 4: Understand Drying vs. Curing Time
This is where many beginners get tripped up.
Open Time: This is the window of time you have to apply the glue and position your pieces before it starts to set. White glue generally has a longer open time than some other adhesives.
Set Time: This is when the glue is dry enough that you can carefully remove the clamps. The bond will feel firm, but it’s not at its maximum strength yet.
Cure Time: This is the full period required for the glue to reach its maximum bond strength. For white glue, this can take 24 hours or more, especially in humid conditions.
Crucial Advice: Do not stress your glued joint before the full cure time. Even if it feels solid, it’s still developing its full strength. For most white glues, waiting at least 12-24 hours before subjecting a joint to significant stress is a good rule of thumb.
Tip 5: Manage Squeeze-Out Effectively
That little bit of glue that oozes out needs attention.
While Wet: For wood, many woodworkers prefer to leave the squeeze-out to fully cure, then simply scrape or sand it off. This is often the safest approach as trying to wipe it off too aggressively while wet can smear the glue and leave a mess you can’t get rid of.
Damp Cloth (Carefully): For paper or fabric crafts, where excess might be more noticeable, you can gently wipe away excess with a slightly damp cloth or a cotton swab immediately after clamping. Be careful not to pull glue away from the joint. For wood, this is generally NOT recommended.
Scraping: Once the glue is fully dry (hardened), you can often scrape hardened white glue squeeze-out from wood with a chisel, a razor blade, or sandpaper.
Tip 6: Optimize for Humidity and Temperature
Environmental factors play a role!
Humidity: High humidity means slower drying times because the air can hold more water vapor. In very humid conditions, consider using a fan to increase air circulation around the project.
Temperature: Warmer temperatures generally speed up evaporation. Very cold temperatures can slow drying and potentially inhibit the polymer’s ability to coalesce properly. Aim for room temperature (around 65-75°F or 18-24°C).
Tip 7: Store Your Glue Properly
To ensure your white glue remains effective for future projects:
Seal the Cap: Always screw the cap on tightly after use. Some glues come with a specially designed cap that prevents the tip from clogging; make sure that’s secured.
Avoid Freezing: Do not store white glue in freezing temperatures, as this can permanently damage the emulsion.
Store Upright: Store bottles upright in a cool, dry place.
Common Problems and Solutions with White Glue
Even with the best intentions, you might run into a snag. Here are some common issues and how to fix them.
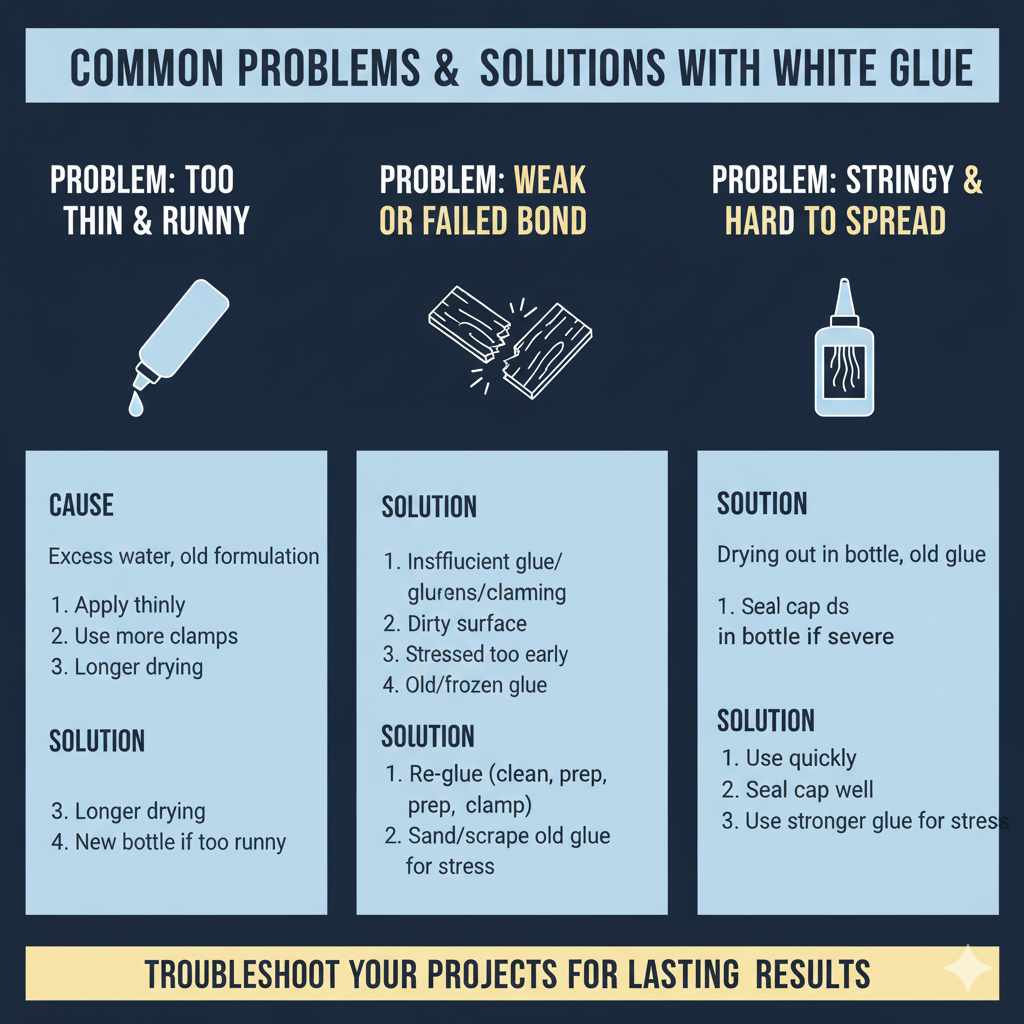
Problem: Glue is too thin and runny.
Cause: Often due to excessive water content or being an older formulation that has lost some of its solids.
Solution: Apply very thinly and use more clamps. Allow for longer drying time. If it’s consistently too runny for stable bonding, it might be time for a new bottle.
Problem: Bond is weak or fails.
Cause:
Insufficient glue.
Uneven glue application (gaps).
Not enough clamping pressure or time.
Surface contamination (dirt, grease).
Joint stressed before fully cured.
Glue is old or has been frozen.
Solution:
Re-glue the joint if possible, ensuring proper preparation, application, pressure, and cure time.
If the bond has broken completely, clean off all old glue residue thoroughly by sanding or scraping and start fresh.
For wood joints, consider using a stronger, water-resistant wood glue if the joint is under any strain.
Problem: Glue is stringy and difficult to spread.
Cause: The glue may be starting to dry out in the bottle, or the PVA particles are beginning to link up prematurely. This can happen if the cap isn’t sealed well or the glue is old.
Solution: Try to use it quickly, applying it to the project immediately. You might need to work faster. If it’s severely stringy, it’s likely past its prime and a new bottle is recommended.
Problem: White residue after gluing paper.
Cause: Often caused by excess glue applied or glue that has completely dried without being wiped.
Solution: For paper, you can often gently sand the dried glue residue with a fine-grit sandpaper (like 220 grit) or carefully scrape it off with a craft knife. Sometimes, a slightly damp cotton swab can lift fresh residue.
FAQs About How White Glue Works
Q1: How long does white glue take to dry completely?
A1: While white glue may feel dry to the touch in an hour or two, it typically takes 24 hours or more to fully cure and reach its maximum bond strength. This can vary based on humidity, temperature, and glue thickness.
Q2: Can I use white glue on fabric?
A2: Yes, white glue can be used on fabric for crafts and temporary fixes like no-sew hems. However, for items that will be washed frequently, you should use a specialized fabric glue designed to withstand laundering.
Q3: Is white glue waterproof?
A3: No, standard white glue is water-soluble. If your project will be exposed to moisture, you need to use a waterproof or water-resistant adhesive.
Q4: Why does white glue become weaker when wet?
A4: White glue’s bonding properties rely on the water evaporating and the PVA particles forming a solid film. When water is reintroduced after drying, it can re-emulsify the PVA, causing the bond to soften or break down.
Q5: Can I speed up the drying process for white glue?
A5: Yes, you can speed up drying by increasing air circulation (using a fan), increasing temperature (within reason, avoiding excessive heat that could damage the material), and ensuring the glue is applied in a thin layer.
Q6: How do I clean up dried white glue from wood?
A6: Dried white glue on wood can often be carefully scraped off with a sharp chisel or a razor blade held at a low angle. Sanding with medium to fine-grit sandpaper will also remove it.
Q7: Is it okay to use old white glue?
A7: It depends on how old it is and how it was stored. If the glue is very thick, clumpy, has separated significantly, or no longer feels sticky when applied, it’s best to get a new bottle for reliable results.
Conclusion: Confident Gluing Starts with Understanding
So there you have it! White glue isn’t just a simple liquid; it’s a beautifully engineered adhesive that works through the clever science of evaporation and polymer coalescence. By understanding this process, you’re already ahead of the game. Remember to prepare your surfaces meticulously, apply glue evenly, use your clamps wisely, and be patient for that full cure.
With these insights and our genius tips, you can approach your next project with confidence, knowing that your white glue bonds will be stronger, more reliable, and more beautiful. Whether you’re a seasoned crafter or just starting out with a simple repair, mastering the basics of adhesives like white glue will elevate your DIY endeavors. Happy making, and happy gluing!