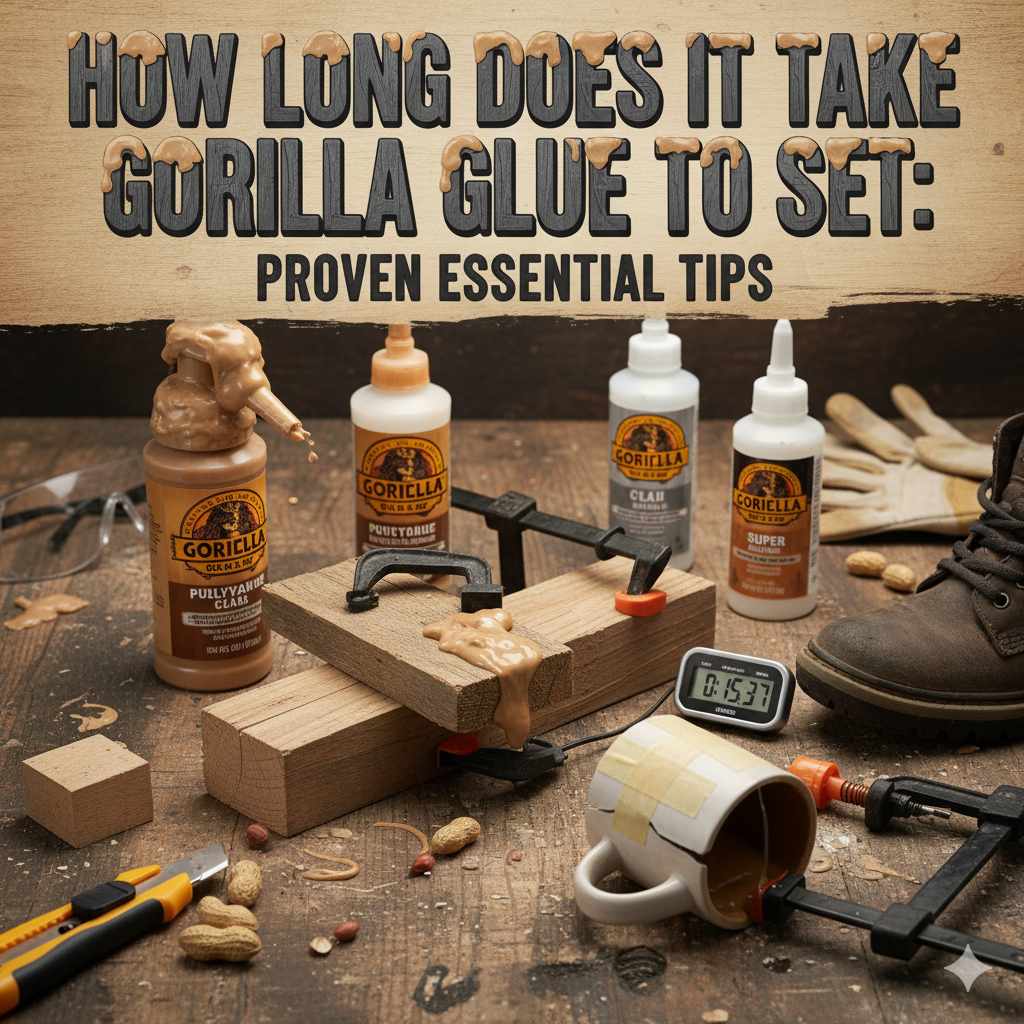
How Long Does It Take Gorilla Glue to Set: Proven Essential Tips
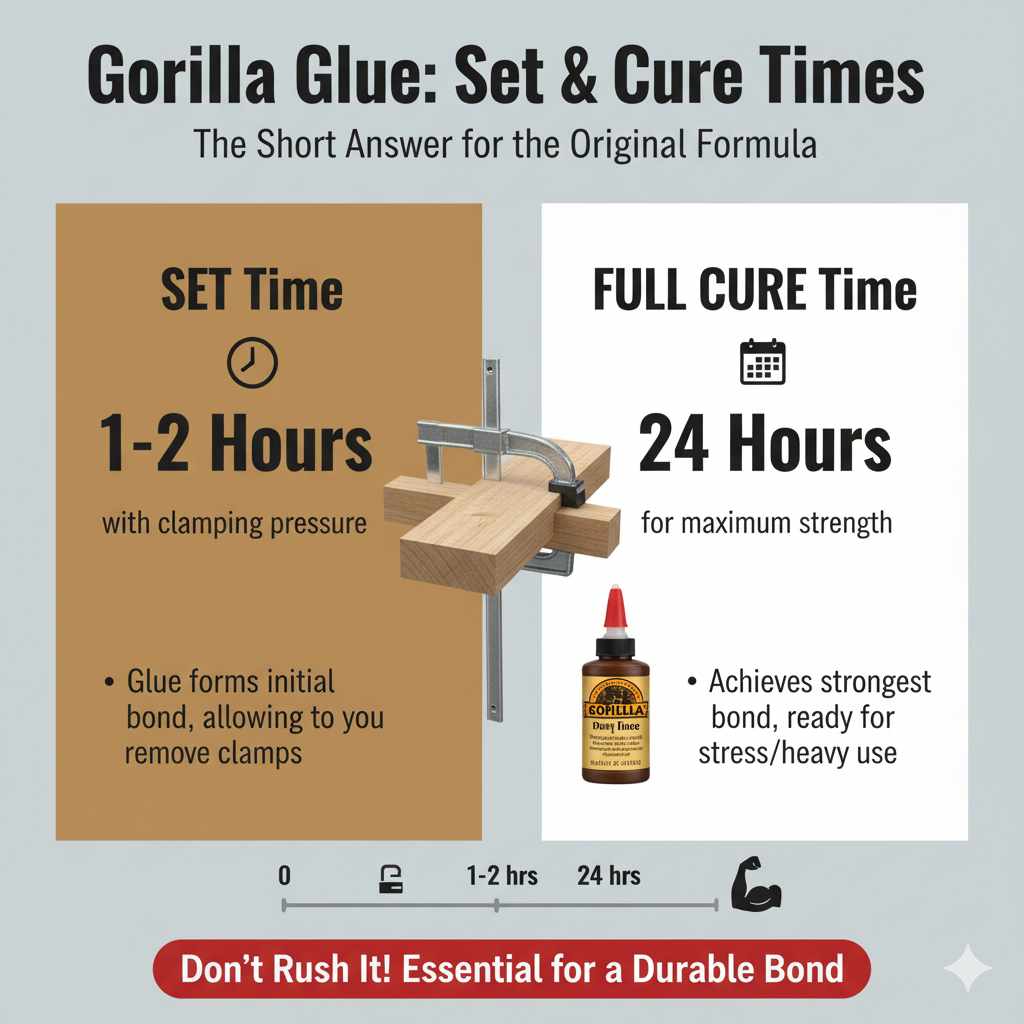
Gorilla Glue typically takes 24 hours to cure fully, but you should clamp it for 1-2 hours for initial bonding. The exact time depends on the specific Gorilla Glue product, humidity, and temperature.
Hey there, DIY enthusiasts and fellow woodworkers! Md Meraj here, your friendly guide to making those home projects shine. Ever reached for that trusty bottle of Gorilla Glue, mixed it up, and then found yourself staring at it, wondering, “Okay, but how long does this actually take to set?” It’s a common question, and honestly, a super important one for getting that strong, reliable bond we all want. Waiting too long can be frustrating, and not waiting long enough can mean a weak joint. Don’t worry, though! Today, we’re going to break down exactly how long Gorilla Glue needs to do its thing, so you can plan your projects with confidence and get back to creating!
Understanding Gorilla Glue: It’s More Than Just “Glue”
Gorilla Glue isn’t your average adhesive. It’s known for its incredible strength, versatility, and that signature foaming action that expands to fill gaps and create a rock-solid bond. This is thanks to its polyurethane base. When exposed to moisture (yes, even the tiny bit in the air!), it initiates a chemical reaction that causes it to expand and harden. This expansion is what gives it its power, but it also means we need to pay attention to the setting times.
Knowing the difference between “set time” and “cure time” is key.
- Set Time: This is when the glue is no longer liquid and won’t easily move or ooze. It’s strong enough to hold things together without immediate support, but it’s still gaining strength. For most Gorilla Glues, this is when you can typically remove clamps.
- Cure Time: This is the total time it takes for the glue to reach its maximum strength. Even after it’s set and you’ve removed the clamps, it’s still working and getting tougher. For Gorilla Glue, a full cure usually means waiting a full 24 hours.
How Long Does It Take Gorilla Glue to Set? The Short Answer
For most applications of the original Gorilla Glue (the brown, thick one), you’ll want to clamp the pieces together for about 1-2 hours. This is the “set” time. After this initial clamping period, the glue has bonded enough that it doesn’t need that pressure to stay in place. However, for the glue to reach its ultimate, super-strong “cure,” you should wait a full 24 hours.
This 24-hour cure time is essential for achieving the strongest possible bond, especially for projects that will face stress or heavy use. Rushing this can lead to a weaker joint that might fail later on.
Factors Influencing Gorilla Glue Setting Time
Gorilla Glue’s setting time isn’t a one-size-fits-all situation. Several factors play a role. Understanding these will help you get the best results:
1. Specific Gorilla Glue Product
Gorilla Glue offers a range of products, and they each have slightly different properties and setting times. It’s crucial to check the packaging for the specific product you’re using.
- Original Gorilla Glue: This is the classic. It requires moisture to work. Expect clamp times around 1-2 hours and a full cure of 24 hours.
- Gorilla Wood Glue: This is a favorite for woodworking. It has a bit of a different formulation, often with a faster initial set. Clamp times can be around 30-60 minutes, with a full cure in 24 hours.
- Gorilla Super Glue (Cyanoacrylate): This is a completely different beast! Super glues set very quickly, often in seconds, and reach full strength in minutes to hours, not a full day. Always read the label carefully for super glue.
- Gorilla Heavy Duty Construction Adhesive: These are designed for larger projects and have longer working and setting times, often measured in hours.
Always refer to the specific product instructions on the bottle or tube!
2. Temperature
Warmer temperatures generally speed up chemical reactions, including the curing process of Gorilla Glue. Colder temperatures will slow it down.
- Ideally, you want to work in a temperature range between 50°F and 90°F (10°C and 32°C).
- In cooler conditions (below 50°F or 10°C), it might take longer for the glue to set and cure fully. You might need to extend your clamping time.
- Very high temperatures can sometimes cause the glue to foam too rapidly, potentially leading to a less controlled bond.
3. Humidity
Humidity is a critical component for original Gorilla Glue. Since it needs moisture to expand and cure, higher humidity levels can speed up the setting process. Lower humidity levels will slow it down.
- If you’re in a very dry environment, you might need to lightly mist one of the surfaces with water before applying the glue to ensure proper activation.
- Conversely, extremely high humidity might cause the glue to foam a bit more aggressively.
You can find helpful resources on humidity and its effects on materials from organizations like the U.S. Environmental Protection Agency (EPA), which discusses indoor air quality and moisture control.
4. Surface Preparation
While not directly affecting the chemical setting time, proper surface preparation is crucial for the structural integrity of the bond. Clean, dry, and properly fitted surfaces allow the glue to do its job effectively. Degreasing and sanding surfaces can also improve the bond strength, meaning the glue will hold better even during the setting phase.
5. Amount of Glue Used
Using too much glue can lead to excessive foaming, which might require more cleanup and can sometimes compromise the bond if it pushes parts apart. Too little glue means an incomplete bond. Applying a thin, even layer is usually best.
Step-by-Step: Using Original Gorilla Glue for a Strong Bond
Let’s walk through using the classic Original Gorilla Glue, step-by-step. This is my go-to for repairs and projects where I need serious strength.
- Prepare Your Surface: Make sure the surfaces you’re bonding are clean, dry, and free of dust, grease, or any loose material. For very smooth surfaces, a little light sanding can help too.
- Apply the Glue: For the original Gorilla Glue, you need to add a little moisture. Lightly mist one of the surfaces with water. Then, apply a small amount of glue to the other surface. Remember, it foams up, so less is more!
- Bring Surfaces Together: Firmly press the two surfaces together.
- Clamp Securely: This is where that 1-2 hour clamping time comes in. Use clamps, tape, or weights to hold the pieces tightly together. Ensure there are no gaps. This holds the pieces while the glue foams and hardens.
- Wipe Away Excess Foam (Optional but Recommended): As the glue sets, foam will likely ooze out of the joints. You can carefully wipe this away with a damp cloth while it’s still wet and pliable. Once it dries, it becomes much harder to remove.
- Wait for Initial Set: Keep the pieces clamped for at least 1-2 hours. For critical joints, I often leave them clamped longer, just to be safe.
- Remove Clamps: Once the initial setting has occurred, you can usually remove the clamps. The glue will be firm to the touch.
- Allow to Fully Cure: This is the most important part for maximum strength! Let the bonded item sit undisturbed for a full 24 hours to achieve its maximum bond strength. Avoid putting stress on the joint during this time.
For cleanup, uncured glue can be wiped away with a damp cloth. Cured glue is much harder to remove and may require scraping or sanding.
Gorilla Glue Setting Times: A Quick Comparison Table
To make things easy, here’s a quick look at typical setting and curing times for different types of Gorilla Glue. Remember to always check the specific product packaging for precise details!
| Gorilla Glue Product | Initial Set (Clamp Time) | Full Cure Time | Notes |
|---|---|---|---|
| Original Gorilla Glue | 1-2 hours | 24 hours | Requires light moisture to activate. Foams significantly. |
| Gorilla Wood Glue | 30-60 minutes | 24 hours | Specifically for wood. Dries a natural wood color. |
| Gorilla Super Glue (Cyanoacrylate) | Seconds to minutes | A few hours to 24 hours (for max strength) | Very fast setting. Minimal foaming. Multiple varieties available. |
| Gorilla Heavy Duty Construction Adhesive | Multiple hours (e.g., 2-12 hours depending on product) | 24-72 hours | For large projects, subfloors, countertops. Longer working time. |
This table is a helpful guide, but the bottle is always your best friend for exact specifications.
Essential Tips for Gorilla Glue Success
Beyond just knowing the times, there are a few tricks that can make your Gorilla Glue projects go smoother and result in a stronger bond. These are tips I’ve picked up over countless projects:
- Read the Label: I can’t stress this enough! Each type of Gorilla Glue has its own quirks.
- Work in a Well-Ventilated Area: Gorilla Glue can release fumes, especially during the curing process. Good airflow is important for your health and can help the glue cure properly. The Occupational Safety and Health Administration (OSHA) provides guidance on proper ventilation and chemical handling in workplaces which is good practice for DIYers too.
- Wear Gloves: Gorilla Glue is super strong and can bond skin very quickly. Treat it with respect! Latex or nitrile gloves are a must.
- Protect Your Workspace: That foaming action can be messy. Cover your work surface with newspaper or a drop cloth.
- Test on Scraps First: If you’re unsure about how the glue will react with your materials or how long it really takes in your environment, do a test run on some scrap pieces.
- Don’t Over-Apply: A thin, even layer is usually sufficient. Excessive glue will just foam out, create more mess, and may not actually make the bond stronger.
- Moisture is Key (for Original): Remember to lightly mist for the original formula. If your environment is very humid, you might not need as much water, or even any at all in some cases.
- Consider Clamping Pressure: While you want to hold the pieces tightly, don’t use so much pressure that you squeeze all the adhesive out. You want enough to close any gaps.
- Patience is a Virtue: Especially for the full cure. Resist the urge to stress the joint before 24 hours have passed.
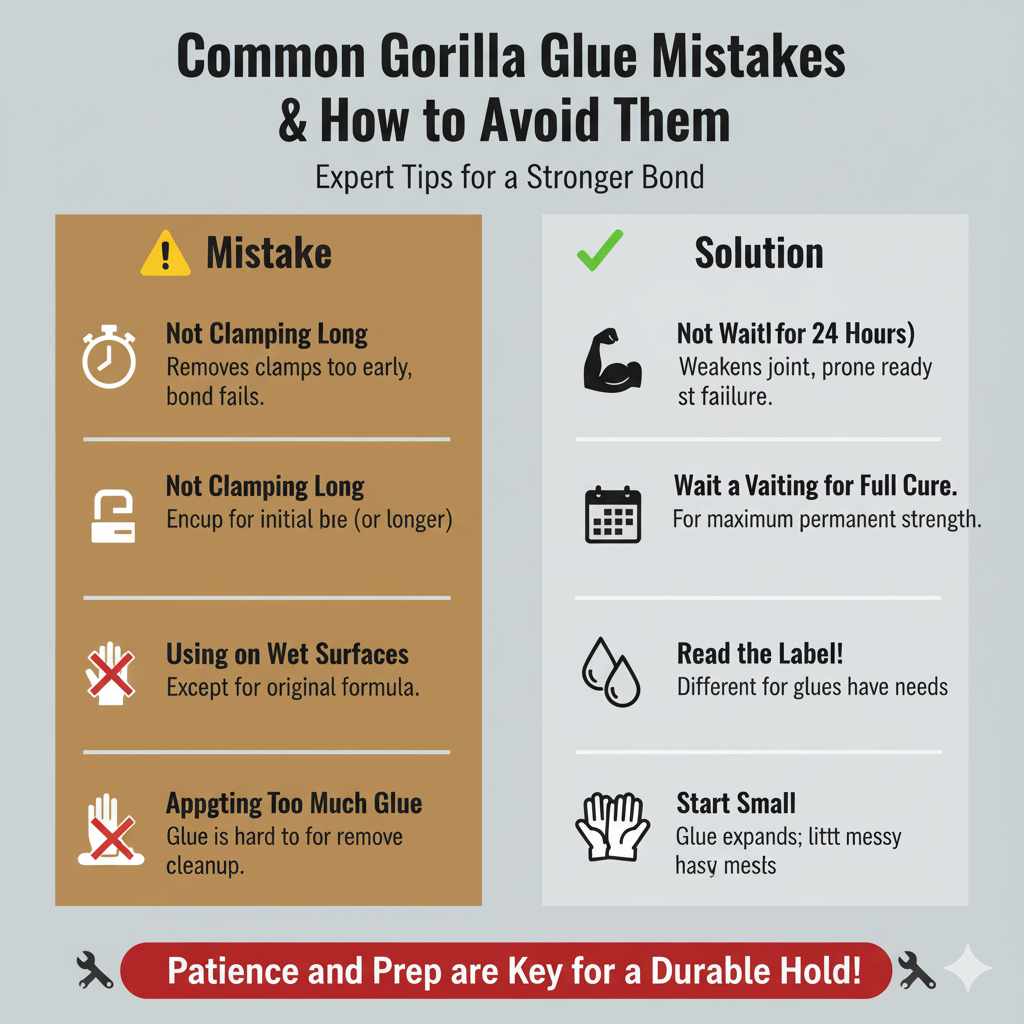
Common Gorilla Glue Mistakes and How to Avoid Them
Even experienced crafters can run into issues with Gorilla Glue. Here are some blunders I’ve seen (and maybe even made myself!) and how to sidestep them:
- Mistake: Not Clamping Long Enough. Solution: Stick to that 1-2 hour minimum, and consider extending it in cooler or less humid conditions. For anything structural, longer is often better.
- Mistake: Not Waiting for Full Cure. Solution: This is hard for eager DIYers! But it’s vital. Treat the joint gently for a full 24 hours. Think of it as the glue reaching its full potential.
- Mistake: Using on Wet Surfaces (for non-water-activated types). Solution: Only the original Gorilla Glue benefits from a light misting. Other types, like wood glue or super glue, often require dry surfaces for optimal adhesion. Read the label!
- Mistake: Forgetting to Wear Gloves. Solution: Seriously, wear gloves. Your fingers will thank you. Getting Gorilla Glue off skin is a waiting game and can involve some scrubbing.
- Mistake: Applying Too Much Glue. Solution: Remember that foaming action. Start with a small amount. You can always add a tiny bit more if needed, but removing excess foam is a chore.
- Mistake: Not Checking the Temperature/Humidity. Solution: If it’s unusually hot, cold, or dry where you’re working, adjust your expectations for setting times. You might need to clamp longer or lightly mist surfaces.
Frequently Asked Questions (FAQ) about Gorilla Glue Setting Times
Q1: Can I use Gorilla Glue in cold weather?
A1: Yes, but it will take longer to set and cure. Aim for temperatures above 50°F (10°C) if possible. In colder conditions, you might need to extend your clamping time significantly.
Q2: How do I remove dried Gorilla Glue from my hands?
A2: It’s tricky! Try soaking in warm, soapy water. For stubborn spots, gently use a pumice stone or apply an oil-based lotion, then try scrubbing. Sometimes, nail polish remover (acetone) can help, but test a small area first and use with caution.
Q3: Does Gorilla Glue expand after I remove the clamps?
A3: Yes, the original Gorilla Glue formulation continues to expand and cure even after clamping pressure is removed, reaching its full strength over 24 hours. This is part of its unique bonding action.
Q4: Can I speed up the Gorilla Glue setting time?
A4: For the original formula, increasing humidity can slightly speed up the activation and initial set. For other types, working in warmer (but not excessively hot) temperatures can help. However, never use artificial heat sources directly on the wet glue, as this can cause issues.
Q5: Is Gorilla Wood Glue better than Original Gorilla Glue for my woodworking projects?
A5: Gorilla Wood Glue is often preferred for woodworking because it dries a natural wood color and has a slightly less aggressive foam. It’s designed specifically for wood, offering strong bonds with easier cleanup in many cases. Original Gorilla Glue is excellent for repairs on wood and other materials where its expanding foam can fill gaps and create a very robust bond.
Q6: What does it mean when Gorilla Glue “foams”?
A6: The foaming is a key characteristic of Original Gorilla Glue. It happens when the polyurethane resin reacts with moisture (from the air, or from lightly misting a surface). This reaction creates carbon dioxide gas bubbles, causing the glue to expand and fill gaps, creating a strong, interlocking bond as it hardens.
Conclusion: Patience for a Powerful Bond
So, there you have it! The exact time Gorilla Glue takes to set and cure depends on the specific product, but for the popular Original Gorilla Glue, you’re looking at about 1-2 hours of clamping followed by a full 24-hour cure for maximum strength. Remember the factors we discussed: temperature, humidity, and the specific glue formula you’re using. By understanding these, reading those labels carefully, and employing a little patience, you’ll achieve those strong, reliable bonds that make Gorilla Glue such a workshop staple.
Don’t let adhesive mysteries slow down your creativity. With this knowledge, you can approach your next project with confidence, knowing what to expect from your glue and how to get the best possible results. Now, go forth and build something amazing!