How To Adjust A Spray Paint Gun: Proven Effortless Tips
Adjusting a spray paint gun is simple! Learn to fine-tune fluid, air, and spray pattern controls for a flawless, professional finish every time. This guide provides easy, step-by-step tips for perfect paint application, ensuring your DIY projects look amazing.
Hey there, fellow DIYers and woodworking enthusiasts! Md Meraj here, your go-to guide for making your projects shine. Ever stared at a spray-painted surface and seen drips, runs, or an uneven finish? It’s frustrating, right? Especially when you’ve put in so much effort. The good news is, it’s usually not your paint or your skill – it’s often just a matter of knowing how to adjust your spray paint gun correctly.
Many beginners find spray guns intimidating. You might think they’re only for seasoned pros requiring a degree in paint dynamics! But I promise you, with a few simple adjustments, you can achieve beautiful, consistent results that will make your projects stand out. Think of your spray gun like a finely tuned instrument – a few tweaks make all the difference.
In this guide, I’ll walk you through the essential adjustments – fluid, air, and pattern. We’ll keep it straightforward, with no confusing jargon. We’ll cover common issues and how to fix them with ease. By the end, you’ll feel confident and ready to tackle your next painting project with a perfectly dialed-in spray gun. Let’s get painting!
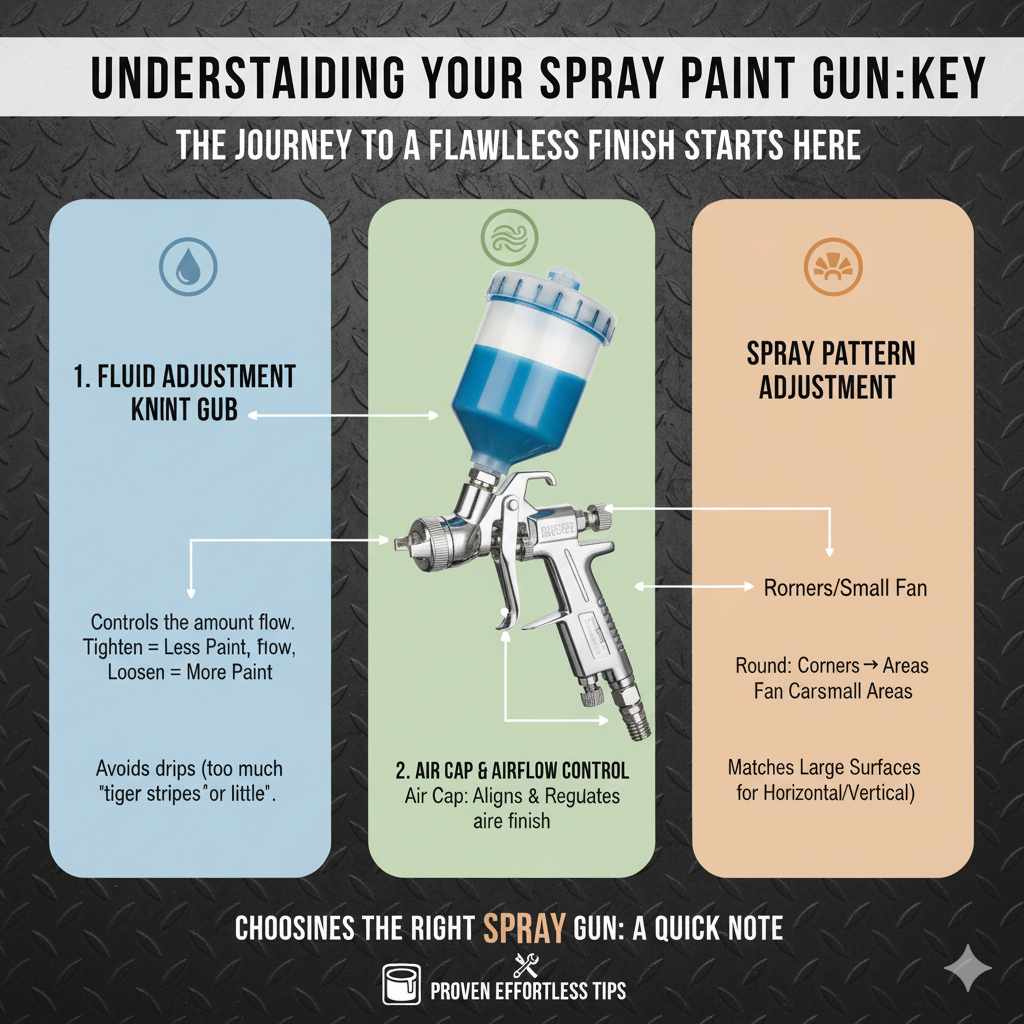
Understanding Your Spray Paint Gun: The Key Controls
Before we start adjusting, let’s get acquainted with the main parts of your spray gun that we’ll be working with. Most spray paint guns, whether they’re HVLP (High Volume, Low Pressure) or conventional, have three primary adjustment controls. Understanding what each one does is the first step to achieving that smooth, perfect finish.
1. Fluid Adjustment Knob
This is where you control the amount of paint being sprayed. It’s usually a screw located at the back of the trigger mechanism. When you tighten this knob, you reduce the amount of paint that flows through the gun. Loosening it allows more paint to come out.
Why it matters: Too much fluid, and you get runs, drips, and an overly thick coat. Too little, and you get a thin, spotty finish or “tiger stripes” (uneven color). Getting the fluid flow right is crucial for proper coverage and a smooth look.
2. Air Cap & Airflow Control
The air cap is what shapes the spray pattern. It’s the part with holes around a central nozzle. The airflow control, often a separate knob or part of the air inlet, regulates the pressure and volume of air leaving the gun.
Why it matters: Air pressure atomizes (breaks down into tiny droplets) the paint. Too little air, and your paint won’t atomize properly, leading to large paint particles, a rough finish, and poor coverage. Too much air can cause overspray and waste paint. The air cap itself needs to be aligned correctly to create an even fan pattern.
3. Spray Pattern Adjustment (or Fan Control)
This control changes the shape of the spray. You can usually adjust it to create a round pattern or a wider, elliptical “fan” pattern. The control is often related to the air cap and might involve rotating parts of it or a separate knob.
Why it matters: A round pattern is good for spraying into corners or small areas. A fan pattern is perfect for covering larger surfaces like cabinet doors or walls. Adjusting this helps you match the spray shape to the size and shape of your workpiece, making your job quicker and more efficient. Many guns allow you to rotate the air cap to switch between horizontal and vertical fan patterns, which is excellent for different spraying directions.
Step-by-Step Guide: How To Adjust A Spray Paint Gun
Now that we know our controls, let’s walk through the process. It’s best to do this in a low-stakes environment, perhaps with some scrap material, before you tackle your final project. This is where you’ll really learn how to adjust your spray paint gun and build confidence. Safety first, always! Make sure you’re in a well-ventilated area and wearing appropriate personal protective equipment (PPE), including a respirator mask.
We’ll cover the common types of spray guns, focusing on the main principles that apply to most. For specific instructions related to your model, always refer to the manufacturer’s manual. You can often find great resources online too – for instance, the Occupational Safety and Health Administration (OSHA) has guidelines on choosing the right personal protective equipment for painting and spraying.
Step 1: Prepare Your Paint and Gun
This is foundational. You can’t adjust a spray gun properly if your paint isn’t ready or your gun isn’t clean.
- Paint Viscosity: Different paints have different thicknesses (viscosities). Most paints need to be thinned to spray correctly. The perfect consistency is usually like thin cream. A general rule of thumb is that paint should flow through a standard viscosity cup (like a #4 Ford cup) in about 15-25 seconds. If it flows too fast, it’s too thin; if it takes much longer, it’s too thick or needs more thinning agents. Always follow the paint manufacturer’s recommendations for thinning.
- Clean Gun: Ensure your spray gun is completely clean and free of old paint, solvents, or debris. This prevents clogs and ensures consistent performance.
- Setup: Connect your air source, ensuring it’s clean and dry (moisture can cause paint defects like pinholes or blistering).
Step 2: Set Up Your Test Area
Find a safe, well-ventilated area. Use a large piece of cardboard, scrap wood, or an old panel. This is your testing ground. You want plenty of space to see the spray pattern from different distances and angles.
Step 3: Adjusting Airflow (Pressure)
This is often the first thing beginners should get right. Too much or too little atomizing air pressure can ruin your finish before you even touch the fluid control.
- Connect Air: Attach your air hose to the gun and your air source.
- Set Initial Pressure: For most HVLP guns spraying general-purpose finishes (like latex or enamels), start with an air pressure setting between 15-30 PSI (pounds per square inch) at the gun. For airless sprayers, pressures are much higher, often 1000-3000 PSI or more, but these are adjusted differently and have different tip sizes. This guide focuses on air-assisted guns (like HVLP or conventional).
- Test Spray (No Paint): Pull the trigger slightly, allowing air to flow. Listen to the sound – it should be a steady, solid hiss.
- Observe Fan: If you have an air cap adjustment, ensure it’s set to your desired fan shape (horizontal or vertical). The air should form a consistent, even fan.
- Adjust for Atomization: This is key. With the fluid needle closed (trigger fully pulled, but no paint flow), slowly increase air pressure until the air coming out is smooth and well atomized. You shouldn’t hear excessive sputtering or see misting that dissipates too quickly.
Step 4: Adjusting Fluid Flow
Now we’ll dial in the paint volume. This step involves a bit of trial and error, but it’s essential.
- Load with Paint: Fill your cup with your prepared, thinned paint.
- Start with Minimal Fluid: Turn the fluid adjustment knob all the way in (clockwise) until it’s snug, then back it out maybe one or two full turns. This is your starting point.
- Test Spray (with Paint): Aim at your test material (cardboard). Pull the trigger all the way back. Notice the paint output. Is it a fine mist, or is it spitting? If it’s spitting, you might need more air or more fluid. If it’s a solid stream with no mist, you likely need more fluid.
- Adjust Fluid Knob: Slowly loosen the fluid adjustment knob (counter-clockwise) in quarter-turn increments. With each adjustment, spray a short burst. Watch the pattern. You’re looking for a consistent, fine mist that lays down an even coat.
- Look for the “Sweet Spot”: You’ll find a point where the pattern is evenly distributed, has a fine atomization, and covers the area well. If you go too far with the fluid adjustment, you’ll start to see the pattern widening excessively, splattering, or running.
Step 5: Adjusting the Spray Pattern Shape
This control determines how wide or narrow your spray pattern is, and how it’s shaped.
- Locate the Control: This is often done by rotating the air cap rings or a dedicated pattern control knob, depending on your gun model.
- Test Different Shapes: Spray with the pattern horizontal, then vertical. See how it lays down the paint. You can also adjust how wide the fan is. For large, flat surfaces, a wider fan is generally better for efficiency. For smaller items or edges, a narrower, more concentrated pattern might be needed.
- Match to Task: Spray a few passes. Does the pattern have nice, soft edges? Is it even across its width? You want to adjust it so it’s suitable for the item you’re painting. For example, when painting a cabinet door, you might use a horizontal fan pattern and overlap your passes.
Step 6: Fine-Tuning and The “Perfect” Pass
This is where you combine all the adjustments to achieve that beautiful, professional finish.
- The “Fan and Mist” Test: With the gun set up to spray paint, pull the trigger. You should get a clean, fine mist that forms a well-defined fan shape. If there’s a lot of paint built up in the center of the fan, you need more air. If the edges of the fan are ragged or spitting, you might need more fluid or more air pressure.
- Check for “Tiger Stripes”: These are dark stripes at the edges of your spray pattern and lighter stripes in the middle. This means you need more fluid. Turn the fluid knob out a little.
- Check for Runs and Sags: These indicate too much fluid or that you’re holding the gun too close to the surface. If you’ve followed the other steps, this is usually a distance issue.
- Check for Orange Peel: This looks like the skin of an orange. It means the paint is not atomizing properly – likely too much fluid or not enough air.
- Practice Your Technique:
- Distance: Hold the gun about 8-12 inches (20-30 cm) away from the surface. Consistency is key.
- Trigger Control: Start your spray pass off the edge of your workpiece, squeeze the trigger fully, move the gun steadily across the surface, and release the trigger after you’ve passed the opposite edge. This prevents splatters at the start and end of each pass.
- Overlap: Overlap each pass by about 50%. This ensures even coverage and avoids stripes.
- The Final Check: Make a long, steady pass on your test material. The paint should be a fine, even mist, laying down a consistent, wet-looking coat that blends seamlessly into the previous pass. If you see any of the issues mentioned above, go back to step 3 and make small adjustments to your air and fluid controls until you get it right.
Troubleshooting Common Spray Paint Gun Issues
Even with the best adjustments, you might run into hiccups. Here’s a quick look at common problems and their solutions:
| Problem | Likely Cause | Solution |
|---|---|---|
| Dripping/Running Paint | Too much fluid; gun held too close; paint too thin. | Reduce fluid flow (tighten fluid knob); move gun further away; ensure paint has correct viscosity. |
| “Tiger Stripes” (Uneven Pattern) | Too little fluid; incorrect air pressure. | Increase fluid flow (loosen fluid knob); check and adjust air pressure for proper atomization. |
| Orange Peel Finish | Poor atomization: not enough air pressure; paint too thick; gun too far away. | Increase air pressure; thin paint to correct viscosity; move gun closer. |
| Sputtering/Splatter | Clogged nozzle or air cap; not enough air pressure; paint too thick or contains debris. | Clean gun thoroughly; increase air pressure; ensure paint is strained and properly thinned. |
| Uneven Fan Pattern | Dirty or damaged air cap; incorrect air cap alignment. | Clean air cap; ensure air cap is properly seated and aligned according to the manual. |
| Overspray | Too much air pressure; gun held too far away. | Reduce air pressure; maintain consistent, closer distance to the surface. |
Remember, patience is key. If something isn’t right, don’t just keep spraying. Stop, assess the pattern, and make small, controlled adjustments. Often, a very minor tweak is all it takes.
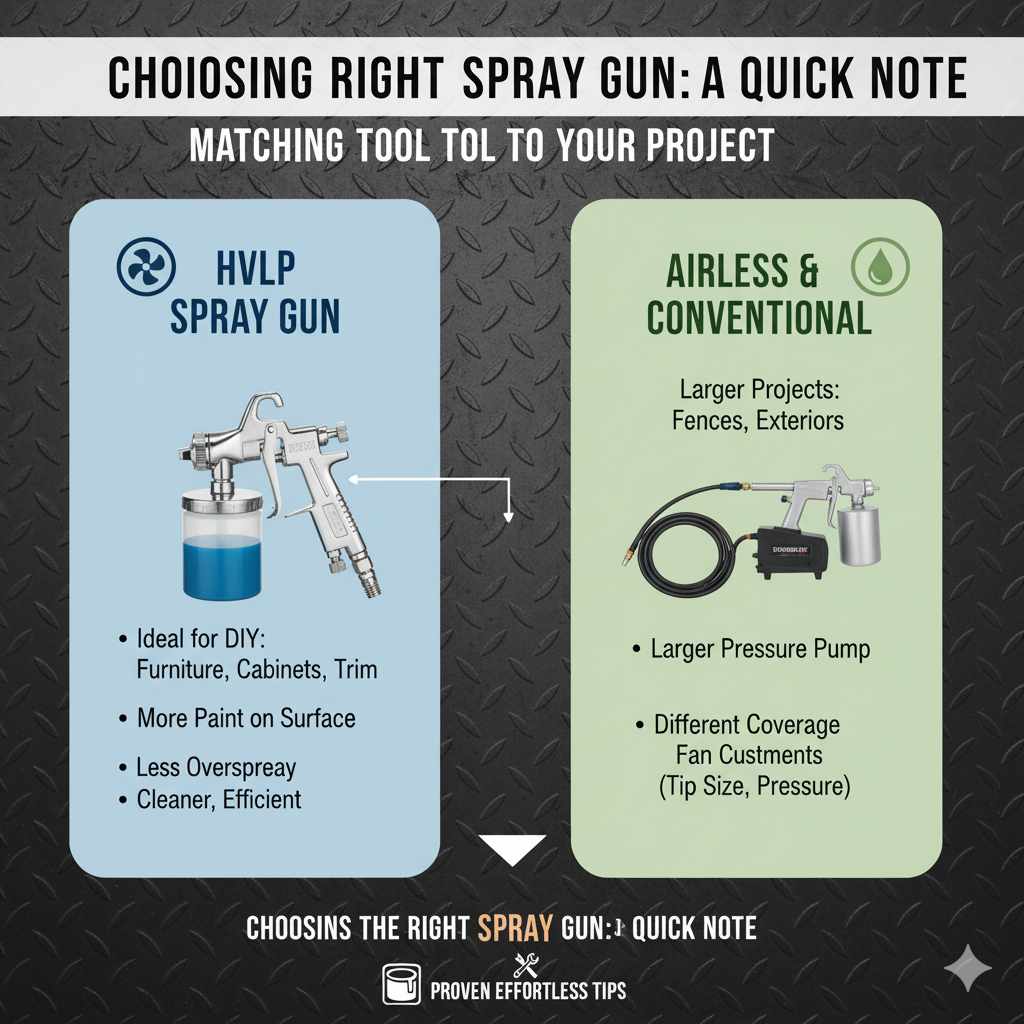
Choosing the Right Spray Gun: A Quick Note
While this guide focuses on how to adjust a spray gun, briefly mentioning types can be helpful. For DIYers tackling furniture, cabinets, or smaller projects, an HVLP (High Volume, Low Pressure) spray gun is often recommended. They use a large volume of air at lower pressure, which transfers more paint to your surface and creates less overspray. This means less wasted paint and a cleaner working environment. For larger jobs, like fences or house exteriors, electric airless or air-powered sprayers might be considered, but they operate on different principles and often require different adjustment techniques and setups focusing more on tip size and pump pressure.
Frequently Asked Questions (FAQs)
Q1: How do I know if my paint viscosity is correct for spraying?
Answer: The best way is to use a viscosity cup, usually a #4 Ford cup. Dip it in your thinned paint, lift it out, and time how long it takes for the paint stream to break. For most paints, the ideal range is 15-25 seconds. If you don’t have a cup, you can do a rough test: the thinned paint should flow off a stirring stick like thin cream, not drip off too quickly or slowly.
Q2: Do I need to adjust the air pressure for different types of paint?
Answer: Yes, generally. Thicker paints (like some primers or heavy-bodied enamels) might require slightly higher air pressure for proper atomization. Thinner paints might spray well at slightly lower pressures. Always check the paint manufacturer’s recommendations for spraying, and use your test sprays to fine-tune. It’s about achieving a fine, even mist.
Q3: I’m getting drips. Should I reduce fluid or increase air?
Answer: Most often with drips, you have too much fluid. Try tightening the fluid adjustment knob first. If that doesn’t resolve it, ensure you’re holding the gun at the correct distance (8-12 inches) and moving at a steady pace. Only increase air pressure if the atomization is poor after adjusting fluid.
Q4: What’s the difference between atomization and pattern?
Answer: Atomization refers to how finely the paint is broken down into tiny droplets by the air. Good atomization is crucial for a smooth finish. The pattern refers to the shape of the spray – round, horizontal fan, or vertical fan – and its width. You need both good atomization and the right pattern shape for the job.
Q5: My spray gun is sputtering. What’s wrong?
Answer: Sputtering usually means the nozzle or air cap is partially clogged, or there isn’t enough air pressure or fluid. First, try cleaning the tip and air cap.