How To Clean A Door Before Painting: Essential Guide
To ensure a smooth, professional finish when painting a door, you must clean it thoroughly. This guide will walk you through cleaning your door effectively, preparing it for paint, and achieving a beautiful, lasting result.
Are you getting ready to give your old door a fresh new look with a coat of paint? It’s exciting to think about the transformation! But before you even think about picking up a paintbrush, there’s one crucial step that can make all the difference between a job well done and a disappointing mess: cleaning the door. It might seem like a small detail, but a dirty surface will fight with your paint, leading to peeling, bubbling, and an uneven finish. Don’t worry, though! I’m here to guide you through this process step-by-step. We’ll make sure your door is perfectly prepped for a beautiful paint job you’ll be proud of. Let’s get started!
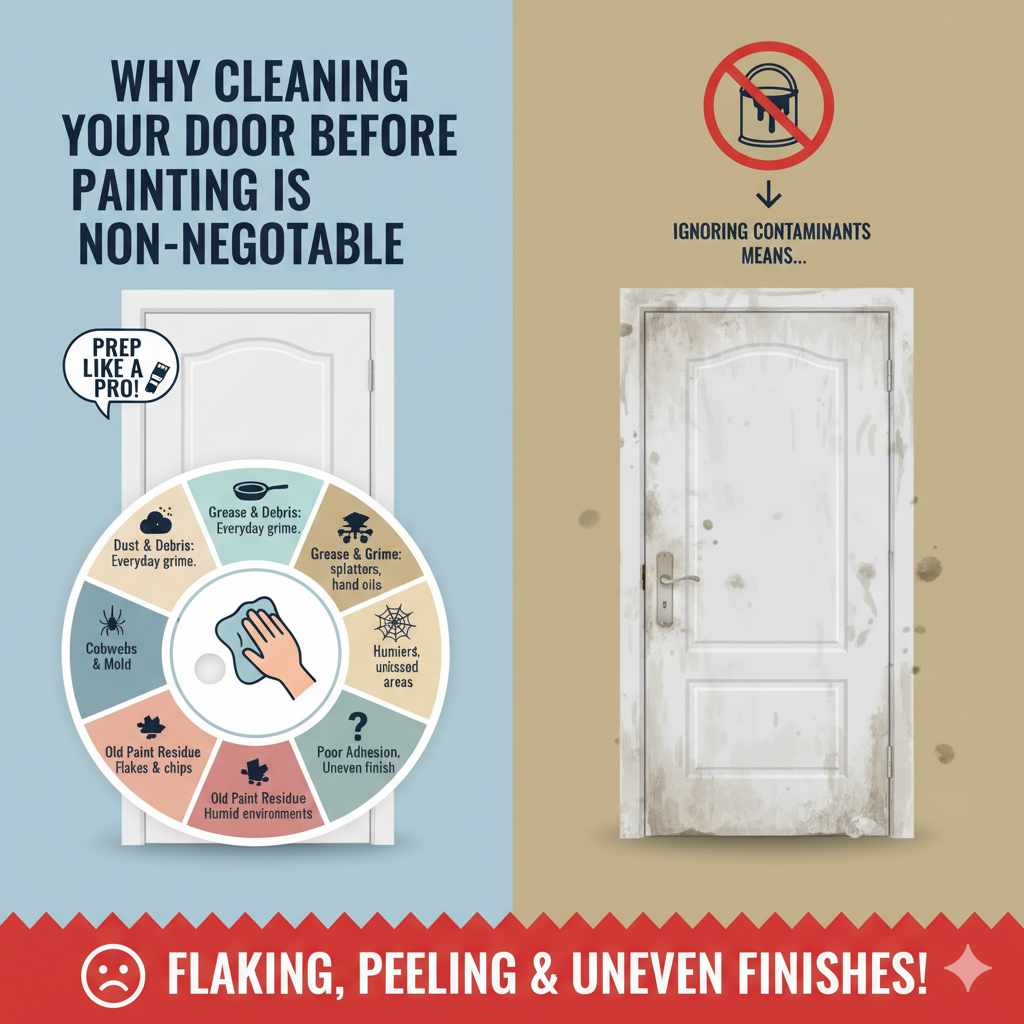
Why Cleaning Your Door Before Painting is Non-Negotiable
Think of cleaning your door before painting like preparing a canvas before you paint a masterpiece. If the canvas is dusty or greasy, the paint won’t adhere properly, and the final artwork won’t look its best. The same applies to your door. Over time, doors accumulate a surprising amount of grime. This can include:
- Dust and Debris: Everyday dust settles on surfaces, and doors, especially those with nooks and crannies, are magnets for it.
- Grease and Grime: Kitchen doors often get splattered, while hallway doors pick up oils from hands.
- Cobwebs: Especially common on exterior doors or doors in less-used areas.
- Mildew or Mold: In humid environments, these can form on door surfaces.
- Old Paint Residue: If you’re repainting, lingering flakes or chips can interfere with a smooth application.
Ignoring these contaminants means your new paint has nothing solid to stick to. It’s like trying to build a house on sand – it’s bound to fail. A clean surface ensures the primer and paint can bond directly to the door material, creating a durable, long-lasting finish. This is the secret to a professional-looking paint job that will stand the test of time.
Gathering Your Cleaning Supplies
Before we dive into the cleaning process, let’s make sure you have everything you need. Having your supplies ready will make the job much smoother and more efficient. You don’t need anything fancy; most of these items are likely already in your home or are inexpensive to pick up.
Essential Cleaning Tools:
- Soft Sponges or Cleaning Cloths: You’ll want a few to avoid spreading dirt around. Microfiber cloths are excellent for this.
- Buckets: At least two are recommended. One for your cleaning solution and one for rinsing.
- Mild Detergent: Dish soap is usually perfect for general cleaning. For tougher grime, you might need a specialized cleaner (more on that later).
- Warm Water: This helps lift dirt and dissolve greases.
- Drop Cloth or Old Towels: To protect your floors from drips.
- Screwdriver or Putty Knife: For removing hardware.
- Painter’s Tape: To protect areas you don’t want to get wet or dirty.
- Optional: Degreaser, Mold/Mildew Remover, TSP (Trisodium Phosphate) Substitute.
Having these tools ready will make the entire process feel much less daunting. Remember, preparing your workspace is just as important as preparing the door itself!
Step-by-Step Guide: How to Clean a Door Before Painting
Now that you have your supplies and understand why this step is so vital, let’s get down to the actual cleaning. We’ll break it down into manageable steps. Remember to work at a comfortable pace and don’t rush. Safety first!
Step 1: Prepare the Area and the Door
Before you start wetting anything, it’s wise to protect your surroundings and get the door ready for deep cleaning. This minimizes mess and makes the actual cleaning much easier.
- Lay Down Protection: Place a drop cloth or old towels on the floor on both sides of the door. This will catch any drips and spills, keeping your floors clean.
- Remove Hardware: If possible and safe to do so, remove the doorknobs, hinges, and any other hardware. This gives you unobstructed access to the entire door surface and prevents paint from getting on them. Keep the hardware in a safe place, perhaps in a labeled plastic bag. If you can’t remove the hardware, don’t worry; you can carefully tape around it in a later step.
- Open the Door: For interior doors, open it fully so you can access both sides without obstruction. For exterior doors, you may need to remove it from its hinges.
Step 2: Initial Dusting and Debris Removal
Let’s get rid of the loose stuff first. This prevents you from just smearing dust around with water.
- Using a soft brush, a dry microfiber cloth, or a vacuum cleaner with a brush attachment, gently remove all loose dust, cobwebs, and any surface debris from the door. Pay attention to any grooves, panel details, or corners.
Step 3: Mix Your Cleaning Solution
For most doors, a simple solution of water and mild detergent is enough. Warmer water works best for dissolving grease and grime.
- Fill one bucket with warm water and add a small amount of mild dish soap. You don’t need a lot; just enough to create some suds.
- Fill the second bucket with clean, warm water for rinsing.
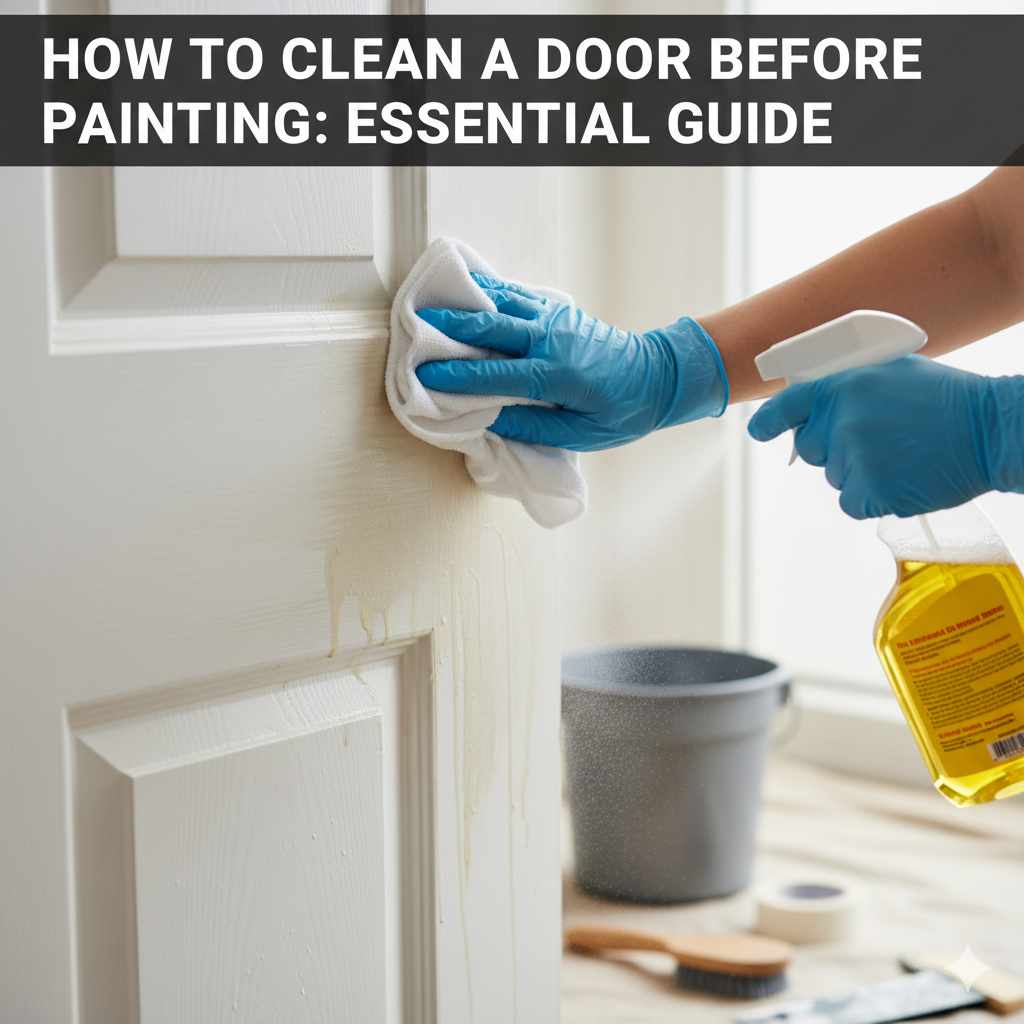
Step 4: Wash the Door Surface
This is where you’ll start tackling the actual grime. Work in manageable sections and avoid soaking the door, especially if it’s made of wood, as excessive moisture can cause damage.
- Dip a clean sponge or cloth into your soapy water. Wring it out well so it’s damp, not dripping wet.
- Gently wipe down the door’s surface, starting from the top and working your way down.
- Focus on any stained or greasy areas. For stubborn spots, you may need to apply a little gentle pressure or use a slightly more concentrated soap solution.
- Rinse your sponge or cloth frequently in the clean water bucket to ensure you’re not just reapplying dirt.
Step 5: Rinse Thoroughly
It’s crucial to remove all soap residue. Leftover soap can create a barrier that prevents paint from adhering properly.
- Now, take a clean sponge or cloth, dip it in the clean water bucket, and wring it out well.
- Wipe down the entire door surface again, just as you did with the soapy water, to rinse away all traces of detergent.
- For doors with intricate details, you might need to use a soft-bristled brush or an old toothbrush dipped in clean water to get into the crevices and ensure all soap is removed.
Step 6: Dry the Door Completely
Moisture is the enemy of a good paint job. Not only can it cause blistering, but it can weaken the paint’s bond. Make sure the door is bone dry before proceeding.
- Use a clean, dry microfiber cloth to wipe down the entire door surface.
- Ensure all areas are dry, including any grooves or panels.
- Allow the door to air dry for at least a few hours, or even overnight if possible, especially if the wood is dense or the environment is humid. You can use a fan on a low setting to speed up the process.
Dealing with Stubborn Stains and Grime
Sometimes, a simple soap and water solution isn’t enough. If you encounter tougher challenges, you’ll need to bring out the heavy-duty cleaners. Here’s how to tackle specific issues:
Grease and Heavy Grime:
For doors in kitchens or workshops that have a significant buildup of grease, a dedicated degreaser or a stronger soap solution might be necessary. Always follow the product’s instructions carefully. A good option is a product like Simple Green or a dedicated kitchen degreaser. You can also use a solution of hot water and a bit of ammonia, but ensure good ventilation and wear gloves.
Mold and Mildew:
If you notice any black spots or fuzzy growth, you’ve got mold or mildew. This needs to be eliminated thoroughly. A solution of one part bleach to three parts water is effective against mold and mildew. Alternatively, a commercial mold and mildew cleaner can be used.
- Important: When using bleach or strong cleaners, always wear rubber gloves, eye protection, and ensure the area is very well-ventilated. Open windows and doors as much as possible.
- Apply the solution with a sponge or cloth, let it sit for a few minutes (as per product instructions), and then scrub gently.
- Rinse the area thoroughly with clean water and dry completely before proceeding. For more severe issues, consult resources from organizations like the Environmental Protection Agency (EPA) for safe and effective mold remediation: EPA on Mold Cleanup.
Smoke and Soot:
If your door has been exposed to smoke (e.g., from a fireplace or a fire incident), it will require a special cleaner. Trisodium Phosphate (TSP) or a TSP substitute is highly effective at cutting through tough residues like smoke and soot. TSP is a powerful cleaner, so it’s crucial to follow the manufacturer’s instructions precisely and take all necessary safety precautions, including wearing gloves and eye protection. Many modern paints recommend using a TSP substitute, which is often less caustic but still very effective. Always test in an inconspicuous area first.
Here’s a quick comparison of cleaning agents:
| Cleaning Task | Recommended Cleaner | Safety Precautions |
|---|---|---|
| General Dust & Grime | Mild Dish Soap & Warm Water | Gloves (optional) |
| Grease & Heavy Grime | Degreaser, Stronger Dish Soap Solution, or Ammonia Solution | Gloves, Good Ventilation |
| Mold & Mildew | Bleach Solution (1:3 ratio) or Commercial Mold Cleaner | Gloves, Eye Protection, Excellent Ventilation |
| Smoke, Soot, Stubborn Residues | TSP or TSP Substitute | Gloves, Eye Protection, Good Ventilation, Follow Product Instructions Precisely |
Tips for Tough Spots:
- Don’t Scrub Too Hard: Excessive scrubbing can damage the door’s surface, especially if it’s old or made of softer wood.
- Use an Old Toothbrush: Great for getting into corners, carvings, or panel edges.
- Patience is Key: Sometimes, letting the cleaner sit for a few minutes can do most of the work for you.
Cleaning Specific Door Types
The material of your door can influence the best cleaning method. While the general steps apply to most doors, here are a few specific considerations:
Solid Wood Doors:
Wood is porous and can absorb moisture. Always wring out your cleaning cloths and sponges thoroughly. Avoid saturating the wood. For very old or antique wood doors, a gentle dusting and perhaps a light wipe with a damp cloth may be all that’s needed. For painted wood doors, ensure you’re not removing too much of the existing paint unless you intend to strip it.
Hollow-Core Doors:
These doors are typically made with a thin wood veneer or a laminate surface over a cardboard or honeycomb core. They are more susceptible to damage from excessive moisture. Be gentle and ensure they are dried thoroughly. The surface is often smoother, making them easier to clean but also more prone to showing imperfections if not prepped well.
Metal Doors:
Metal doors, whether steel or aluminum, are quite durable. You can usually use slightly stronger cleaning solutions and more vigorous wiping. However, be cautious of abrasive cleaners that could scratch the surface. If the metal door is painted, the paint finish is your primary concern, ensuring you don’t damage it during cleaning.
Fiberglass Doors:
Fiberglass is a resilient material. Similar to metal doors, they can handle most common cleaning agents. Avoid harsh abrasives that could dull the finish. Mild detergent and water are usually sufficient for regular cleaning. For tougher stains, a quality degreaser should work well.
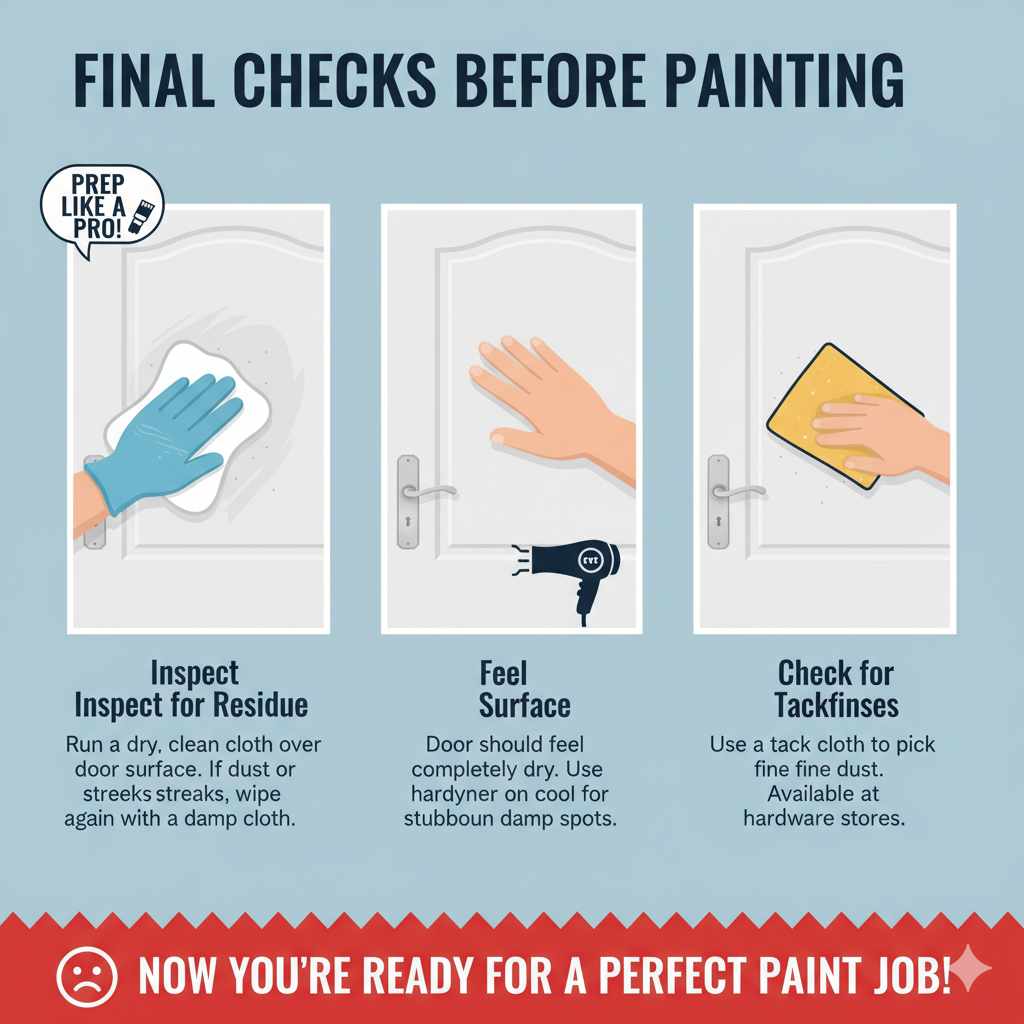
Final Checks Before Painting
You’ve cleaned, rinsed, and dried. You’re almost there! Before you grab that primer, let’s do a quick check to ensure your door is truly ready.
- Inspect for Residue: Run a dry, clean cloth over the door surface, especially in corners and grooves. If any dust or streaks come off, wipe it down again with a slightly damp, clean cloth and let it dry completely.
- Feel the Surface: The door should feel completely dry to the touch. If there’s any hint of moisture, especially in recessed areas, give it more time to dry. You can use a hairdryer on a cool setting for stubborn damp spots in crevices.
- Check for Tackiness: If you used a stronger cleaner, a slight tackiness might remain. You can often follow up with a “tack cloth” to pick up any fine dust particles. A tack cloth is a special cloth that’s slightly sticky and designed to pick up dust and lint, leaving a perfectly clean surface for painting. You can purchase these at any hardware or paint store.
Once you’re absolutely sure the door is clean and dry, you’re ready for the next steps in your painting project: priming and painting!
Frequently Asked Questions About Cleaning Doors Before Painting
Q1: How often should I clean a door before painting it?
You should clean a door thoroughly every single time you plan to paint it. For regular maintenance beyond painting, cleaning every 6-12 months is usually sufficient, depending on traffic and environment.
Q2: Can I use a power washer to clean my exterior door?
For most exterior doors, especially wooden ones, a power washer is too aggressive and can damage the finish or even the material itself. It’s better to use a garden hose on a gentle setting or hand wash it.
Q3: What if my door has old, peeling paint?
You’ll need to scrape away all loose paint flakes with a putty knife or scraper first. Then, you can proceed with cleaning the remaining surface as usual. For a super smooth finish, you might want to sand down any rough edges left by scraping.
Q4: Can I paint over a dirty door directly?
No, you absolutely should not paint over a dirty door. Paint will not adhere properly to grease, dust, or grime, leading to peeling, bubbling, and a poor finish.
Q5: Do I need to use a special cleaner for interior doors?
Usually, mild dish soap and warm water are sufficient for interior doors. Only resort to stronger cleaners if you notice stubborn stains like grease, smoke, or mold. Always test any cleaner in an inconspicuous spot first.
Q6: What is a TSP substitute and why is it used?
TSP stands for Trisodium Phosphate, a powerful cleaning agent. A TSP substitute is a less caustic but still effective cleaner designed to remove tough residues like grease, dirt, smoke, and mildew stains, preparing surfaces for painting. It’s often recommended for older homes or surfaces with significant buildup.
Q7: My door has a glossy finish. Does that affect how I clean it?
A glossy finish can sometimes make it harder for new paint to adhere. While cleaning, make sure to remove all dirt and grime thoroughly. You may also want to lightly scuff the surface with fine-grit sandpaper (around 220 grit) after cleaning and drying to create a better “tooth” for primer and paint to grip onto. Always wipe away sanding dust with a tack cloth.
Conclusion
Taking the time to properly clean your door before painting is far more than just an optional step; it’s the bedrock of a professional and lasting paint job. By following these straightforward steps, you’re not just cleaning a door; you’re ensuring that your new paint will adhere beautifully, look smooth and even, and withstand the test of time. Remember to protect your workspace, gather your supplies, tackle dirt and grime with the right solutions, and always ensure the door is completely dry before you move on. This preparation guarantees that your hard work will pay off with a flawless finish that enhances the look and feel of your home. So go ahead, grab your cleaning supplies with confidence, and get ready to transform your doors!