How to Drill a Hole in Ceramic Tile: Best Local Methods
Many folks find drilling into ceramic tile tricky. It feels like it could crack or break easily. This is why learning How to Drill a Hole in Ceramic Tile: Best Local Methods is a common question for DIYers.
Don’t worry, it’s not as hard as it looks! We’ll walk you through it step-by-step. Get ready to tackle this project with ease.
Gathering Your Tools for Drilling Ceramic Tile
Before you start, having the right tools makes all the difference. You need specific drill bits designed for hard materials like tile. Safety gear is also a must.
Protect your eyes and hands. This section covers everything you need to have ready.
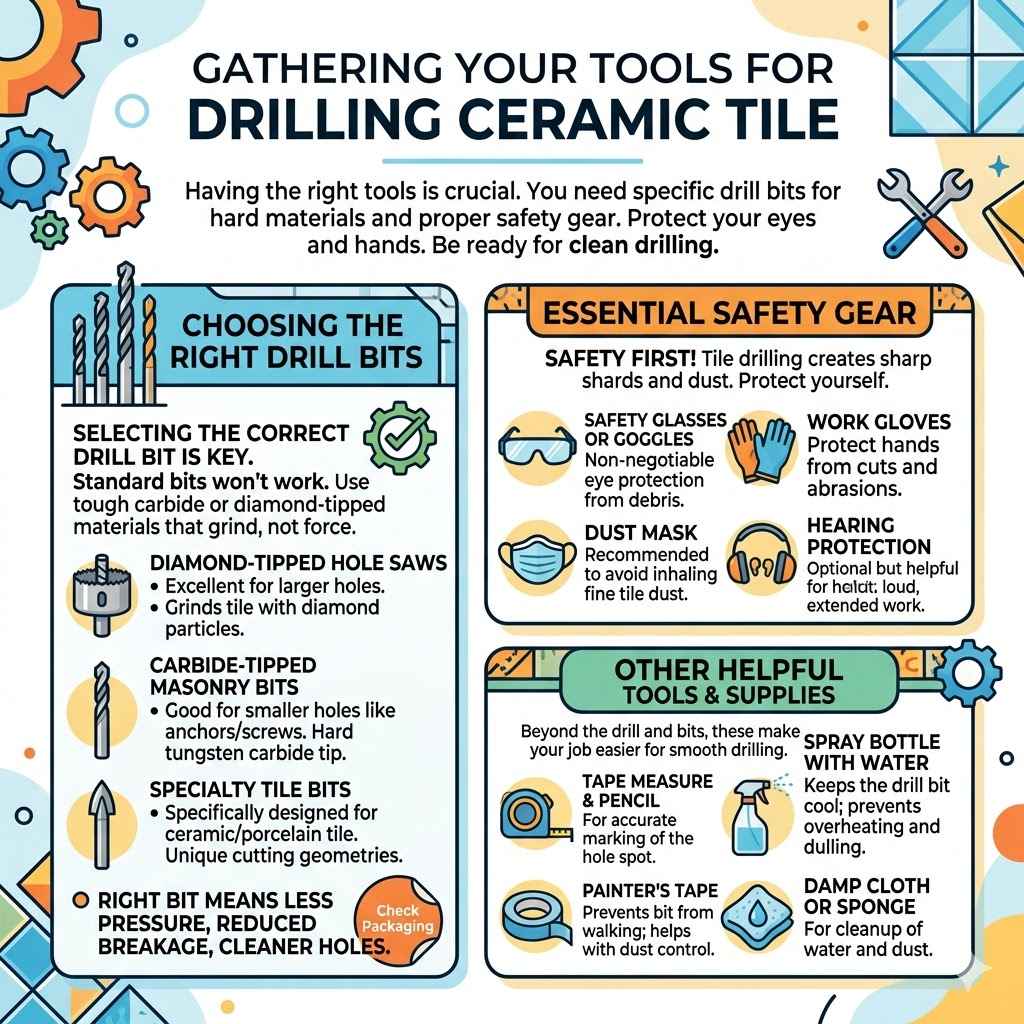
Choosing the Right Drill Bits
Selecting the correct drill bit is key to a clean hole. Standard drill bits for wood or metal won’t work well. They will likely dull quickly or just skip over the tile surface.
You need something tough enough to cut through the ceramic glaze and body without shattering it. These bits are often made of carbide or diamond-tipped materials. Think of them like tiny, super-hard cutting tools.
They are designed to grind away at the tile rather than forcing their way through.
- Diamond-Tipped Hole Saws: These are excellent for larger holes. They look like a cup with diamond particles on the cutting edge. They work by grinding the tile away.
- Carbide-Tipped Masonry Bits: These are good for smaller holes, like for anchors or screws. They have a very hard tip made of tungsten carbide.
- Specialty Tile Bits: Some bits are specifically designed for ceramic or porcelain tile. They might have a spear-shaped tip or other unique cutting geometries.
Using the right bit ensures less pressure is needed, reducing the risk of breakage. It also makes the drilling process much faster and cleaner. Always check the packaging for the manufacturer’s recommendations on what materials the bit is suited for.
Essential Safety Gear
Safety should always come first when working with tools. Drilling tile can create sharp shards and dust. You want to protect yourself from these hazards.
Wearing safety glasses or goggles is non-negotiable. They shield your eyes from flying debris. Gloves are also important.
They protect your hands from cuts and scrapes if the tile slips or breaks unexpectedly. Hearing protection might be useful if you’re drilling many holes, as the sound can be quite loud. A dust mask can help prevent you from inhaling fine tile dust, which can be irritating to your lungs.
- Safety Glasses or Goggles: Essential for eye protection.
- Work Gloves: Protect your hands from cuts and abrasions.
- Dust Mask: Recommended to avoid inhaling tile dust.
- Hearing Protection: Optional but helpful for extended drilling.
These items are readily available at hardware stores. They are inexpensive but provide vital protection. Don’t skip this step, even for a small job.
Other Helpful Tools and Supplies
Beyond the drill and bits, a few other items will make your job easier. A tape measure and a pencil are needed for marking the exact spot where you want the hole. Painter’s tape can be a lifesaver.
It helps prevent the drill bit from “walking” or slipping when you start. It also helps to catch some dust. A spray bottle filled with water is used to keep the drill bit cool.
This prevents it from overheating and dulling too quickly. A damp cloth or sponge is handy for cleaning up any water or dust afterwards.
- Tape Measure and Pencil: For accurate marking.
- Painter’s Tape: To prevent bit slippage and dust control.
- Spray Bottle with Water: To cool the drill bit.
- Damp Cloth or Sponge: For cleanup.
Having these items prepared means you can focus on the drilling itself. It makes the whole process smoother.
Mastering the Technique How to Drill a Hole in Ceramic Tile
Now that you have your gear, let’s talk about the actual drilling. This is where you’ll learn the core skills. We’ll cover how to mark your spot, start the drill, and keep it steady.
Proper technique is what separates a clean hole from a cracked tile.
Marking Your Drilling Spot
Accuracy is important. You don’t want to drill in the wrong place. Use your tape measure to find the exact center for your hole.
Mark this spot with your pencil. For extra security, place a piece of painter’s tape over the marked spot. This tape helps to give the drill bit some grip.
It stops the bit from sliding across the smooth tile surface when you first start drilling. You can even draw a small “X” on the tape where you want to drill. This makes the target even clearer.
- Measure precisely to the desired location.
- Use a pencil to make a clear mark.
- Apply painter’s tape over the mark for grip.
- Draw an “X” on the tape for a clear target.
This simple step prevents a lot of frustration later on. It ensures your hole ends up exactly where you need it.
Setting Up Your Drill
Next, you need to set up your drill. Most common drills have settings for speed. For ceramic tile, you want to use a slow speed.
High speeds create too much friction and heat. This can damage the tile and the drill bit. Some drills also have a hammer function.
You should turn this off. Hammering will almost certainly crack the tile. It’s designed for masonry, not delicate tile surfaces.
Make sure your chosen drill bit is securely attached to your drill. A loose bit is dangerous and ineffective.
- Select a slow speed setting on your drill.
- Ensure the hammer drill function is turned OFF.
- Securely tighten the drill bit in the chuck.
Getting these settings right from the start is crucial for success. It prepares your drill for the delicate task ahead.
Starting the Hole
This is often the most challenging part for beginners. Hold the drill straight up and down, perpendicular to the tile surface. Begin drilling at a very slow speed.
Apply gentle, steady pressure. Let the drill bit do the work. Don’t force it.
The painter’s tape you applied earlier will help keep the bit from skidding. Once you’ve made a small indent, you can gradually increase the pressure slightly. The goal is to create a small pilot hole first.
- Hold the drill perfectly vertical.
- Start with very slow drill speed.
- Apply light, consistent pressure.
- Let the bit slowly grind into the tile.
This initial stage is critical. Patience here pays off with a much cleaner result. If you feel the bit starting to slip, stop immediately and readjust.
Drilling Through the Tile
As you continue drilling, remember to keep the bit cool. Periodically spray water onto the drilling area. This helps to prevent the bit from overheating.
Overheating can weaken the bit and damage the tile. You’ll notice dust and water mixing. This is normal.
Continue drilling at a slow to moderate speed. Maintain steady pressure. If you are using a diamond-tipped hole saw, you may need to tilt it slightly to help clear out debris.
With masonry bits, just keep going steadily.
- Keep the drill bit cool with water.
- Drill at a steady, moderate speed.
- Apply consistent downward pressure.
- Clear away dust and water as needed.
When you feel the bit breaking through the other side, ease up on the pressure. Drilling through the last bit of tile requires extra care. This is where cracks are most likely to happen.
Dealing with Different Tile Materials and Types
Not all ceramic tiles are the same. Some are harder than others. The type of tile you have can affect how you drill.
Knowing these differences helps you adjust your approach. This ensures you get the best result for your specific tile.
Understanding Glazed vs. Unglazed Tiles
Glazed tiles have a smooth, glassy coating on top. This glaze can be slippery and prone to chipping if you apply too much force or speed. Unglazed tiles are more porous and rougher.
They can sometimes be easier to start drilling on. However, the dust produced from unglazed tiles can be finer. For glazed tiles, the painter’s tape is especially important to prevent the bit from skipping.
For unglazed tiles, the bit might grip a bit better naturally. But the risk of chipping the edges still exists. Always use slow speeds and gentle pressure for both.
- Glazed Tiles: Smooth surface, prone to chipping. Use tape for grip.
- Unglazed Tiles: Rougher surface, finer dust. Careful about edge chipping.
The fundamental techniques remain the same. The key is adjusting your feel and pressure based on the tile’s behavior.
Hardness of Porcelain Tiles
Porcelain tiles are a type of ceramic tile, but they are much denser and harder. They are fired at higher temperatures. This makes them very durable and less porous than standard ceramic tiles.
Because they are so hard, you absolutely need the right drill bits. Diamond-tipped bits or specialized porcelain bits are essential. Standard masonry bits may struggle and wear out very quickly.
Be prepared for drilling porcelain to take a bit longer. Patience and a cooling method are vital to avoid damaging your drill bit or the tile. Consider using a lubricant specifically designed for drilling hard surfaces if available.
- Porcelain is very dense and hard.
- Diamond-tipped or porcelain-specific bits are a must.
- Expect drilling to take more time.
- Cooling and steady pressure are critical.
Many modern tiles are porcelain, so understanding this is important for DIY projects.
Natural Stone Tiles and Their Properties
While this guide focuses on ceramic tile, it’s worth noting that natural stone tiles like granite or marble are even harder. They require specialized techniques and often diamond-core bits. If you are drilling into a stone tile, ensure your drill bits are rated for that specific stone type.
The same general principles of slow speed and cooling apply, but the equipment needs to be more robust. The composition of natural stone varies greatly, so research your specific stone’s hardness before starting. This avoids costly mistakes.
- Natural stone is often harder than ceramic.
- Use diamond-tipped or stone-specific bits.
- Research your stone’s hardness.
- Slow speed and cooling are crucial.
While ceramic is our focus, recognizing these material differences helps in related projects.
Troubleshooting Common Issues When Drilling Tile
Sometimes, things don’t go perfectly. You might encounter a problem. Knowing how to fix it is part of the process.
This section helps you overcome common hurdles.
Preventing the Drill Bit from Slipping
The most common problem is the drill bit skidding across the tile. This can happen especially on smooth, glazed surfaces. As mentioned, painter’s tape is a great first defense.
Some people also use a small piece of cardboard with a hole poked in it placed over the drill spot. Another tip is to start drilling at an angle, creating a shallow groove. Then, straighten the drill to perpendicular.
For particularly slippery tiles, some DIYers have success using a small amount of sticky putty around the drill bit tip. This adds extra grip. Always start slow.
- Use painter’s tape over the mark.
- Try starting at a slight angle to create a groove.
- Use a small piece of cardboard for guidance.
- Apply gentle pressure slowly.
If the bit continues to slip, stop and try a different approach or bit. Don’t force it.
Dealing with Cracks and Chipping
Cracks and chips are the biggest fears. They usually happen due to too much pressure, too high speed, or a dull drill bit. If you see a small chip forming at the edge, try to slow down and apply even less pressure.
Sometimes, you can carefully smooth out small chips with fine-grit sandpaper after the hole is made. If a significant crack appears, you might need to stop and re-evaluate. Can you live with the crack, or do you need to replace the tile?
Sometimes, strategic placement of items like soap dispensers or towel bars can hide minor imperfections.
- Excessive force or speed causes cracks.
- Dull drill bits can also lead to breakage.
- Slow down and use gentle pressure.
- Consider if a small imperfection is acceptable.
Prevention through proper technique is the best way to avoid these issues.
Overheating the Drill Bit
If you drill for too long without cooling, your drill bit can get very hot. This makes it less effective and can damage its hardness. It can also stress the tile.
Always have your spray bottle of water handy. Spray the drilling area frequently, especially when drilling through the tile. You’ll see steam when water hits a hot bit.
This is a sign you need to cool it down more often. Don’t let the bit get scorching hot. If it feels too hot to touch, let it cool down completely before continuing.
A bit that has overheated too much might need to be replaced.
- Spray water onto the drilling area often.
- Allow the bit to cool if it feels very hot.
- Don’t drill continuously for extended periods.
- An overheated bit may need replacement.
Consistent cooling is one of the most important steps for a successful drill.
How to Drill a Hole in Ceramic Tile: Best Local Methods for Various Needs
The methods you use can vary depending on what you need the hole for. Whether it’s for plumbing, a light fixture, or just hanging a picture, there are slight adjustments. These tips ensure the hole is perfect for its purpose.
Thinking about the end goal helps guide your drilling.
Drilling for Plumbing Fixtures
When drilling holes for plumbing, like for a faucet or showerhead, accuracy is paramount. You’ll likely need larger holes, sometimes requiring a hole saw. Measure twice, drill once.
Ensure the hole is perfectly centered for the fixture to fit flush. For larger holes, using a template or jig can ensure consistent results. Consider the thickness of the tile and any backing material.
You may need to drill through multiple layers. Always err on the side of caution with pressure. Clean up any debris thoroughly to prevent pipe blockages.
- Precision is key for plumbing.
- Hole saws are often needed for larger diameters.
- Use templates for consistent hole placement.
- Clean all debris thoroughly afterwards.
This is a critical application where mistakes can be costly and difficult to fix.
Creating Holes for Electrical Outlets and Wiring
For electrical work, safety is the top priority. Always turn off the power to the area before you begin. You’ll need to know the exact size of the electrical box or conduit you’re using.
Again, hole saws are commonly used here for neat, round openings. Some electrical boxes require square or rectangular openings, which may involve a series of smaller holes or specialized tools. Be aware of any wires or pipes behind the tile before you drill.
Use a stud finder or an electronic scanner if you’re unsure. A hole drilled through a live wire can be extremely dangerous.
- ALWAYS turn off power before drilling for electrical work.
- Use correct size hole saws or bits for boxes/conduit.
- Check for existing wires or pipes behind the tile.
- Drill slowly and carefully to avoid damaging utilities.
This type of drilling requires extra caution due to the inherent risks involved.
Small Holes for Mounting and Hanging
If you just need a small hole to hang a picture, mount a shelf, or install a small hook, the process is simpler. You’ll likely use a carbide-tipped masonry bit. Even for small holes, the principles of slow speed, gentle pressure, and cooling still apply.
A small hole is still a break in the tile’s integrity. A crack can still start easily if you’re not careful. Using painter’s tape is highly recommended to prevent the bit from wandering.
For very light items, a plastic anchor might be all you need. Just ensure the hole is snug for the anchor.
- Carbide-tipped bits are suitable for small holes.
- Painter’s tape is essential for preventing bit slippage.
- Start slow and apply steady, light pressure.
- Ensure the hole is sized correctly for anchors.
This is a common DIY task where learning the proper technique prevents frustration and damaged tiles.
Decorative and Design Holes
Sometimes, holes are drilled for aesthetic purposes, like in decorative screens or backsplashes. In these cases, the appearance is paramount. The holes need to be clean, uniform, and precisely placed.
Larger diameter bits or specialized tools might be used for creating patterns. Consistency is key. If you’re drilling multiple holes for a pattern, measure and mark each one carefully.
Consider using a template to ensure all holes are aligned perfectly. The cooling and slow speed techniques are vital to maintain the tile’s integrity and ensure a professional finish. Take your time and work methodically for the best visual outcome.
- Precision and uniformity are critical for decorative holes.
- Use templates for consistent placement and alignment.
- Maintain slow speeds and cooling to prevent damage.
- Take extra time for a professional, clean look.
These projects highlight the importance of technique for both function and form.
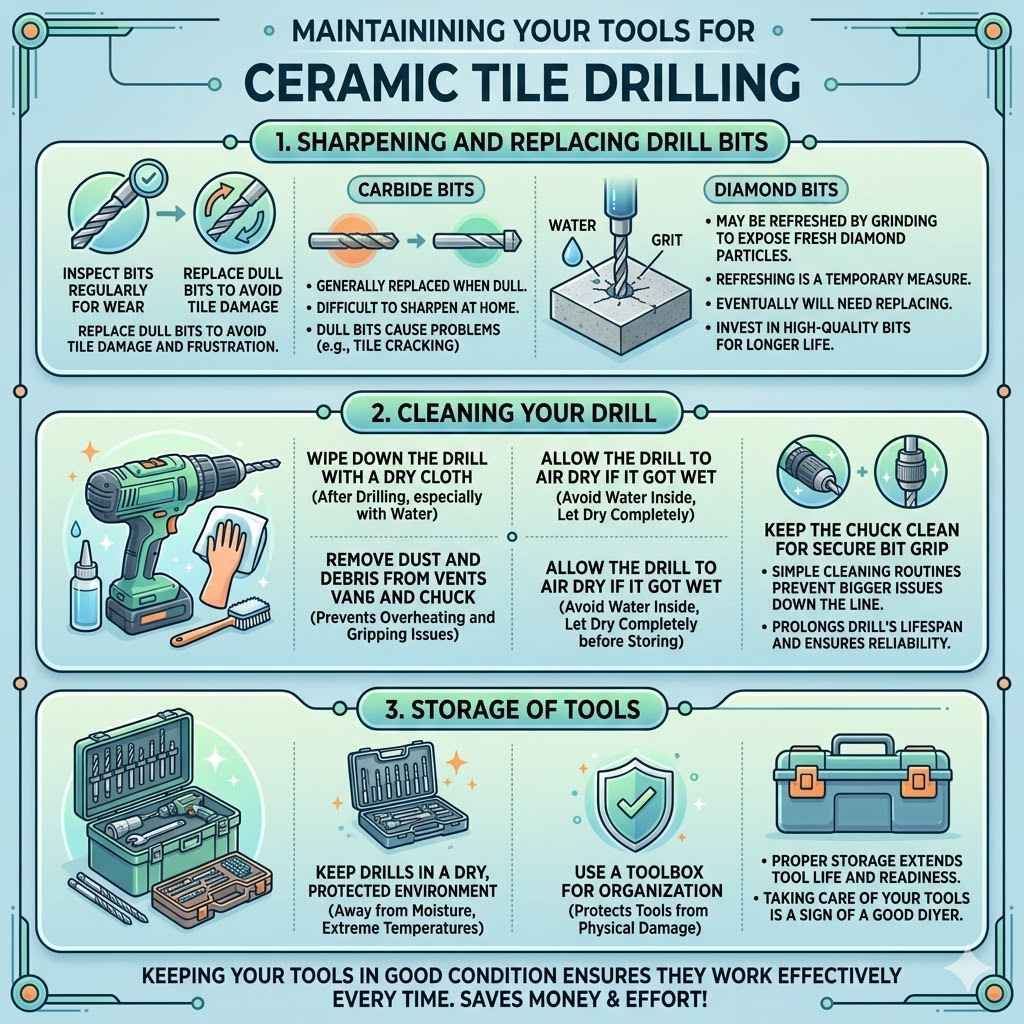
Maintaining Your Tools for Ceramic Tile Drilling
Keeping your tools in good condition ensures they work effectively every time. Proper maintenance saves you money and effort in the long run.
Sharpening and Replacing Drill Bits
Drill bits, especially masonry and carbide-tipped ones, do wear down. A dull bit is ineffective and can cause more problems, like cracking the tile. For carbide bits, they are often not designed to be sharpened at home.
It’s usually more cost-effective to replace them when they become dull. Diamond-tipped bits can sometimes be “refreshed” by drilling into a piece of concrete or a grinding stone. This can expose fresh diamond particles.
However, eventually, even these will need replacing. Inspect your bits regularly. If they aren’t cutting cleanly, it’s time for new ones.
- Carbide bits are generally replaced when dull.
- Diamond bits may be refreshed by grinding.
- Inspect bits regularly for wear.
- Replace dull bits to avoid tile damage and frustration.
Investing in good quality drill bits will also mean they last longer.
Cleaning Your Drill
After drilling, especially when using water, it’s important to clean your drill. Remove any dust or debris that may have accumulated. Wipe down the exterior of the drill.
If water got into any vents, let the drill dry completely before storing it. For drills with adjustable chucks, ensure they are clean and free of grit. This helps them grip the drill bits securely.
Keeping your drill clean ensures it operates smoothly and prolongs its lifespan. A clean tool is a reliable tool.
- Wipe down the drill with a dry cloth.
- Remove dust and debris from vents and chuck.
- Allow the drill to air dry if it got wet.
- Keep the chuck clean for secure bit grip.
Simple cleaning routines prevent bigger issues down the line.
Storage of Tools
Proper storage protects your tools from damage and the elements. Keep drill bits in their original cases or a dedicated bit organizer. This prevents them from getting lost or damaged.
Store your drill in a dry place, away from moisture and extreme temperatures. If you have a toolbox, use it to keep everything organized and protected. Good storage habits mean your tools are always ready when you need them, in good working order.
- Store drill bits in their cases or organizers.
- Keep drills in a dry, protected environment.
- Use a toolbox for organization.
- Proper storage extends tool life and readiness.
Taking care of your tools is a sign of a good DIYer.
Frequently Asked Questions
Question: What is the best drill bit for ceramic tile
Answer: The best drill bits for ceramic tile are diamond-tipped hole saws for larger holes and carbide-tipped masonry bits or specialized tile bits for smaller holes.
Question: Do I need a special drill for ceramic tile
Answer: You can usually use a standard corded or cordless drill. However, ensure it has a variable speed setting and that the hammer drill function is turned OFF.
Question: How do I stop ceramic tile from cracking when drilling
Answer: To prevent cracking, use the correct drill bit, set your drill to a slow speed, apply gentle and steady pressure, keep the bit cool with water, and use painter’s tape to prevent bit slippage.
Question: Can I drill through porcelain tile
Answer: Yes, but porcelain tile is very dense and hard. You must use diamond-tipped or specialized porcelain drill bits, and be extra patient with slow speeds and cooling.
Question: How deep should I drill
Answer: Drill only as deep as necessary for your application, such as for a screw anchor or to pass a wire. Be careful not to drill too deeply, especially if there are pipes or wires behind the tile.
Wrap Up
Learning how to drill a hole in ceramic tile is an achievable skill. By using the right tools and techniques, you can make clean holes without breaking your tile. Remember to go slow, keep things cool, and be patient.
You’ve got this!