How To Make Sure Your Table Saw Fence Is Square? [Easy Trick]
As a carpenter, you need an accurately sized table saw fence for effective performance. It is a little hard to find out the measuring of the fence geometrically. But do you have any idea on how to make sure your table saw fence is square?
If you aren’t a professional woodworker, working with a table saw fence may be challenging. Here are some great techniques from my several years’ journey with making and repairing wooden objects. By following these, you can create your professionalism, but you have to be passionate.
Read the entire article attentively, because there are proper guidelines about table saw fence measurement and making. Even if you want to take it as your career, it is enough to make your journey easier with a table saw fence.
5 Easy Steps To Make Sure Your Table Saw Fence Is Square:
There are several steps you can take to begin the process of preparation for checking the measurements. In addition, the most simple and effective way is described here. In this way, I have gained quite a prominent experience with a table saw fence which I am going to share with you.
Step-1 Need Some Geometrical Tools:
Fortunately, you can easily measure the size of a table with a geometric method. But, unfortunately, geometric tools can be a little difficult to collect or buy. Try to use geometric methods. This is the best way to measure accurately. You will not understand the size of the table saw fence to guess your eyes. So, let’s find out the names of what tools are needed.
- Rip Fence Alignment;
- Table Blade Alignment;
- Blade Bevel Angle;
- Miter Gauge Angle;
- Rip Scale Indicator.
With these instruments, you need more skill, patience, attention, and time. You may not have an idea about each of the tools. You will get the idea through work from the next steps.
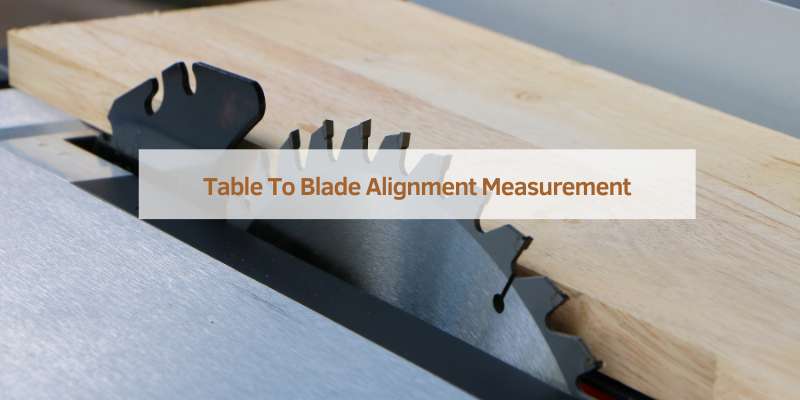
Step-2 Table To Blade Alignment Measurement:
This tool should be placed on the track of the miter slot on the table and measured in parallel. This tool has sharp teeth that will scratch against your wood if it is not on the parallel border. Then you have to look at the abrasion marks of the blade alignment on your surface to understand where there is a lack of measurement.
Mark the ‘X’ on one end of the blade teeth. Take a small part to attach the screw to one end. The screw touches the blade slightly. The part must be less than 2.5*4.5. Now set the miter gauge with the screw near the blade in such a way that it touches slightly. Look at the picture and now rotate the blade.
Rotate as long as it takes to observe you. The tooth marked X will create pressure with the screw, otherwise, if there is slight air pressure, loosen the clamp more and rotate it again in the same manner. This way you can check if the blade alignment is parallel to the table. Consult a skilled carpenter to get a clearer idea, if you don’t yet understand clearly.
Step-3 Parallel To The Fence Alignment:
Getting an idea of rip fence alignment is the most important tool for measuring table saw fences. Check if it is compatible with the fence and see if it is parallel. Set it with the track for the rip fence of your table. See how to level up the rip fence alignment to your saw fence. With this, you can easily know if your table is so square.
Once the table is parallel to the blade, you will want the table and the fence to be parallel to the blade. It is very easy to do this with the miter slot. Measure with a miter slot, you will see if it is parallel to the upper and lower corner.
Step-4 Miter Gauge Adjustment:
Now it is time to measure with a meter gauge. Set the meter gauge and turn the pointer to zero. This means the meter gauge is fixed at a 90-degree angle with a blade. You can mark it with two different symbols. Now set the two pieces in such a way that one letter is facing upwards and the other is facing downwards, and it is attached to the surface of the miter gauge.
Now you will see some asymmetrical objects like in the picture. Now try to cut the unequal part and make it equal so that there is no gap. In this way, complete the process with a miter gauge and measure.
Step-5 90 Degrees/45 Degrees Blade Bevel Angle:
The blade bevel angle is a tool to cut your piece at 90 degrees or 45 degrees angle. Many of the same rules apply such as a 90 degrees angle. But it can be required to cut it at a 45-degree angle. The bevel angle is perfectly perpendicular to the cut as per your requirement.
Don’t trust the bevel indicator in your table saw. It is not enough to be accurately set up. It’s easy to set it up at 45-degrees and back it to 90 degrees. You can measure it with a very useful digital angle box. It is the most effective and easy to use I found. You tape it to 0 levels and set it with the blade.
The blade turns 45 degrees and the digital box shows the result of the angle. Moreover, you can use normal tools to know the measurement. A digital measuring box may be very expensive to you and it cannot deliver the exact result sometimes.
3 Simple Steps To Make The Table Saw Fence Square:
The biggest issue with a table saw that you have to face is a proper table saw fence. Here I discuss how to solve the problem. And that is to make your table saw fence. The way I make it is very easy, cheap, and quick.
Step-1 Straight Cut Pieces:
You need a square fence for your table which you can make yourself. Cut a piece by measuring with a miter slot. Cut with a table circular saw. Make sure it is a left and right-side straight cut piece. Clamp up the cut piece for another piece. Then cut another piece of the same size by double-checking. You should take double measures to make sure the size is accurate.
So, now you have the two great pieces, you can make a rough check for 90 degrees. Cut the length equal to the table. It will make you satisfied if the size is suitable for your table.
Step-2 Make A Small Support:
You have to make some square blocks to support the glue of two cut pieces. Make sure the blocks are equal squares. It needs to be 4, 5, or 6 pieces for support. You use them because it links with another piece.
Now glue the blocks together with a piece of glue. And then shape the rest of the piece and glue it. Apply glue by measuring it exactly with the geometric tool to keep the 90-degree angle. Clean the white glue and clamp it and then check the 90-degree angle properly. You have to wait for a whole day.
You can use screws instead of glue. Although the glue is not permanent, the screw is much more durable. However, screwing is not flexible, you have to manage the machine to drill.
Step-3 Attach The Fence:
The basic part of making a fence is complete now. Cut the two pieces measuring the table length to attach the fence to the front and back of the table saw. Now clamp the two pieces on either side of the table so that it is parallel to the table. Check temporarily to see if everything is okay. It’s aligned with my table saw blade, which is very important.
Now you make the two screw holes on each side. Keep the screws tight with the table’s edges so the fence cannot wiggle. It needs to be set in such a way that it can move from left to right and right to left side easily.
Now your square fence-making is great. It’s very accurate and perfect now. It makes you happy because it is aligned with your table saw blade. So this is great, cheap and easy which you can make in a day.
4 Mistakes You Have To Avoid While Making A Table Saw Fence Square:
Here are some common mistakes that usually happen when you try to make your table saw fence square:
1. Using the digital angle box and the indicator:
Though it is easy and handy to use, there are a few good reasons why you shouldn’t use the tools. These are not consistent with all. It is good for factory scale. But not as good as a quality square. Need to use a quality square instead. Woodpecker is better in this case. However, home depot ones are probably worse than digital gauges.
So, what’s wrong with the digital ones? It has a factory error. Of .2 degrees which means, it reads 90.0 it could be 89.8, 89.9,90.1, or 90.2, etc. And then the indicator cannot give you the exact information. So, don’t use a digital angle box and don’t use the indicator.
2. Pressing Against The Blade:
Use your rip fence to cut a wide board. You almost want your workpiece to be on the side between the blade and the fence. For this, it is bound to get a square face of the piece. You should keep a little pressure on the things you cut, not the blade. So, try not to put extra pressure when you cut things.
3. Trying To Cut With Freehand:
It is better not to cut anything on the table blade with free hands. There is also a risk that your hand may move toward the blade. Also, your cut will not be straight. You should not handle it with a free hand to prevent these obstacles.
4. Overtightening The Arbor Nut:
This is a kind of minor one. But You have all done this you replace the blade. You put the nut back on the arbor. What do you do? You crank down that nut because we don’t want that blade flying off right. You don’t need a lot of tightening pressure on the table saw blade nut. Don’t worry the blade isn’t going anywhere.
Tips For Measuring & Making Table Saw Fence Square:
The best tips and tricks you need to follow for measuring your table saw fence. These help you make the better performance to cut the things:
- Get acquainted (gain, obtain) with present geometrical tools. Each tool has different functional capabilities. If you don’t know these, it can be difficult for you to be effective by using them first. Try to know the correct and tactical use of them from an expert.
- Use enough extensions and tools. Use it, your work will be more perfect and easy. But if you do not know how to use everything correctly, you can make mistakes.
- You can take the help of a professional or expert without trying to work alone for the first time. You should learn the process of working safely.
- You can use wax to lubricate the table and fence. Learn how to use it well.
- Of course, you should maintain the safety issue. Many safety tools for table saw fences are available. As you are a newbie, you should take proper care about security.
Related Questions About Table Saw Fence
How Accurate Should A Table Saw Fence Be?
The more accurate the table saw is, the more perfect and suitable your cut will be. To get the job done perfectly, measure beforehand whether your table saw fence is parallel. Also, check if there are squares after the table saw the fence is parallel. Your table fence and table saw blade over the blade diameter of 001” should be parallel. This is a standard, so adjust the size of your table fence.
Should The Table Saw Fence Be Parallel And Square To The Blade?
A properly sized table fence can deliver a great performance in cutting. It should be exactly parallel and square. When you have a parallel between the table blade and the fence, you do not have to worry about the accuracy of your cutting. The cutting process is done through the blade to match the edge of the fence.
If the fence is not parallel, it will look dull and you will not get enough. That’s why square Fence is a blessing in disguise for you. Just try to cut with the mentioned process and make it better swiftly.
Which Side Of The Blade Should The Square Fence Be On?
The Rip Square Fence on your controlling hand is the most effective for you. Because your cutting thing will be between the fence and the saw. So set the fence in such a way that it feels convenient to work with your hands. Of course, make the fence in such a way that it can be moved around the table. So you use the fence for the convenience of your controlling hand.
How Can You Tell If A Table Saw Fence Is Accurate?
Check whether the table fence is accurate with T square. T square is a woodworking tool for measuring 90-degree angles. With this tool, you can easily check the table fence. To test, measure with a T square with a cutting and see exactly a 90-degree angle.
You can also check by measuring square fences with a meter gauge. A digital meter tool is another great measure of measurement. Besides, you can get 100% accurate information about your table saw fence by following each step above.
Why Is A Square Table Saw Fence Important?
There is no substitute for square and parallel table fences for great guidance and security. A square fence as a woodworking tool will bring great success which will make you happy in this work. Make a substantial experience with the table saw square fence by making a flawless shape of cutting. By following the steps, make the fence square and try to keep the shape of the cutting accurately.
Why Does Your Table Saw Not Cut Straight?
There may be some notable reasons why the cut may not be straight. The biggest reason for not cutting the table saw straight is because the table saw fence is not square. A square fence saw will help to keep your cut straight and perfect. It can also be due to the wrong alignment.
Do not cut with freehand, because of this the cut will not be even. The most important tips are to keep your table saw and table fence parallel and square in shape, this will allow you to ensure the cut is straight.
Final Thoughts
Finally, If you are a newbie woodcutter, I suggest you make the table saw fence in an exact square shape. With the geometrical instruments, you can make it accurately as well. If you take the profession as your career, follow my guideline properly and go ahead with doing hard work.
Gather the appreciable experience and share it in the comment section below.