How To Use A Sliding Compound Miter Saw? [A Beginner Guide]
A compound miter saw is an intelligent tool that is malfunctioning. For average homeowners or hobbyists, you need a tool for installing flooring and trimming longer wood. In that case, you must be aware of using a sliding compound miter saw correctly.
Using any backsaw is very easy, and somewhere the guidelines are pretty straightforward. Pull the slider blade and the guard over the working pieces, then turn on the trigger switches. It is a notable point to operate any sliding compound miter saw.
Place the working pieces into the fence and slide the blade forward and backward to get an angle and accurate cut. However, there are some other things that you must be aware of along with this guidance. So, read this one from top to bottom to know all the related topics.
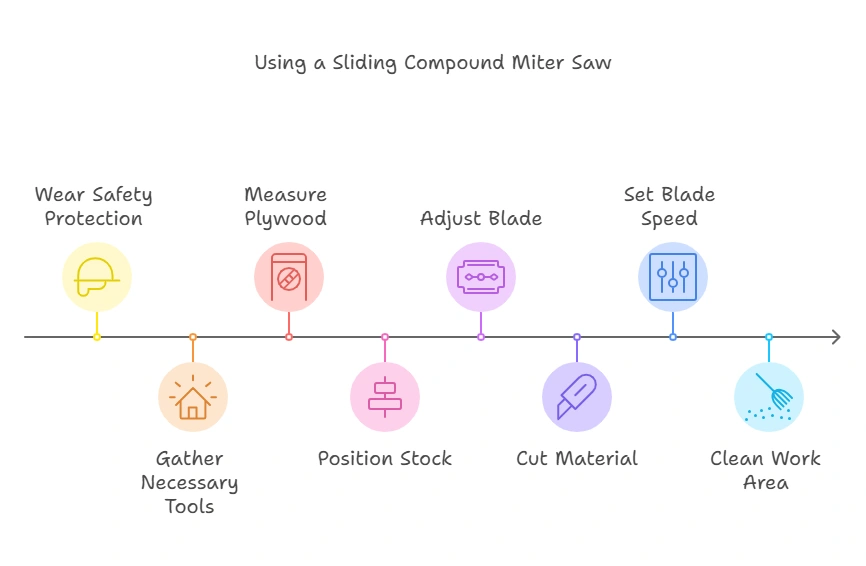
8 Steps To Use A Sliding Compound Miter Saw With Tips
Driving any compound miter saw didn’t let you do the task fruitfully without suitable preparation. Below is the clear guidance you should follow to use a tenon saw. Try to mimic each step carefully and finish it with clarity.
Step-1: Wear Necessary Safety Protection
Put on your hearing protection to save you from deafening. Wear safety protection like a dust mask, eyewear, and hand gloves.
Make sure you wear something loose or not too tight for wearing clothes. Tighten your hair correctly and make a long ponytail before going to work. Now you are prepared for the job.
Step 2: Gather The Things You Need To Assemble
Collect those things and keep them near you to find them immediately while you need them:
- A Backsaw;
- A Wrench;
- Some screw nuts;
- Meter tape;
- Ruler scale;
- Pencil/pen marker;
- Working pieces of plywood.
Step-3: Take The Plywood & Measure It Properly
Take your working pieces and lay them over the floor slightly. Put the meter tape over the wood, and trace it. For example, if you want to cut off the plywood 5 meters in half, trace the measurement in the middle of the wood with a pencil or a marker pen.
Step 4: Push The Stock Against The Fence & Put The Wood There
Put them over the fence if you’re used to cutting out the wooden block on a slope. Push the stock against the wall and use the clamp to hold the wood properly. It contains the wood tightly to prevent wood movement. Try to learn how to use the miter saw to cut angles to have the actual hints drive it prominently.
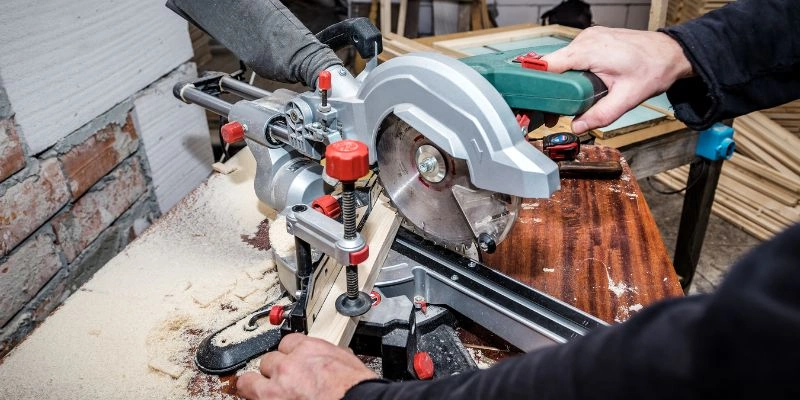
Step 5: Bring The Upper Blade Close To The Wood
Bring the upper blade close to the wood, and check twice that you place the wood just at the point of the edge. Remember to bring it as close as possible to you. Then trigger the turn-on switch off the saw and push the border through the work. This is the ultimate step that may let you learn how to use a miter saw for beginners.
You can make a saw to cut off many angels. If you want to cut 0⁰ angle, measure the saw meter scales. Unlike this, you can take shortcut measurements for the 22.5⁰, 31.6⁰, and 45⁰. Set the meter at the right angle and press the trigger to cut it off.
Step-6: Cut Out The Longer Piece Of Material With Stand
Longer pieces may move to and fro if they’re not appropriately supported. In that case, use an extra strand to reduce its movements. You can put a wooden block inside the machine. Luckily, if your device has built-in extension material as needed, you don’t need to add any wooden block for this.
Step-7: Bring The Blade Up To The Minimal Speed & Make A Swivel Cut
Now, bring the blade up to the traced mark that you made. Keep the edge under speed, which you feel comfortable working on. Remember to keep your finger at least 6 inches away from the edge. Otherwise, you may drive it over your hands and finger unconsciously.
Step-8: Clean The Entire Areas And The Miter Saw Dust Port
Once you’re finished, cut off all the wooden pieces. Now finalized, the task is to clean the entire area. You can use a vacuum cleaner for this job. And also, don’t skip cleaning and sweeping away the miter saw dust port.
4 Things You Should Know Before Using A Sliding Compound Miter Saw
As the name suggests, a miter saw is used for cross-cuts and miter cuts in a workspace. Using this miter saw may not be easy for the beginner since you should maintain some things strictly. Here are the things which you need to be conscious of.
1. Take Proper Safety Proclamation
It is the most important part before starting the job. Otherwise, all your attempts go in vain. Sliding a miter saw may bring disaster to you if your finger goes beyond the saw.
You should take three kinds of protection before going to the final destination. Those are – hearing protection, eye protection, and dust protection. Do not forget to wear them during the working period.
2. Get Some Basic Ideas About The Miter Saw’s Mechanism
A general miter saw has its anatomy or mechanical design. If you skip those parts, using the machine is challenging. This is why getting some idea about the saw is wise to know.
While you see the machine, you will notice eight essential parts: a handle, slide rails, fence, table, meter scale, meter lock handle, power switch, and guard. Each of the parts works differently to give you a perfect cut. Besides, some miter saws may vary in features and be set up slightly differently. But their usability is the same as described below, which you will see with them.
- Blade:
The miter saw blade is the core of everything. It is the thing where you have to cut off the working pieces. However, you may find the saw in different sizes. But the vast majority use the blade, which is around 5-7 inches. You also see other measures, including -7-½” inch, 8-½” inch, and 10 inches, which may raise about 12 inches.
- Guard:
The second thing you will find about any miter saw is its blade guards. It is fitted around the blades, covering the area’s half and locking the end of the parts like a door hinge. Miter saw guard protects you and the working pieces from inconvenience.
The saw guard helps lower the bottom part of the machine and set it properly over the working pieces. You can select how much you want to lower the blade down. By that time, it will also return to its position once it is finished cutting off the workpiece.
- Handle/ Power Switches:
Handle and power switches are found to be situated in the same panel. But don’t confuse it with the saw’s main power switch. The miter saw power switches let you get total control over the blade with the same hand. Some machines come with trigger-like power switches compacted into the handle. It becomes easy for you to operate the appliance on your own time.
- Table:
It gives you the main working area to place the active pieces to be seated and cut off appropriately. The table has a slot where the blade can go if you bring it down onto the functional parts.
- Fence:
A miter saw’s fence usually seems like a large, flat surface to place the working pieces to remain stable. This machine’s central part can be mounted directly onto the table. Moreover, this part can run perpendicularly to the machine’s 90-degree position. With this system, your level will be cut to any angle.
- Vise:
The other part of the miter saw is a vise grip, which is standard on almost every machine. It helps stabilize the saw onto the surface, holding the working pieces longer to be seated. The vise grip provides extra support while you lower the blade over them.
- Scale:
The miter saw scale lets you cut out the working pieces in the correct position and determine what angle you’re cutting. It can be rotated with the saw while you’re turning the baseplate. Here you also find an indicator built into the base that points to what degree you are having at.
Using this scale, one can get popular cutting angles such as 45⁰, 90⁰, and 22.5⁰. However, some miter saw has an added feature that may give you more unique cuts and shapes.
3. Know What Cut You May Get Into & What Will Not
Take an overall idea about what cut you may get from the compound miter saw and what will not. For this, you can drive it the right way without any trouble. A sliding miter saw will give you a straight cut, bevel cut, and angle cut to make any compound cut quickly.
4. Choose The Right Blade For Right Cut
Choosing any suitable blades for the proper cutting may give you trouble later. So try to get an overall idea about the compound slider’s sharp edges and usability. Do not choose thin or high tooth blades that may slow the work. It is best to use only a sword with a negative tooth pitch angle for the job.
Once you know, everything about this sliding miter saw, let us jump into the guidance of using it properly.
5 Quick Simple Guides To Cut With Sliding Miter Saws
You must learn some simple guides to run the miter saw adequately. By doing this, the task becomes easier for you to accomplish. However, I instruct you through 5 quick and straightforward guides to cut with sliding miter saws below. Try the below guidelines:
1. Use A Stop Block To Make Repetitive Cuts
If you are a professional carpenter, you need to cut out the wooden pieces for a busy schedule. Don’t fool yourself by measuring the wooden pieces continuously with a meter scale. Set up the correct measurement into the saw, and it will cut the wooden pieces at the exact length. By this, you can easily make as many cuts as you need.
2. Carry The Mobile Miter Saw Stand
Try to use a mobile miter saw stand to seat it into the place. Setting up the miter saw in the right place is tough to handle while using them on the job site. In the field of that site, you need to move the saw frequently. Correspondingly, it is tough to fix the saw into the workbenches. So a mobile miter saw is a good option in this regard.
3. Install A Laser Light For Clear Vision
Many sliding miter saws come with these features added. But if you don’t have this, try to install it at the exact line where the blade will cut. This ultimate miter saw tips and tricks give you a satisfactory result.
4. Allow The Tenon Saw Speed to rise Higher
Allow the miter saw to raise the higher speed for a polished and reputed finish. The more rate you’ll allow this to increase, the more even cut you will get. So whenever you’re turning on the miter saw, wait for the maximum speed, then lower it to cut off the working pieces.
5. For Cutting Small Pieces, I Prefer Using an Auxiliary Fence
You might not be aware while cutting any small wooden pieces. They are too small to hold and position the machine on flat surfaces. Maintaining the rules to keep both hands away from the blade at least 6 meters here will also be cumbersome.
Try to keep yourself safe by adding any auxiliary fences in this issue. Those fences are suitable for cutting small pieces and flying them off at a higher speed.
Mistakes Should Be Avoided During Use of Miter Saw
During work, many of us make significant mistakes. Of this, they can’t end their work with complete satisfaction. Avoid the below five mistakes to use the miter saw efficiently. They could make a way to play the game safely for you.
- Don’t Raise The Blade Until It Has been Completed.
Please wait until the blade is complete to make an angle and distinct cut-off. Do not raise it in the middle. It may damage the wooden pieces or give you an uneven finish.
- Keep Your Finger Away From The Blade
Remember to keep your finger 6 inches away from the blade when you’re using the miter saw. This will eliminate the easiest route to save yourself from injury.
- Slide The Blade Forward & Backward, Don’t Push It
It is a mistake commonly made by beginners to pull or push the blades instead of sliding them. Be aware of this fact; you should slide it forward when it’s time to cut off the pieces. After that, slide it back to separate the wooden pieces once completed.
Advantages Of Cutting With a Sliding Back Saw
A compound sliding miter saw has so many good sites; among them, I like some things most. Like as:
- This saw meter is suitable for having modern machinery and technology to give versatile output,
- It’s very efficient on longer pieces,
- Compound sliding may be tough to operate but valuable for beginners to experts,
- It’s effective for finishing any heavy-duty projects,
- With a unique pivoting arm and rail-free design, you get the opportunity to cut at extreme angles,
- Easy to install and change the old use blades,
- Able to cut off any depth and inches within a short period.
Related Questions:
How Do You Cut Wood With A Sliding Compound Miter Saw?
Pulling the blade forward, you can easily cut the wood with a sliding compound miter saw. Place the wood into the fence, and mark or point out the depth and length of the wood. Attach the wood with the girder to settle it properly and eliminate the movements.
Now, push the blade forward to make a bevel cut. After placing the edge appropriately, trigger the switch to start it. Wait until the blade is finished to cut the wood completely.
Can A 10-inch Sliding Compound Miter Saw Cut A 2×8?
A sliding compound miter saw can rationally cut off 2×8″-inches. Which means that while you drive the miter saw at 90 degrees, you will get 2×6″ inches cut with the saw. On the other hand, a 10-inches sliding miter saw also has a 2×8″ inches cutting depth at 90⁰-45⁰degrees.
In addition to having an accurate angle, a miter saw will also give you some extra advantages. It won’t slip over in the middle. Again, there are fewer chances to make mistakes, even if you’re a novice.
What Is The Disadvantage Of A Sliding Compound Miter Saw?
One of the disadvantages of using any sliding compound miter saw is its heavy weight. You may not be able to slide it down and pull it properly. Again, moving the sliding miter saw is tricky for people who need to work fast.
On the other hand, it is a little costly that anyone with a limited budget cannot buy the machine. Its bulky design might annoy you if you store it correctly. A compound miter saw is worth using for commercial purposes rather than home projects.
Are Sliding Compound Miter Saws Less Accurate?
Sliding compound miter gives you an accurate cut all the time. You can get 90⁰ bevel and straight guidelines with that saw. The worth of this miter saw is that it has a precise chop cutting at 90⁰, which is on par with other saws at 1/256 inches in 4″.
Besides, a sliding saw gives versatile cutting accuracy even if the wooden pieces are too long. It cuts more than any other chopping machine. The person doesn’t have hesitation or confusion about their cutting ability.
Final Word:
Now you know all about how to use a sliding compound miter saw. It’s time to get on to work. Make necessary arrangements to do the job with more clarity. But do not forget to keep the valuable safety equipment with you.
Wear headphones to avoid the noise that occurs from the tool. Always slide the machine forward and backward. Avoid pulling or pushing it ignorantly, lest it might chase after you. Keep the blade at least 1-½” inches away from the exact measurement of the working pieces to get an accurate cut.