How to Make Exterior Wood Doors: A Step-by-Step Guide
To make exterior wood doors, start by selecting high-quality wood and precise measurements. Assemble the door frame, then attach the panels securely.
Creating exterior wood doors combines craftsmanship with functionality. These doors not only enhance your home’s curb appeal but also provide security. Choosing the right materials is essential for durability against weather elements. Popular woods like oak, mahogany, and cedar offer both strength and beauty.
Accurate measurements ensure a perfect fit, which is crucial for insulation and aesthetics. Proper sealing and finishing protect the wood from moisture and UV damage. By following the right steps, you can craft doors that are not only visually appealing but also long-lasting and resilient. Embrace the art of woodworking to create stunning exterior doors that elevate your home’s entrance.
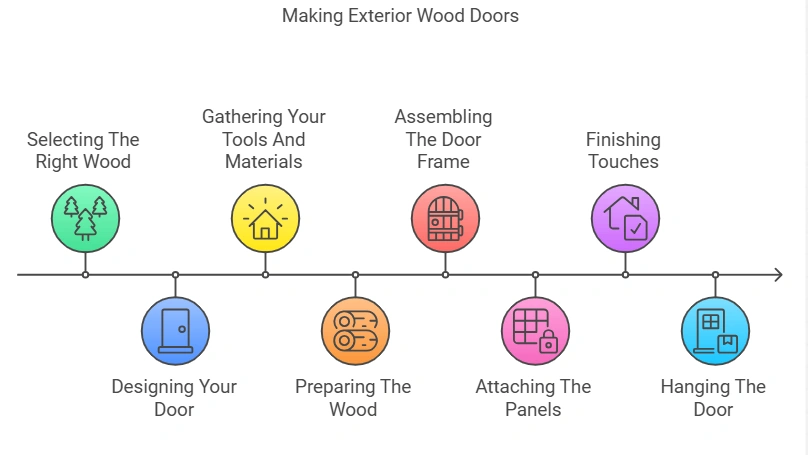
Selecting The Right Wood
Choosing the right wood is very important for exterior doors. Durability and weather resistance are key factors. Here are some types of wood that work well:
| Type of Wood | Durability | Weather Resistance |
|---|---|---|
| Mahogany | High | Excellent |
| Redwood | Medium | Good |
| Cedar | Medium | Very Good |
| Oak | High | Good |
Mahogany is known for its strength and beauty. Redwood offers great resistance to decay. Cedar has a natural oil that protects against moisture. Oak is sturdy and adds a classic look.

Designing Your Door
Designing your door involves several key choices. First, consider different door styles. Options include traditional, modern, and rustic designs. Each style adds a unique touch to your home.
Next, think about aesthetics. Choose colors and finishes that match your home’s exterior. Natural wood finishes provide warmth, while painted options offer a pop of color.
Dimensions and technical specifications are crucial. Measure the door frame accurately. Common door sizes include 36 inches wide and 80 inches tall. Ensure your door fits well to avoid gaps.
Consider the thickness too. Standard thickness is about 1.75 inches. Thicker doors provide better insulation and security.
Gathering Your Tools And Materials
Start with the right tools for making exterior wood doors. Here are the essential woodworking tools:
- Table saw – for precise cuts.
- Router – for shaping edges.
- Drill – for making holes.
- Sander – for smooth surfaces.
- Measuring tape – for accurate measurements.
Next, gather your hardware and finishing supplies. These items are crucial for a great finish:
- Hinges – to attach the door securely.
- Handles – for easy opening.
- Wood glue – for strong joints.
- Wood stain – to enhance appearance.
- Varnish – for protection against weather.
Preparing The Wood
Start by measuring the wood accurately. Use a saw to cut the wood to size. Make sure the cuts are straight and clean. This will help the door fit well.
Next, use sandpaper to smooth the edges. Start with coarse sandpaper, then switch to finer grades. Sanding helps to remove any splinters and rough spots.
Ensure the surface is even and smooth. This step is important for a nice finish. Pay attention to corners and edges. A well-prepared door looks better and lasts longer.
Assembling The Door Frame
Joinery techniques are vital for strong exterior wood doors. Use dowels, mortise-and-tenon, or biscuit joints. These methods ensure durability and strength.
Ensure the frame is square and level. Use a carpenter’s square for accuracy. Check the corners to confirm they are at 90 degrees. A level helps keep the frame straight.
Use clamps to hold pieces together. This step prevents movement while the glue dries. Choose high-quality wood glue for a strong bond. Sand any rough edges for a smooth finish.
Attaching The Panels
Choosing the right panels is crucial. Consider the wood type and thickness. Popular choices include oak, pine, and mahogany. Prepare the panels by sanding and cleaning them. This step helps in better adhesion.
Securing panels is important for a sturdy door. Use wood glue for initial bonding. Apply it along the edges of the panels. Next, use clamps to hold them in place. Allow the glue to dry completely. For added strength, use screws or nails. Make sure they are evenly spaced. This method ensures the panels stay aligned and secure.
Finishing Touches
Applying stain enhances the beauty of your exterior wood doors. Choose a stain that matches your style. Use a brush or cloth to apply it evenly. Allow the stain to dry completely before moving on.
After staining, use a sealant to protect the wood. A good sealant keeps moisture out and prevents damage. Apply it with a clean brush, ensuring even coverage. Let it dry as per the manufacturer’s instructions.
Installing door hardware is the final step. Choose handles and locks that fit your door style. Make sure to measure carefully before drilling. Follow the instructions for a secure fit. Enjoy your new exterior wood door!
Hanging The Door
To ensure proper alignment, measure the door frame first. The top and bottom should be even. Place the hinges at a height that allows smooth opening and closing. Typically, use two to three hinges for stability.
For weatherproofing, use weatherstripping around the door edges. This helps keep cold air and moisture out. Choose a door sweep for the bottom to block drafts. Insulation is crucial for energy efficiency.
Select a solid-core door for better insulation. This type reduces noise and keeps the heat in. Seal any gaps to enhance weather resistance.
Maintenance Tips
To keep your exterior wood doors looking great, regular cleaning is essential. Use a soft cloth and mild soap. This helps remove dirt and grime.
Check for wear and tear every few months. Look for cracks or peeling paint. Address these issues promptly to avoid bigger problems.
Apply a fresh coat of sealant or paint as needed. This protects the wood from moisture and sun damage. Always choose high-quality products for best results.
Lastly, ensure that hardware like hinges and locks functions well. Lubricate them regularly to prevent rust and ensure smooth operation.
Customization Options
Customization options for exterior wood doors can enhance their beauty and appeal. Adding decorative elements like carvings or glass inserts makes each door unique. Consider using different shapes or patterns to create a striking look.
Personalizing with paint and stain can transform the door’s appearance. Choose vibrant colors or natural wood tones to match your home’s style. Test samples on a small area to see how they look.
Using a high-quality finish will protect the door from weather damage. Regular maintenance keeps the door looking fresh and attractive. Enjoy the process of making your door truly yours!
Safety Considerations
Safety is very important when making exterior wood doors. Always wear protective gear like goggles and gloves. Keep your work area clean and free of clutter. This helps prevent accidents while using tools.
Using power tools requires special care. Always read the tool’s manual before use. Check tools for damage before starting. Never bypass safety features. Always unplug tools when changing blades or bits.
Handle chemicals and stains with care. Use them in a well-ventilated area. Wear gloves and a mask to protect your skin and lungs. Store chemicals away from children and pets. Follow instructions on labels for safe use.
Troubleshooting Common Issues
Warping or swelling in wood doors can be fixed easily. Start by checking the humidity in your area. High humidity can cause wood to absorb moisture. Use a dehumidifier to reduce moisture. You can also sand down areas that stick.
For sticking or misalignment, check the hinges first. Tighten any loose screws on the hinges. If the door is still misaligned, adjust the hinges. Sometimes, shimming the hinges helps. This keeps the door aligned and opens smoothly.

Frequently Asked Questions
How Do I Choose The Right Wood For Doors?
Selecting the right wood is crucial for durability and aesthetics. Common choices include oak, mahogany, and cedar. Consider the climate, as some woods handle moisture better than others. Additionally, think about the door’s style and finish. Your choice impacts both functionality and appearance.
What Tools Do I Need For Making Wood Doors?
Essential tools for making wood doors include a table saw, router, and chisels. A miter saw helps with accurate cuts, while clamps secure pieces during assembly. Sanding tools ensure a smooth finish. Don’t forget safety gear like goggles and ear protection for a safer work environment.
How Long Does It Take To Make A Wood Door?
The time required to make a wood door varies by complexity. A simple door might take a day, while intricate designs could take several days. Factors like drying time for finishes also affect the timeline. Planning ahead ensures you stay on schedule for your project.
Can I Install Wood Doors Myself?
Yes, you can install wood doors yourself with proper tools and guidance. Measure the door frame accurately to ensure a proper fit. Follow manufacturer instructions for hardware installation. However, if you’re unsure, consider consulting a professional for assistance. This ensures a secure and correct installation.
Conclusion
Creating exterior wood doors can be a rewarding project. With the right materials and techniques, you can achieve stunning results. Remember to prioritize durability and aesthetics. Regular maintenance will keep your doors looking beautiful for years. Embrace your creativity, and enjoy the transformation of your home’s entrance.
Happy crafting!


