How to Make a Wooden Clock Case: Craft with Precision
To make a wooden clock case, first measure and cut your wood pieces to the desired dimensions. Assemble the pieces using wood glue and nails for a sturdy finish.
Creating a wooden clock case combines craftsmanship and creativity, making it a rewarding DIY project. This task is perfect for hobbyists and beginners alike, as it allows you to customize your clock to fit any décor. A well-made clock case not only enhances the aesthetic of your clock but also protects its delicate mechanisms.
Selecting the right type of wood is crucial for durability and style. With the right tools and materials, you can craft a beautiful and functional piece. Follow this guide to embark on your clock-making journey and impress friends and family with your handmade creation.
Introduction To Wooden Clock Crafting
Creating a wooden clock case is a fun and rewarding hobby. Wooden clocks combine beauty with functionality. They tell time while showcasing craftsmanship. The art of timekeeping has a rich history. Handcrafted items feel unique and special.
Benefits of making a wooden clock include:
- Enhancing your craft skills
- Using eco-friendly materials
- Creating a personalized gift
- Adding character to your home
- Learning about mechanics and design
Each clock tells a story. It reflects your style and creativity. Handcrafted wooden clocks are timeless treasures.
Essential Tools And Materials
Choosing the right wood is crucial for a wooden clock case. Consider using hardwoods like oak or maple. They are strong and durable. Softwoods like pine can also work, but they may not last as long.
Look for wood that is free of knots and defects. This ensures a smooth finish. Plywood is another option, providing stability and strength.
| Tool | Purpose |
|---|---|
| Saw | Cut the wood to size |
| Drill | Create holes for assembly |
| Screwdriver | Tighten screws |
| Sandpaper | Smooth the wood edges |
| Wood Glue | Bond pieces together |
Designing Your Clock Case
Designing a wooden clock case starts with choosing a style. Think about classic, modern, or quirky designs. Each style has its own unique charm.
Creating a blueprint is essential. Draw your ideas on paper first. Measure dimensions carefully to ensure everything fits well.
Consider using natural wood for beauty. Softwoods like pine are easy to work with. Hardwoods like oak offer durability and elegance.
Gather all necessary tools before starting. A saw, sandpaper, and glue will help. Prepare a clean workspace for safety and efficiency.
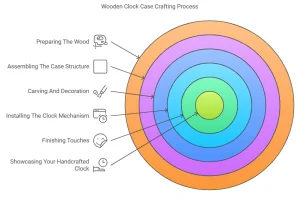
Preparing The Wood
Start by measuring the wood pieces for your clock case. Use a tape measure for accuracy. Mark the cutting lines clearly with a pencil. Carefully cut the wood using a saw. Make sure to follow your lines closely.
Next, it’s time for sanding. Use sandpaper to smooth the edges. This will help avoid any splinters. Start with a rough grit and finish with a fine grit for a nice touch. Always sand in the direction of the wood grain.
Check for any rough spots after sanding. Feel the surface with your hands. It should be smooth to the touch. A well-prepared wood surface will look great in your clock case.
Assembling The Case Structure
Start by gathering all your wooden pieces. Make sure to measure them carefully. Use wood glue to join the pieces together. Clamps will help hold them in place while drying.
Check for symmetry as you assemble. Each side should look the same. Use a square tool to ensure alignment. This will keep the clock case looking neat.
After the glue dries, sand any rough edges. This makes the case look smooth and professional. Finally, apply a finish to protect the wood.
Carving And Decoration
Carving a wooden clock case can be fun and rewarding. Start by choosing the right wood. Popular options include oak, maple, and cherry. These woods are strong and beautiful.
Focus on adding artistic details. Use tools like chisels and gouges for fine work. Patterns can enhance the look of the clock. Consider floral designs or geometric shapes.
Always practice on scrap wood before carving the final piece. This helps improve your skills. Take your time and be patient.
For painting, select colors that match your home decor. Using a clear finish can protect the wood. This also enhances its natural beauty.
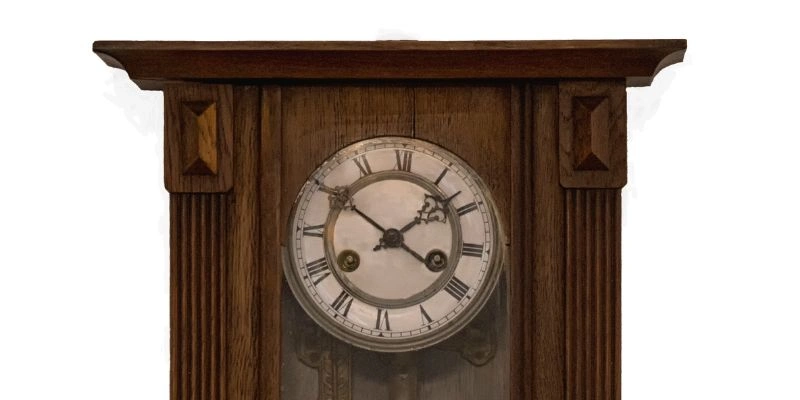
Installing The Clock Mechanism
Begin by securing the clock movement inside the wooden case. Use screws or brackets to hold it firmly. This ensures the mechanism stays in place during use.
Next, attach the clock hands carefully. Start with the hour hand, followed by the minute hand. Ensure they do not touch each other.
Finally, place the dial onto the clock. Align it properly with the hands. Make sure everything is secure and working well.
Finishing Touches
Staining the wooden clock case enhances its beauty. Choose a stain that fits your style. Apply the stain with a soft cloth. Let it soak in for a few minutes. Wipe off any excess stain to avoid blotches.
After staining, it’s time to seal the wood. Use a clear sealant to protect the finish. This will help prevent scratches and moisture damage. Apply the sealant evenly with a brush. Allow it to dry completely before moving on.
Final assembly requires careful attention. Attach the clock mechanism securely. Ensure all parts fit well and align properly. Double-check that the hands move freely. Conduct a quality check to make sure everything works.
Inspect the clock case for any flaws. Look for uneven surfaces or missed spots. A well-finished clock case looks and works better.
Maintenance And Care
To keep your wooden clock case in great shape, regular cleaning is key. Use a soft, lint-free cloth to gently wipe the surface. Avoid using water or harsh cleaners. Instead, opt for a gentle wood cleaner.
For dust, a microfiber cloth works wonders. Dust can scratch the finish over time. Clean your clock case at least once a month.
Long-term upkeep involves checking for any loose parts. Tighten screws and hinges as needed. Also, keep the clock away from direct sunlight to prevent fading.
Humidity can damage wood, so maintain a stable environment. Use a humidifier in dry months, and avoid damp areas.
Showcasing Your Handcrafted Clock
Show off your wooden clock case in creative ways. Use a bright wall to catch attention. A well-lit shelf can make your clock stand out. Consider placing it near natural light for a warm effect.
For online sharing, take clear photos of your clock. Use a simple background to highlight your work. Share your process in short videos. This helps others learn from your craft.
| Display Idea | Description |
|---|---|
| Wall Mount | Hang your clock at eye level. |
| Table Centerpiece | Place the clock in the middle of a table. |
| Gallery Wall | Combine with other art pieces for a stunning look. |
Frequently Asked Questions
How Do I Choose Wood For A Clock Case?
Choosing the right wood is crucial for a clock case. Opt for hardwoods like oak, walnut, or maple for durability. These woods offer a beautiful finish and are resistant to warping. Consider the grain pattern and color to match your aesthetic preferences.
Always ensure the wood is properly dried.
What Tools Do I Need For Building A Clock Case?
Basic tools for building a clock case include a saw, drill, and sander. You’ll also need clamps, measuring tape, and wood glue. If you have access to a router, it can enhance your design options. Ensure your tools are sharp and in good condition for best results.
How Long Does It Take To Build A Clock Case?
The time required to build a clock case varies. For beginners, it may take several days to complete. More experienced woodworkers might finish within a few hours. Factors like design complexity, finishing techniques, and drying time will also influence the overall duration.
Plan accordingly for each step.
Can I Customize My Wooden Clock Case Design?
Absolutely! Customizing your wooden clock case design is encouraged. You can modify dimensions, choose unique wood types, or incorporate decorative elements. Personalizing your clock case adds character and reflects your style. Use sketches or software to visualize your ideas before starting the construction process.
Conclusion
Creating a wooden clock case can be a rewarding project. It combines craftsmanship with creativity. By following the steps outlined, you can build a unique piece that enhances your space. Enjoy the process and take pride in your work. Your handmade clock case will be a timeless addition to your home.