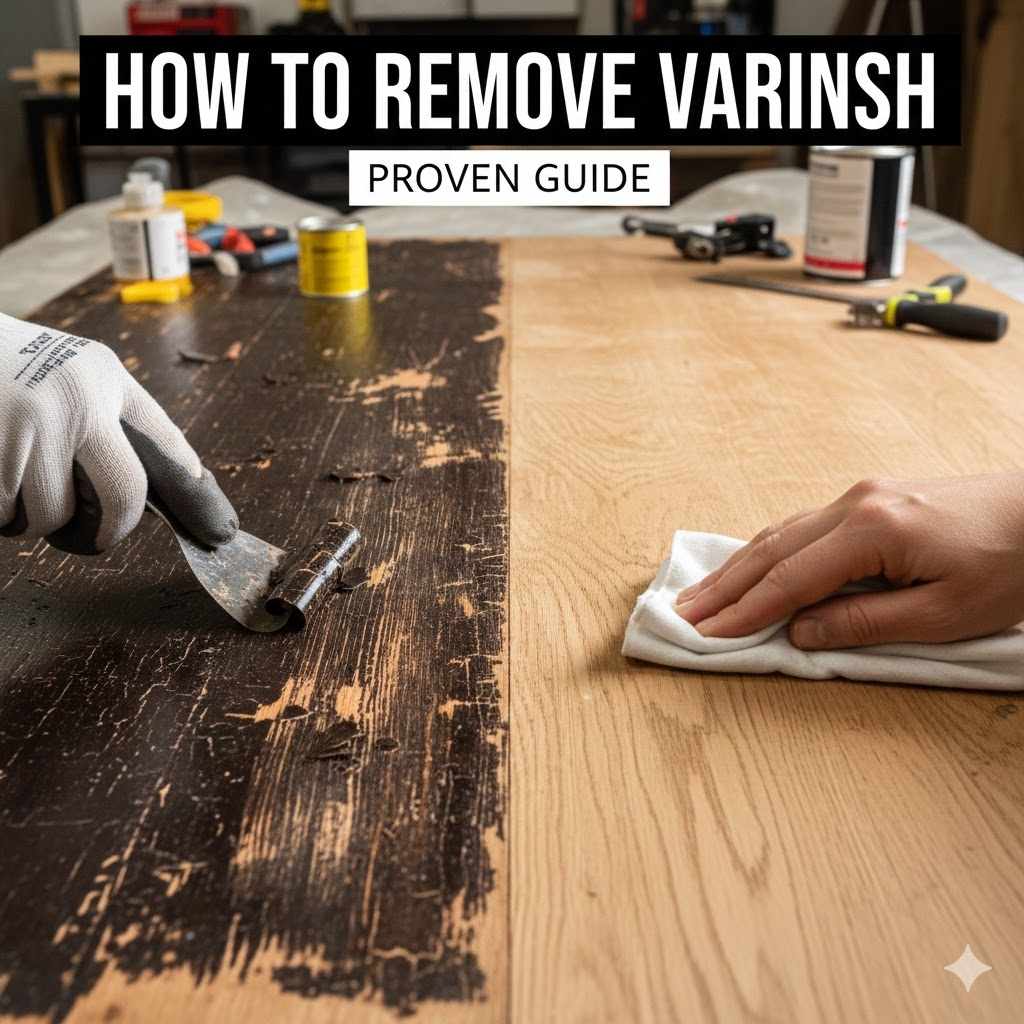
How To Remove Varnish Proven Guide
You can successfully remove stubborn old varnish from wood using easy solvent-based chemical strippers, careful sanding, or less damaging methods like applying mineral spirits or, for mild jobs, a vinegar solution, always prioritizing sanding, stripping, caution, and clean finishes upon completion.
Do you have an old, treasured piece of furniture hiding under a dark, glossy layer of varnish? Peeling, cloudy, or water-damaged varnish can look terrible and hide the natural beauty of wood grain. Tackling varnish removal sounds like a big, messy job, and honestly, most beginners fear ruining an antique in the process of refinishing it. Fear not! As your woodworking mentor, I am here to guide you through this essential step with confidence.
We will break down the easiest and safest methods, from simple sanding to using strong chemical helpers. You already have the vision to create something beautiful. Let’s give your wood a great new start, ensuring craftsmanship without guesswork. Stay tuned—we are starting with preparation now.
The Beginner’s Master Guide to Removing Old Varnish Safely
Removing an old tabletop or cabinet finish is often the hardest part of refinishing, but trust me, doing it right is simple step-by-step labor. Proper varnish removal ensures your new stain or oil finish takes perfectly. We focus on preparation, choosing the right chemical, taking your time, and staying safe.
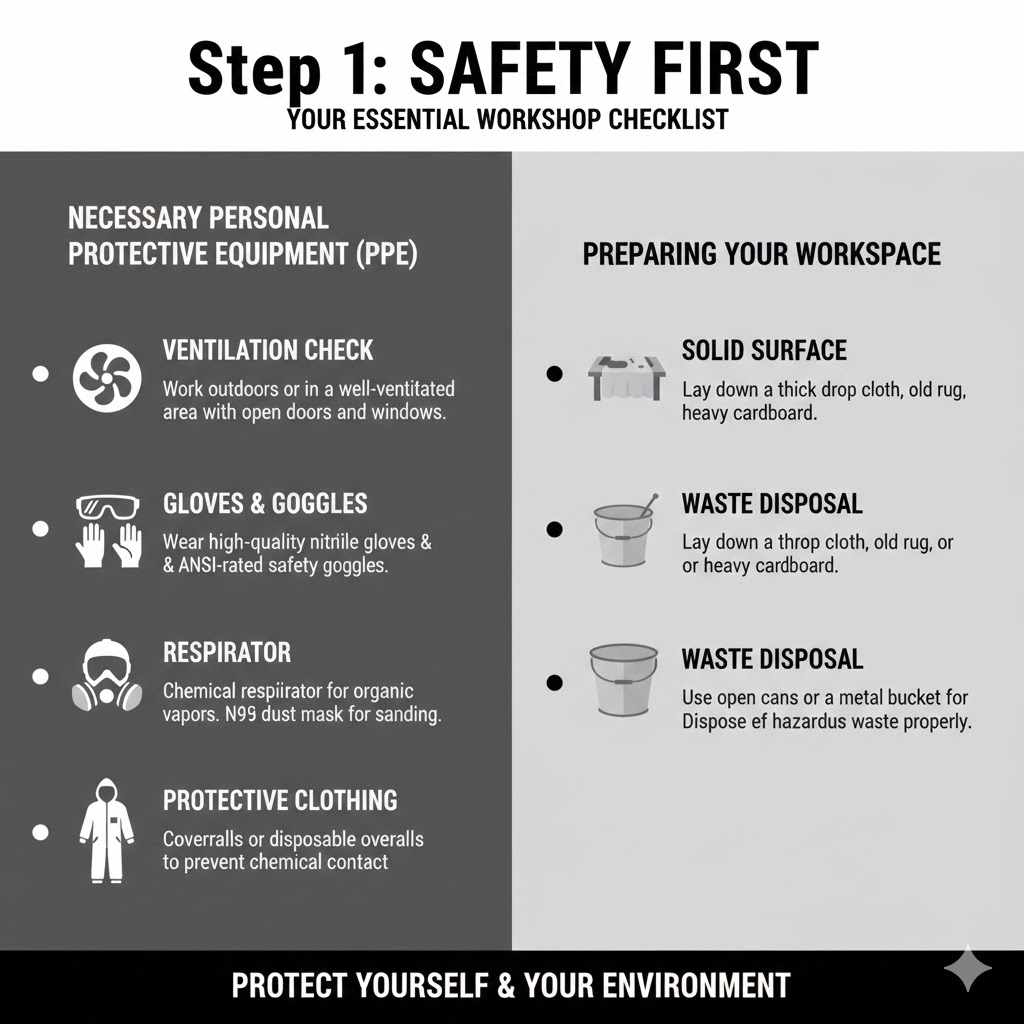
Step 1: Safety First—Your Essential Workshop Checklist
Before touching any finish remover, safety gear must be sorted. Chemical strippers and sanding dust introduce elements that are rough on your eyes, lungs, and skin. This preparatory step cannot be skipped; it protects you and keeps future projects going smoothly.
Necessary Personal Protective Equipment (PPE)
- Ventilation Check: Only work outdoors or in a well-ventilated area, like having all garage doors and windows open. Fumes from strippers go straight up.
- Gloves & Goggles: Wear high-quality nitrile gloves (regular thin gloves will dissolve fast) and ANSI-rated safety goggles—not just eyeglasses.
- Respirator: Always use a chemical respirator rated for organic vapors when stripping varnish. Sanding requires an N95 dust mask.
- Protective Clothing: Coveralls or disposable overalls prevent chemicals from soaking into street clothes. Old shirts are perfect.
Preparing Your Workspace
You need a solid surface that can handle chemicals splashing onto it and plenty of rags. Never apply stripper directly onto grass or soil.
- Lay down a thick drop cloth, an old rug remnant, or just heavy scrap cardboard that a stripper splash cannot burn through directly underneath your project.
- Have nearby receptacles ready—open paint cans or an old metal bucket for rinsing brushes away from sinks or drains. Proper waste disposal is incredibly important to prevent environmental contamination. If unsure understand hazardous waste handling through national guidelines.
Step 2: Decide Your Varnish Removal Method
There are three primary battlefield strategies everyone uses: Mechanical Removal (sanding), Chemical Peeling (strippers), and Gentle Warming (like heat guns, most challenging for beginners). Choosing the right method depends on the varnish type, the wood underneath, and most importantly of all, your comfort level indoors.
Method A: Sanding, Scratching Bare Wood, One Finish Shall Fall
Sanding is the most straightforward, least chemically intensive way, but it’s hard physical work, and the risk of sanding too deeply (blowing out softer grain while leaving bumps behind) is high.
When Physical Removal is the Best Choice:
If the varnish layers are thick, incredibly glossy, many coats deep, or gummy, step away from the orbits driver on the top setting. You will likely take chunks of wood with you.
The Beginner’s Safe Sanding Progression
Because we want bare wood eventually (without deep gouges!) we must start rough and get finer.
- Strip the Loose Stuff: Use a plastic scraper to remove anything already curling loose from the wood (no bare metal scrapers unless extremely gentle). Pull the blade towards you gently.
- Heavy Cutting Pass (If Necessary):Employ 80 or 100-grit sandpaper, usually with a long, smooth random orbit sander, moving systematically in the direction of the wood grain across the general surface area. Cover all spots.
- Grain Refinement: Move to sequential paper grits. 120-grit comes next, thoroughly removing scratches left by the 100-grit paper.
- The Finish Pass: Follow that with 150-grit, then hit every spot aggressively with 180-grit. For finishing/stain prep, professional advice recommends not going above what your final application prefers, usually 180 for furniture that gets heavy protection over the top.
Method B: Introducing Slow/Thick Chemical Varnishes That Soften Shellacs
For truly baked-on varnish, chemical application allows the solvent an opportunity to work its way into the layers like a hot knife through butter (softer analogy!). Look for slower, less volatile stripping gels labeled for ‘thick polyurethane or varnish removers.’; These contain less harsh stuff but take longer.
Essential Tools for Chemical Stripping
| Tool Requirement | Purpose (Why Use It While I Mentor You) |
|---|---|
| Thick-Jelly Stripper | Stays put! It won’t evaporate fast like inexpensive versions, allowing longer working time. |
| Cheap Bristle or Nylon Brush | Apply generously; use a tough brush that you don’t mind tossing later. |
| Plastic Putty Knives or Dull Scrapers | Used only to lift and drag what the stripper has turned gooey—absolutely NO metal digging. |
| Mineral Spirits or Water (for rinsing/neutralizing) | Depends totally on what the stripper MSDS sheet recommends for safety cleanup after lifting the goo. |
Applying Chemical Finish Remover Safely
- Test Square Area: Apply a nickel-sized spot in an inconspicuous area first! Wait the recommended time to ensure everything lifts without harming or discoloration to you or the original undercoat (if any).
- Apply Thick Coat Regardless of Looks: Load your brush and spread fertilizer about $0.125 like the thicker coatings of 1950s finishing techniques required—thick, goopy layers are often best to stop quick evaporation. Follow label timers exactly or err slightly on the side of ‘wait longer after the recommended agitation time’.
- Wait, Wait, Breathe Safely: Respirator on! Let the chemical turn varnish gooey/puckering. Sometimes 30 minutes, sometimes a couple of hours depending on chemistry.
- Scrape Gently: Gather softened varnish using a clean plastic scraper in manageable strips. Deposit this sludge immediately into your designated disposable pail.
- Second/Third Coats: Usually needed once the first clean pass looks dry. Repeat! Patience converts work from hours of frustration into easily manageable batches.
Step 3: Tackling That Infamous Stubborn Varnish Spots (“How To Remove Varnish From Wood With Vinegar”)
Now we must address the budget-friendly classic: The vinegar query. Can you strip tough varnish with household ingredients like distilled white vinegar? The short, honest answer used in my mentorship is:
- Vinegar/Ammonia/Steel Wool: This combination absolutely melts shellac! It will cause fine etching but will clean light shellac very fast while preparing a final sanding canvas.
- Polyurethane/Lacquer Varnish Protection: Real oil or plastic (polyurethane) varnishes strongly resist common household acid and alcohol mixes. You MUST use specialized chemical solvents for those very defensive finishes. Trying commercial strippers that utilize Methylene Chloride alternatives as replacements for historical hazards is really a different chemical operation all together though this idea sometimes is mixed between solvents and vinegar. Make your varnish chemical decision wisely.</l<i) If your varnish isn’t the extremely basic shellac, using vinegar is better left for neutralizing excess stripper residue upon wood surface before sanding stage five
If your current gunk passed the fingernail scratch test, you already know true sanding or specialized gel removers will provide the best journey today across this wooden expanse.
My primary professional directive here keeps it simple:
- If it peels easily: Scrape or Power Dust off.
- If it stubbornly clings in large spots: Deploy a strong Stripping Gel.
Step 4: The Neutralization and Wash Battle
This is crucial, particularly after using chemical peelers. Allowing acidic or base stripper elements to dry on the wood surface will ruin any subsequent stain or clear coat you attempt on top, causing uneven drying, blotching, or bubbling.
Step-by-Step Neutralization
ALWAYS check your chemical stripper manufacturer’s advice first—they tell you exactly what solvent counters that specific chemistry!
- Gentle Rinse (If Recommended Clear Varnish Lifted Quickly): Saturate large clean rags with the cleaner—perhaps clear water, paint thinner, or mineral spirits depending on product type. Wipe the entirety of the project generously but quickly one last time. (Watch the rag closely—the older goo moves quickly).
- The Wash Stage: I often find wiping the surface down several times with clean ________ (mineral spirits if oil solvent remover, water/denatured alcohol if shellac solvent remover) cleans residual gunk effectively right down to the raw spot structure needed. Discard those dirty wash rags carefully later outside the dust.
- Drying Time: Allow wood panels adequate time (often 24 hours or more, depending on heat & humidity) underneath a strong fan before getting brave with the abrasive papers again.
Step 5: Returning to Sanding—Achieving Bare, Unvarnished Bliss
The chemicals loosen the top layer; now, sanding must remove the very edges left behind or take off a very fine second varnish skin left when you wiped it. This stage refines the grain texture for the coming topcoat.
The Detail Cleaning Polish Round
Remember the main difference between removing varnish entirely and refinishing prep sanding: Now you follow the grain precisely. You aren’t hogging off huge chunks.
- Start with 150-grit to evenly correct slight swirls missed with bulk work—focus on consistency and evenness. Keep your orbital sander FLAT over repairs sections, and use hand sanding/detailed small pads (or foam blocks) for mouldings, curved legs, etc.; do not rush the edges with machines onto curves.
- Jump to your penultimate paper, commonly 180- or slightly finer 220-grit depending on your piece’s destiny (soft woods often better with anything less refined than 220 prior oil entry). For furniture you love, aiming at 220 makes for amazing final finish smoothness.
- Get those fine details clean—tack items need fine sandpaper wrapped around a pencil (or dowel shim) passed rhythmically into grooves.
Top Mentor Skill Booster: How to Check for Remaining Residue (The Reveal!) Before Finishing
To verify you are down to 100% bare wood open your new can of mineral oil or even generic cheap coffee—brew very strong and drop $0.25 white paper towel dots!
If bare, stripped, wood accepts $o_{text {(dark or warm stain solution) from coffee/oil wash}} / a spot looks uniformly darker or takes on the color tone evenly, congratulations—your varnish is fully gone! Wherever a spot stays suspiciously lighter grey OR refuses to take pigment application well instantly, you know a sneaky varnish pimple or stripper hideout remains under light’s edge!
Table: Troubleshooting Common Varnish Removal Issues at Home
| The Problem Now Appears To Resemble… | Most Likely Cause | My Beginner Fix Guide Correction |
|---|---|---|
| Varnish looks soft/gooey but scrape tools scratch rather than pick up chunks | Stain needed more cook time and better dilution. The furniture needs its final wash more vigorously delivered. | Light sanding pass (220-grit around 88) to pull off small bits—Rinse again with the corresponding solvent before re-applying striker gel slightly hotter than before for 30 extra full minutes |
| Sanding scratches look everywhere but only disappear around the edges | You kept going back! Usually the previous grit (e.g., 100s vs 150s) left scratches that the next grit has given a better job with, though your focus area has not had sufficient passes. | Go back ONE grit lower and spend 75% more time making your passes perfectly uniform and straight every passing time the wood appears totally smooth as needed. |
| Area glows dull/watery even after long drying time since cleaning liquid | Remnants of the finishing remover chemical are preventing grain from taking moisture, looking bleached/dead. | Repeat Step 4 completely again, ensuring 2 full hours of fast, dry curing time over natural cross-breeze before any re-sanding can happen. |
| Softwoods are tearing out during the scraping stages regardless of the edge scraper angle. | Even softer than maple species are receiving far too heavy a handed attempt/touch for these aggressive phases, potentially involving a rounded edge metal component somewhere. | Switch $190/$170 metal/plastic putty from dull, or replace wood structure contact point material entirely – no harder implements should have entered in during or immediately preceding this stage whatsoever. If structure allows use $510$ steel wool saturated by mineral spirits lightly rather than any aggressive blade/edge whatsoever due to tenderness. |
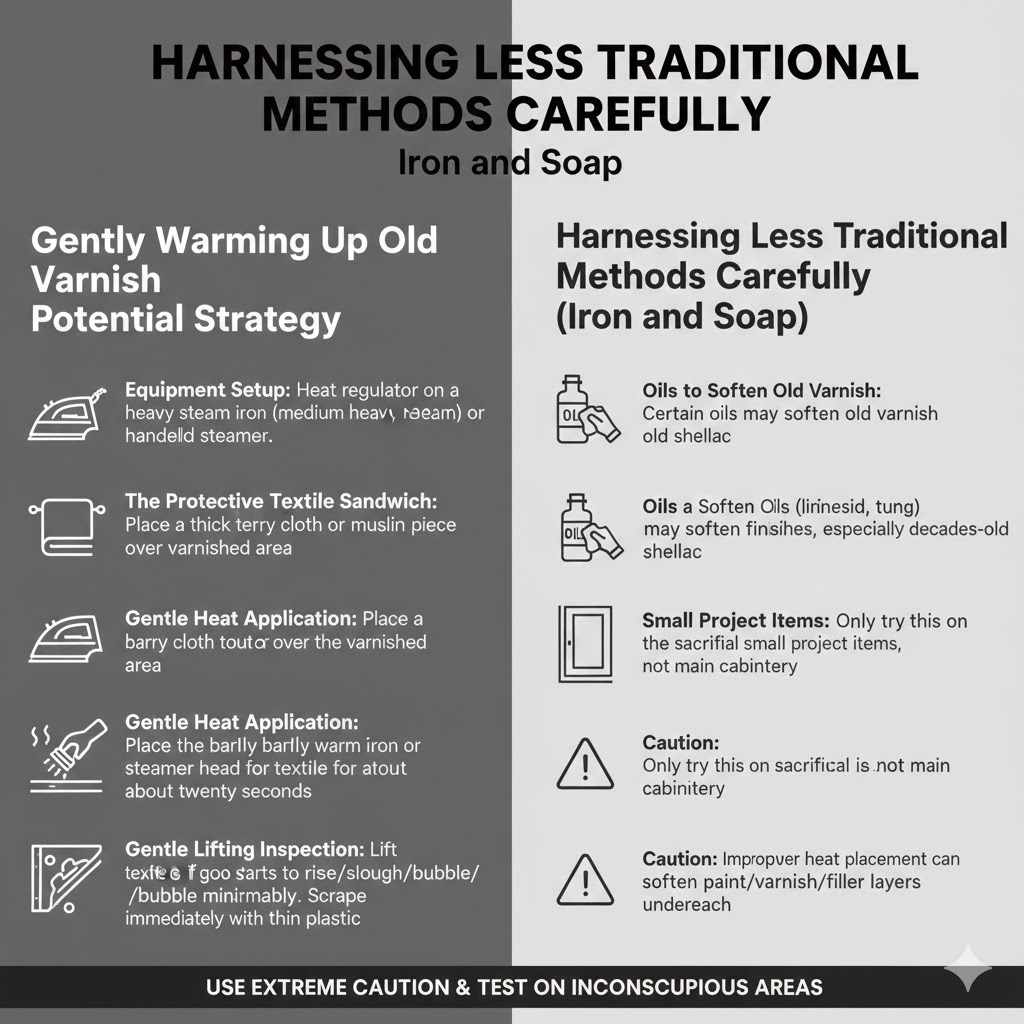
Harnessing Less Traditional Methods Carefully (Iron and Soap)
Home remedy folklore often tosses in steaming hot iron methods around ancient wood that might respond well to concentrated, localized warmth used not to burn, like a small spot of old cabinet construction refinishing prep for its final coating.
Some heritage experts swear that certain oils can soften old varnish finishes enough to scrape them away by hand slowly. This trick tends to focus on genuine linseed or tung oil aging over many decades and less modern commercial polyurethane applications.
Gently Warming Up Old Varnish Potential Strategy
This is one method I advise beginners only try on extremely sacrificial small project items as a final measure rather than huge main cabinetry portions where ruin is a terrifying outcome. Improper heat placement softens paint/varnish/fix/clear layers underneath.
- Equipment Setup: You need the heat setting regulator on a heavy steam iron or handheld steamer handy (medium heat, no heavy steam setting if ironing a cloth covering it like an apron).
- The Protective Textile Sandwich: Place a thick terry cloth towel, muslin piece over thevarnished area. It provides mild dispersion/insulation without combustion risk.
- Gentle Heat Application: Place the barely warm, regular iron (sole plate resting gently after wiping clean of moisture), setting or steamerhead carefully over the layer of textile for about twenty seconds.
- Gentle Lifting Inspection: Quickly lift textile to see if a cloud of heat vapors shows goo starting to rise/slough/bubble minimally, never boil vigorously. If yes, move immediately to clean wood scraping with thin plastic immediately off the area treated whilst the lacquer is marginally more pliant / workable at warmer degrees.
This takes incredibly sensitive management. Many times what releases cleanly is decades-old shellac or oil application only beneath the latest harsh polymer topcoat lacquer or varnish layer and this usually indicates more strong chemical treatment exposure on tough modern coatings rather than anything like this specific gentle steam action. Save this warm touch attempt just in workshops testing milder applications only.
Frequently Asked Questions (FAQ) for Varnish Removal
Q1: How can I tell if the finish I’m trying to remove is standard varnish or shellac coating?
.A: A very quick and simple beginner trick isn’t fully testing but knowing that $2$ tablespoons denatured grain alcohol (found near general stain aisle) swab wiped gently on a hiding corner will soften/attack shellac immediately, varnish will generally sit there stubbornly unbothered.
Q2: Is using a blowtorch safe or recommended for tough external varnish on old decks?
.A: NO. Torch heat boils finish too actively. Near old wood, using this level/intensity is fire risk; near structural deck elements, water damage may worsen underneath, often hiding water damage dueating moisture entrapment from peeling varnish; only use a true specialized low temp/wide field (broad zone) heat removal appliance if you absolutely desire working that way!
Q3: How long does wood need to fully dry after removing varnish with a chemical stripper before I re-stain?
.A: Generally give varnish removal work (after solvent washing of stripper remnants) minimal time needed outdoors using forced fan circulation – 48 hours Minimum between chemical application and application of water or alcohol based stain – for oil-based applications always wait nearly $72$ hours for safe absorption and full vapor evacuation. Confirm manufacturers direction too.
Q4: My old antique cabinet has deep carvings, what kind of sander saves my wrist?
.A: Forget big machines! Heavy sanding on curves should utilize rigid pieces of dense sanding foam block cut, or small files covered tightly with the 120-150 grit until the grain exposes better finishes through better adhesion of next coat, allowing only small hand/power/tool combo work without damaging recessed carved portions deeply or losing subtle surface finish quality.
Q5: Can sandpaper scratch newly stripped wood when using fresh 220 grit even if correctly applied with the grain?
.A: Yes. If the physical sandpaper grade ($220$) itself is lower grade/cheap consistency materials—paper scratching deeper than intended into wood fibers $below$ what appears as residue removal—then this occurs far more frequently: Choose higher quality $made$ papers or try replacing $180$-grit papers halfway with newer identical/higher counts $180$ instead of going straight onto the shiny $220$-$grit}$ papers which usually just carry debris or deep sanding lines over very soft areas which happen near seams & corners.
Q6: After striking through varnish zones, how should I handle the transitions areas differently for a smooth finish?
.A: Focus on Fades. The edges between fully stripped areas and what remains covered (but waiting) or sanded areas that differ in surface smoothness (tooth/texture) require extreme gradual friction tapering—think gently feathered passes $150-$grit around edges for long periods on surface areas closest yet farthest from the heavy chemical working surface boundaries.
Conclusion: Finishing Strong After Defeating Old Varnish
And there you have it, friend! We walked through preparation, deployment of careful tools, selection of appropriate stripping chemicals (or sometimes safer sanding options where appropriate), and finally, the critical neutralizing rinse and final sanding steps.
Varnish removal demystified is actually just systematic work: strong start attire, paying full attention, and not stopping until you are certain those old layers are totally gone and the grain is welcoming your new finish with open arms. Remember the mentor rule: Always aim for level contact surfaces and sequential improvement across grits!
With the successful raw structure uncovered, achieving your desired final wood look—whether that’s a deep oil finish in walnut tone—starts now with confidence. Gather your leftover stripper and toss those spent rags safely. Enjoy the smell of fresh, clean wood. That fresh wood smells infinitely better than that gummy old finish ever dared suggest!