How To Use Wood Wicks: The Essential Proven Guide
To use wood wicks, secure the wick to the bottom of your candle jar, pour melted wax, and let it cure. Before each use, trim the wick to about 1/8 inch. To light it, tilt the candle and hold the flame to the wick’s edge, allowing the wax to draw up and fuel the flame.
Hello there! I’m Md Meraj, and I love helping folks discover the joy of making things with their own hands. If you’ve ever wanted to make candles that look beautiful and sound like a tiny, cozy fireplace, you’ve probably heard of wood wicks. They can seem a bit tricky at first. Maybe you’ve tried them, and they just wouldn’t stay lit. It’s a common frustration, but I promise you, it’s easier than it looks.
You don’t need to be an expert candle maker to master wood wicks. In this guide, I’ll walk you through everything, step by step. We’ll cover picking the right wick, setting it up perfectly, and getting that beautiful, crackling burn every single time. Let’s get started and make something wonderful together.
What Exactly Are Wood Wicks?
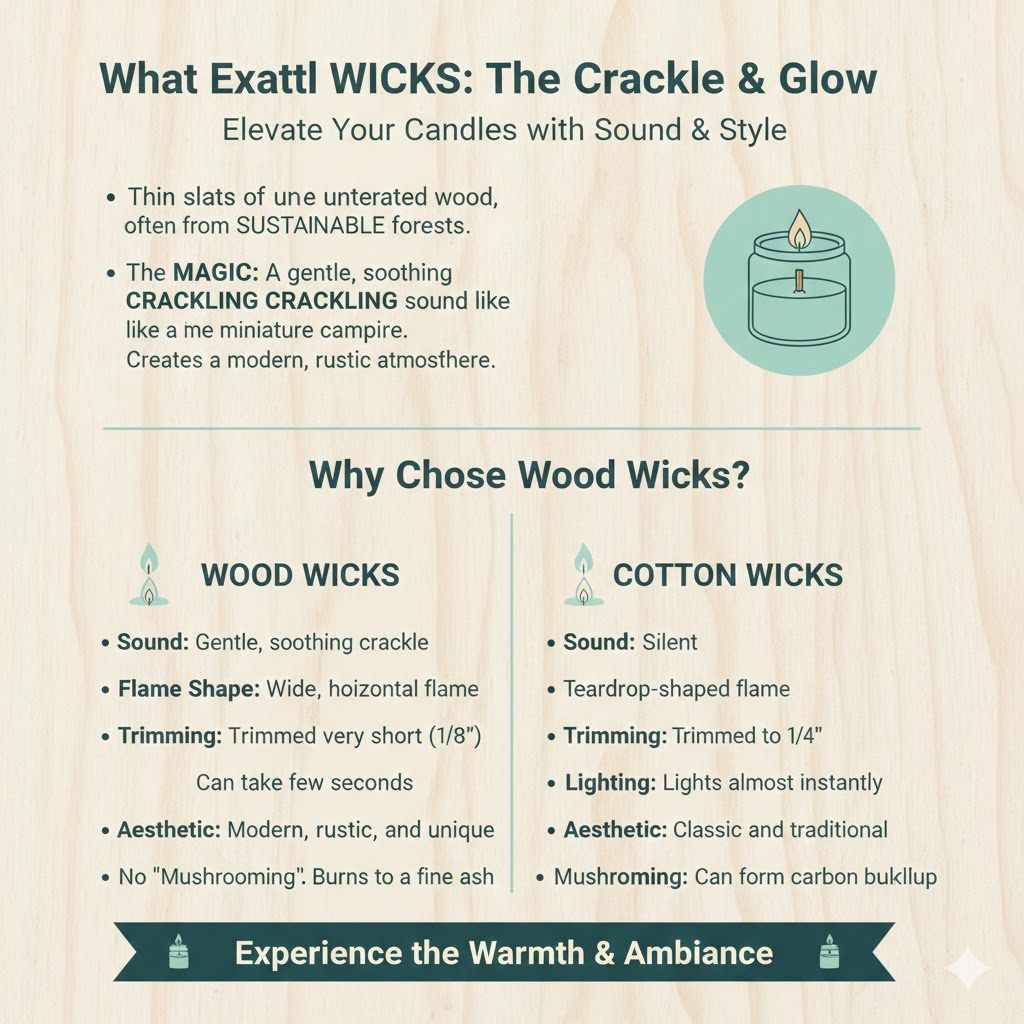
Before we dive into how to use them, let’s quickly talk about what makes wood wicks so special. Unlike the braided cotton wicks you see in most store-bought candles, wood wicks are thin, single-ply or multi-ply slats of wood. Most are made from natural, untreated wood sourced from sustainable forests.
What’s the magic? When you light a wood wick, the flame draws wax up through its porous surface. As the wax burns, it creates a gentle, soothing crackling sound, much like a miniature campfire. This unique feature, combined with their modern, rustic look, makes them a favorite for DIY candle makers who want to create a warm and inviting atmosphere.
Why Choose Wood Wicks Over Traditional Cotton Wicks?
You might be wondering if making the switch from cotton to wood is worth it. Both have their place, but wood wicks offer some fantastic benefits that can elevate your candle-making projects. Of course, they also have a few quirks to be aware of. Let’s break it down.
Here are some of the main advantages:
- The Crackle: The number one reason people love wood wicks! The soft, crackling sound creates a unique, multi-sensory experience that you just don’t get from a silent cotton wick.
- A Beautiful Flame: Wood wicks produce a wide, horizontal flame that is both beautiful and functional. It throws off a lovely glow and helps create an even wax pool.
- Cleaner Burn: High-quality wood wicks often burn cleaner than their cotton counterparts, producing less soot when properly maintained.
- Modern Aesthetic: Their clean, simple lines give candles a contemporary, high-end look that is very popular.
- No “Mushrooming”: Unlike cotton wicks that can “mushroom” at the top (forming a carbon buildup), wood wicks burn away to a fine ash.
To give you a clearer picture, here’s a simple comparison:
| Feature | Wood Wicks | Cotton Wicks |
|---|---|---|
| Sound | Gentle, soothing crackle | Silent |
| Flame Shape | Wide, horizontal flame | Teardrop-shaped flame |
| Trimming | Must be trimmed very short (1/8″) | Trimmed to 1/4″ |
| Lighting | Can take a few seconds to light | Lights almost instantly |
| Aesthetic | Modern, rustic, and unique | Classic and traditional |
Gather Your Supplies for Success
Having everything ready before you start is the key to a smooth and fun candle-making process. Think of it like preparing your ingredients before you start cooking. It makes everything easier! Here’s a checklist of what you’ll need.
- Candle Wax: Soy, coconut, or a paraffin blend works well. Natural waxes are often preferred for their clean burn.
- Wood Wicks and Metal Clips: Make sure they are the right size for your containers.
- Candle Containers: Glass jars, tins, or ceramic pots are great choices. Ensure they are heat-safe.
- Fragrance Oil: Choose a high-quality oil made specifically for candles.
- Double Boiler or Melting Pot: A dedicated pot for melting wax is ideal. Never melt wax directly on a stove burner.
- Pouring Pot: A pot with a spout makes for a clean and easy pour.
- Digital Thermometer: Crucial for monitoring wax temperature.
- Wick Stickers or Hot Glue Gun: To secure the wick clip to the bottom of the container.
- Stirring Utensil: A bamboo skewer or silicone spatula works great.
- Kitchen Scale: For accurately measuring your wax and fragrance oil.
- Paper Towels and a Protected Workspace: Candle making can get messy!
Choosing the Perfect Wood Wick
This is where many beginners trip up, but don’t worry, it’s very simple once you know what to look for. Choosing the wrong wick size is the most common reason a wood wick candle won’t burn correctly. A wick that’s too small will create a “tunnel” down the center of the candle. A wick that’s too large will create a dangerously large flame and excess soot.
The goal is to select a wick that creates a full melt pool—where the melted wax reaches all the way to the edges of the container—within about 2 to 4 hours of burning. The right wick size depends entirely on the diameter of your container.
Understanding Wick Sizing
Wood wicks are typically sized by their width. The wider the wick, the bigger the flame and melt pool it will create. Always check the recommendations from your wick supplier, as different brands and wood types can perform differently. However, here is a general guideline to get you started.
| Container Diameter | Suggested Wood Wick Width | Notes |
|---|---|---|
| Up to 2 inches | 0.25″ – 0.375″ | Good for votives or very small tins. |
| 2 – 3 inches | 0.5″ | A very common size for standard candle jars. |
| 3 – 4 inches | 0.625″ – 0.75″ | For larger, multi-wick, or wide-mouthed candles. |
| 4+ inches | Use multiple wicks | Space two or three smaller wicks evenly apart. |
My Personal Tip: Always, always do a test burn! Before you make a big batch of candles, make just one with your chosen container, wax, wick, and fragrance. It’s the only sure way to know if you’ve found the perfect combination. It saves you time, money, and a lot of frustration.
How to Use Wood Wicks: A Step-by-Step Guide
Alright, you’ve got your supplies and you’ve chosen your wick. Now for the fun part! Let’s walk through the process of making your first wood wick candle. I’ll break it down into simple, manageable steps.
Step 1: Prepare Your Workspace and Container
First things first, safety and prep. Lay down newspaper or a protective cover on your work surface. Wax spills happen! Make sure your candle container is clean and completely dry. Any moisture can cause problems with how the candle sets and burns.
Step 2: Secure the Wood Wick
Take your wood wick and slide it firmly into the metal clip that came with it. Next, attach the clip to the bottom center of your container. You can use a wick sticker (a small, double-sided adhesive dot) or a small dab of hot glue. Press it down firmly to ensure it’s secure. Centering the wick is very important for an even burn.
Step 3: Melt Your Wax
Using your kitchen scale, measure the amount of wax you need for your container. Place the wax into your melting pot or the top of your double boiler. Heat the wax gently over medium-low heat. Stir it occasionally as it melts. Never leave melting wax unattended. Use your thermometer to keep an eye on the temperature. Most soy waxes should be heated to around 185°F (85°C). Always follow the instructions provided by your wax supplier, as temperatures can vary.
Step 4: Add Fragrance Oil
Once your wax reaches the target temperature (e.g., 185°F), remove it from the heat. This is the best time to add your fragrance oil. A general rule of thumb is to use 0.5 to 1 ounce of fragrance oil per pound of wax. Pour the oil into the melted wax and stir gently but thoroughly for about two minutes. This ensures the fragrance oil binds completely with the wax, which is key for a great-smelling candle. According to the National Candle Association, using the correct amount of fragrance is also important for fire safety.
Step 5: Pour the Wax
Let your wax cool down to the recommended pouring temperature, which is often around 135°F (57°C) for soy wax. Pouring too hot can cause surface issues like cracks or sinkholes. Pour the wax slowly and steadily into your container. Try not to splash wax onto the wood wick above the pour line. Fill the container, leaving about half an inch of space at the top.
Step 6: Let It Cure
Now comes the hardest part: waiting! Your candle needs to cool and cure. Let it sit undisturbed at room temperature for at least 24 hours. After that, it needs to cure for a longer period before you get the best scent throw. For soy wax, I recommend a cure time of 1 to 2 weeks. This allows the fragrance oils to fully integrate into the wax. It’s well worth the wait.
The First Burn and Proper Maintenance
You’ve made your candle! Now, let’s make sure it burns beautifully. The first burn is the most important one. It sets the “memory” for how the candle will burn for the rest of its life.
How to Light Your Wood Wick Candle
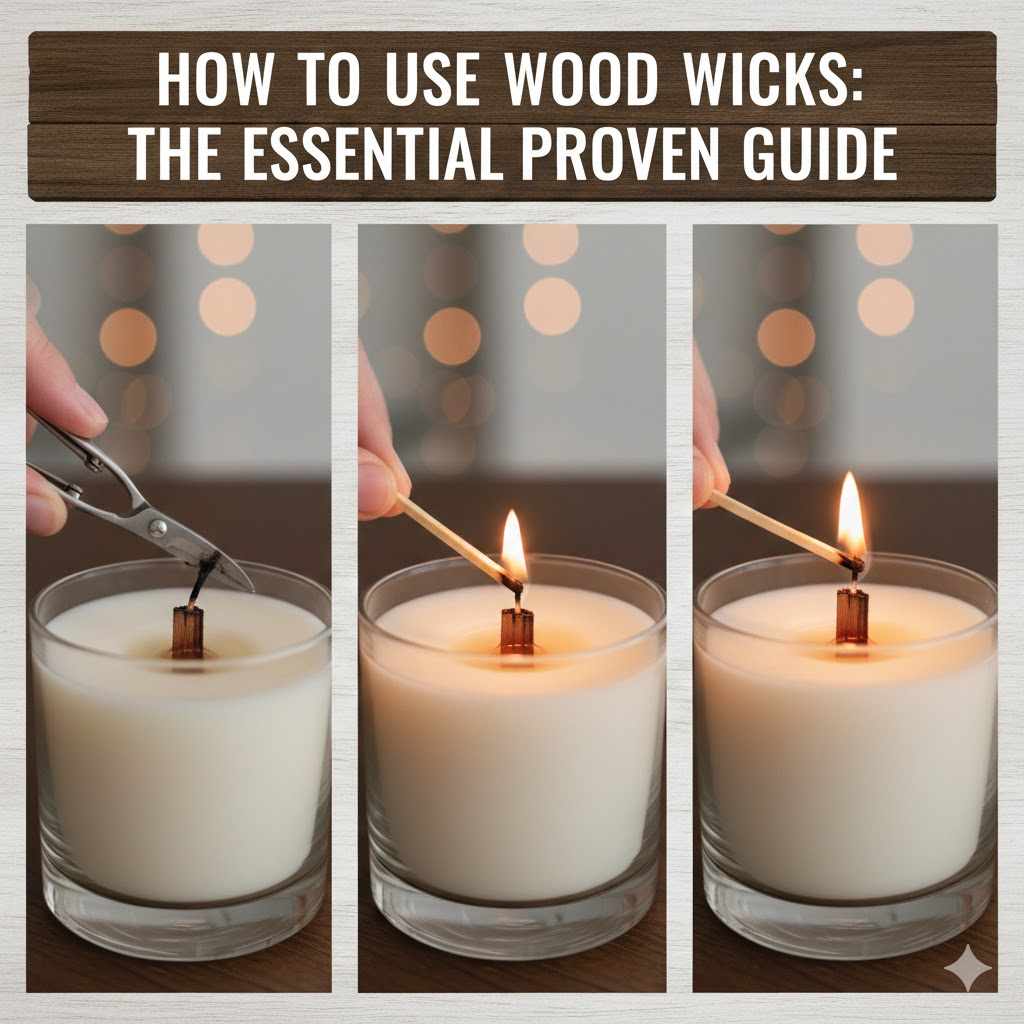
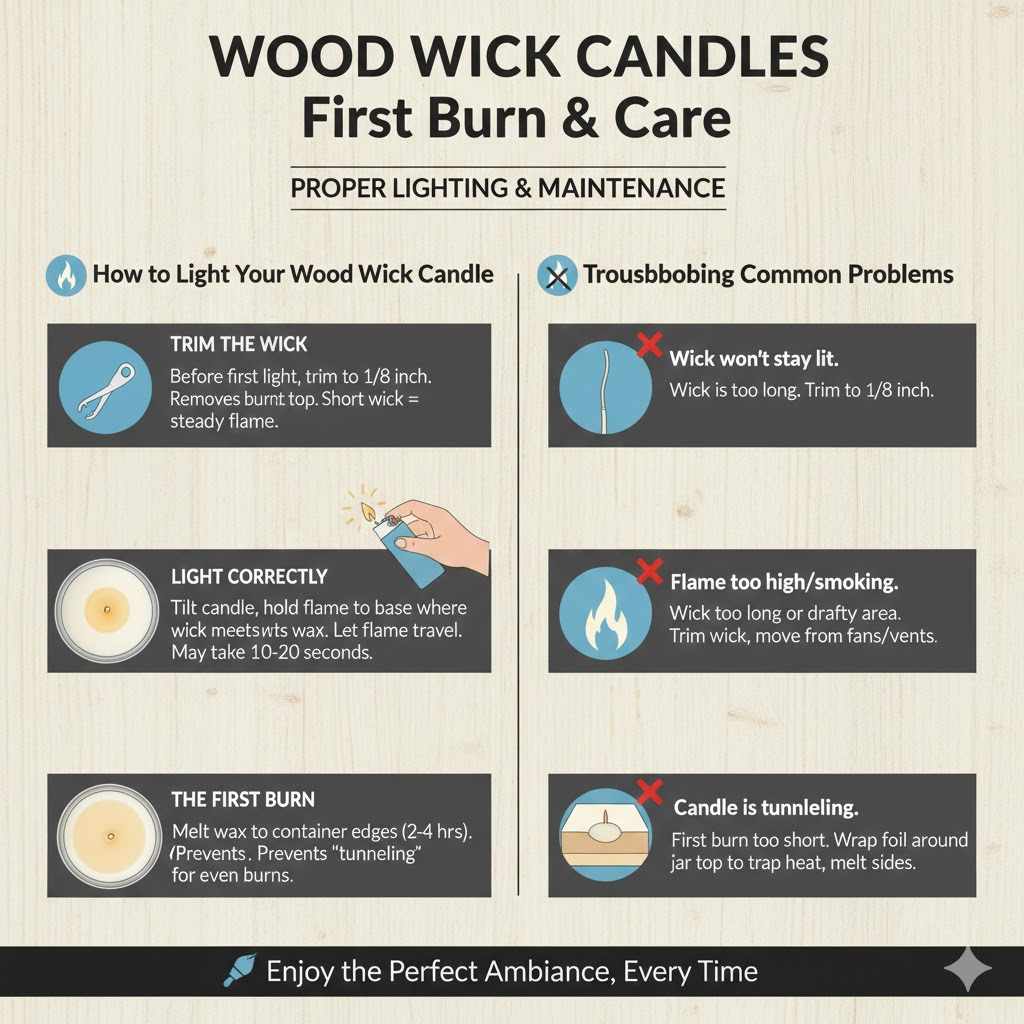
- Trim the Wick: Before you light it for the first time, trim the wick to about 1/8 of an inch. You can use wick trimmers, nail clippers, or even your fingers to gently break off the burnt top. A short wick is essential for a steady flame.
- Light it Correctly: This is key! Instead of lighting the tip, tilt your candle and hold your lighter or match to the edge of the wick where it meets the wax. Let the flame travel across the top of the wick. It may take 10-20 seconds to get a good flame going as the wax needs to be drawn up into the wick.
- The First Burn: Let the candle burn long enough for the melted wax pool to reach all the way to the edges of the container. This can take 2 to 4 hours depending on the size of your candle. If you extinguish it too soon, it will “tunnel” and never burn evenly.
Troubleshooting Common Wood Wick Problems
Even with the best instructions, you might run into a hiccup. Don’t worry! Most problems are easy to fix. Here are some common issues and their solutions.
- Your wick won’t stay lit. This is almost always because the wick is too long. The flame can’t draw the wax up. Extinguish the flame, let the wax cool slightly, and trim the wick down to 1/8 inch.
- The flame is too high or smoking. The wick is too long, or the candle is in a drafty area. Trim the wick and move the candle away from fans, open windows, or vents.
- Your candle is tunneling. This happens when you don’t allow for a full melt pool on the first burn. You can try fixing it by wrapping the top of the jar in aluminum foil (leaving an opening at the top) to trap heat and melt the excess wax on the sides.
Frequently Asked Questions (FAQ)
Why won’t my wood wick stay lit?
This is the most common issue! The number one reason is that the wick is too long. It needs to be trimmed very short, to about 1/8 inch above the wax. A short wick allows the wax to be drawn up properly to fuel the flame. If it’s still going out, you may need a slightly larger wick for your container diameter.
Do I need to soak my wood wicks before using them?
No, you do not. This is a common myth. Soaking wicks in oil or wax before use is not necessary and can actually cause them to burn poorly. Always use your wood wicks as they come, dry and untreated.
How short should I trim a wood wick?
Always trim your wood wick to about 1/8 of an inch (3-4 mm) before every burn. You can gently pinch off the charred bits with your fingers or use a nail clipper for a clean trim. A short wick creates a clean, steady flame and prevents soot.
Can I use wood wicks with any type of candle wax?
Wood wicks perform best with natural waxes like soy, coconut, and palm wax, as well as paraffin blends. They can be more challenging to use with 100% beeswax because of its high viscosity (thickness), which makes it difficult for the wick to draw up fuel.
Why is my wood wick flame so small or weak?
A small flame usually means the wick isn’t getting enough fuel (wax). This can happen if the wick is too long, if there’s a draft, or if the wick is too small for the diameter of the candle. Try trimming it shorter first. If that doesn’t work, you may need a wider wick for that container size on your next batch.
How do I fix a candle that is “tunneling”?
Tunneling occurs when a candle burns straight down the middle, leaving hard wax around the edges. To fix it, you can use the “foil method.” Wrap a piece of aluminum foil around the top of the candle jar, creating a dome with an opening in the center. Let the candle burn for an hour or two. The trapped heat will melt the hard wax on the sides, evening out the surface.
What makes the crackling sound in a wood wick?
The crackling sound is created by the moisture and natural compounds trapped in the wood being vaporized by the heat of the flame. It’s essentially a series of tiny, controlled combustions that produce the signature sound we all love, just like a miniature log fire.
Your Journey into Candle Making
There you have it—everything you need to know to confidently use wood wicks in your candle projects. See? I told you it was easier than it seemed. It all comes down to a few key things: choosing the right size wick, securing it properly, and most importantly, trimming it short before every burn.
Making something with your own hands is one of life’s simple pleasures. The feeling of lighting a candle you made yourself—one that not only looks beautiful but also fills the room with a wonderful scent and a soothing crackle—is truly special. Don’t be afraid to experiment with different waxes, fragrances, and containers. Every batch is a new opportunity to learn and create. Now go on, give it a try. I know you’ll make something amazing.