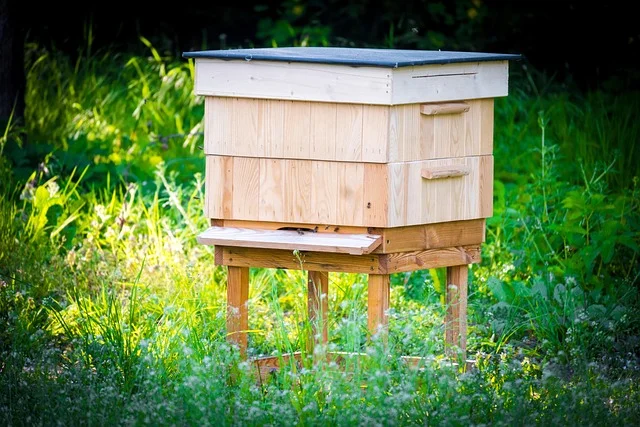
DIY Bee Box: Build a Langstroth Hive Body With Real Dimensions
Building a bee box can be a rewarding project. It allows you to support local bee populations.
Creating your own DIY bee box is simpler than you might think. Bees play a crucial role in pollination, which is vital for our ecosystem. By making a bee box, you provide a safe haven for these essential insects. This small effort can have a significant impact on your garden and the environment.
If you’re building a standard deep hive body, the real dimensions to build to are 19-7/8″ long by 16-1/4″ wide, about 9-5/8″ tall, with a 3/8″ bee space between frames — get that spacing wrong and bees will fill the gap with burr comb. Here’s the full build, materials, and steps.

Materials Needed
Best Ready-Made Hive Frames
 |
Mann Lake Beekeeping Frames (10-Pack) – $49.99 Once your hive body is built, these ready-made frames with beeswax-coated foundation save you from hand-wiring your own.
|
Pine and cedar are the two most common choices for a hive body, and both work well for different reasons: pine is cheap and easy to find as dimensional lumber, while cedar’s natural oils resist rot and insects without needing any chemical treatment – a real advantage since anything applied to the wood has to be safe for bees living in constant contact with it. Whichever species you pick, use 3/4-inch stock; that thickness gives the hive real insulation value against both summer heat and winter cold, which matters more for colony survival than most first-time builders expect. Inspect every board for knots, checks, and cracks before cutting – a knot near a corner joint is a weak point that can split under the stress of nailing, and any gap in a wall lets in drafts the colony has to spend energy compensating for. Skip pressure-treated lumber entirely – the preservative chemicals in it have no place anywhere near a food product bees are producing and storing.
Beyond the wood itself, the tool list is short and mostly things a woodworking shop already has: a saw for cutting panels to size, a tape measure and square for accurate layout, a drill for boring ventilation and entrance holes, a hammer or screw gun for assembly, and wood glue to reinforce every joint before fastening it. Sandpaper matters more here than on most projects – bees navigate partly by feel along interior surfaces, and a rough or splintered interior can injure wings or legs over repeated contact. If you finish the exterior at all, use a water-based, low-VOC exterior paint or a beeswax-based finish; anything with strong ongoing fumes can linger inside the hive body long after it’s dry to the touch.
Choosing The Right Location
Site selection has more influence on colony health than almost any other decision you’ll make. Aim for a spot that gets morning sun – it warms the hive early and gets bees out foraging sooner in the day – with some afternoon shade in hot climates to keep the interior from overheating; in cooler regions, full sun all day is usually fine. Position the entrance facing away from prevailing wind, and if the site is genuinely exposed, a windbreak of shrubs or a fence panel a few feet away cuts wind stress without blocking airflow around the hive itself.
Keep real distance between the hive and anywhere people and pets spend time – the entrance is where returning foragers cluster and where defensive behavior is most likely if the colony feels crowded or threatened. A low fence or hedge a few feet in front of the entrance forces bees to fly up and over rather than straight out at head height, which meaningfully reduces the odds of a chance encounter with someone just walking by.
Building The Hive Body
Cut all four panels to the dimensions established earlier – 19-7/8″ for the long sides and the matching width for the ends – and square every cut, since even a small deviation compounds across four joined panels into a box that doesn’t sit flat or seal properly. Sand each cut edge before assembly; a splinter along a joint won’t just look bad, it can catch a bee’s wing during the thousands of trips in and out of that entrance over a season.
Assemble with glue and mechanical fasteners together, not one or the other – glue alone doesn’t handle the repeated stress of weather and hive weight over years, while nails or screws alone can work loose without the extra holding strength glue provides at the joint. Rabbet or box-joint corners, rather than simple butt joints, hold up significantly better long-term if you have the tooling for them, since they resist racking in a way a glued butt joint doesn’t. Whichever joint style you use, check every corner for square before the glue sets – an out-of-square box telegraphs into every frame and lid that has to fit inside or on top of it.

Creating Frames
Standard Langstroth deep frames run about 19 inches along the top bar and roughly 9-1/8″ tall, sized to hang inside the hive body with the correct bee space on all sides – the same 3/8″ clearance mentioned earlier, which keeps bees from either sealing frames together with propolis if the gap’s too tight, or building unwanted burr comb to fill it if it’s too wide. Building frames from scratch is a realistic project, but buying pre-made frames, like the set linked above, saves real time if you’d rather put your build effort into the hive body itself.
Foundation gives bees a head start on drawing straight comb instead of building freeform inside the frame, which matters both for inspection – straight comb is far easier to lift and examine – and for keeping comb from crossing between frames. Wax foundation is the traditional choice and bees generally take to it faster since it’s the material they’d naturally build with; plastic foundation, often wax-coated itself, lasts longer and holds up better to a mechanical extractor if you’re planning to harvest honey that way.
Adding A Bottom Board
Solid and screened bottom boards solve different problems, and the choice comes down mostly to climate and mite management. A solid board seals the bottom of the hive completely, which helps retain warmth through cold winters but gives Varroa mites nowhere to fall out of the hive once they drop off a bee. A screened board lets mites fall through and out rather than climbing back onto a bee, which is a genuine pest-management advantage, but it also bleeds some warmth in cold climates unless you close it off seasonally with a removable insert.
Attach the bottom board to the underside of the hive body with screws rather than nails, since you’ll likely want to remove it for cleaning between seasons – screws come out cleanly, nails tend to tear the wood on removal. Check the fit carefully once it’s on: any gap between the board and the hive body wall is an opening bees will either try to seal with propolis or, worse, a gap other insects and small pests can use to get in.

Constructing The Inner Cover
An inner cover’s main job is ventilation and moisture control, not sealing the hive tight – trapped moisture from the colony’s own respiration is a bigger winter killer than cold air is, since condensation dripping back down onto a cold cluster of bees causes far more colony losses than the cold itself. Drill a series of small holes or cut a larger notch for airflow, sized to let humid air escape without creating a draft strong enough to chill the cluster directly.
Fit the cover so it sits flush and stable on top of the hive body without racking or shifting, since a loose inner cover is one of the more common places a poorly sealed hive develops a real gap. Secure it just enough to keep it from blowing off in wind, but it doesn’t need to be permanently fastened the way the hive body itself does – you’ll be lifting this cover every time you inspect the colony.
Attaching The Outer Cover
Wood, telescoping metal-clad, and plain metal are the three common outer cover styles, and each trades off differently. A wood cover blends with a traditional hive’s look and is easy to build to match the rest of the box, but it needs the same weather protection as the rest of the hive – paint, sealant, or a naturally rot-resistant species. Metal-clad covers shed rain and snow better than bare wood and hold up longer outdoors with less maintenance, which is why they’re the standard on most commercially made hives.
Whatever material you choose, the cover needs a genuine overhang past the hive body’s edges so rain runs off away from the walls rather than down them, and it needs to seat securely enough that wind and curious wildlife – raccoons are a real, common problem for hives – can’t easily dislodge it. Check the fit periodically through the season; wood covers especially can warp slightly with weather exposure, and a cover that no longer sits flush is worth re-fitting or replacing before it becomes an actual gap.
Maintaining Your Beehive
A weekly check through the active season is enough to catch most problems before they become colony-threatening: look for the queen or fresh eggs as evidence she’s present even if you don’t spot her directly, watch for unusual quietness or lethargy that can signal disease or a failing queen, and check for visible pests like small hive beetles or Varroa mites on the bees themselves.
Care needs shift with the seasons. Spring inspections focus on confirming the colony survived winter and the queen is laying well as the population rebuilds. Summer is mostly about making sure the colony has enough space to expand and, in hot or dry regions, access to a nearby water source. Fall is when you evaluate whether the colony has stored enough honey to survive winter – a shortfall here is one of the most preventable causes of winter colony loss, and it’s the last real chance to feed sugar syrup before cold weather sets in. Winter care is mostly hands-off: insulate or wrap the hive in genuinely cold climates, but resist the urge to open it and check on the bees, since breaking the cluster’s seal in freezing weather does more harm than leaving them alone.
Wondering how many hours this build will take? See our beehive build time breakdown for estimates by stage.
Frequently Asked Questions
How To Make A Simple Bee Box?
To make a simple bee box, use untreated wood. Build a box with removable frames. Ensure proper ventilation and a secure lid. Paint the exterior to protect from weather. Place the box in a shaded area.
Is It Cheaper To Build Your Own Beehive?
Building your own beehive can be cheaper. It depends on the materials and tools you use.
What Is The 3 Feet 3 Mile Rule For Bees?
The 3 feet 3 mile rule for bees means moving hives less than 3 feet or more than 3 miles to avoid confusion.
What Is The 7/10 Rule In Beekeeping?
The 7/10 rule in beekeeping suggests inspecting hives every 7 to 10 days to ensure colony health and prevent swarming.
Conclusion
Creating a DIY bee box is both rewarding and fun. You can help bees thrive in your garden. This small effort leads to a big impact on nature. Bees play a crucial role in pollination. Building a bee box is a simple way to support them.
Plus, it’s a great project for all ages. Follow the steps, and soon you’ll have happy bees buzzing around. Enjoy your new bee box and the benefits it brings to your garden. Happy building!
Sponsored / affiliate links. As an Amazon Associate I earn from qualifying purchases. I may earn additional commission from eligible campaigns.