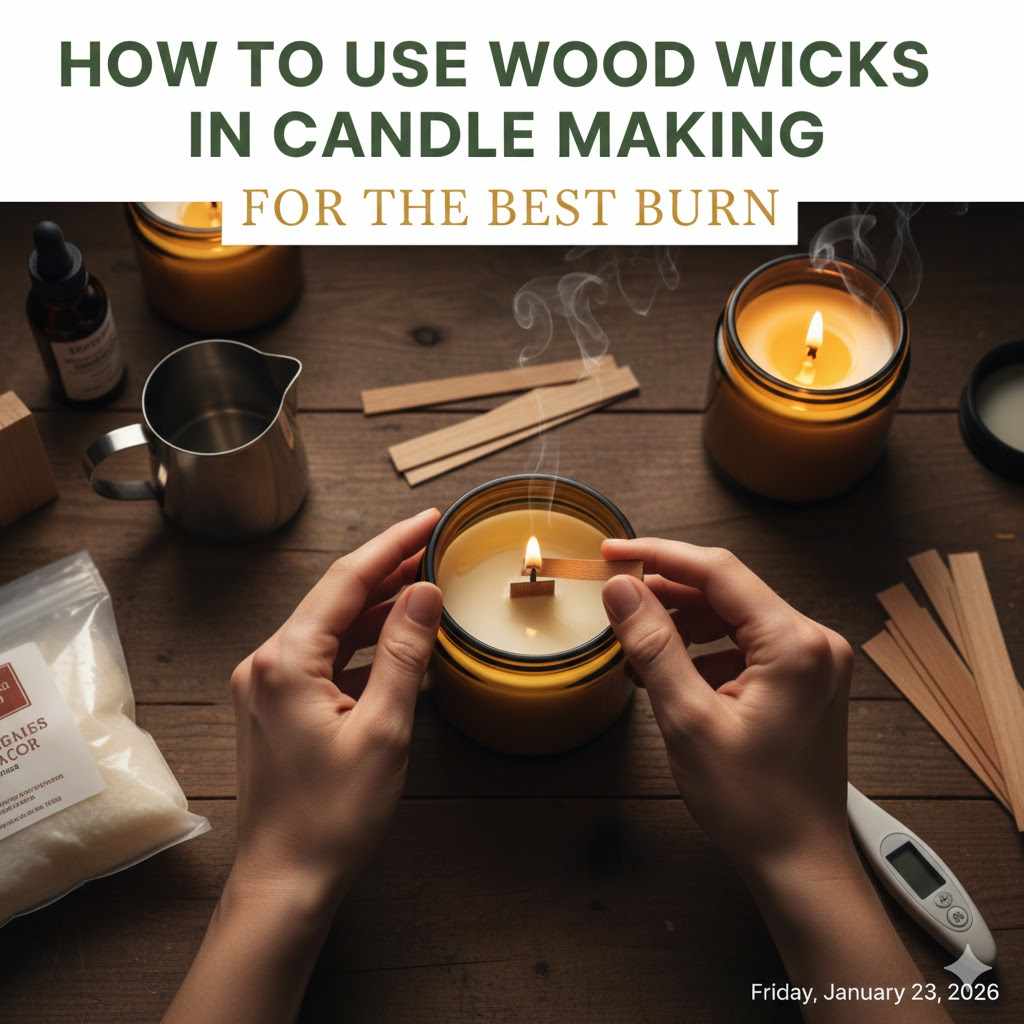
How To Use Wood Wicks In Candle Making For The Best Burn
To use wood wicks in candle making, first select the right wick size for your container diameter. Secure the wick in its metal clip and place it in the center of your jar. Pour your melted wax, let the candle cure completely, and trim the wick to about 1/8 inch before the first burn for a clean, crackling flame.
Hello, friends! Md Meraj here. If you love the cozy crackle of a fireplace, bringing that sound into your home with a handmade wood wick candle is a wonderful project. But sometimes, getting that wood wick to burn just right can feel tricky. You might find it tunnels, won’t stay lit, or just doesn’t perform as you hoped.
Don’t worry! It’s a common hurdle, and it’s much easier to overcome than you think. I’m here to walk you through every step, just like I would in my own workshop. We’ll turn that frustration into the satisfaction of a beautifully burning candle. Together, we’ll cover choosing the right wick, setting it up perfectly, and troubleshooting any issues. Let’s get started!
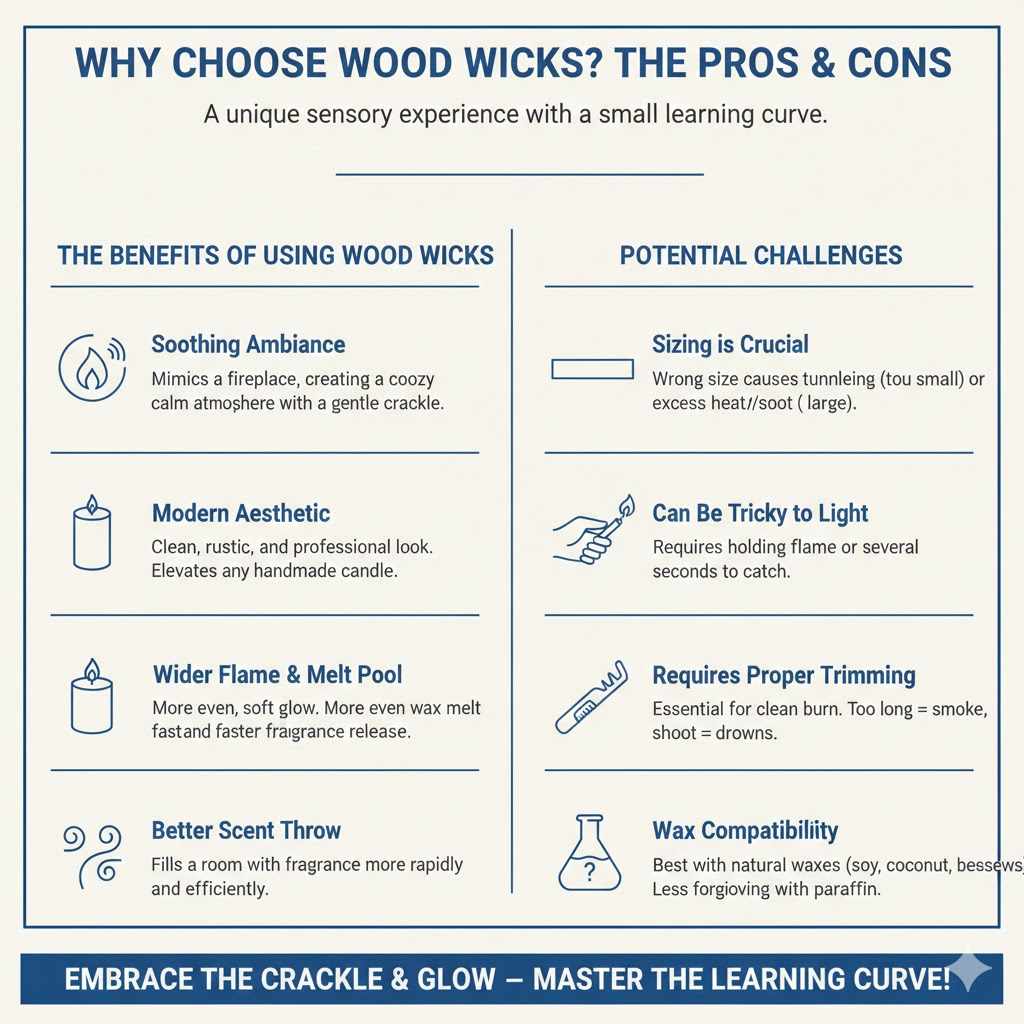
Why Choose Wood Wicks? The Pros and Cons
Wood wicks offer a unique experience that’s different from traditional cotton wicks. They create a beautiful horizontal flame and an alluring crackling sound. But like any material in a DIY project, they have their own set of characteristics. Understanding the pros and cons helps you decide if they’re the right fit for your candle making journey.
The Benefits of Using Wood Wicks
Many crafters fall in love with wood wicks for a few key reasons. It’s about more than just holding a flame; it’s about the entire sensory experience.
- Soothing Ambiance: The gentle crackling sound is the number one reason people choose wood wicks. It mimics a miniature fireplace, creating a calm and cozy atmosphere that’s hard to beat.
- Modern Aesthetic: Wood wicks have a clean, rustic, and modern look that elevates the appearance of any handmade candle. They add a touch of craftsmanship that looks professional and stylish.
- Wider Flame: They produce a beautiful, horizontal flame that gives off a soft, inviting glow. This wider flame also contributes to a more even wax melt.
- Better Scent Throw: Because a wood wick creates a wider melt pool, it can release fragrance more rapidly and efficiently. This often results in a stronger scent throw, filling your room with fragrance more quickly.
- Cleaner Burn (When Trimmed): When properly maintained, wood wicks produce minimal carbon buildup and soot, leading to a cleaner burn compared to some untrimmed cotton wicks.
Potential Challenges with Wood Wicks
While the benefits are wonderful, it’s also helpful to know about the challenges you might encounter. Think of these not as deal-breakers, but as small learning curves you can easily master with a little guidance.
- Sizing is Crucial: Unlike cotton wicks, wood wicks are less forgiving if you choose the wrong size. A wick that’s too small will cause tunneling (where the wax only melts in the center), while one that’s too large can create excess heat and soot.
- Can Be Tricky to Light: Sometimes, a wood wick needs a little more time to catch a flame. You may need to tilt the candle and hold the lighter to the wick for several seconds.
- Requires Proper Trimming: Trimming a wood wick is essential for a good burn. If it’s too long, the flame will be too high and smoky. If it’s too short, it may drown in the wax pool.
- Wax Compatibility: Wood wicks perform best with all-natural waxes like soy, coconut, or beeswax. They can struggle a bit with paraffin waxes unless it’s a specific blend designed for them.
Understanding Wood Wick Types
Not all wood wicks are created equal. When you start shopping, you’ll notice a few different styles. Knowing the difference will help you pick the perfect one for your project. Think of it like choosing the right type of wood for a project—each has its own purpose and works best in certain situations.
Here’s a simple breakdown of the most common types you’ll find:
| Wick Type | Description | Best For |
|---|---|---|
| Single-Ply Wick | This is the most common type, made from a single thin layer of wood. It’s simple, effective, and provides a gentle crackle. | Beginners, smaller container candles (under 3 inches in diameter), and all-natural waxes like soy and coconut. |
| Booster Wick | This wick has a thin strip of wood added down the center. This “booster” strip helps the flame burn more consistently and provides a stronger fuel draw. | Harder-to-burn waxes, candles with a high fragrance load, or for anyone who has trouble with single-ply wicks staying lit. |
| Crackle Wick (or Spiral Wick) | These wicks are often two or more pieces of wood laminated together or sometimes a tube-like shape. They are specifically designed to maximize the crackling sound. | Candle makers who want to emphasize the audible crackle. They work well in most natural waxes and create a strong flame. |
| Cross Wicks | Two flat wicks are fitted together to form a “+” shape. This design creates a large, robust flame and a wide melt pool quickly. | Very large containers (over 4 inches in diameter) where a single wick would not be enough to prevent tunneling. |
For your first project, I recommend starting with a simple single-ply or booster wick. They are the most straightforward and will give you a great feel for how wood wicks work.
Essential Tools and Materials
Before we start pouring, let’s gather our supplies. Having everything ready makes the process smooth, safe, and enjoyable. It’s just like setting up your workshop before starting a new woodworking project—preparation is key!
Must-Have Supplies:
- Wood Wicks and Metal Clips: Make sure you have the correct size for your candle containers. Most wicks come with their own clips (sustainers).
- Candle Wax: For beginners, I highly recommend a natural container wax like soy wax (e.g., GW 464) or a coconut-soy blend. These waxes adhere well to jars and work beautifully with wood wicks.
- Candle Containers: Choose heat-safe jars, tins, or ceramic vessels. Make sure they are clean and completely dry.
- Fragrance Oil: Select a high-quality fragrance oil specifically designed for candle making.
- Wax Melting Pot: A pouring pot with a spout is essential for safely melting and pouring wax. A double boiler setup also works perfectly. You can learn more about safe candle-making practices from the National Candle Association.
- Heat Source: An electric hot plate or your stovetop will work. Avoid using a microwave.
- Kitchen Scale: For accurately measuring your wax and fragrance oil. Precision here leads to consistent results.
- Thermometer: A digital candy or candle-making thermometer is crucial for monitoring wax temperature.
- Stirring Utensil: A silicone spatula or a wooden craft stick works well.
- Wick Centering Tool or Clothespins: To hold your wick straight and centered while the wax sets.
- Safety Gear: Safety glasses and heat-resistant gloves are a must. Always protect yourself from hot wax.
- Paper Towels: For quick cleanup of any drips or spills.
Choosing the Right Wood Wick Size: A Simple Guide
This is the most important step for getting a perfect burn. If your wick is too small, you’ll get tunneling. If it’s too large, you’ll have a smoky, oversized flame. The goal is to create a “melt pool” that extends to the edges of the container within 2-3 hours of burning.
Wood wick manufacturers provide sizing guides, and it’s always best to check their recommendations for the specific wicks you purchased. However, here is a general guideline to get you started. This chart is based on using a natural soy container wax.
| Container Diameter | Suggested Wick Size (Single-Ply) | Helpful Tip |
|---|---|---|
| 2″ – 2.5″ | Small (e.g., 0.3″ – 0.4″ width) | Perfect for small tins, votives, or tealights. |
| 2.5″ – 3.5″ | Medium (e.g., 0.5″ – 0.6″ width) | This is the most common size, ideal for standard 8-10 oz candle jars. |
| 3.5″ – 4.5″ | Large (e.g., 0.6″ – 0.75″ width) | Use for large 3-wick style bowls or wide-mouth jars. |
A Friendly Word of Advice: Always, always, always do a test burn! The best way to know if your wick size is right for your specific combination of wax, fragrance, and container is to make one test candle first. It saves you from wasting a whole batch of supplies and ensures your final product is safe and effective.
Step-by-Step Guide: How to Use Wood Wicks in Candle Making
Alright, you’ve got your supplies and you’ve chosen your wick. Now for the fun part! Let’s walk through the process together. Take your time, enjoy the craft, and remember that every great candle maker started with their first pour.
Prepare Your Workspace and Materials
Cover your work surface with newspaper or a craft mat. Make sure your candle jars are clean and completely dry inside—any moisture can cause problems. Have all your tools within easy reach.
Secure the Wick Clip and Wick
Slide the wood wick into the metal clip (sustainer). It should fit snugly. Gently press it in until it touches the bottom of the clip. If it feels a little loose, you can use a pair of pliers to gently pinch the clip for a tighter fit.
Position the Wick in Your Container
The wick needs to be perfectly centered at the bottom of your jar. You can use a wick sticker or a small dot of hot glue to adhere the metal clip to the bottom of the container. Press down firmly to secure it. This ensures the wick doesn’t float or move when you pour the wax.
Melt and Prepare Your Wax
Using your kitchen scale, measure out the required amount of wax for your containers. Place the wax in your melting pot and heat it gently using a double boiler or on a low setting on a hot plate. Stir occasionally as it melts. Keep your thermometer in the wax and heat it to the temperature recommended by your wax supplier (usually around 185°F or 85°C for adding fragrance).
Add Fragrance and Pour
Once your wax reaches the target temperature, remove it from the heat. Measure your fragrance oil (a common ratio is 1 ounce of fragrance per pound of wax, but check your supplier’s recommendation). Add the oil to the melted wax and stir gently but thoroughly for about two minutes. This ensures the oil fully binds with the wax. Let the wax cool to the recommended pouring temperature (often around 135°F or 57°C for soy wax) to minimize cracking or frosting. Pour the wax slowly and steadily into your container, avoiding the wick as much as possible.
Secure the Wick and Let the Candle Cure
Use a wick centering tool or two clothespins laid across the jar’s rim to hold the top of the wick straight and centered as the wax cools. Let the candle sit undisturbed at room temperature for at least 24 hours. “Curing” allows the wax and fragrance to fully bind together for the best scent throw. Most natural waxes need a cure time of 1-2 weeks for optimal performance. The curing process is a chemical one, and studies like those from institutions such as the Penn State Department of Chemical Engineering explore how molecular structures change over time in various materials.
Trim the Wick Before the First Burn
This is a non-negotiable step for wood wicks! Before you light your candle for the first time, trim the wick to about 1/8 of an inch (3-5 mm) above the wax. You can use wick trimmers, nail clippers, or even sturdy scissors. A short wick is key to a steady, clean-burning flame.
Troubleshooting Common Wood Wick Problems
Sometimes, even with the best preparation, things don’t go exactly as planned. That’s perfectly okay—it’s part of the learning process! Here are some common issues and how to fix them, workshop-style.
| Problem | Common Cause | Easy Fix |
|---|---|---|
| Wick Won’t Stay Lit or Keeps Going Out | The wick is too long, the wax pool has drowned it, or the wick is not drawing fuel properly. | Trim the wick to 1/8″. If it’s drowned, carefully pour off a small amount of melted wax and try relighting. If the issue persists, your wick may be too small for the container’s diameter. |
| Candle is Tunneling (Melting Only in the Center) | The wick is too small for the diameter of the container, or the first burn was too short. | For the future, choose a wider wick. To fix a tunneled candle, you can use the “foil method”: wrap foil around the top of the jar, leaving an opening over the flame. Let it burn for 2-3 hours to help the edges melt. Always let the first burn last until the melt pool reaches the container edge. |
| Flame is Too High, Smoky, or Flickering Wildly | The wick is too long or too large for the container. | Extinguish the flame, let the wax cool, and trim the wick down to 1/8″. If the flame is still too big on subsequent burns, the wick is likely oversized for your container/wax combination. |
| The Crackle is Too Loud or Not Happening at All | The crackling sound comes from moisture and organic substances in the wood being vaporized. The amount of crackle depends on the wick type and thickness. | If you want more crackle, try a “Crackle” or booster wick. If it’s too quiet, make sure your wick is properly trimmed and free of burnt debris. The type of fragrance oil can also impact the sound. |
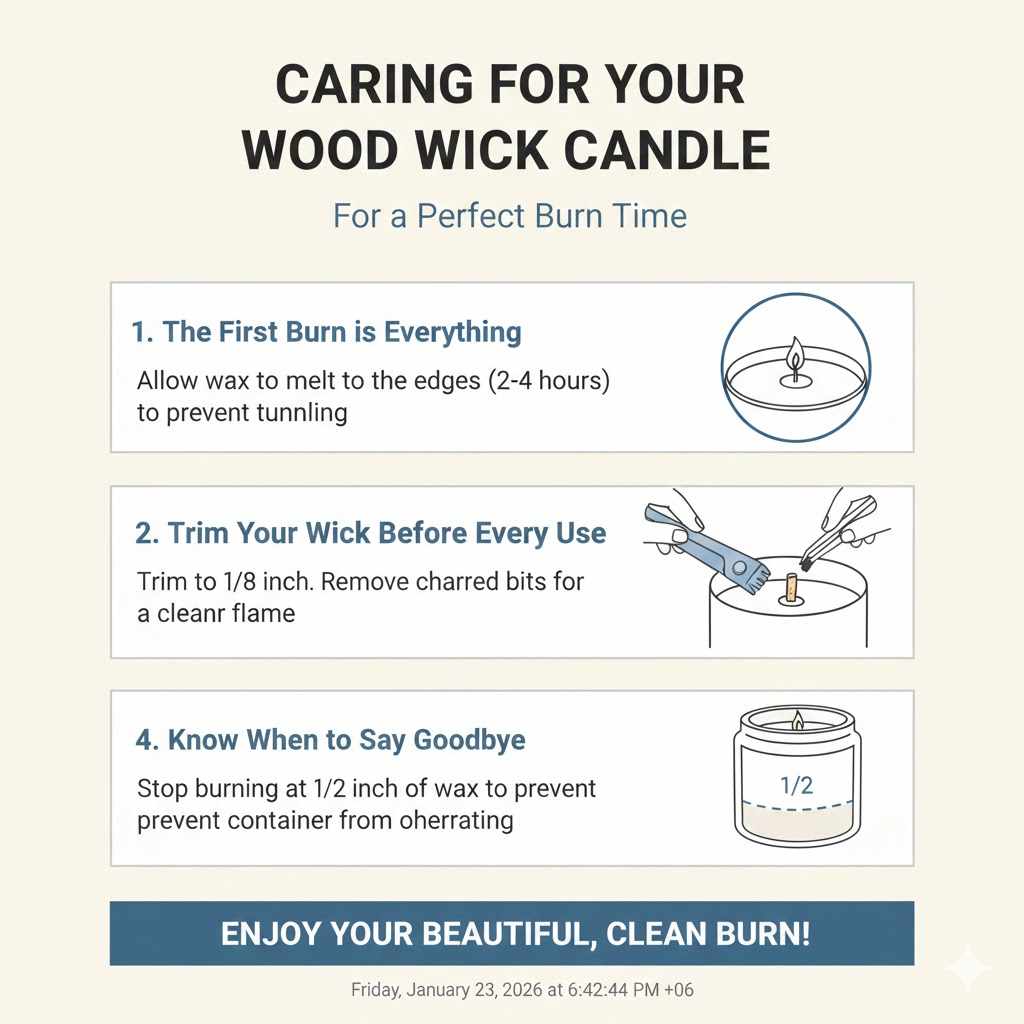
Caring for Your Wood Wick Candle for a Perfect Burn Every Time
You’ve made a beautiful candle! Now, let’s make sure it performs perfectly every time you light it. Proper candle care is simple and makes all the difference.
- The First Burn is Everything: Allow your candle to burn long enough for the melted wax pool to reach all the way to the edges of the container. This can take 2-4 hours depending on the candle size. This sets the “memory” for the wax and prevents tunneling on all future burns.
- Trim Your Wick Before Every Use: I can’t say this enough! Before each burn, trim your wood wick to about 1/8 of an inch. Gently break off the charred, brittle bits with your fingers or use a wick trimmer. A clean, short wick creates a clean, happy flame.
- Keep it Clean: Keep the wax pool free of debris like charred wick bits or dust. This ensures a cleaner burn and prevents the debris from becoming extra fuel.
- Know When to Say Goodbye: For safety, stop burning your candle when about 1/2 inch of wax remains at the bottom of the container. Burning it all the way down can cause the container to overheat and crack.
FAQ: Your Wood Wick Questions Answered
Why does my wood wick crackle?
The crackling sound is created when the moisture trapped within the wood cells is heated and vaporizes, causing the wood fibers to split and pop. It’s a natural and safe process that mimics the sound of burning wood in a fireplace.
Do I need to soak my wood wicks in oil or wax before using them?
No, this is a common myth. High-quality wood wicks are ready to use right out of the bag. Soaking them can actually disrupt their ability to draw wax up properly and can lead to a weak or inconsistent flame.
What kind of wax works best with wood wicks?
Wood wicks perform best with 100% natural waxes like soy, coconut, palm, and beeswax, or blends of these. While they can work with paraffin, you often need a larger or “booster” wick to get a strong enough flame, as paraffin is a harder wax.
My wood wick is burning on one side only. How can I fix this?
This can happen if the wick isn’t perfectly centered or if there’s a draft in the room. Make sure your candle is on a level surface away from fans or open windows. If the wick itself seems to have an uneven grain, carefully trimming the unburnt side a tiny bit lower can sometimes help correct it on the next burn.
Can I use two smaller wood wicks in one large candle?
Yes, absolutely! For very large or irregularly shaped containers (like long rectangles or wide bowls), using two or even three smaller wood wicks is often better than one giant one. This ensures an even melt pool across the entire surface and prevents tunneling.
Why did the top of my soy wax candle look rough or cracked after it cooled?
This is a common trait of natural soy wax and doesn’t affect the candle’s performance. It’s caused by the wax cooling at an uneven rate. To minimize this, try pouring your wax at a lower temperature and ensure the candle cools slowly in a room with a stable temperature, away from drafts.
Is the black, burnt part of the wick supposed to be there?
Yes, the charred top layer is a normal byproduct of combustion. However, this is the part you want to remove before each new burn. That charred material doesn’t burn well and can inhibit the flame. Gently pinch or snap it off to reveal the fresh wood underneath for the best performance.
Embrace the Crackle and Enjoy Your Craft
Making your first wood wick candle is a truly rewarding experience. From selecting the materials to hearing that first gentle crackle, it’s a craft that engages all the senses. Remember, the key to success is all in the details: choosing the right size wick, securing it properly, and most importantly, trimming it before every burn.
Don’t be afraid to experiment. Your first few candles are your learning tools. If one doesn’t turn out perfectly, just think of it as practice. Every project you complete in your workshop, whether it’s out of wood or wax, builds your skills and confidence. You now have the knowledge to create beautiful, crackling candles that will bring warmth and a cozy ambiance to your home or make a heartfelt, handmade gift for someone special.
So go ahead, give it a try. I’m confident that with a little patience and these simple steps, you’ll be making incredible wood wick candles in no time. Happy crafting!