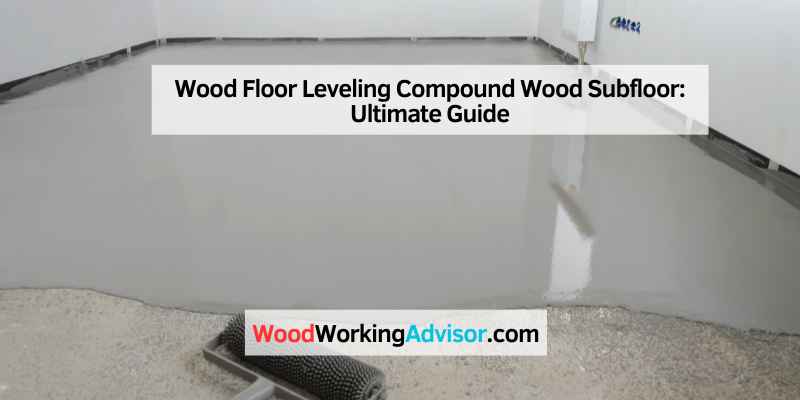
Wood Floor Leveling Compound Wood Subfloor: Ultimate Guide
To level a wood subfloor with a wood floor leveling compound, first clean the subfloor of debris and fill in any large gaps or holes. Then, mix the leveling compound according to the manufacturer’s instructions and pour it onto the subfloor, spreading it evenly with a trowel.
Allow the compound to dry completely before installing your wood flooring. Wood floor leveling compound is a useful tool in ensuring a smooth and level surface for your wood flooring. It can be used to fill in low spots, smooth out uneven areas, and create a level surface for installation.
There are many different types of leveling compound available, each with their own unique features and benefits. By selecting the right type of compound for your specific needs and following proper application techniques, you can ensure a successful and long-lasting wood floor installation.
Introduction To Wood Floor Leveling Compounds
Wood floor leveling compounds are a convenient solution for leveling uneven wood subfloors. They are easy to use and provide a sturdy and clean finish. With a range of options available, such as self-leveling compounds, these products make it simple to achieve a smooth and level surface for your wood flooring installation.
When it comes to installing wood flooring, having a level subfloor is essential. Uneven subfloors can lead to a range of problems, including squeaky floors, gaps between planks, and premature wear and tear. That’s where wood floor leveling compounds come in. These specialized materials are designed to fill in low spots and level out imperfections in the subfloor, creating a smooth and even surface for the wood flooring to be installed on.
Why Leveling Matters For Wood Subfloors
Having a level subfloor is crucial for the proper installation and long-term performance of wood flooring. Here are a few reasons why leveling matters:
- Prevents squeaky floors: Uneven subfloors can cause the wood flooring to rub against the subfloor, resulting in annoying squeaks and creaks.
- Eliminates gaps between planks: A level subfloor ensures that there are no gaps between the wood planks, creating a seamless and visually appealing floor.
- Improves durability: An uneven subfloor can cause the wood flooring to wear unevenly, leading to premature damage and a shorter lifespan.
- Enhances aesthetics: A level subfloor provides a solid foundation for the wood flooring, allowing it to be installed smoothly and creating a visually pleasing finish.
Types Of Wood Floor Leveling Compounds
There are several types of wood floor leveling compounds available in the market. Here are some popular options:
| Product | Price | Features |
|---|---|---|
| Home Depot | $28.98 | Pick up today CURBSIDE, Easy to install, Sturdy |
| Lowe’s | $10.75 | Pick up today, Easy to use, Easy to clean up |
| Home Depot | $35.00 | Pick up today CURBSIDE, Easy to use, Good finish, Mixes well |
| Home Depot | $40.63 | Pick up today CURBSIDE, Easy to use, Easy to clean up |
| Amazon.com | $19.49 | Leveler Wood Filler |
| Floor and Decor | $17.94 | Pick up today, High compressive strength |
| Lowe’s | $34.98 | Pick up today, Easy to use, Good finish, Mixes well |
| Lowe’s | $30.44 | Pick up today, Versatile underlayment |
| Home Depot | $13.97 | Pick up today CURBSIDE, Easy to use, Good finish |
| Lowe’s | $34.98 | Pick up today, Easy to use, Easy to clean up |
These wood floor leveling compounds vary in terms of price, availability, and features. It’s important to choose the right one based on your specific needs and the condition of your wood subfloor.
Now that you understand the importance of wood floor leveling compounds and the different options available, you can confidently proceed with your wood flooring installation project. Remember, a level subfloor is the foundation for a beautiful and long-lasting wood floor.
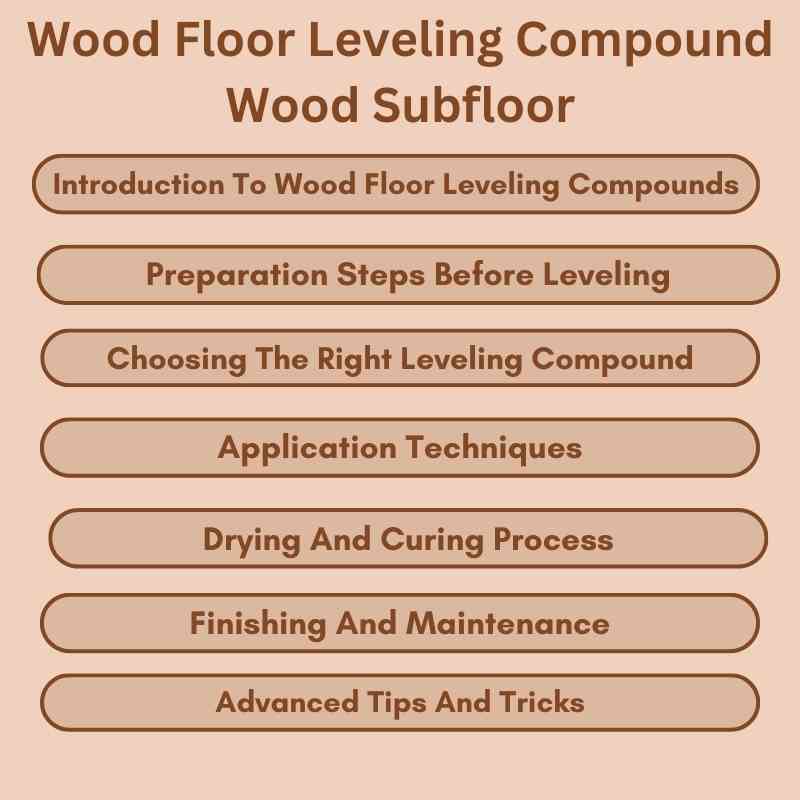
Preparation Steps Before Leveling
Before leveling your wood subfloor with a wood floor leveling compound, there are a few preparation steps you should follow. First, make sure the subfloor is clean and free of any debris. Next, check for any loose or damaged boards and repair them before applying the leveling compound.
Finally, ensure that the subfloor is dry and properly sealed to prevent moisture issues. Following these steps will ensure a smooth and successful leveling process.
Before applying wood floor leveling compound to a wood subfloor, it is crucial to ensure that the subfloor is properly prepared. This includes assessing the subfloor condition, gathering the necessary materials and tools, and following specific steps to guarantee a successful leveling process.
Assessing The Subfloor Condition
Prior to applying the wood floor leveling compound, it is essential to thoroughly inspect the wood subfloor for any imperfections or irregularities. Look for dips, cracks, or uneven areas that may affect the application of the leveling compound.
Materials And Tools Needed
Here are the essential materials and tools required for the wood floor leveling process:
- Wood Floor Leveling Compound: Choose a high-quality leveling compound suitable for wood subfloors. Look for products with excellent compressive strength and self-leveling properties.
- Primer: A suitable primer to prepare the wood subfloor for the application of the leveling compound.
- Edge Bands: These are necessary for sealing gaps and holes in the subfloor.
- Mixing Tools: Ensure you have the appropriate tools for mixing the leveling compound, such as a mixing paddle and a drill.
- Application Tools: Tools for spreading and smoothing the leveling compound, including trowels and straight edges.
Choosing The Right Leveling Compound
When leveling a wood subfloor, choosing the right leveling compound is crucial to ensure a smooth and even surface for your new flooring. With various brands and types available in the market, it’s important to consider key properties and compare prices to make an informed decision.
Comparing Brands And Prices
Before selecting a leveling compound, it’s essential to compare different brands and their prices. Here’s a comparison of popular products:
| Brand | Price | Retailer | Features |
|---|---|---|---|
| Brand A | $28.98 | Home Depot | Easy to install, sturdy |
| Brand B | $10.75 | Lowe’s | Easy to use, easy to clean up |
| Brand C | $35.00 | Home Depot | Easy to use, good finish, mixes well |
| Brand D | $40.63 | Home Depot | Easy to use, easy to clean up |
| Brand E | $19.49 | Amazon.com | Leveler wood filler |
Key Properties Of Leveling Compounds
- Compressive strength
- Workability
- Setting time
- Application thickness
- Compatibility with wood subfloors
- Moisture resistance
- Self-leveling properties
Considering these key properties will help you determine the most suitable leveling compound for your wood subfloor, ensuring a successful flooring installation.
Application Techniques
When it comes to applying wood floor leveling compound on a wood subfloor, the right techniques can make a significant difference in achieving a smooth and level surface. Proper application techniques involve mixing the leveling compound correctly and applying it in a manner that ensures the best results.
Mixing The Leveling Compound
Properly mixing the leveling compound is crucial for achieving the desired consistency and performance. Here are the basic steps for mixing the leveling compound:
- Start by reading the manufacturer’s instructions to understand the specific mixing ratios and guidelines for the leveling compound.
- Measure the appropriate amount of water and leveling compound powder as per the instructions, and pour the water into a clean mixing bucket.
- Gradually add the leveling compound powder to the water while stirring continuously to avoid lumps and ensure a smooth, lump-free mixture.
- Continue stirring until the compound reaches a uniform consistency, free of any dry clumps or uneven texture.
- Let the mixture stand for the specified time as recommended by the manufacturer to allow the compounds to fully blend and activate.
- After the resting period, stir the mixture again before proceeding with the application to ensure that it is ready for use.
Proper Application For Best Results
Applying the leveling compound correctly is essential for achieving a level and even surface. Here are the key steps for the proper application of wood floor leveling compound:
- Prepare the subfloor by cleaning it thoroughly to remove any debris, dust, or contaminants that could affect the bonding of the leveling compound.
- Prime the subfloor with a suitable primer as recommended by the manufacturer to promote strong adhesion and prevent the absorption of moisture from the leveling compound.
- Pour the mixed leveling compound onto the prepared subfloor in sections, starting from the farthest corner of the room and working towards the exit to avoid stepping on the freshly applied compound.
- Spread the compound evenly using a trowel or a leveling tool, ensuring that it fills any low spots and creates a smooth, level surface across the entire area.
- Use a spiked roller to eliminate any air bubbles and ensure uniform thickness and adhesion of the leveling compound to the subfloor.
- Allow the compound to cure as per the manufacturer’s instructions before proceeding with any additional flooring installation or finishing treatments.
Troubleshooting Common Issues
When leveling a wood subfloor with wood floor leveling compound, common issues may arise such as uneven application and cracking. To troubleshoot these issues, it is important to properly prepare the subfloor, follow manufacturer instructions, and allow sufficient drying time.
Additionally, using a primer and self-leveling underlayment can help achieve a smoother and more durable finish.
Installing wood floors is a great way to beautify your home. However, if your subfloor isn’t level, it can cause problems. Fortunately, there are wood floor leveling compounds that can help fix these issues. While leveling compounds can solve many problems, there are still common issues that can arise. Here are some tips for troubleshooting these problems.
Dealing with High Spots
High spots are one of the most common problems when it comes to wood floor installations. If you notice high spots in your subfloor, you can use a leveling compound to even it out. Here are some steps you can follow to deal with high spots:
1. Identify the high spots on the subfloor.
2. Use a grinder or sander to remove the high spots.
3. Clean the area to remove any dust or debris.
4. Apply the leveling compound according to the manufacturer’s instructions.
5. Allow the compound to dry completely before installing your wood flooring.
Addressing Low Spots
Low spots are another common problem when it comes to wood floor installations. If you notice low spots in your subfloor, you can use a leveling compound to fill them in. Here are some steps you can follow to address low spots:
1. Identify the low spots on the subfloor.
2. Clean the area to remove any dust or debris.
3. Apply the leveling compound according to the manufacturer’s instructions.
4. Use a trowel to spread the compound evenly.
5. Allow the compound to dry completely before installing your wood flooring.
It’s important to note that using too much leveling compound can cause problems. It can take longer to dry and can also crack under the weight of heavy furniture. Always follow the manufacturer’s instructions and use the correct amount of compound.
In conclusion, wood floor leveling compounds can be a lifesaver when it comes to subfloor issues. By following these troubleshooting tips, you can ensure a smooth installation and a beautiful finished product.
Drying And Curing Process
To ensure a smooth and level wood floor, it’s important to use a wood floor leveling compound on the subfloor. Once applied, the drying and curing process should be carefully monitored to ensure a sturdy and durable finish. Various products are available for easy installation and clean-up, including options from Home Depot, Lowe’s, and Amazon.
Helpful tutorials on YouTube can guide you through the process.
Timeframe For Drying
After applying the wood floor leveling compound to the subfloor, it is essential to give it enough time to dry. The drying time will vary depending on the type and brand of leveling compound used, the temperature and humidity of the room, and the thickness of the layer applied. Generally, it takes around 24 to 48 hours for the compound to dry and set.
Ensuring Proper Curing
Once the compound is dry, it is crucial to ensure that it cures properly before installing any flooring material. Curing time is the time needed for the compound to reach its full strength and stability. It is recommended to wait for at least 48 hours before walking on the leveled surface and 72 hours before installing any flooring material.
To ensure proper curing, it is essential to maintain a stable temperature and humidity level in the room. Any sudden changes in temperature or humidity can affect the curing process and lead to cracks or shrinkage in the compound.
In addition, it is recommended to avoid applying any weight or pressure on the leveled surface during the curing process. This includes heavy furniture, tools, or equipment. Also, it is crucial to keep the room well-ventilated to allow proper airflow and prevent any moisture buildup.
The drying and curing process is a crucial step in leveling a wood subfloor with a leveling compound. By following the recommended timeframe for drying and ensuring proper curing, you can ensure a stable and durable surface for your flooring installation. Remember to always read the manufacturer’s instructions before applying any leveling compound and follow the recommended drying and curing time for best results.
Finishing And Maintenance
Once the wood floor leveling compound has been applied to the subfloor, it is important to take proper measures to protect and maintain the leveled surface. This ensures the longevity and durability of the flooring, keeping it in top condition for years to come.
Protecting The Leveled Subfloor
Protecting the leveled subfloor is crucial to prevent any damage or wear and tear. Here are some important tips to safeguard the leveled subfloor:
- Place protective mats or rugs in high-traffic areas to minimize direct impact on the leveled surface.
- Avoid dragging heavy furniture or sharp objects across the leveled floor to prevent scratches or indentations.
- Use furniture pads or coasters to distribute the weight of heavy furniture and reduce pressure on specific areas of the leveled subfloor.
- Regularly inspect the subfloor for any signs of damage or wear and address them promptly to prevent further deterioration.
Long-term Care Tips
Implementing long-term care practices is essential for maintaining the quality and appearance of the leveled subfloor. Here are some valuable tips for long-term care:
- Regularly clean the leveled subfloor using a soft broom or vacuum cleaner to remove dirt, dust, and debris.
- Avoid using harsh cleaning agents or abrasive materials that can cause damage to the leveled surface.
- Periodically inspect the subfloor for any signs of moisture or water damage, addressing any issues promptly to prevent potential structural damage.
- Consider applying a protective sealant or finish to the leveled subfloor to enhance its durability and resistance to wear.
Advanced Tips And Tricks
When it comes to leveling wood subfloors, utilizing advanced tips and tricks can make the process more efficient and effective. Whether you’re dealing with a large area or structural subfloor issues, these strategies can help you achieve a perfectly level surface for your wood floor installation.
Leveling Over Large Areas
Leveling a large area of a wood subfloor requires careful planning and execution. One effective approach is to use a self-leveling compound, which can provide a smooth and even surface for the installation of wood flooring. Here are some advanced tips for leveling over large areas:
- Divide the large area into smaller sections to ensure thorough coverage and even application of the leveling compound.
- Consider using a notched trowel to spread the compound evenly, minimizing the need for excessive sanding or leveling afterwards.
- Work in small, manageable sections to maintain control over the application and achieve consistent results across the entire area.
Dealing With Structural Subfloor Issues
Structural subfloor issues can pose challenges when it comes to achieving a level surface for wood floor installation. Addressing these issues with the right techniques and products is essential for a successful outcome. Here are some advanced tips for dealing with structural subfloor issues:
- Identify and address any structural deficiencies in the subfloor, such as uneven joists or significant dips or slopes.
- Utilize a combination of plywood and self-leveling compound to effectively level and reinforce the subfloor, ensuring a stable foundation for the wood flooring.
- Consider consulting a professional to assess and address any structural issues before proceeding with the leveling process.
Case Studies And Success Stories
Discover the success stories and case studies of using wood floor leveling compound on wood subfloors in Austin, Texas. From easy installation and cleaning to achieving a smooth finish, these compounds are available at top retailers like Home Depot and Lowe’s for as low as $10.
75. Check out YouTube tutorials for tips on applying self-leveling compounds and leveling plywood subfloors for a flawless result.
Residential Leveling Projects
John and Sarah transformed their outdated hardwood floors in their family home using a wood floor leveling compound on the subfloor. The uneven surfaces and low spots were effectively addressed, creating a smooth and level base for the new flooring installation. The result was a stunning transformation that added value and beauty to their home.
Commercial Flooring Successes
ABC Construction Company undertook a large-scale commercial flooring project in a retail space. By utilizing a wood floor leveling compound on the subfloor, they were able to achieve a perfectly level surface, ensuring the successful installation of the new flooring. The efficient application of the leveling compound saved time and labor costs, contributing to the overall success of the project.
DIY Vs. Professional Leveling
When it comes to leveling a wood subfloor, you may be wondering whether to tackle the project yourself or hire a professional. There are a few factors to consider before making a decision. Let’s take a look at when it’s appropriate to call in the pros and do a cost-benefit analysis of DIY versus professional leveling.
When To Call The Pros
If you have a large or complex flooring project, it’s often best to leave it to the professionals. Here are a few situations where hiring a professional leveling service makes sense:
- If your wood subfloor has extensive damage or is uneven over a large area, professionals have the expertise and specialized equipment to handle the job efficiently.
- When time is a factor, professionals can complete the leveling process more quickly, allowing you to proceed with the installation of your new flooring sooner.
- For commercial projects or high-traffic areas, professional leveling ensures a durable and long-lasting result that can withstand heavy use.
Cost-benefit Analysis
Before deciding whether to tackle the wood floor leveling yourself or hire a professional, it’s important to consider the cost-benefit analysis. Here are a few factors to weigh:
| DIY Leveling | Professional Leveling |
|---|---|
|
|
Consider your skill level, available time, and the complexity of the project when deciding whether to take the DIY route or hire a professional leveling service. While DIY may save you money upfront, professional leveling can ensure a high-quality, long-lasting result.
In conclusion, it’s essential to assess the scope of your wood floor leveling project and your own capabilities before deciding whether to tackle it yourself or hire a professional. Both options have their pros and cons, so make your decision based on what will ultimately result in a level and sturdy subfloor for your new flooring.

Frequently Asked Questions
Can You Use Leveling Compound On Wood Subfloor?
Yes, you can use leveling compound on a wood subfloor. It is a common practice to level out uneven areas before installing new flooring. The leveling compound helps create a smooth and even surface for the flooring to be installed on.
Make sure to follow the manufacturer’s instructions for proper application.
Can Self-leveling Compound Be Used On Wood Floors?
Yes, self-leveling compound can be used on wood floors. It is a versatile solution for leveling uneven surfaces and providing a smooth base for various flooring materials. It is easy to install and clean up, making it a popular choice for DIY projects.
Ensure to choose a self-leveling compound specifically designed for wood subfloors for optimal results.
How To Level A Wooden Subfloor?
To level a wooden subfloor, start by cleaning and repairing any damage. Next, apply a floor leveling compound to fill in low spots. Follow the manufacturer’s instructions for mixing and applying the compound. Finally, allow it to dry thoroughly before installing any new flooring.
Can You Use Wood Filler To Level A Subfloor?
Yes, wood filler can be used to level a subfloor by filling in small gaps and imperfections.
Conclusion
Leveling compounds are a great solution for addressing uneven wood subfloors. With a wide range of options available, such as those found at Home Depot, Lowe’s, and Amazon, you can easily find a product that suits your needs. These compounds are easy to use and provide a sturdy, clean finish.
Whether you’re filling low spots or preparing for tile installation, leveling compounds offer a versatile underlayment solution. So, don’t hesitate to use leveling compounds on your wood subfloor for a smooth and level surface.