Acrylic Art Painting Ideas: Proven Best for Beginners
The best acrylic art painting ideas for beginners include abstract color fields, simple geometric patterns, monochromatic landscapes with silhouettes, and minimalist florals. These projects are forgiving, teach fundamental techniques like blending and layering, and allow you to create beautiful art without needing advanced drawing skills. They are the perfect way to build your confidence.
Staring at a blank canvas can feel just like looking at a pile of lumber before a big project. It’s exciting, but it can also be a little intimidating. You might be wondering, “Where do I even start?” As someone who loves building things with my hands, I can tell you that the secret to success in any craft—whether it’s woodworking or painting—is to start simple. You don’t need to be a master artist to create something you’re proud of.
The truth is, acrylic painting is one of the most beginner-friendly ways to get creative. In this guide, I’m going to show you some simple and fun acrylic art painting ideas. We’ll walk through everything step-by-step, just like we would in the workshop. You’ll be amazed at what you can create with just a few colors and a little guidance.
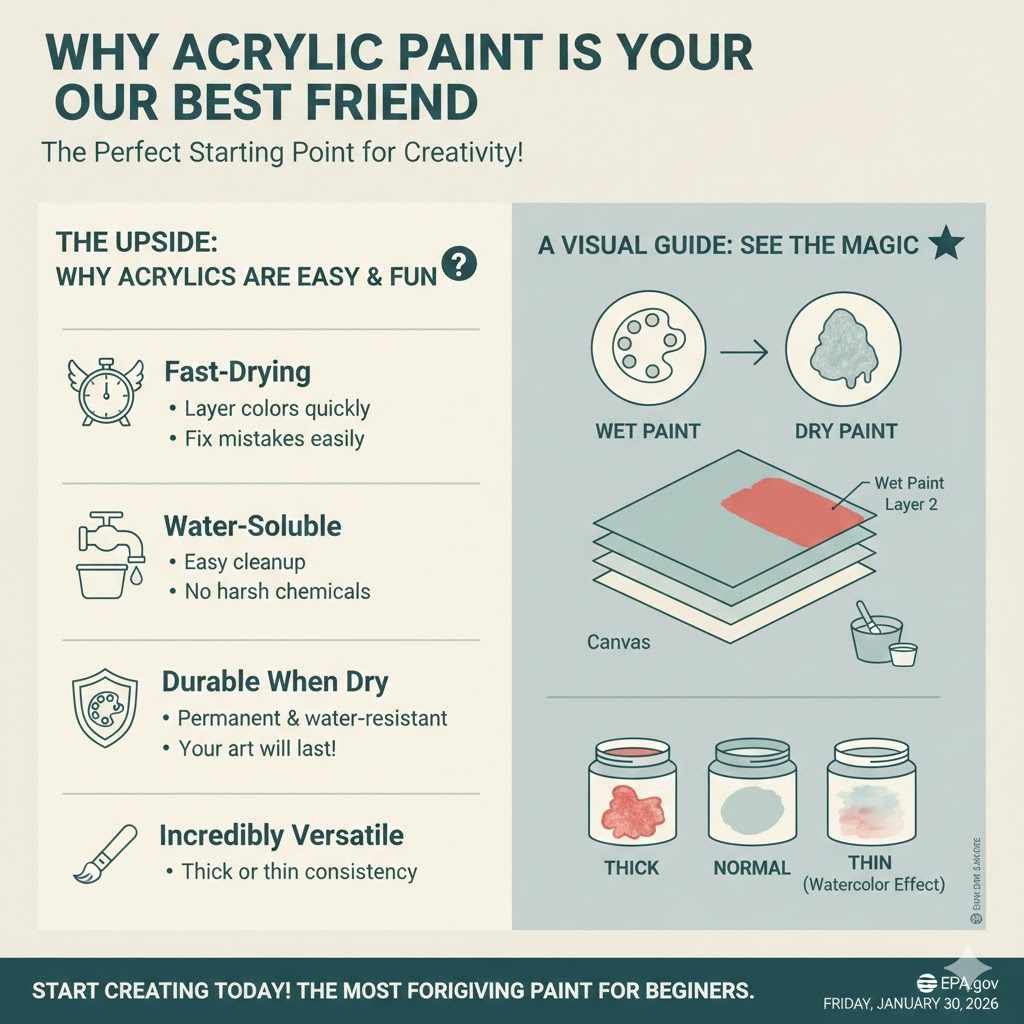
Why Acrylic Paint is Your Best Friend
Before we grab our brushes, let’s talk about why acrylics are the perfect starting point. If paints were tools, acrylics would be the trusty, all-purpose screwdriver you reach for again and again. They are incredibly versatile and, most importantly, forgiving.
- Fast-Drying: Acrylics dry quickly, which means you can add new layers of paint without waiting for hours. This keeps your creative momentum going. If you make a mistake, you can often just wait a few minutes for it to dry and paint right over it.
- Water-Soluble: When they are wet, acrylics clean up easily with just soap and water. No need for harsh chemicals or solvents. This makes setup and cleanup a breeze.
- Durable When Dry: Once dry, acrylic paint becomes water-resistant and permanent. Your beautiful creation will last for a very long time.
- Incredibly Versatile: You can use acrylics on almost any surface—canvas, wood, paper, fabric, you name it. You can also change their consistency, making them thick like oil paints or thin like watercolors just by adding a little water or medium.
Your First Painting Toolkit: Essential Supplies
You don’t need a professional art studio to get started. Just like with my first woodworking projects, I started with a few basic tools that did the job well. Here’s a simple list of supplies that will get you painting without breaking the bank.
| Supply Item | Description | Why You Need It |
|---|---|---|
| Acrylic Paints | A basic set of student-grade paints with primary colors (red, yellow, blue) plus black and white. | You can mix these five colors to create almost any other color you need. Starting with a small set keeps things simple and affordable. |
| Paint Brushes | A small variety pack of synthetic brushes. Look for a flat brush, a round brush, and a smaller detail brush. | Different brushes create different effects. A starter pack gives you options for broad strokes and fine lines without being overwhelming. |
| Painting Surface | Pre-primed canvas panels or a pad of acrylic paper. A small size like 8×10 inches is perfect for practice. | These are ready to paint on right away. Canvas panels are sturdy, and paper pads are great for practicing techniques. |
| Palette | A simple plastic palette, a paper plate, or even a piece of cardboard or wax paper. | You need a dedicated surface to squeeze out your paints and mix colors. Anything non-absorbent will work! |
| Water Cups | Two sturdy jars or plastic cups. | One cup is for rinsing your brushes, and the second is for clean water to thin your paints. This keeps your colors from getting muddy. |
| Paper Towels or a Rag | For blotting excess water from brushes and wiping up spills. | Essential for controlling the amount of water and paint on your brush. An old t-shirt works great, too. |
Core Techniques to Know Before You Start
Think of these techniques as your basic skills. Just like learning to make a straight cut with a saw, mastering these will make every project easier. Spend a little time just playing with paint on a piece of paper to get a feel for them.
Blending Colors
Blending is how you create smooth transitions between colors, like in a sunset. Place two different colors next to each other on the canvas. While they are still wet, use a clean, slightly damp brush to gently sweep back and forth where they meet. The colors will slowly mix together, creating a beautiful gradient.
Layering
This is where the fast-drying nature of acrylics really shines. Once a layer of paint is dry (which only takes a few minutes), you can paint another layer directly on top without the colors mixing. This is perfect for adding details, correcting mistakes, or building up rich color and depth.
Dry Brushing
For this technique, you’ll dip your brush in a small amount of paint and then wipe most of it off on a paper towel. When you brush this onto your canvas, it creates a scratchy, textured effect. It’s fantastic for painting things like wood grain, wispy clouds, or grass.
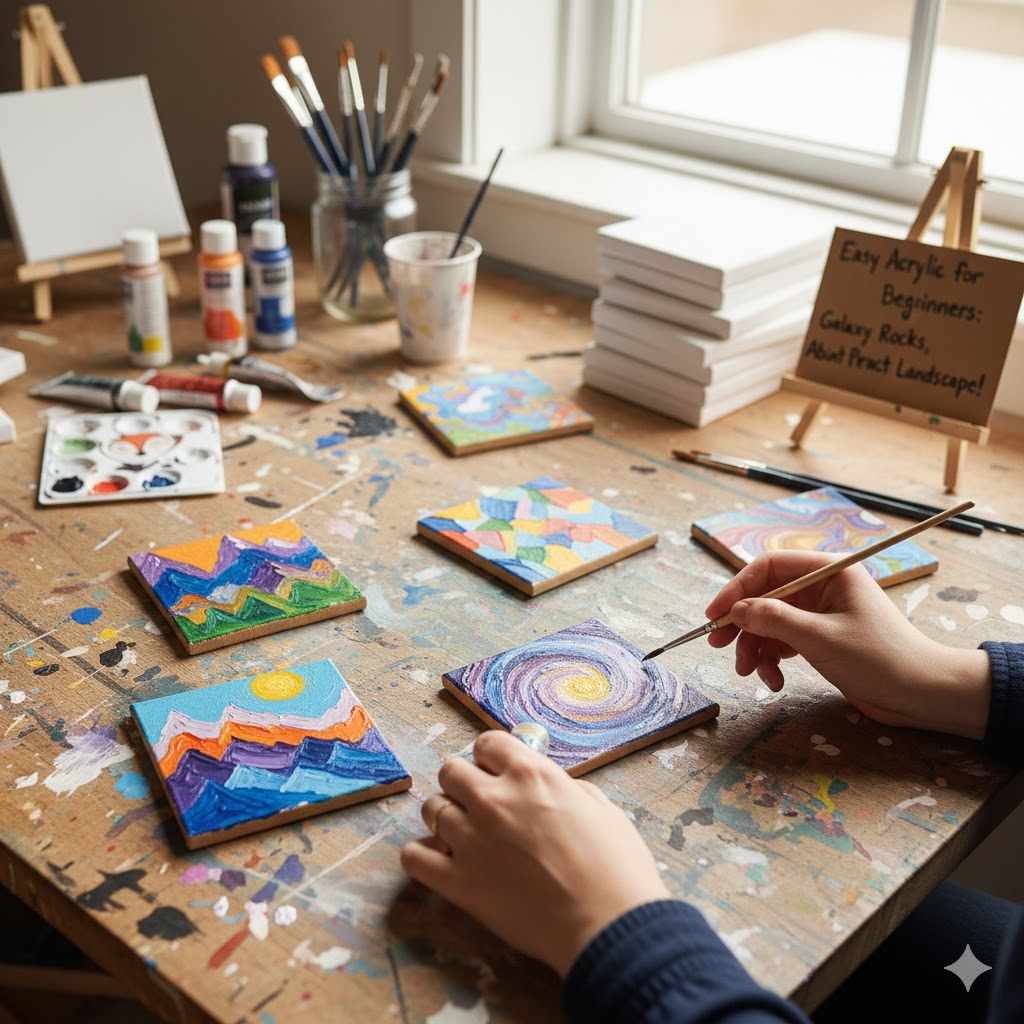
Proven Acrylic Painting Ideas Perfect for Beginners
Now for the fun part! Here are some simple, stress-free acrylic art painting ideas that deliver amazing results. Pick one that looks fun to you and just dive in. The goal here is to enjoy the process, not to create a masterpiece on your first try.
1. Abstract Color Fields Painting
This is the ultimate “no-pressure” painting. There’s no right or wrong way to do it. You’re simply playing with colors that you like and seeing how they interact. It’s a wonderful way to learn about color mixing and express emotion.
Why it’s great for beginners:
- It doesn’t require any drawing skills.
- It helps you get comfortable with how paint feels and moves.
- The final result always looks modern and intentional.
Step-by-Step:
- Choose 3-4 colors you love. Pick colors that make you feel happy, calm, or energetic. Learning a little about color theory can be helpful. Reputable resources like the Museum of Modern Art (MoMA) have great introductions to the topic.
- Squeeze out a good amount of each color onto your palette.
- Using a large flat brush, start blocking in large shapes of color on your canvas. Don’t overthink it! Let one color flow into the next.
- While the paint is still wet, you can use your brush to gently blend the edges where the colors meet. Or, you can let them dry and have hard edges. Both look great.
- Feel free to add a splash of a contrasting color or use a smaller brush to add some small lines or dots for interest. Step back and stop when you feel it’s done.
2. Simple Geometric Patterns
If you love clean lines and crisp designs, this project is for you. With the help of painter’s tape, you can create a professional-looking piece of art that looks like it took way more skill than it actually did.
Why it’s great for beginners:
- Painter’s tape does all the hard work of creating straight lines.
- It’s incredibly satisfying to peel off the tape and reveal your design.
- You can create endless patterns with triangles, squares, and chevrons.
Step-by-Step:
- Start by painting your entire canvas with a single base color. A light color like white, beige, or light gray often works best. Let it dry completely.
- Once dry, use painter’s tape to section off your canvas into a geometric pattern. Press the edges of the tape down firmly to prevent paint from bleeding underneath.
- Choose your other colors and begin painting within the taped-off sections. Don’t worry about staying in the lines—the tape is your guide!
- Apply one or two coats of paint to each section.
- Here’s the key trick: Carefully peel off the painter’s tape while the paint is still slightly wet. If you wait until it’s fully dry, you risk peeling off some of the paint with the tape.
3. Monochromatic Sunset Silhouette
This is a classic beginner project for a reason. It teaches you blending skills and layering in a simple and visually stunning way. You get to paint a beautiful sky and then add a simple, dramatic silhouette over the top.
Why it’s great for beginners:
- You only need a few colors to create a breathtaking sunset.
- Painting silhouettes (like trees or mountains) doesn’t require detailed drawing.
- It’s a “wow-factor” painting that looks much more complicated than it is.
Step-by-Step:
- Start with the colors for your sky. For a sunset, you might use yellow, orange, red, and a dark blue.
- Start at the top of the canvas with your darkest color (blue) and work your way down. Add the next color (red), and while both are wet, blend them together where they meet.
- Continue this process down the canvas with orange and then yellow at the bottom, blending each new color into the one above it. Don’t stress about making it perfect. Skies are naturally uneven!
- Let your beautiful blended sky dry completely. This is very important.
- Once it’s dry, use solid black paint and a small detail brush to paint your silhouette along the bottom. Simple shapes work best: a jagged mountain range, a few bare trees, or the simple outline of a far-off city.
4. Minimalist Botanical and Floral Painting
You don’t need to paint a whole bouquet of flowers to create something beautiful. Focusing on a single leaf or a simple flower stem can make a huge impact. This project helps you practice brush control and basic shapes.
Why it’s great for beginners:
- Focusing on a single object is less intimidating than a complex scene.
- It’s a great way to practice different brush strokes to create petals and leaves.
- The simple, clean look is very popular and fits with many home decor styles.
Step-by-Step:
- Paint your background a solid, neutral color. White, cream, or even a soft gray allows the plant to stand out. Let it dry.
- Look up a picture of a simple leaf, like a monstera leaf or a fern. You can lightly sketch the basic shape onto your canvas with a pencil first.
- Mix a few shades of green. Having a light, medium, and dark green will add depth to your painting.
- Use a medium round brush to fill in the main shape of the leaf with your mid-tone green.
- While the paint is still wet, add a little of your darker green along the stem and veins, and a touch of the lighter green on the edges where light would hit. Use your brush to gently blend these in.
- Use a small detail brush to paint the thin stem. That’s it! You’ve created a simple, elegant piece of art.
Choosing Your Painting Surface
While a standard canvas is a great place to start, acrylics are versatile enough to work on many different materials. Each one provides a slightly different look and feel.
| Surface | Pros | Cons | Best For |
|---|---|---|---|
| Stretched Canvas | Classic artist feel, ready to hang, lightweight. | Can be punctured, more expensive. | Creating finished pieces you want to display on a wall. |
| Canvas Panel | Sturdy, affordable, easy to store and frame. | Less “give” than stretched canvas, can warp if it gets too wet. | Beginners, practice paintings, and smaller projects. |
| Wood Panel | Very durable and smooth, provides a unique look. | Needs to be primed with gesso before painting, can be heavy. | Creating durable art or painting on found objects. |
| Acrylic Paper | Inexpensive, sold in pads, easy to store. | Can buckle with too much water, feels less “official.” | Practicing techniques, testing color mixes, and sketching out ideas. |

Frequently Asked Questions (FAQ)
How do I fix a mistake in acrylic painting?
It’s easy! Because acrylics are opaque and dry quickly, you have two simple options. For a small wet mistake, quickly wipe it away with a damp cloth. If the paint is already dry, just let it be and paint right over it. It’s one of the most forgiving things about acrylic paint.
Do I really need to prime my canvas?
Most canvases you buy at a craft store are already pre-primed with a material called gesso, so you can paint on them right away. If you’re painting on a raw surface like wood or fabric, applying a coat or two of gesso first will help the paint go on smoothly and make your colors look brighter.
How should I clean my brushes?
Clean your brushes right after you’re done painting. Never let acrylic paint dry on the bristles, as it becomes permanent and can ruin the brush. Simply rinse the paint out under cool running water and gently wash the bristles with a little bit of mild soap. Reshape the bristles with your fingers and lay them flat to dry.
What’s the difference between student-grade and artist-grade paint?
Artist-grade paints have a higher concentration of pigment, which means the colors are richer and more vibrant. Student-grade paints have less pigment and more binder, making them much more affordable. For beginners, student-grade paints are absolutely perfect for learning and experimenting.
How long does acrylic paint take to dry?
A thin layer of acrylic paint can be dry to the touch in as little as 10-20 minutes. Thicker applications of paint might take an hour or more to fully dry. The exact time depends on the humidity and temperature of your room.
Can I mix brands of acrylic paint?
Yes, you can. Almost all acrylic paints are compatible with each other. Feel free to mix different brands to get the colors you want. You can also mix in different “mediums” to change the paint’s texture, drying time, or finish (like making it more glossy or matte).
Your Creative Journey Starts Now
Painting is a skill, and just like any other skill, it grows with practice. The most important step is the first one: picking up a brush and putting some color on a canvas. Don’t worry about perfection. The goal of these first projects isn’t to create a flawless masterpiece; it’s to learn, to have fun, and to discover the joy of creating something with your own two hands.
Choose one of the ideas above that sparks your interest. Gather your supplies, put on some music, and give yourself permission to play. You might be surprised by the beautiful things you’re capable of making. Remember, every expert was once a beginner. Welcome to the wonderful world of painting!