Best Way to Clean Kitchen Cabinets: Essential Guide
The best way to clean kitchen cabinets, especially wood, involves gentle, consistent methods. Start with dusting, then use a mild soap and water solution on a damp cloth, wiping with the wood grain. Always dry thoroughly to prevent damage. Regular quick clean-ups prevent stubborn build-up.
Hey there, fellow home improvers! It’s Md Meraj here, your go-to woodworking mentor. Are your kitchen cabinets looking a little… tired? Whether it’s grease splatters from cooking, sticky fingerprints, or just the general dust of everyday life, keeping those cabinets looking their best can feel like a chore. But it doesn’t have to be! With a few simple steps and the right approach, you can restore their shine and protect them for years to come. We’ll break it down so you can tackle this project with confidence, no matter your DIY experience level.
We’ll cover everything from everyday dusting to tackling tougher grime, ensuring your cabinets stay beautiful without damage. Stick around, and let’s get those cabinets sparkling!
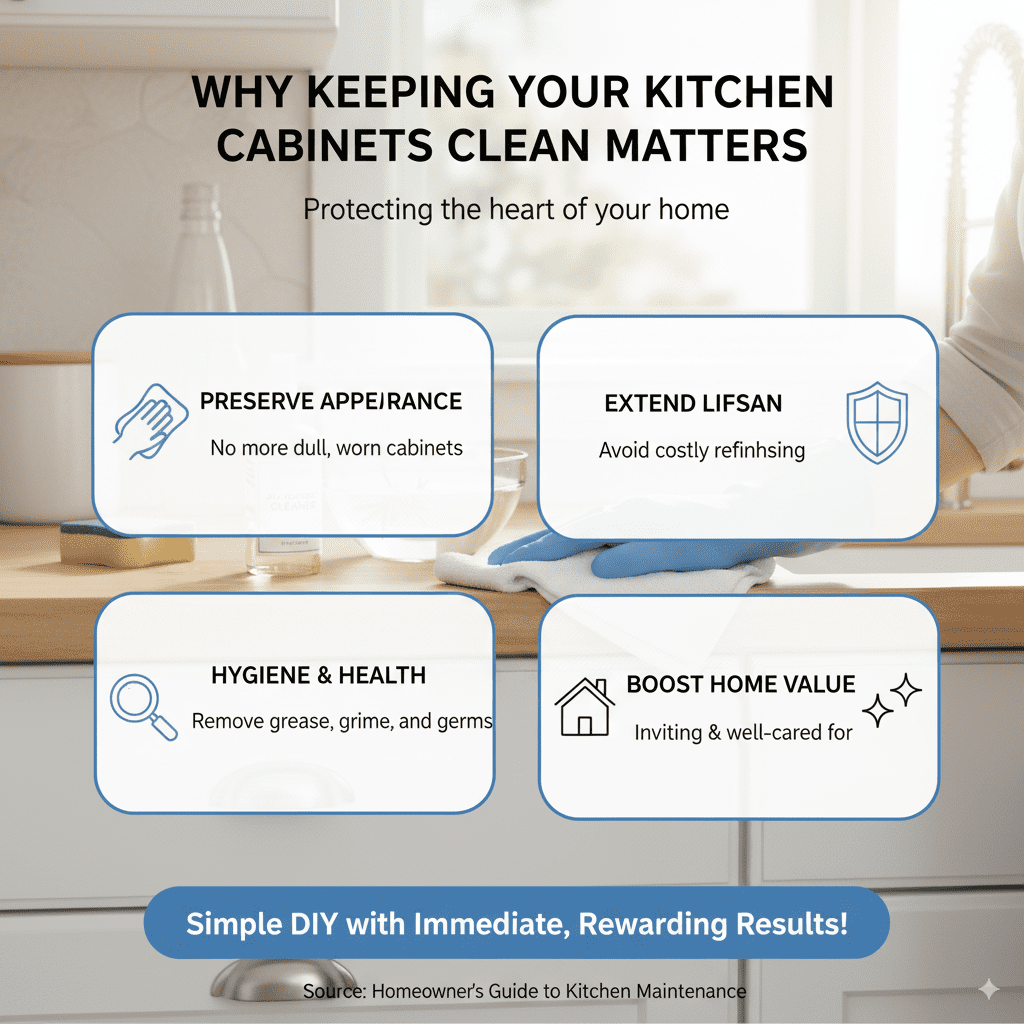
Why Keeping Your Kitchen Cabinets Clean Matters
Your kitchen cabinets are more than just storage; they’re a big part of your kitchen’s overall look and feel. Over time, they collect a variety of unwanted guests: grease, food splatters, fingerprints, and dust. If left unchecked, this build-up can become stubborn, making your cabinets look dull and worn. Regular cleaning not only keeps them looking great but also preserves the lifespan of the wood or finish, saving you from costly refinishing or replacement down the line.
Think of it like this: a clean, well-maintained kitchen makes your whole home feel more inviting and cared for. Plus, it’s a simple yet incredibly impactful DIY project that offers immediate, rewarding results. We’re aiming for a shine that makes you proud!
Understanding Your Cabinet Material
Before we grab any cleaning supplies, it’s crucial to know what your cabinets are made of. Different materials require different care. Most kitchen cabinets are made from wood (solid wood or veneer), but they might have painted finishes, stained finishes, or laminate surfaces. Knowing your material helps you choose the right cleaning method and avoid damage.
Here’s a quick rundown:
- Solid Wood Cabinets: These are sturdy and can often handle more robust cleaning, but still require care to prevent water damage or stripping finishes.
- Wood Veneer Cabinets: These have a thin layer of real wood over particleboard or MDF. They are more sensitive to moisture and abrasive cleaners, as the veneer can lift or peel.
- Painted Cabinets: The type of paint matters. Latex, oil-based, or enamel paints will have different durability. Gentle cleaning is always best here.
- Laminate or Thermofoil Cabinets: These are often found in more budget-friendly kitchens. They can be scratched or peeled by harsh chemicals or intense scrubbing.
For this guide, we’ll focus primarily on wood cabinets, which are common and can be tricky to clean without the right touch. If you’re unsure, check manufacturer guidelines or test a small, inconspicuous area first.
Essential Cleaning Supplies You’ll Need
You don’t need a fancy arsenal to get your cabinets clean. Most of what you need is probably already in your home, or easily found at your local grocery or hardware store. Using the right tools makes the job easier and safer for your cabinets.
Here’s what you should gather:
- Soft microfiber cloths: These are your best friends! They are gentle on surfaces and excellent at trapping dust and grime without scratching. Have a few on hand.
- Mild dish soap: A simple, degreasing dish soap is perfect for cutting through kitchen grease.
- Warm water: The base for most cleaning solutions.
- Spray bottle: For a gentle mist of your cleaning solution.
- A soft-bristled brush or old toothbrush: Great for getting into corners and crevices.
- Optional: Wood cleaner or polish: For a final touch-up and protection after cleaning.
- Optional: White vinegar: Can be used diluted for tougher spots but use with caution on certain finishes.
- Kitchen gloves: To protect your hands from grease and cleaning solutions.
Always ensure your cloths are clean before you start to avoid transferring dirt back onto the cabinets.
The Best Way to Clean Wood Kitchen Cabinets: Step-by-Step
Now for the good part! Let’s get those cabinets sparkling. This method is designed to be safe for most wood finishes, but remember to test in an inconspicuous spot if you’re ever unsure.
Step 1: Dust and Debris Removal
This is the crucial first step that many people skip. Before you introduce any moisture, grab a dry microfiber cloth and gently wipe down all the cabinet surfaces. Pay attention to the tops, sides, and fronts. This removes loose dust and particles, preventing them from turning into mud when you add water, which can scratch the finish.
Don’t forget hardware like knobs and handles – give them a quick dust too!
Step 2: Prepare Your Gentle Cleaning Solution
For most everyday grease and grime, a simple solution of mild dish soap and warm water is incredibly effective. It’s gentle yet powerful enough to cut through common kitchen messes.
Here’s how to mix it:
- Fill your spray bottle with warm water.
- Add just a drop or two of mild dish soap. You want suds, but not an overwhelming amount. Too much soap can leave a residue.
- Close the spray bottle and gently swish it around to mix. Avoid shaking it vigorously, as this can create too many suds.
Pro Tip: Never spray the solution directly onto the cabinets. Always spray it onto your cleaning cloth.
Step 3: Wipe Down the Cabinets
Take your damp, but not soaking wet, microfiber cloth (you can lightly dampen it by spraying the solution onto the cloth itself, or dip it in the solution and wring it out very thoroughly). Start by wiping down the cabinet doors and drawer fronts. Always wipe with the direction of the wood grain for the best results and to avoid creating streaks.
Work in small sections. As you clean a section, immediately follow up with a second, dry microfiber cloth to towel dry. This is key to preventing water spots and protecting the wood finish.
Step 4: Tackle Stubborn Spots (Grease and Grime Build-up)
For areas with more stubborn grease, like around the stove or microwave, you might need something slightly stronger, but still gentle. You can try a slightly more concentrated soap-to-water ratio, or a dedicated wood cabinet cleaner. If using vinegar, mix equal parts white vinegar and water in your spray bottle.
Apply the solution to your cloth, not directly to the cabinet. Gently rub the stubborn spot. For really tough, baked-on grease, you can let the damp cloth sit on the spot for a minute or two to help loosen it before wiping. Again, always wipe with the grain and dry the area immediately with a clean, dry cloth.
Important Note on Vinegar: While effective, vinegar is acidic. Use it sparingly on stained or waxed finishes, and always dilute it. Some manufacturers advise against using vinegar on their cabinetry.
Step 5: Clean Cabinet Hardware
Don’t forget the knobs and handles! These are touched constantly and can get quite grimy. You can clean them with the same mild dish soap solution. For tight spots, use a soft-bristled brush or an old toothbrush. If your hardware is tarnished or discolored, you might need a specialized metal cleaner, but be very careful not to get any on the cabinet finish.
For most cabinet hardware, a good wipe-down with a damp, soapy cloth followed by a dry one is usually sufficient. You can also remove hardware for a more thorough cleaning if you’re comfortable doing so.
Step 6: Final Polish and Protection (Optional but Recommended)
Once your cabinets are clean and completely dry, you can apply a furniture polish or a specific wood cabinet conditioner. This adds a lovely sheen, helps repel future dust and grease, and provides an extra layer of protection for the wood.
Choose a product that is non-greasy and won’t build up. Apply a small amount to a clean, soft cloth and buff it onto the cabinets, again following the wood grain. Let it dry completely according to the product’s instructions.
What to Avoid When Cleaning Kitchen Cabinets
Just as important as knowing what to do is knowing what not to do. To keep your cabinets looking great for years, steer clear of these common mistakes:
- Harsh Chemicals: Avoid abrasive cleaners, ammonia-based cleaners, bleach, or all-purpose cleaners that aren’t specifically designed for wood cabinets. These can strip finishes, discolor wood, or damage laminate.
- Excessive Water: Never drench your cabinets with water. Wood swells and warps when it absorbs too much moisture, which can lead to permanent damage. Always use a damp, well-wrung-out cloth.
- Abrasive Scrubbing: Steel wool, scouring pads, or rough sponges can easily scratch and dull your cabinet finish. Stick to soft microfiber cloths.
- Spraying Directly: Always spray cleaning solutions onto your cloth, never directly onto the cabinet surface. This gives you more control and prevents overspray from damaging surrounding areas or getting into seams.
- Skipping the Drying Step: Leaving cabinets wet is a recipe for water spots and potential wood damage. Always dry thoroughly with a clean cloth immediately after cleaning.
Being mindful of these points will save you a lot of trouble and keep your cabinets in top condition.
Frequency of Cleaning: How Often Should You Clean?
The best cleaning schedule is one that fits your household and cooking habits. Consistency is key to preventing build-up.
Daily Quick Wipe-Downs
After cooking, take a minute to wipe down any obvious splatters or drips on your cabinet fronts and around your backsplash. This prevents them from drying and becoming hard to remove later.
Weekly Cleaning
Once a week, dedicate a little more time. This is when you’ll do the full dusting and a gentle wipe-down of all your cabinet surfaces with the mild soap and water solution. This keeps general dust and light grime at bay.
Monthly Deep Clean or As Needed
Every month, or as needed, tackle more targeted cleaning for grease build-up, especially around high-traffic areas like the stove and sink. This is also a good time to reapply a wood polish if desired.
For heavily used kitchens, you might need to do targeted grease cleaning more frequently. Listen to your cabinets – if they start feeling sticky or look dull, it’s time for a clean!
Troubleshooting Common Cabinet Cleaning Issues
Even with the best intentions, you might run into a few tricky situations. Here’s how to handle them:
Sticky Residue
Often caused by grease or residue from cleaning products. Try a slightly warmer water/soap solution. If that doesn’t work, a solution of equal parts water and white vinegar or a dedicated degreaser for kitchens (ensure it’s safe for wood) can help. Always wipe with the grain and dry thoroughly.
Water Stains or Rings
These are tough! For light stains, sometimes a furniture polish can help mask them. For deeper stains, you might need a wood restorer product, but proceed with caution. In some cases, the damage might be permanent and require professional attention or refinishing.
Scratches
Minor surface scratches can sometimes be touched up with furniture markers or crayons designed for wood. For deeper scratches, you might consider a wood filler or professional repair. Prevention is easier than repair, so be mindful of sharp objects or abrasive cleaning.
White Spots (Heat or Moisture Damage)
These often indicate that the finish has been damaged by heat or moisture. Sometimes, a gentle buffing with a soft cloth and a good quality furniture polish can help. For more severe cases, you might need to consult a professional woodworker for refinishing advice.
Maintaining Cabinet Shine Between Deep Cleans
Keeping your cabinets looking their best between those deeper cleaning sessions is all about quick, preventative actions. It’s about making your life easier and your cabinets happier!
- Immediate Wipe-Downs: As mentioned, wipe up spills and splatters the moment they happen. A damp cloth is all it takes.
- Use Cabinet Pulls: Encourage everyone in the household to use the cabinet handles and knobs rather than pulling directly on the doors or drawers. This minimizes direct fingerprint smudges on the cabinet faces.
- Ventilation is Key: Good ventilation in the kitchen, especially when cooking, helps reduce the amount of grease that settles on surfaces. Use your range hood or open windows.
- Protect Surfaces: Consider using shelf liners inside your cabinets, especially for areas where spills are common. This protects the interior wood and makes cleanup much easier.
- Regular Dusting: A quick daily or every-other-day dusting with a dry microfiber cloth can prevent dust from accumulating and becoming harder to remove later.
These small habits can make a huge difference in how often you need to perform more intensive cleaning tasks.
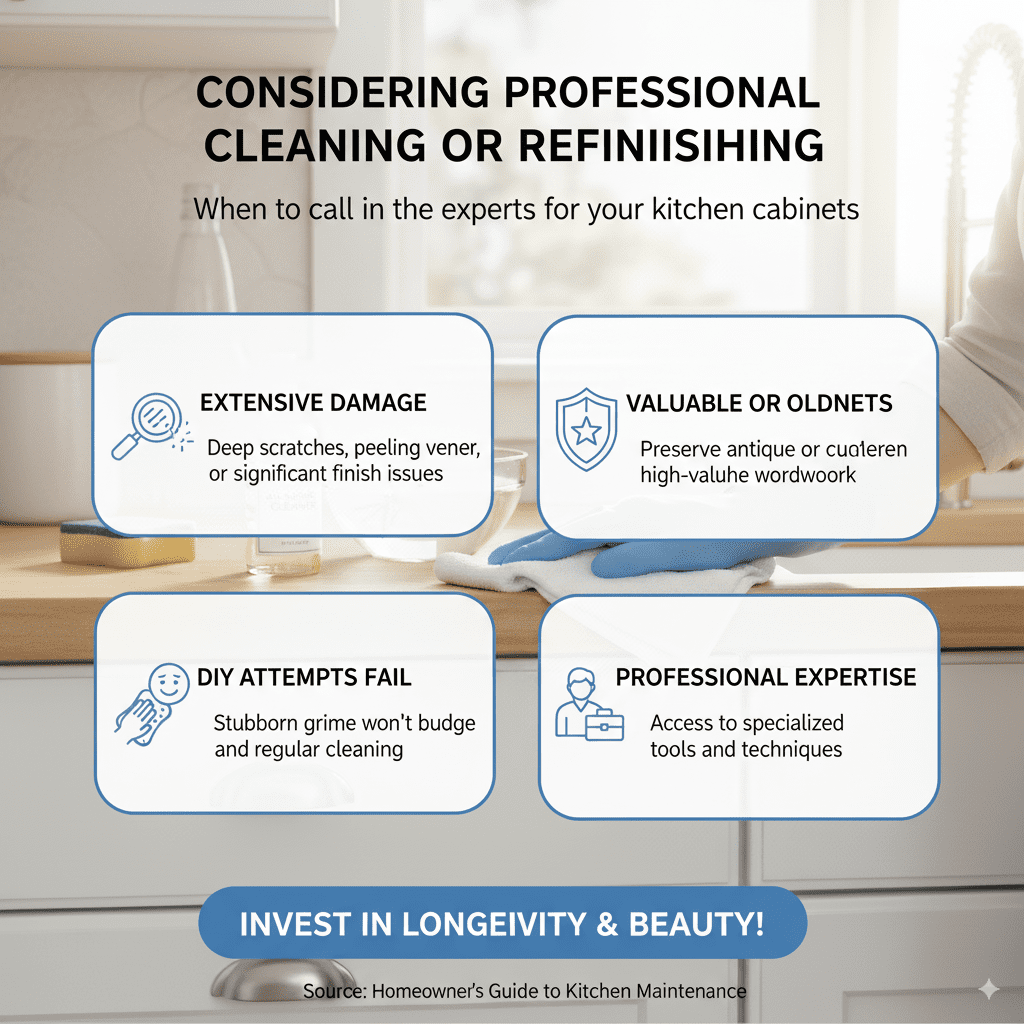
Considering Professional Cleaning or Refinishing
While most cabinet cleaning can be a satisfying DIY project, there are times when professional help might be the best course of action. If your cabinets are particularly old, valuable, or have extensive damage (like deep scratches, peeling veneer, or significant finish damage), a professional woodworker or cabinet restoration specialist can offer expertise.
They have access to specialized products and techniques to safely clean, repair, or even refinish your cabinets, restoring them to their former glory. This is something to consider if DIY attempts aren’t yielding the desired results or if you fear causing further damage. It might seem like an added expense, but the longevity and beauty they can restore can be well worth the investment.
FAQs About Cleaning Kitchen Cabinets
Here are some common questions beginners have about cleaning their kitchen cabinets:
Q1: Can I use Windex on my wood kitchen cabinets?
A1: It’s generally not recommended. While Windex is great for glass, it can contain ammonia or alcohol that may be too harsh for wood finishes, potentially drying them out or damaging the protective coating over time. Stick to milder solutions.
Q2: My cabinets have a greasy film. What’s the best way to remove it gently?
A2: A mild dish soap and warm water solution is excellent for grease. Make sure to use a soft cloth and wipe following the wood grain. For tougher grease, you can slightly increase the soap-to-water ratio or use a dedicated degreaser safe for wood. Always dry thoroughly afterward.
Q3: How should I clean cabinets that are painted?
A3: For painted cabinets, a gentle approach is best. Use a soft cloth or sponge with a mild soap and water solution. Avoid abrasive cleaners or scrub brushes, as they can scratch or chip the paint. Always dry immediately to prevent water damage.
Q4: What about cleaning the inside of my cabinets?
A4: The inside of cabinets can usually be cleaned with a damp cloth and a mild soap and water solution. For shelves where spills might occur, a dedicated cleaner might be helpful. Ensure they are completely dry before placing items back inside.
Q5: Can I use furniture polish every time I clean?
A5: No. Furniture polish is best used periodically, perhaps monthly, after cleaning, to add shine and protection, not as a daily or weekly cleaner. Over-application can lead to a waxy build-up that attracts dust and dulls the finish.
Q6: What if I have laminate or thermofoil cabinets? How do I clean them?
A6: For laminate or thermofoil, gentle cleaning is crucial. Use a soft cloth with mild dish soap and water. Avoid harsh chemicals or abrasive scrubbers, as these can scratch, dull, or even peel the surface. Dry thoroughly with a soft cloth.
Conclusion
Keeping your kitchen cabinets clean and looking their best is a totally achievable DIY task. By understanding your cabinet’s material, gathering the right gentle supplies, and following a simple step-by-step process, you can effectively tackle grease, grime, and dust without causing damage. Remember the golden rules: always go with the wood grain, use minimal moisture, dry thoroughly, and avoid harsh chemicals.
A little regular maintenance goes a long way, preventing stubborn build-up and keeping your cabinets beautiful for years to come. So grab your microfiber cloths, mix up that mild soap solution, and enjoy the satisfying transformation. Happy cleaning!