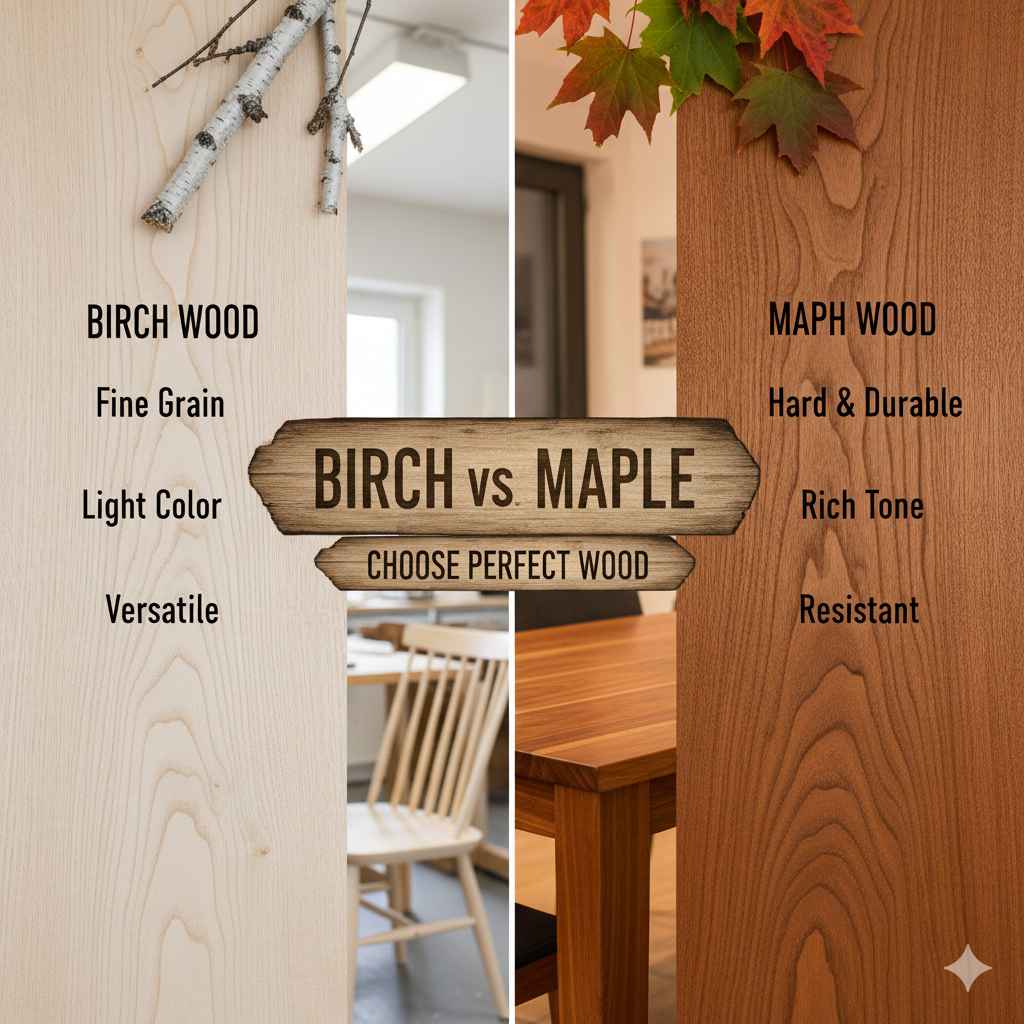
Birch Wood Vs Maple: Choose Perfect Wood
Birch wood vs maple? Maple is generally harder, takes a richer stain, and resists dents better, making it ideal for floors and countertops. Birch, being softer and more affordable, is great for cabinetry insides and painted projects where cost and workability matter most.
This is a puzzle almost every new woodworker, homeowner taking on a DIY renovation, and cabinet maker faces! Choosing between birch wood and maple wood can feel intimidating. Both seem excellent for furniture, cabinetry, and crafts, and both provide a beautiful, light appearance. Getting mixed up on hardness, grain, or cost can lead to frustration down the road. But really, both are fantastic choices that stand the rest of time in North American homes.
Do not worry; figuring out which one is right for your next project comes down to understanding just a few simple differences in toughness and look. We will lay out the pros and cons side-by-side today so you can cut through the confusion confidently.
Tons of projects start right here in the wood aisle, whether you’re refinishing a kitchen or just building a simple shelf. Making the correct first choice saves you time, hassle, and cash! Let’s dive into what sets genuine birch apart from premium hardwoods like maple.
Understanding Birch Wood and Maple Wood: A Quick Look
Because you asked about “birch wood vs maple,” you are seeking a durable, fine-grained, light-colored wood that works well. You aren’t choosing soft Pine or temperamental Walnut; you are pitting two excellent, close relatives against each other (in many ways). Both are common American hardwoods, but tiny differences really influence how they perform in the home environment.
What is Maple Wood? Defining the Hard Rock
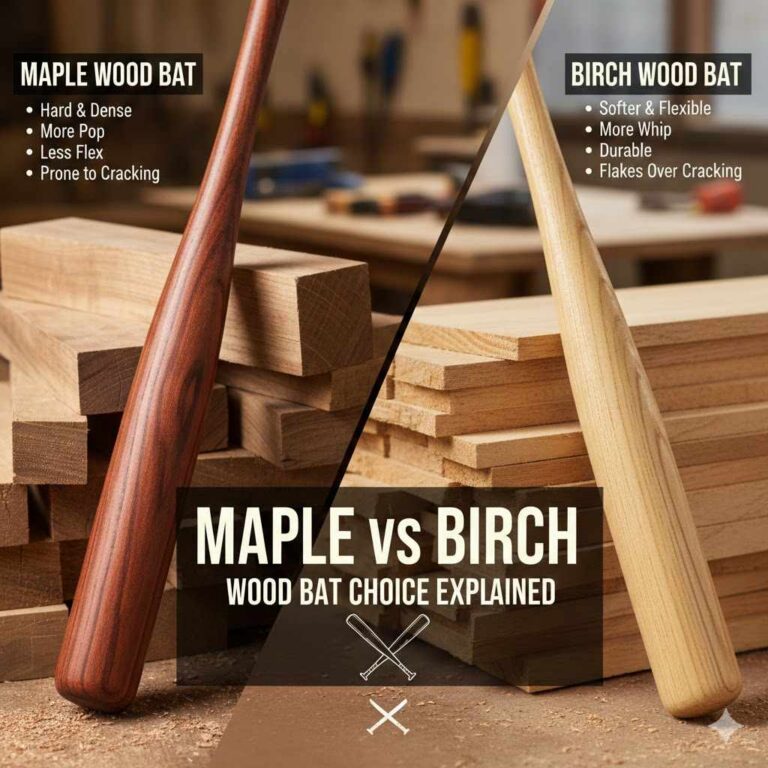
Maple primarily means Sugar Maple or Hard Maple since it rates so high in durability. It sits at the top of something called the Janka scale (a common test for wood hardness). You find maple hardwood used everywhere that traffic is really high—think gym floors, butcher blocks, and skateboards because it resists deep scratching and crushing quite well. It offers a very fine, generally straight grain that is consistent.
What is Birch Wood? Meeting the Versatile Starter
Birch wood comes in a few varieties too, such as Yellow Birch (“Sweet Birch”). It’s often slightly softer than maple but is incredibly versatile. Historically, rotary-cut birch veneers have been key in sturdy plywood designed for cabinets and furniture boxes. It holds light colors exceptionally well beneath paint. Overall, Birch offers great value compared to harder woods without totally sacrificing durability. A common use is interior shelving, drawers, or lower-cost but appealing cabinets.

Birch Wood Vs Maple: The Breakdown of Key Characteristics
To make smart decisions in the workshop apron, we need to compare durability, cost, how they accept finishes, and what they look great used for around the house. Remember while we compare these, safety gloves and eye protection should be your tools always—see some basic shop rules from the folks at OSHA (https://www.osha.gov/publications/oish105/).
Wood Hardness and Durability (Scratch Resistance)
When planning projects that see heavy use (your kitchen cabinets or living room tables), hardness is vital. It tells you how easily blunt force or normal shoe traffic can dent or nick the wood. We use the Janka Hardness Test Score numerically. Even a fifty-point difference can show over years of use.
| Wood Type | Common Janka Hardness Score (Lbs-force) Estimation | General Toughness |
|---|---|---|
| Hard Maple (Rock Maple) | approx. 1,450 | Very hard, excellent abrasion resistance (best for floors) |
| Birch (e.g., Yellow Birch) | approx. 1,260 | Medium-hard, durable for normal indoor furniture |
Maple in Practice
Maple’s higher score (closer to 1,450 if we are just talking quality Hard/Rock Maple, though rates vary slightly based on grain direction) gives it noticeable strength. If the kids bang toy trucks onto the tabletop every afternoon, maple holds its look longer. It bends wood a little less easily when planing or routing compared to some very softwoods, asking for sharp tools.
Birch in Practice
Birch trades some impact toughness for an easier cut (around 10%). This doesn’t mean it’s “soft” by any means—it’s harder than Oak by some measures—but in a head-to-head floor durability test against Maple against the worst scuffs, Maple wins out firmly. Luckily, this means slightly less effort from your router for detailing rounded edges!
Grain Appearance and Finishing
Aesthetic qualities often guide beginner choices, especially if the wood will show openly in the home.
Maple’s Aesthetic
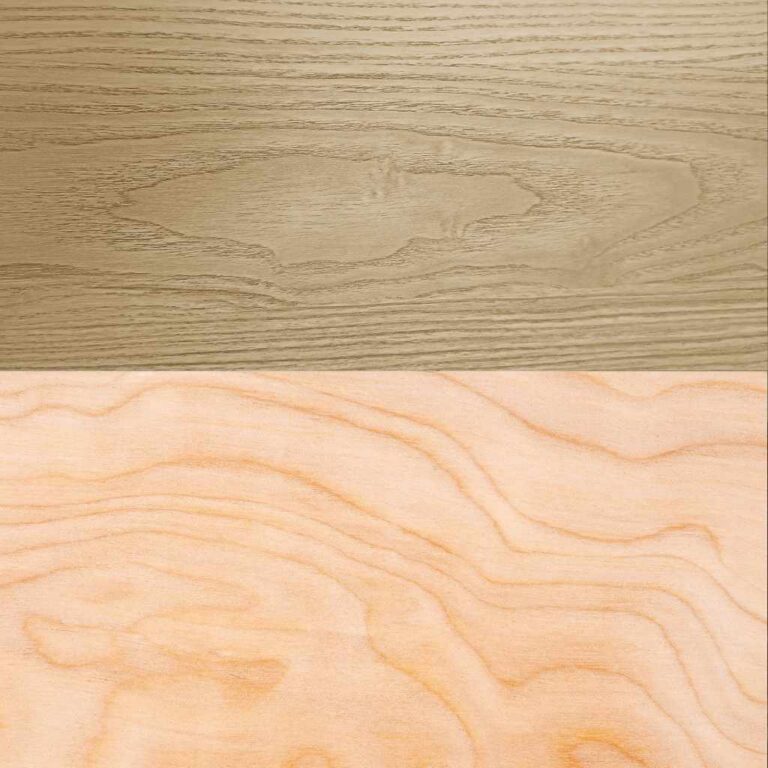
Maple typically features a very light, creamy white color in the sapwood bleeding into light brown heartwood. Its strongest characteristic? Grain structure. It is remarkably uniform, fine, and tight. Why? It lacks large growth rings visible to the naked eye making it look almost spotlessly smooth under finish. It beautifully reflects light, which makes rooms seem brighter.
Stain Acceptance Challenge for Maple: Here is the known “gotcha” for maple—because the grain is so tight and porousness varies little between areas, pure maple notoriously tends to absorb wiping stain very unevenly. blotching is very common. If you seek deep cherry or classic dark walnut stain, use a pre-stain wood conditioner first for uniform results.
Birch’s Aesthetic
Birch shares good color traits: very similar light cream base often mixing with a yellowish hue, sometimes sporting delicate, distinct markings, especially often subtle, wavy areas or “small figure.” The grain is slightly more open and consistent than cherry but finer than oak.
Stain Acceptance Performance for Birch: Birch generally works just fine with stains, sometimes taking finishes a bit easier or more openly than pure maple, reducing noticeable blotching worries for DIY folks. However, most Birch projects showcase its natural hue by being painted rather than deeply stained, showing just off-white when lacquered.
Cost and Project Budget (Affordability for DIYers)
Money talk is crucial for home projects that need covering wide spans, like large batches of inexpensive kitchen cabinets or shelving runs.
Maple Pricing Reality
Because recognized ‘hard’ specialty Maple (Quartersawn or Figure-8 Maple) demands respect near Oak or Ash price points, it usually places on the higher end of non-exotic domestic hardwood slabs at your big box store rack. When building large surfaces, costs really start adding up quickly.
Birch Pricing Advantage
Birch typically offers greater affordability, often significantly cheaper than comparable premium Hard Maple pieces from the lumberyard rack. This is why a massive percentage of commercial plywood (like furniture cores or high-end cabinet boxes used for concealed materials) uses birch often layered or mixed. It simply yields performance appropriate for the lower input cost needed for large production runs.
Project Applications by Wood Type: Making the Right Fit
Okay, let’s answer the core question directly by scenario. Where should you definitively choose Maple over Birch, and where should Birch save you cash and effort?
When Maple is Your Superior Choice
If hardness and heavy use are unavoidable factors, reach for Maple. Think high wear and surfaces that need regular tough cleaning. Always choose it where long-term impact resistance defines success:
1. Kitchen Countertops and Islands: Need the resilience against dropped heavy pans or vegetable chopping where the wood may see knife marks (though check guidance on food-safe surfaces).
2. Butcher Blocks & Cutting Boards: Its density makes it highly food-safe (less risk of bacteria harboring in deep gouges) and it’s highly sought for aesthetic polish.
3. Entryway/Mudroom Flooring: Areas facing constant moisture fluctuation combined with heavy daily dirt grinding.
4. High-End Furniture That Needs Fine-Grained Plying: Things like heirloom drawer fronts or very ornate detailed moldings where detail retention under harsh finish curing rates high satisfaction over time.
When Birch Is Your Smarter Selection
Birch performs incredibly when you need excellent utility, a lighter weight profile for materials (like interior carcass structure), or when budgetary constraints are tight around bulk material purchasing. Use Birch when the project is meant to be sealed with a solid color or needs light duty.
1. Built-In Cabinet Boxes (Unexposed Interior Structure): Plywood often facing the inside is often quality Birch because it performs robustly during years of opening/closing and moving of boxes yet saves huge upfront costs compared to using structural Maple.
2. Items Receiving Solid Paint Finishes: If you plan on three coats of pure, bright white cabinet lacquer, the slight variation in tone or grain pattern disappears completely under modern primers. Birch provides a fantastic, smooth base layer underneath this paint seal without the high cost attached to prime-grade maple.
3. Shelving for Lighter Loads: Standard interior closet shelves, garage storage built around the corners, or smaller craft Caddies require minimal high-impact resistance but benefit from a clean surface quality before economical clear finish application.
4. Accessible Drawer Sides / Backers: Much woodworking often consumes many linear feet of less-visible material. Birch excels here environmentally and on budget for excellent utility-grade framing components.
Deeper Dives: Crafting with Birch and Maple
As woodworkers making things in our home shops. how these specific hardwoods handle power tooling makes a major difference in setup time and personal injury.
Working Properties: Routing and Sawing
Power working usually produces a small amount of heat by exciting grain fuzzies. With any wood, change your tool setups frequently! Learning how to safely ramp up power feed rates from experts helps maximize blade life, read through fine suggestions for speed/temp when machine routing hardwoods like these from manufacturing safety documents.
When comparing actual machining—that lovely crisp sound differs between the two:
Maple Work: Requires razor-sharp blades, belts, or routters. Because of its density gradient, chipping out (tear-out) requires slower feed over high-speed routing to manage the direction change in grain patterns on the exit path. Take light passes!
Birch Work: generally machines somewhat smoother off the tool but generates potentially more heat due to internal resin paths sometimes present in the wood—keep that sandpaper handy for final light sanding right after cutting sequence checks.
Finishing Specific Traps Everyone Should Know About
Remember, these aren’t Pine trees; deep pore absorption varies. Skip prepping those fancy fine sanding routines at your peril! Finalizing work means prepping the surface perfectly, which ensures your hard work shines through at the end.
Using quality products like a professional grain filler (if you want amazing depth, more typically associated with Oak or Ash textures, but still often used on Maple if you dare to stain). Use multiple thin, wiped-on coats for either specimen, letting each layer utterly cure and settle. For absolute best advice on commercial products safe for home use, check reliable DIY resources like that found in local university extension publications regarding residential finishes.
Maple Vs Birch Comparative Table: The Go-Getter Guide
Let’s put the key data points forward into the easiest guide possible for you to tape up inside your current project space. This summarizes all our talks beautifully fast!
| Feature | Maple Wood Comparison Aspect | Birch Wood Comparison Aspect | Winner For |
|---|---|---|---|
| Hardness (Janka ±) | ~1,450 Lbs. | ~1,260 Lbs. | Maple (Heavy Use) |
| Common Density / Weight | Slower Density Build | Slightly Less Dense Build | Tie (For lighter weight frame where possible) |
| Appearance | Very Creamy/White, Tight, Simple Grain | Cream/Light Yellow, Sometimes Wavier Grains | Maple (If requiring absolute lack of figure) |
| Staining Difficulty | High Risk of Blotching | Moderate Risk of Minor Blotch | Birch (Generally slightly more forgiving) |
| Rough Repair Cost/Risk | Replacement slabs cost more | Replacement often sourced for less | Birch (Budget Constraint) |
| Best Overall Application | Hard-use flooring, high-traffic case goods | Value cabinet carcass, painted builds, interior components | Context Dependent |

Frequently Asked Questions (FAQ) for Beginner Builders
These simple spots trip up new DIY makers frequently, but simple truths clarify things fast.
Q1: Can I hide the color difference between Maple and Birch I already cut?
A slight difference in color—Maple being whiter, Birch slightly yellower—is totally noticeable before applying any finish unless you are applying a bright white paint over both surfaces equally. If combining these woods on one visible surface like an open countertop, aim to use the materials from the manufacturer who matches their batches best, or just stick to one wood for that primary visible surface.
Q2: Is Birch as strong as Maple for making durable kitchen cabinets installed today?
For the exposed fronts, door structures and hinges supporting load, Maple is physically better, lasting significantly longer against incidental bumps. However, Birch paneling forming the core interior box construction is perfectly strong when utilized as plywood backing and perfectly structurally sound for household cabinets for decades of normal kitchen use. You save money on materials you don’t see every day.
Q3: Which wood, Birch or
Maple, shows dirt and small scratches the least?
Maple tends to hide tiny superficial scratches slightly better because its density makes abrasion markings shallow. However, extremely large impacts or drops will always compress the wood fibers on whichever sample you put down. Choosing light, somewhat figured hardwoods (like some natural Birch patterns or highly figured Maple) often naturally obscures minor superficial surface debris compared to stark, plain white boards.
Q4: How much more difficult is sanding Maple compared to Birch material?
Roughly one difficulty grade harder for a beginner. Maple’s extra hardness just means sanding paper wears faster, whether by your orbital sander or when you are feeling overly zealous power sanding by hand. Both benefit incredibly well from careful movement through medium grits (120p to 180p usually). Do not try skip-sanding grades on either board—it requires even layer conditioning preparation always!
Q5: When sealing Birch, must I use a dark pre-stain conditioner to stop the yellowing look?
Not necessarily just to “stop the yellowing look;” use a wood conditioner only if you apply a transparent wiping stain (like Oak Brown or Pecan shade). Birch just starts slightly yellower than raw Maple sometimes; if you are painting, seal it with a dedicated water-based primer first that seals everything. If skipping all color altogether, a clear UV-protective finishing coat like an Alkyd Polyurethane often achieves what builders want, enhancing the natural rich warmth subtly. Always test in small areas!
Q6: Can I successfully install cabinets sides constructed of Birch directly against a humid basement wall installation?
Absolutely not correct material for raw, constant damp or flood areas for long periods in home settings! Any dimensional lumber wood like slab Maple/Birch handles fluctuation much better if expertly finished and sealed first! However, if basements cause constant, 80% plus humidity spikes, you must invest in stable, robust synthetic materials like Melamine core for box bottoms intended to sit above the base. Even high-quality plywood, be it Birch-core or hardwood layers, requires total protective coating when installed near ground-level structural moisture.
Expert Tips for Project Success
Remember, taking the worry out of woodworking just means approaching cuts with awareness towards the material in hand. You are aiming for craftsman results achievable by clear process management over sheer power or speed investment. Always triple confirm measurements using reliable metal squares—even the toughest maple bends if slightly cross-grained when ripping under pressure. Build confident, friendly, and safe!
Final Finishing Checklists
Before finishing anything visible made from Maple or Birch, always employ this simple pre-finish check derived from production shops:
1. Dust Removal Scan: Run a vacuum brush lightly over the surface to collect all airborne fine particles left sitting on your sanding process residue.
2. Tacky Rubdown: Use a plain lacquer-infused tack-cloth just until the surface feels smooth but dry—it lightly pulls dust.
3. Grain Inspection Light Check: Prop the flat piece upright near very bright fluorescent light; flaws cast great shadows visible differently when flat at bench height compared to finished hanging vertically.
Congratulations! You now hold the knowledge required to decide intelligently about Birch wood vs Maple wood on both budget grounds and physical application needs. You are not guessing anymore; you are choosing based on predictable, sturdy hardness scores and proven application history in high-quality North American builds every day. Maple shines bright on the hardest applications (floors, impact stops), while surprisingly resilient Birch steps in economically for large cabinetry structures, painted builds, or inner components.
Confidence levels are officially boosted for cutting material purchase straight off the big rack knowing you secured value for your purpose! Now, get out a piece you trusted in your shop today, safely plan that first cut, and enjoy seeing beautiful, finished results emerge from your steady hands, friend. Finishing that one first cut is truly when the realization hits how obtainable the grand design really is. Happy sawing and creating truly valuable items!