Building Wood Deck Railing: A Quick and Easy Guide
Figuring out How to Build Wood Deck Railing Fast can feel like a challenge. It’s common to worry about getting it right, especially if you’re new to the whole DIY thing. But don’t fret! Building a deck railing can be straightforward when you break it down into simple steps. This guide will walk you through the process, making sure you can create a safe and stylish deck railing quickly and easily. Let’s get started!
Planning Your Deck Railing Project
Before jumping into construction, planning is key for any deck railing project. Proper planning ensures you have the right materials and tools, leading to a smoother and faster build. Considering the deck’s size, your local building codes, and your desired style are important. Think about the overall look you want to achieve and measure carefully to avoid mistakes that could slow you down later. It’s much easier to take your time in this initial phase to make the whole process easier.
Assessing Your Deck’s Dimensions and Needs
The first step is measuring your deck. This includes the length of all the areas where you need a railing. Also, consider the height you want for your railing. Most building codes require railings to be at least 36 inches high, but always check your local regulations. Knowing the dimensions helps you determine the amount of wood, posts, balusters, and other materials you’ll need. Don’t forget to account for any existing structures like steps or benches that might affect your design. Accurate measurements now save time and money later.
- Measure the perimeter: Use a measuring tape to find the total length of the deck areas where you’ll build the railing.
- Determine the height: Check your local building codes for the required railing height. Standard is often 36 inches, but confirm with your local building codes to ensure safety.
- Calculate the post spacing: Decide on the distance between your posts. This usually depends on the type of wood and the building code, but 6-8 feet is typical.
- Consider the baluster spacing: Make sure the space between balusters is narrow enough to meet code. Usually, it’s 4 inches or less to prevent children from getting through.
- Assess existing features: Account for any stairs or other elements that will change the railing’s design.
Building codes vary by location. They cover height, spacing between balusters, and how the railing attaches to the deck. Following these guidelines ensures your railing is safe and legal. Checking with your local building department helps you stay compliant and avoid any fines or rework later on. Plus, it gives you peace of mind that your deck railing will provide the proper safety measures. The goal here is a safe and code-compliant railing.
Selecting the Right Materials for Speed and Style
Choosing the right materials is important for a quick build. Wood options like pressure-treated lumber are common because they are resistant to rot and insects. Using pre-cut materials can save you significant time. Consider using pre-made baluster panels, which reduce cutting and assembly time. Also, picking fasteners like screws that are easy to use with power tools can speed up your work. Don’t forget about the appearance too – wood choices offer many design options, from classic to modern.
- Pressure-treated lumber: Choose this for posts and rails since it resists rot and weather damage.
- Pre-cut balusters: These save time and ensure consistent spacing.
- Fasteners: Use screws instead of nails for a stronger hold and faster installation.
- Wood types: Consider cedar, redwood, or composite materials for their durability and appearance.
- Hardware: Pick quality brackets and connectors for stability and longevity.
Selecting durable wood ensures your railing lasts. Pressure-treated lumber is a popular choice for its resistance to moisture and pests, making it great for outdoor use. For the balusters, consider something like pre-made panels to quicken assembly. Using the correct screws and connectors makes a big difference in speed and how secure everything is. Think about how long you want your railing to last; quality materials are a good investment. Making decisions now will save you from having to do it again later.
Gathering Your Tools and Preparing the Work Area
Before you start building, having all the right tools and prepping your workspace makes the job quicker and easier. Having all the tools within reach eliminates trips to the garage and keeps you focused on the task. Clear your deck of any items and ensure you have enough space to work safely and efficiently. Planning where you’ll cut, assemble, and store materials helps keep everything organized. A well-organized workspace makes a big difference in how quickly and smoothly you can build your railing.
Essential Tools for Deck Railing Construction
Having the correct tools makes building your deck railing a much smoother process. A power drill is essential for driving screws, while a circular saw or miter saw helps with accurate cuts. A level is important to ensure your posts and rails are straight, and a measuring tape is crucial for precise measurements. Safety gear, like safety glasses and gloves, is necessary to protect yourself. Make sure you have the right tools, and you’ll see how fast the work goes.
- Power drill/driver: For screwing in posts, rails, and balusters.
- Circular saw or miter saw: For making accurate cuts to the lumber.
- Level: To make sure your posts and rails are straight and plumb.
- Measuring tape: Essential for accurate measurements of posts and balusters.
- Safety glasses and gloves: Protect yourself while cutting and assembling.
A good set of tools not only speeds up the building process but also improves the quality of your work. Consider investing in quality tools that will last. A cordless drill gives you flexibility. A circular saw or miter saw helps you make precise cuts. A good level is critical for a professional finish. Safety should always be your top concern, so wear protective gear. With the right tools and safety precautions, you can finish your project safely and quickly.
Preparing the Deck Surface for Railing Installation
Before you build, make sure your deck surface is ready for the railing. Clear the area of any debris or obstructions. If you’re attaching posts to the deck surface, inspect the deck boards for any damage or looseness. Make sure the deck structure is sound. You might need to make some repairs before adding the railing. The more time you spend on this step, the better the final outcome will be. A good start makes the rest of the project easier to complete.
- Clear the deck: Remove anything that may get in the way, such as furniture.
- Inspect the deck boards: Look for any loose or damaged boards that need repair.
- Check for levelness: Ensure the deck surface is even, or make adjustments.
- Mark post locations: Use a pencil to mark the places where you will install the posts.
- Gather all materials: Ensure you have all the necessary lumber, hardware, and tools ready.
Preparing the deck surface correctly will make the railing installation much easier. The deck must be sound and strong enough to support the railing. You might have to make some repairs to ensure that the deck is stable. Marking where the posts will go helps with the installation. Taking the time to prepare now will save you from problems later. A solid base is important for a railing that is both safe and long-lasting.
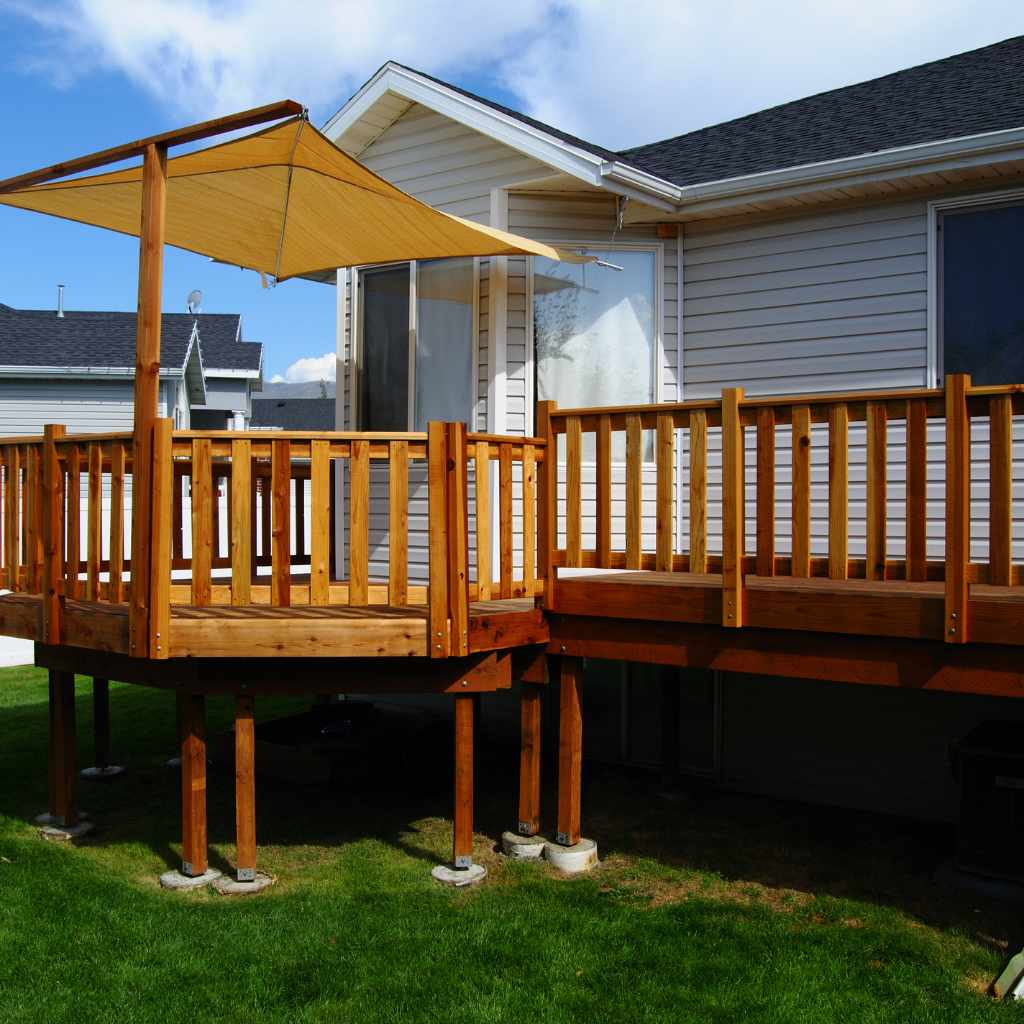
Building Your Deck Railing: Step-by-Step Guide
The core of the project involves the actual construction of the railing. This section provides a detailed, step-by-step guide to help you build your deck railing efficiently and correctly. You will learn the process for setting the posts, adding the top and bottom rails, and installing the balusters. Each step is broken down with tips to make it simpler and faster, helping you finish the job with confidence and achieve a professional finish.
Setting the Posts: The Foundation of Your Railing
Installing the posts correctly is the first key to a sturdy railing. Start by measuring and marking the location of each post, ensuring they are evenly spaced. Use a level to make sure the posts are perfectly vertical (plumb) before securing them. There are different ways to attach the posts, such as using post anchors bolted to the deck surface, or setting them in concrete. No matter how you choose to do it, the posts have to be strong and secure. This is important for the stability and safety of the entire railing.
- Mark the post locations: Use a measuring tape to find the right spots.
- Attach post anchors: Bolt the anchors to your deck surface, if using this method.
- Set the posts: Place each post into its anchor or hole.
- Ensure plumbness: Use a level to make sure each post is straight up and down.
- Secure the posts: Fasten the posts firmly to the anchors or deck.
The method you use to attach the posts depends on your deck design and building codes. Post anchors are a simple option for attaching posts to the surface of your deck. If you are starting from scratch, setting posts in concrete provides a very stable base. Double-check local codes to ensure your method meets all requirements. Well-placed posts ensure a strong and long-lasting railing, so take your time and do it right.
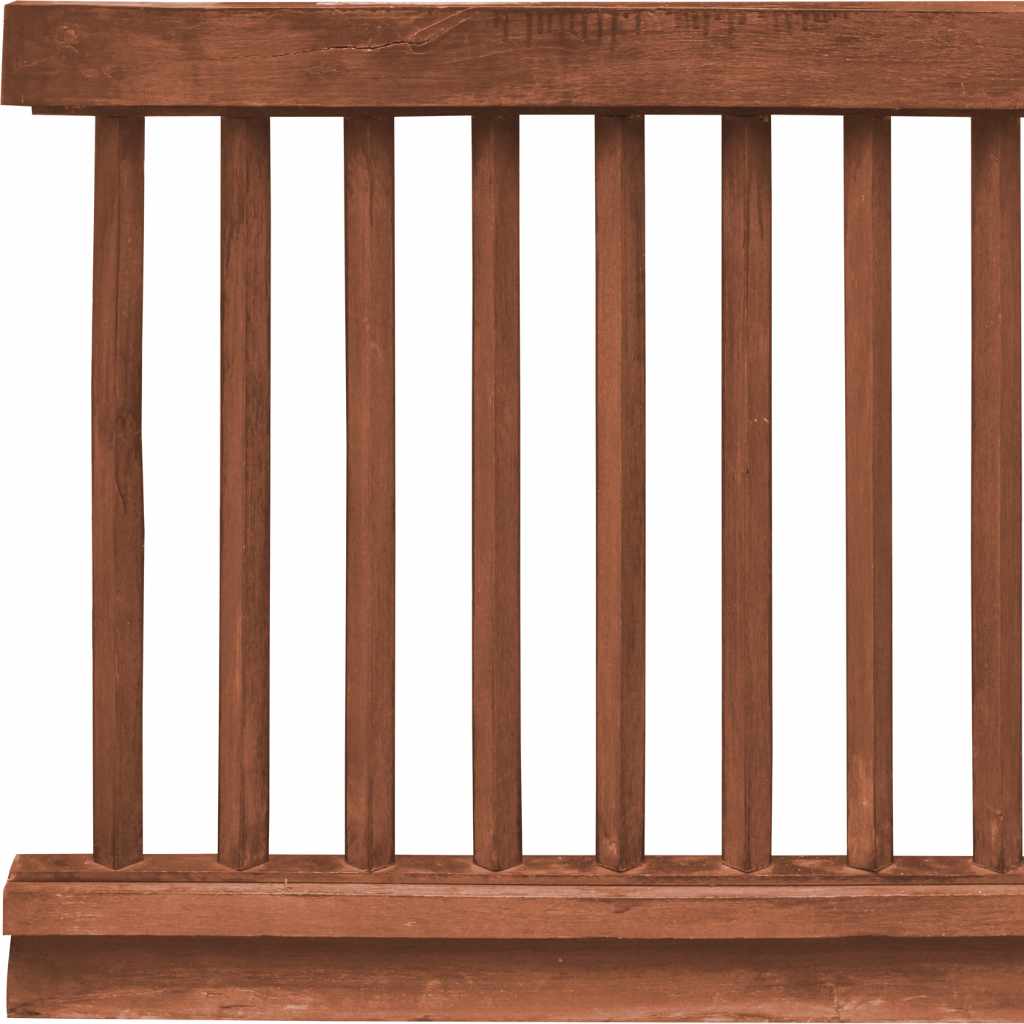
Installing Rails and Balusters for Speed and Safety
After the posts are in place, the rails and balusters come next. Attach the top and bottom rails to the posts, ensuring they’re level and securely fastened. Once the rails are installed, carefully measure and cut the balusters, then attach them, keeping the spacing consistent to meet code. Using pre-cut materials and a good cutting technique will help speed up this process. The alignment and spacing of the balusters affect both the look and safety of your railing.
- Attach the top and bottom rails: Use screws to attach the rails to the posts.
- Ensure levelness: Use a level to make sure the rails are straight.
- Measure and cut balusters: Precisely cut balusters to the correct size.
- Install balusters: Secure the balusters with nails or screws, keeping consistent spacing.
- Check for compliance: Confirm the baluster spacing meets local building codes.
The spacing of the balusters is a significant safety feature. The gaps should be narrow enough so that a child cannot get through. Always check your local building codes to ensure the spacing meets the standards. Correct rail and baluster installation results in a strong and aesthetically pleasing railing. With good planning, you can complete this part of the job quickly and accurately. The goal is a railing that looks great and is super safe.
Finishing Touches and Safety Checks
Once the structure is complete, take care of the finishing details. This involves checking all connections, sanding any rough edges, and applying a protective finish to the wood. Give your railing a final inspection to check for stability and any potential hazards. This is an important step. It makes sure that your railing is not just well-built but also safe and attractive. This final step helps improve both the durability and look of the railing, making it a valuable addition to your deck.
- Check all connections: Make sure screws are tight and joints are secure.
- Sand rough edges: Smooth any sharp edges or splinters.
- Apply a finish: Protect the wood with stain, paint, or sealant.
- Clean up the area: Clear away any debris or leftover materials.
- Final safety inspection: Check the railing for stability and any hazards.
Applying a finish not only improves the look but also protects the wood from the weather. This will help to prolong the life of your railing. The final safety check should include verifying that the railing is stable and meets local building codes. Addressing any problems now ensures a safe and beautiful deck railing for years to come. By paying attention to these finishing steps, you are ensuring your hard work lasts.
Advanced Techniques to Build Wood Deck Railing Fast
While the basic steps are straightforward, you can use several advanced techniques to speed up your project. These methods involve prefabrication, the use of power tools, and smart planning. These approaches will not only save you time but also help you produce a more professional-looking railing. Learning these extra skills can take your DIY deck project to the next level.
Prefabrication and Pre-Cutting: Time-Saving Strategies
Prefabrication and pre-cutting can save significant time. Measure and cut all the pieces you need before you start assembly. You can build panels or sections of railing in your workshop or garage and then attach them to the deck. This allows you to work in a more comfortable environment. Preparing ahead of time reduces the time spent on the deck and minimizes delays caused by weather. These simple tips can significantly reduce your construction time.
- Pre-cut all lumber: Cut all posts, rails, and balusters to size before starting assembly.
- Build railing sections: Construct complete sections in your garage.
- Use pre-made panels: Opt for pre-made baluster panels to reduce cutting time.
- Organize materials: Arrange all cut pieces by assembly location for easy access.
- Create a cutting station: Set up a dedicated workspace for precise and quick cuts.
Prefabricating sections allows you to work in a more controlled environment, free from the elements. This also allows you to handle each piece one time. Precise pre-cutting also guarantees that all the pieces fit perfectly. This way, the final assembly goes much faster, and the result is more professional. Time spent in preparation is time saved during the actual building. These steps make the building process more efficient, creating a great railing in record time.
Utilizing Power Tools for Efficiency
Power tools will speed up your work and improve accuracy. A power drill with the proper bits is important for quickly driving screws. A circular saw or miter saw helps you make quick, precise cuts. A nail gun is a huge time-saver for attaching balusters. Proper use of these tools will lead to a faster and better finish. Investing in quality power tools will improve both the speed and the quality of your deck railing project.
- Power drill/driver: Use for fast screwing.
- Circular saw or miter saw: Cut lumber quickly and accurately.
- Nail gun: Speed up baluster attachment.
- Impact driver: Drive screws with more power and speed.
- Power sander: Smooth wood surfaces rapidly.
Having the right power tools makes every step of the project easier and faster. Power tools give you more consistent results. Using a power drill makes fastening easier. A circular saw helps with those tough cuts. Safety is super important, so always wear protective gear and follow the manufacturer’s directions. The proper use of power tools can make your deck railing project much faster and less difficult.
Optimizing Your Work Flow for Quick Assembly
Optimizing the work flow is a good approach for fast assembly. Plan your steps and keep your tools and materials in easy reach. Working in an organized manner reduces wasted motion and makes your work quicker. If you have help, assign specific tasks to each person to streamline the process. Good workflow means less time wasted and a more efficient building process. With these ideas, you can build your deck railing faster and more efficiently.
- Plan each step: Outline the process before you start.
- Organize materials: Keep tools and materials easily accessible.
- Work in a logical sequence: Assemble posts, rails, and then balusters.
- Assign tasks if working with others: Distribute tasks to maximize efficiency.
- Take breaks strategically: Avoid burnout by taking short breaks.
A well-organized work process makes a huge difference in how fast you complete the job. Taking the time to plan will help you avoid problems and make the job easier. Keeping all your supplies within reach means you do not have to walk around looking for stuff. Working in a logical order ensures each step flows well to the next. This careful organization speeds up your work and improves the final result.
Addressing Common Challenges and Mistakes
Building a deck railing has its challenges, but knowing the common pitfalls can help you avoid them. Some common issues include mismeasuring, incorrect post installation, and failing to meet building codes. This section will look at the common challenges you might encounter and give you tips on how to address them. These insights will help you build your railing faster and more efficiently, saving both time and frustration.
Avoiding Measurement Errors and Miscalculations
Measurement errors and miscalculations can cause significant delays. Double-check all measurements before cutting any wood. Measure twice and cut once. Use a good measuring tape and a level to guarantee accuracy. Remember to account for the thickness of rails and posts when planning baluster spacing. Careful measurement reduces errors and ensures everything fits together right. This focus on accuracy will save time and money by preventing mistakes.
- Measure twice: Always double-check measurements before cutting.
- Use a reliable measuring tape: Make sure your tape is accurate and easy to read.
- Account for wood thickness: Factor in the width of rails and posts.
- Plan baluster spacing: Make sure balusters are evenly spaced and meet code.
- Create a cutting list: Write down all measurements to avoid mistakes.
One of the most frequent problems in any building project is measurement errors. Before you cut a single piece, take the time to double-check everything. Using a quality measuring tape guarantees accurate measurements. Careful planning of baluster spacing makes sure the railing looks good and meets all safety standards. Careful measurements prevent costly errors and waste of materials. This extra effort will pay off by saving both time and money.
Dealing With Uneven Deck Surfaces
Uneven deck surfaces can make your railing project more difficult. If the deck surface is not level, you will have to make adjustments to your posts. You can use shims to level the posts or cut the posts to different lengths. Using a level throughout the process is important. This ensures that the rails and balusters will be straight and safe. Good preparation ensures you achieve a professional and attractive finish despite any irregularities.
- Check the deck surface: Use a level to identify any uneven areas.
- Use shims: Place shims under the posts to make them level.
- Cut posts to different lengths: Adjust the post height as needed.
- Use a level: Keep checking to ensure the rails are level.
- Adjust rail heights: Make sure the rails are at the correct height even with an uneven deck.
Dealing with uneven surfaces requires careful planning and the right tools. Using shims to level the posts allows you to get a perfectly level railing. Cutting posts to various lengths will allow you to adjust for any irregularities in your deck. Paying attention to these things during the installation process is critical to guarantee a safe and visually pleasing railing. With these techniques, you can make sure your railing looks great, even on a surface that is not perfectly level.
Building Code Compliance and Safety Considerations
Building codes and safety are really important. Always check your local building codes for the right requirements for your area. These codes will direct the height of the railing, spacing between balusters, and how the railing is attached. Making sure your railing meets building codes guarantees the safety of the users. Focusing on safety will ensure your deck is a secure and enjoyable space for you and your family.
- Check local building codes: Find out the exact requirements in your area.
- Determine the height of the railing: Railings usually need to be at least 36 inches high.
- Confirm baluster spacing: Make sure balusters are close enough together to prevent climbing.
- Ensure secure attachment: Fasten the railing securely to the deck posts.
- Inspect frequently: Check the railing regularly for any damage.
Building codes are designed to ensure safety, so make them a priority. Local building codes cover things such as railing height and baluster spacing. These rules minimize the risk of accidents. Regular inspection of your railing is essential to catch any issues early and prevent problems from happening. By following these safety considerations, you are creating a deck that is safe and fun for everyone. Your commitment to these standards ensures the safety of your project.
Frequently Asked Questions
Question: How high should my deck railing be?
Answer: Most building codes require railings to be at least 36 inches high. Always check your local codes for specific requirements in your area.
Question: How far apart should the balusters be?
Answer: Balusters should be spaced close enough together so a 4-inch sphere cannot pass through. This is to ensure children cannot get their heads or bodies stuck.
Question: What is the best wood to use for deck railings?
Answer: Pressure-treated lumber is popular due to its resistance to rot and insects. Other options include cedar, redwood, and composite materials, based on your aesthetic and budget.
Question: How can I make sure my railing is level?
Answer: Use a level when installing posts and rails. Measure from a consistent point on your deck surface. Make adjustments with shims if the deck is uneven.
Question: Can I build my railing without a permit?
Answer: Building permits may be needed. Check with your local building department to find out the requirements. Permits ensure your project meets safety standards.
Final Thoughts
Building a wood deck railing quickly is completely achievable with the right planning, tools, and a step-by-step approach. You have learned the value of good planning, proper material selection, and effective use of power tools. You now know how important it is to deal with common challenges, such as measurement errors and uneven surfaces, and how important following the building codes is. This knowledge gives you the confidence to start your project. You can improve your skills and efficiency even more by trying some advanced techniques. Use the information in this guide to build a railing that is both safe and stylish. Get started on your project today and transform your deck into a beautiful and functional space!