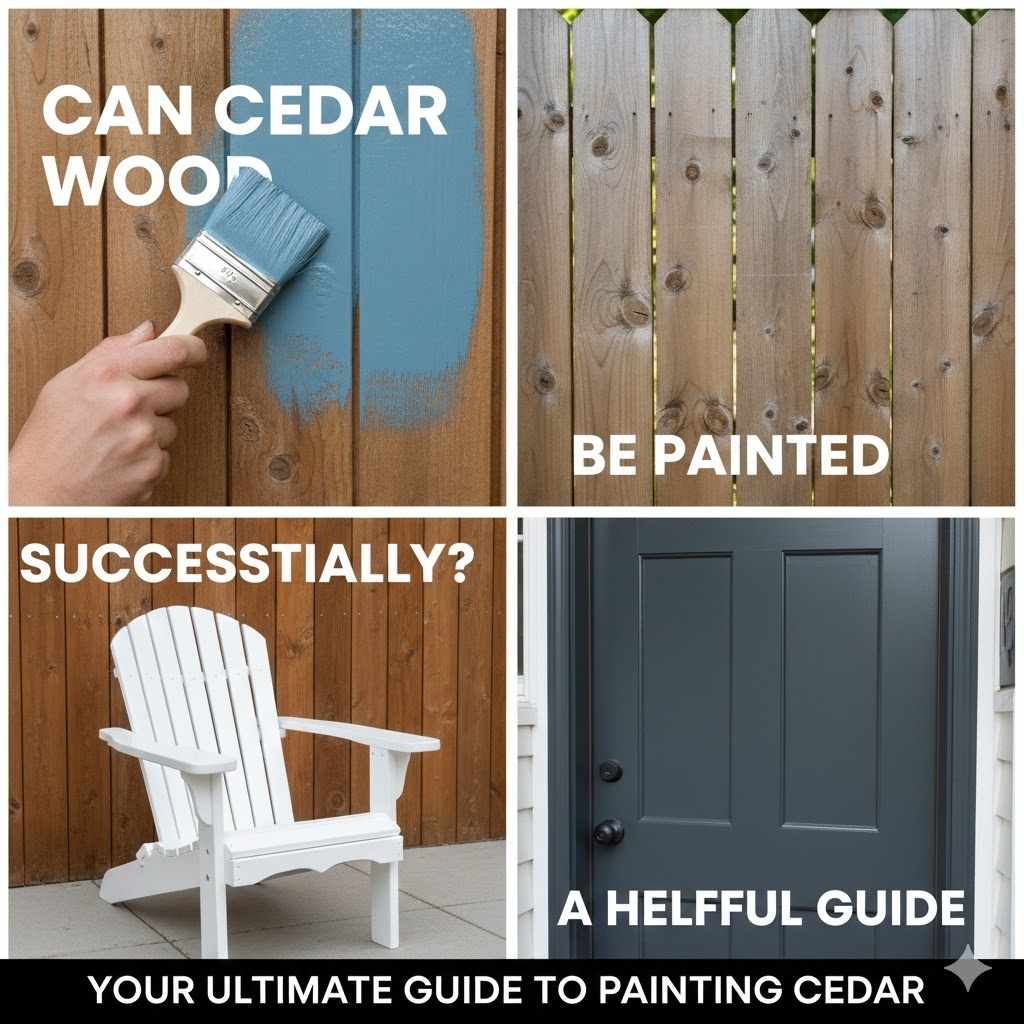
Can Cedar Wood Be Painted Successfully? A Helpful Guide
Thinking about painting cedar wood? It’s a common question! Many people wonder Can Cedar Wood Be Painted Successfully? The good news is, you absolutely can paint cedar. But, it needs a little prep work. Cedar wood has unique qualities that can make painting tricky for beginners. Don’t worry, we’ll break it down step-by-step to make it easy to paint and protect your cedar. We’ll explore everything you need to know. Get ready to transform your cedar projects into beautiful, long-lasting creations!
Reasons Why Painting Cedar Wood Is Sometimes Tricky
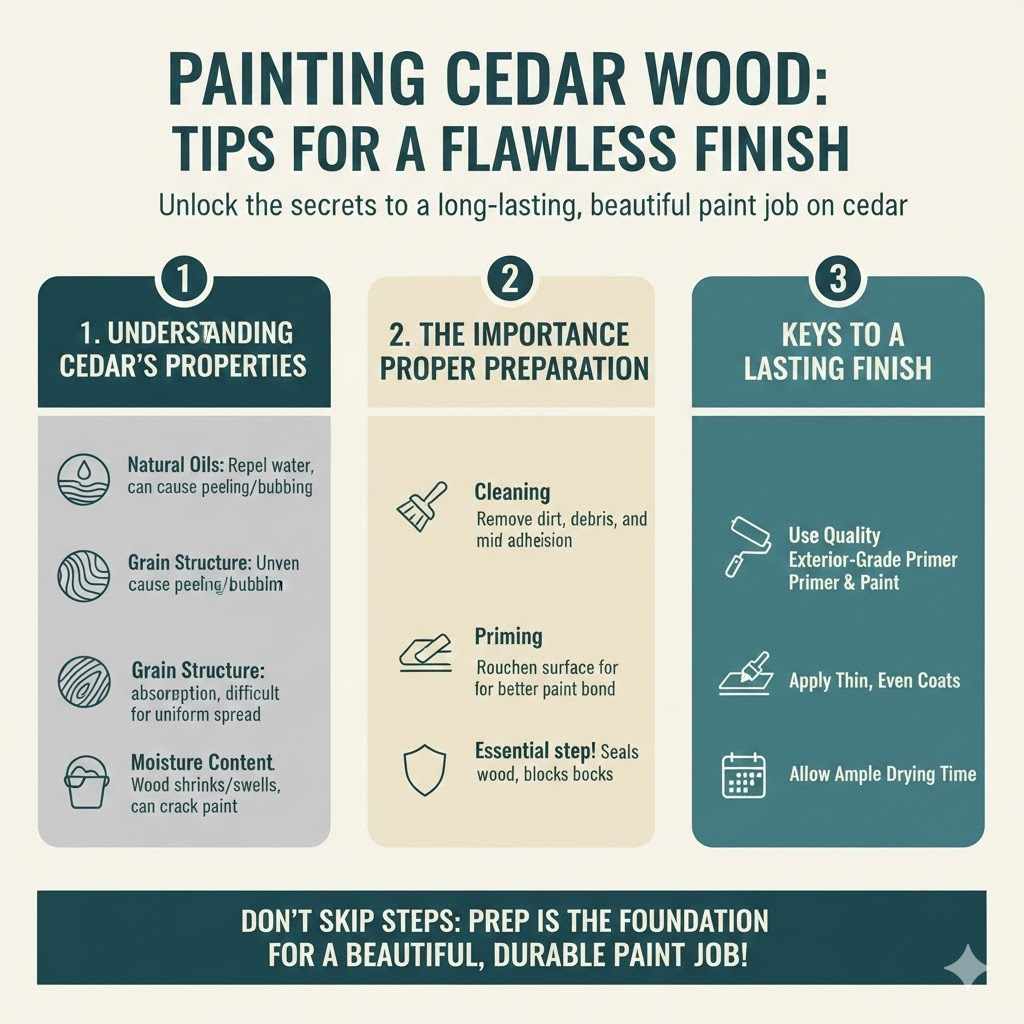
Cedar wood, with its natural beauty and distinctive aroma, is a favorite for outdoor projects. However, preparing cedar for paint can present some difficulties. Cedar’s natural oils and unique grain structure can create challenges for paint adhesion. These oils can cause paint to peel or bubble over time, leaving your hard work looking less than stellar. The wood’s ability to expand and contract with changes in moisture and temperature can also affect the paint’s longevity. Getting a good paint job on cedar needs the correct steps. The natural characteristics of cedar mean you need to be aware of the right techniques.
Understanding Cedar’s Natural Properties
Cedar is known for its durability and resistance to decay, but it’s these same qualities that affect how it takes paint. The oils in cedar act as a natural preservative, but they also prevent paint from properly sticking to the surface. Without the correct preparation, paint can’t form a solid bond, leading to peeling, cracking, and a shorter lifespan for your painted finish. The wood’s texture also matters. Its varying grain can impact how uniformly the paint spreads and how easily it absorbs into the surface. These are essential factors to consider when planning a cedar painting project.
- Natural Oils: Cedar has natural oils that repel water. These oils can prevent paint from adhering. They can also cause problems with how the paint sets and stays on the wood over time.
- Grain Structure: The grain of cedar can vary from piece to piece. This makes it difficult for paint to be applied evenly. Uneven paint can affect its look and how well it protects the wood.
- Moisture Content: Cedar’s response to moisture impacts how paint performs. The wood will shrink and swell based on moisture levels. This movement can crack the paint.
- Durability: Cedar is naturally resistant to bugs and rot. But it does need a good primer and paint to stay protected when it’s exposed to the elements.
The Importance of Proper Preparation
The key to successful cedar painting is preparation. This involves cleaning, sanding, and priming the wood before applying paint. Cleaning removes dirt, debris, and any mold. Sanding creates a rough surface for better paint adhesion. Priming seals the wood, blocks the cedar’s oils, and provides a base for the paint. Skipping these steps can lead to paint failure, meaning your cedar project won’t last. Take the time to do it right, and the results will be a beautiful and lasting finish. Proper preparation is the foundation for a successful paint job.
- Cleaning: Cedar projects often are exposed to dirt, dust, and natural weathering. Before you paint, the surface must be cleaned. A good cleaning solution is needed, along with a scrub brush and water. Clean the wood thoroughly to get rid of any dirt or mildew.
- Sanding: Sanding is needed to roughen the surface of the cedar. This helps the paint stick. Sanding also smooths the wood, removing any imperfections. Use medium-grit sandpaper first, then a finer grit for a smooth finish.
- Priming: Priming is a must when painting cedar. A quality primer seals the wood. It also blocks the natural oils that can prevent paint from sticking. Apply an exterior-grade primer, allowing ample drying time before painting.
Choosing the Right Paint for Cedar Wood
Selecting the correct paint type is just as important as preparation. The best paints for cedar are designed to withstand the elements, flex with the wood’s movement, and provide excellent adhesion. You’ll have options to explore, and each has its own benefits. Choosing the right paint will improve the look of your project. It will also help the paint last longer and resist weather damage. Consider factors like durability, UV resistance, and the specific cedar’s location when selecting the appropriate paint.
Paint Types That Work Well on Cedar
Several types of paint are well-suited for painting cedar. Acrylic latex paints are a popular choice due to their flexibility and resistance to cracking. Oil-based paints offer excellent durability and a smooth finish, but they can take longer to dry and have a stronger odor. Another option is a solid-color stain. This provides a similar look to paint, but it allows the wood grain to show through slightly. The decision depends on the desired appearance and the cedar’s location. Consider these factors to select the best paint for your project. A quality paint job will protect and beautify your cedar.
- Acrylic Latex Paint: Acrylic latex paints are a good choice. They are flexible and can move with the wood as it expands and contracts. They also resist cracking, which is a common problem with wood. They’re water-based, making them easy to clean up.
- Oil-Based Paint: Oil-based paints offer great durability and a smooth finish. They create a strong, lasting layer. However, they need more time to dry, and they have a stronger smell. They are an option for exterior projects.
- Solid-Color Stain: Solid-color stains have a similar look to paint. However, they allow some of the wood grain to show through. This can be a great choice if you still want to see the natural texture of the cedar.
- Exterior Paint Specifically Made for Wood: Some paints are made just for wood and are made with special ingredients. They offer good protection against the elements, UV rays, and moisture. They often have special primers already in them to help with adhesion.
Factors to Consider When Choosing Paint
Beyond the paint type, other factors influence your selection. The location of the cedar project is important. For example, exterior projects need paint that can withstand the sun, rain, and temperature changes. The finish you want is important, too. Glossy paints are more durable and easier to clean, while flat paints offer a more natural look. Don’t forget the color and the specific product’s features. A carefully chosen paint will beautify and protect your cedar.
| Factor | Considerations |
|---|---|
| Location | Exterior projects need UV protection and weather resistance; interior projects have fewer demands. |
| Finish | Glossier finishes are durable and easy to clean; flatter finishes have a natural look. |
| Color | Choose colors that complement the surroundings and your personal preference. |
| Durability | Look for paints that can resist cracking, peeling, and fading. |
| Application | Consider the ease of application; some paints require more coats than others. |
How to Paint Cedar Wood Successfully
The process of painting cedar wood, when done correctly, ensures a long-lasting and beautiful finish. This involves careful preparation, correct application techniques, and attention to detail. This section covers all the steps, from preparing the surface to applying the final coat. Follow these guidelines, and you can achieve professional results. Each step builds on the previous one to create a durable and stunning paint finish on your cedar project.
Step-by-Step Guide to Painting Cedar
Painting cedar involves a methodical approach. Start with cleaning the wood surface, then sand the wood. Prime the wood with a high-quality primer. Apply the paint. The next sections will give a more detailed review of each step. The best results come from following the process step by step, which ensures that each layer adheres properly and protects the cedar.
- Step 1: Surface Preparation: Start by cleaning the cedar with a suitable cleaning solution and a scrub brush to remove dirt, mold, and mildew. If the wood has old paint, you may need to scrape it off. Then, sand the surface with medium-grit sandpaper to create a smooth surface. This is important for paint to stick.
- Step 2: Priming: After the wood has been prepared, apply a good-quality exterior primer designed for wood. Priming is especially key for cedar. It prevents the oils from seeping through. Allow the primer to dry completely. Following the manufacturer’s instructions.
- Step 3: First Coat: Once the primer has dried, apply the first coat of paint. Use a brush or roller. Make sure to apply the paint evenly. Work in the same direction, and avoid applying too much paint at once. Let it dry completely.
- Step 4: Second Coat (If Needed): After the first coat has dried, check the surface. If needed, apply a second coat of paint. Check that the color is even and there are no areas where the wood is showing. Let it dry according to the paint manufacturer’s recommendations.
Tips for Applying Paint Effectively
The application method matters. Applying the paint correctly will enhance your cedar project. This starts with choosing the right tools. Brushes and rollers specifically made for wood painting are often a good starting point. Apply the paint in thin, even coats to avoid drips or runs. Take your time, and work in sections, particularly on larger projects. Proper technique helps in ensuring a smooth and even finish that boosts durability.
- Choose the Right Tools: Use high-quality brushes or rollers. The type of paint you choose affects which tools are best. For oil-based paints, use natural-bristle brushes. For water-based paints, consider synthetic-bristle brushes.
- Apply Thin Coats: Apply multiple thin coats, rather than one thick coat. Thin coats dry faster, and help prevent runs and drips. They also provide better adhesion and a smoother finish.
- Work in Sections: Break the cedar surface into manageable sections. This allows for better control and helps maintain a wet edge. It’s especially useful for larger projects.
- Maintain a Wet Edge: As you paint, keep a wet edge. This avoids lap marks, which can occur when one area of paint dries before the next is applied. Work fast enough. The paint should stay wet as you connect the sections.
- Allow Proper Drying Times: Always allow each coat of primer and paint to dry fully before applying the next coat. Follow the drying times recommended by the paint manufacturer. This improves the overall finish and durability.
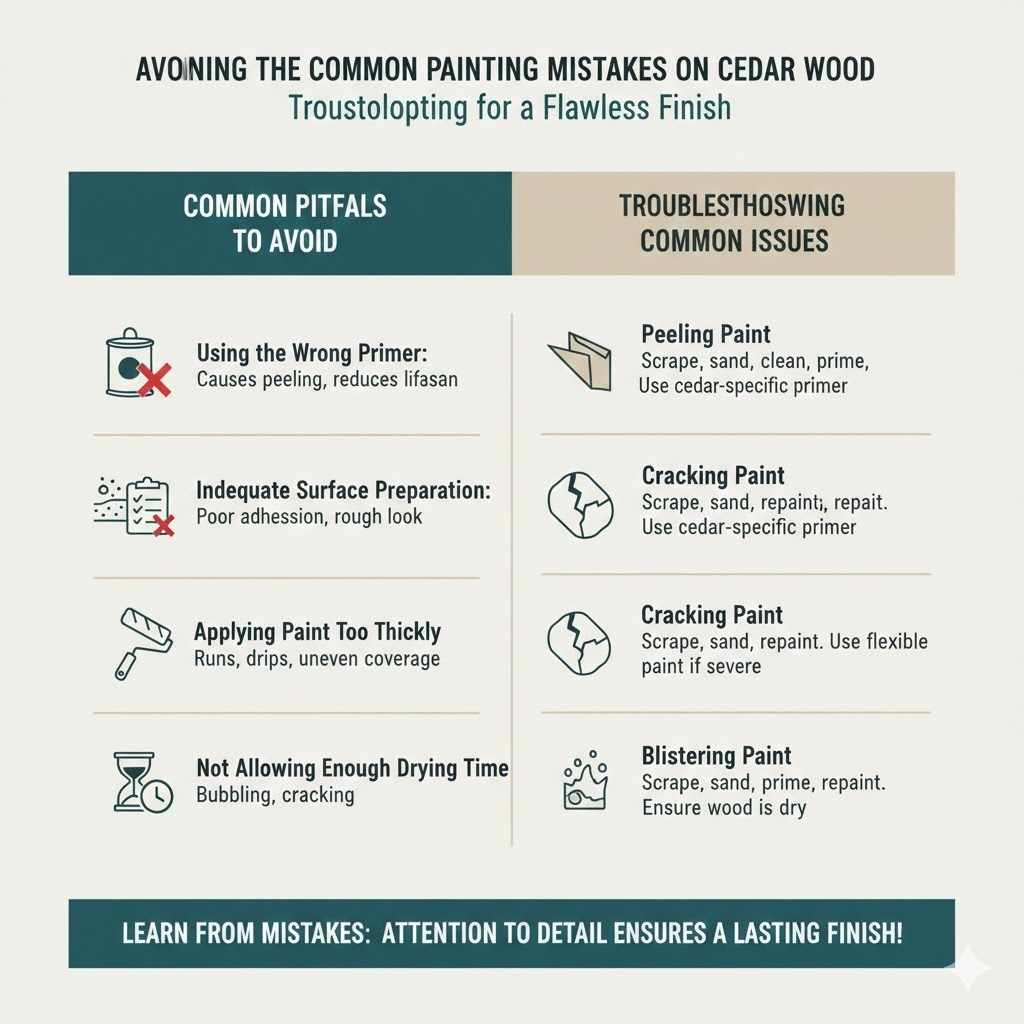
Avoiding Common Painting Mistakes on Cedar Wood
Even with careful preparation, some common mistakes can occur when painting cedar. This section will look at what can go wrong and how to fix them. Knowing these issues in advance can help you prevent them. From choosing the wrong primer to rushing the process, understanding these missteps helps you get better results. Correcting these problems can save you time and ensure a long-lasting, visually stunning cedar project.
Common Pitfalls to Avoid
Many painting problems can arise if you’re not careful. These issues often relate to surface preparation or the application process. For example, choosing the wrong primer or not sanding properly can lead to poor adhesion. Applying too much paint at once, or not allowing enough drying time, can create runs or cracks. Understanding these pitfalls allows you to proactively avoid these problems. Careful planning and attention to detail will set the stage for success. This knowledge will save you from frustration and costly mistakes.
- Using the Wrong Primer: A standard primer won’t work on cedar. You need a primer designed for cedar and other oily woods. Using the wrong primer is one of the most common mistakes. It can cause paint peeling and reduce the lifespan of your paint job.
- Inadequate Surface Preparation: Skipping steps like cleaning and sanding can make the paint not stick to the wood. This can create a rough look. These steps are a must for good adhesion and a smooth finish.
- Applying Paint Too Thickly: Thick coats of paint can cause runs, drips, and uneven coverage. Applying too much paint can also take a long time to dry. Always use thin, even coats.
- Not Allowing Enough Drying Time: Painting over paint that has not dried can cause a range of problems. It can lead to the paint not drying correctly. This will also cause bubbling or cracking. Always wait for the full drying time.
Troubleshooting Common Issues
Even if you follow all the steps, you might run into problems. Peeling paint can be caused by the wrong primer or not cleaning the surface properly. Cracking can be caused by the wood expanding and contracting. Blistering might be due to moisture. If you notice a problem, identifying the cause is the first step in solving it. You can address the problem by repairing the surface, fixing the paint, and starting over. Taking action will save time and money.
- Peeling Paint: If the paint is peeling, you probably didn’t prepare the surface correctly. Scrape off the loose paint. Sand the area. Clean, prime, and repaint the area. Be sure to use a cedar-specific primer.
- Cracking Paint: Cracking can happen when the wood moves and the paint can’t keep up. Scrape off the cracked paint, sand the surface, and repaint. If the issue is severe, consider using a paint that is more flexible.
- Blistering Paint: Bubbles, or blisters, can happen because of trapped moisture. Scrape off the blisters and sand the area smooth. Prime and repaint. Ensure the cedar is completely dry before painting.
- Poor Adhesion: If the paint does not stick, the surface may not have been clean or primed properly. Also, the cedar oils can still be at play. Clean, sand, and prime the surface again. Choose a primer for cedar.
Frequently Asked Questions
Question: Do I need to prime cedar before painting?
Answer: Yes, priming cedar is essential. A good primer seals the wood and blocks the natural oils that can prevent paint from adhering properly. Choose a high-quality, exterior-grade primer made for wood.
Question: What type of paint is best for cedar?
Answer: Acrylic latex paints are a popular choice due to their flexibility and resistance to cracking. Oil-based paints offer excellent durability, while solid-color stains provide a similar look. The choice depends on your needs.
Question: How do I prepare cedar wood for painting?
Answer: First, clean the cedar with a mild detergent and water to remove dirt, mold, and mildew. Then, sand the surface to create a better surface for paint adhesion. After sanding, you’ll need to prime the wood.
Question: Can I paint cedar that has already been treated?
Answer: Yes, but you need to prepare the surface. You’ll need to clean, sand, and prime the wood. Remove any loose or flaking finish before sanding.
Question: How many coats of paint should I apply to cedar?
Answer: It’s best to apply two coats of paint to cedar. This ensures even coverage and provides better protection against the elements.
Final Thoughts
Painting cedar wood successfully is within reach! This isn’t a job you should be scared of. By understanding the wood’s properties, selecting the right paint, and following the correct steps, you can get beautiful results. Remember to start with proper surface preparation. That’s the most important part! Choose the correct primer and paint. Apply multiple thin coats, allowing the correct time to dry. If you run into problems, don’t worry. Troubleshoot the issue and adjust. Now you are ready to explore your next project with a fresh coat of paint! Go ahead and transform your cedar projects!