Can I Paint Gutters? Your Essential Proven Guide
Yes, you absolutely can paint gutters to boost your home’s curb appeal and protect them from the elements. With the right preparation, primer, and paint, you can give your aluminum, vinyl, or steel gutters a durable, fresh new look. Proper cleaning and priming are the keys to a professional-looking finish that lasts for years.
Hello there! I’m Md Meraj, and in my workshop, I’ve learned that a little bit of care can make a huge difference in how things look and last. Your home’s gutters are a perfect example. Are yours looking a bit faded, stained, or chipped? Maybe their color just doesn’t match the beautiful new trim you just installed. It’s a common issue that can make a house feel a little worn out.
You might be wondering, “Can I paint gutters myself, or is that a job for the pros?” I’m here to tell you with a little guidance, you can definitely do this. It’s a rewarding project that instantly freshens up your home’s exterior. In this guide, I’ll walk you through every simple step, from picking the right paint to getting that perfect finish. Let’s get started!
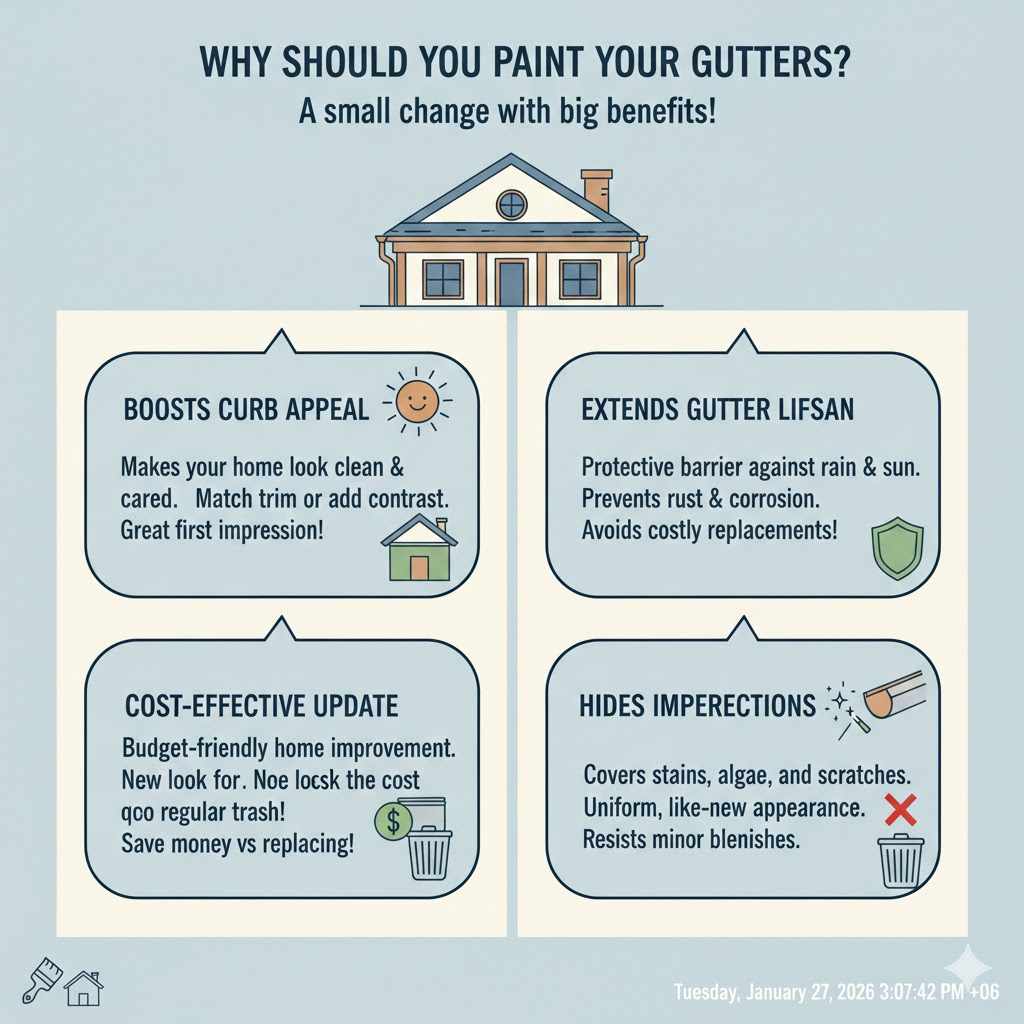
Why Should You Paint Your Gutters?
Painting your gutters might seem like a small detail, but it offers some wonderful benefits. It’s more than just a color change; it’s a smart upgrade for your home. Let’s look at why this project is worth your time.
- Boosts Curb Appeal: A fresh coat of paint makes your whole house look cleaner and more cared for. You can match your gutters to your trim for a seamless look or use a contrasting color to add a pop of character. It’s one of the easiest ways to improve your home’s first impression.
- Extends Gutter Lifespan: Paint isn’t just for looks; it’s a protective shield. A quality exterior paint creates a barrier against rain, sun, and temperature changes. For metal gutters, it helps prevent rust and corrosion, which can lead to leaks and costly replacements down the road.
- Cost-Effective Update: Replacing your entire gutter system is expensive. Painting them, however, is very budget-friendly. For the cost of a few cans of paint and some supplies, you can achieve a brand-new look without breaking the bank.
- Hides Imperfections: Over time, gutters can get stained from leaves, algae, or mineral deposits. They might also have small scratches or dings. A fresh coat of paint covers these minor blemishes, making your gutters look uniform and new again.
Choosing the Right Paint and Primer
The secret to a long-lasting paint job on your gutters is using the right products. Gutters live outside, so they need paint that can handle everything Mother Nature throws at them. The material of your gutters—usually aluminum, vinyl, or steel—will determine the best paint and primer to use.
Always choose a high-quality exterior-grade paint. Look for paints labeled for outdoor or metal use. An acrylic latex paint is often the best choice because it’s flexible, durable, and easy to clean up with soap and water.
Here’s a simple table to help you choose the best products for your specific gutter material:
| Gutter Material | Recommended Primer | Recommended Paint | Key Tip |
|---|---|---|---|
| Aluminum (Most Common) | Metal etching primer or galvanized metal primer. | 100% Acrylic Latex Exterior Paint (Satin or Semi-Gloss). | Aluminum can get chalky. Make sure you clean it thoroughly and use a primer designed to bond with metal. |
| Vinyl (PVC) | Latex primer or a paint with primer built-in (labeled for vinyl). | 100% Acrylic Latex Exterior Paint (labeled “vinyl-safe”). | Vinyl expands and contracts with temperature changes. Use a flexible paint that won’t crack or peel. Choose a color that is the same shade or lighter than the original to avoid warping. |
| Galvanized Steel | Galvanized metal etching primer. | 100% Acrylic Latex Exterior Paint or an alkyd-based exterior paint. | New galvanized steel has an oily coating that must be cleaned off with a solvent. A special primer is essential to prevent the paint from peeling off. |
Essential Tools and Materials You’ll Need
Getting everything ready before you start makes the whole process smooth and easy. You don’t need a lot of fancy equipment for this job. Here is a checklist of the supplies you’ll want to have on hand.
- Safety Gear: Safety glasses, gloves, and a dust mask (especially for sanding).
- Ladder: A sturdy extension ladder that can safely reach your gutters.
- Cleaning Supplies: A garden hose with a spray nozzle, a stiff-bristled brush, bucket, dish soap or a dedicated gutter cleaner, and old rags. For tough stains, a solution of water and white vinegar can work wonders.
- Repair Materials: Exterior-grade waterproof sealant or caulk for fixing any leaks.
- Sanding Supplies: Medium-grit sandpaper (around 120-grit) or a scouring pad.
- Primer: The correct type of primer for your gutter material (see table above).
- Paint: High-quality exterior-grade paint suitable for your gutters.
- Painting Tools: You have options here.
- Brushes: A 2-inch angled brush is great for cutting in and tight spots.
- Rollers: A small 4-inch roller with a low-nap cover works well for flat surfaces.
- Paint Sprayer: An airless sprayer can make the job much faster, but requires more prep (masking off areas).
- Painter’s Tape and Drop Cloths: To protect your siding, roof shingles, and the ground below.
Your Step-by-Step Guide to Painting Gutters
Ready to get started? I’ll break this down into simple, manageable steps. Just take your time and follow along. You’ll be admiring your beautiful new gutters in no time!
Step 1: Safety First!
Before you do anything else, let’s talk about safety. You’ll be working on a ladder, so it’s the most important step. Always place your ladder on firm, level ground. Have a helper hold the base of the ladder if possible. Remember the “4-to-1” rule: for every four feet of height you have to climb, move the base of the ladder one foot away from the wall. For more detailed ladder safety tips, resources like the U.S. Consumer Product Safety Commission provide excellent guidance. Wear your safety glasses to protect your eyes from debris and paint drips.
Step 2: Check the Weather Forecast
Paint needs time to dry properly. A good forecast is your best friend for this project. Look for a few clear, dry days in a row with low humidity and moderate temperatures—ideally between 50°F and 85°F (10°C and 29°C). Avoid painting in direct, hot sunlight, as it can cause the paint to dry too quickly and blister.
Step 3: Clean the Gutters Thoroughly
This is the most critical step for a long-lasting finish. Paint won’t stick to dirt, grime, or mildew. First, remove all leaves, twigs, and debris from inside the gutters. Then, it’s time to scrub the outside. Mix a cleaning solution in a bucket with warm water and a good squirt of dish soap or a dedicated gutter cleaner. Use your stiff brush to scrub away all the dirt, mildew, and chalky residue. For stubborn stains, a pressure washer on a low setting can be effective, but be careful not to damage the gutters or siding. Once clean, rinse everything thoroughly with your garden hose and let the gutters dry completely. This might take 24 hours, so be patient.
Step 4: Repair Any Damage
Inspect your clean gutters for any holes, cracks, or leaking seams. Use an exterior-grade, waterproof sealant or caulk to fill any gaps. If you have larger holes, you may need a small metal patch, which you can secure with sealant and rivets. Make sure any repairs are fully cured before you move on to priming and painting.
Step 5: Scuff and Sand the Surface
Most gutters have a smooth, glossy finish that paint struggles to grip. You need to give the surface a little “tooth” for the primer to bond to. Lightly scuff the entire surface of the gutters with medium-grit sandpaper or a scouring pad. You don’t need to remove the old paint completely—just dull the sheen. After sanding, wipe away all the dust with a clean, damp rag. Let it dry completely before priming.
Step 6: Apply the Primer
Do not skip priming! Primer is the glue that holds your paint to the gutter. It seals the surface and ensures the topcoat adheres properly for a durable finish. Using a brush, roller, or sprayer, apply one thin, even coat of the correct primer for your gutter material. Work in long, smooth strokes. Let the primer dry completely according to the manufacturer’s instructions, which is usually a few hours.
Step 7: Apply the First Coat of Paint
Now for the fun part! Once the primer is dry, you can apply your first coat of paint.
- If using a brush: Use long, even strokes, and try to maintain a “wet edge” to avoid brush marks. An angled brush is perfect for this.
- If using a roller: A small 4-inch roller can cover the flat faces of the gutters quickly. Use a brush for any detailed areas.
- If using a paint sprayer: This is the fastest method, but it requires careful masking. Cover your siding, roof, windows, and anything else you don’t want painted with plastic sheeting and painter’s tape. Apply a light, even coat, keeping the sprayer moving to avoid drips.
Whichever method you choose, a thin, even coat is better than a thick, heavy one. A thick coat is more likely to drip and peel later on.
Step 8: Apply a Second Coat (Recommended)
Most jobs look best with two coats of paint. The second coat ensures full coverage, a deeper color, and better protection. Wait for the first coat to dry completely, checking the paint can for recommended recoat times. It’s often best to wait at least 4-6 hours. Apply the second coat just like you did the first.
Step 9: Clean Up and Admire Your Work
Once you’re finished painting, carefully remove all the painter’s tape while the paint is still slightly soft to get a clean line. Clean your brushes, rollers, or sprayer according to the paint manufacturer’s instructions. Step back and take a look at your work—your house has a fresh, clean look, and you did it yourself!
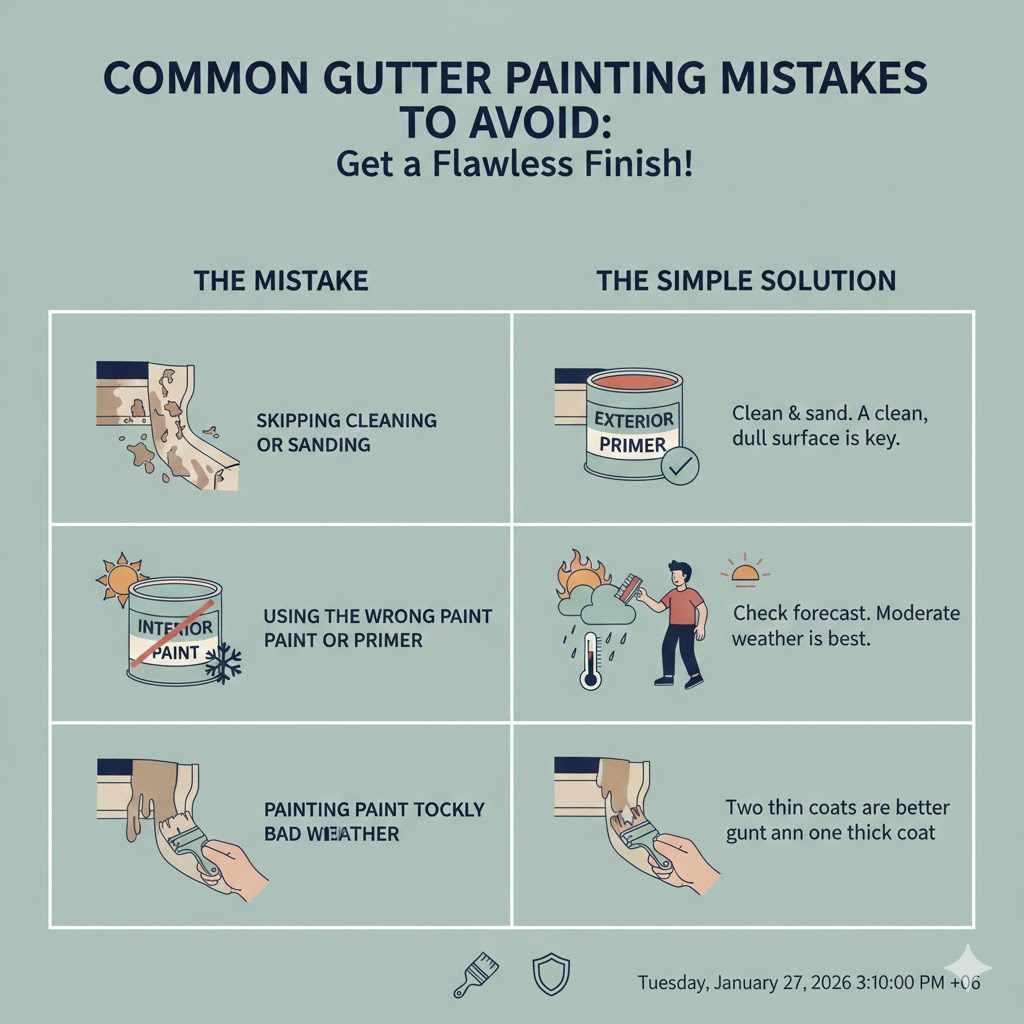
Common Gutter Painting Mistakes to Avoid
Even seasoned DIYers can make mistakes. Knowing what to watch out for will help you get a flawless finish. Here are a few common pitfalls and how to steer clear of them.
| The Mistake | The Simple Solution |
|---|---|
| Skipping Cleaning or Sanding | This is the #1 cause of peeling paint. Always take the time to scrub your gutters clean and lightly sand them. A clean, dull surface is the only way for primer and paint to stick properly. |
| Using the Wrong Paint or Primer | Interior paint will not survive outdoors. Using the wrong primer on galvanized steel will cause it to peel in sheets. Double-check that your products are for exterior use and match your gutter material. |
| Painting in Bad Weather | Painting in direct sun, high humidity, or when it’s too cold will ruin the finish. The paint won’t cure correctly, leading to blisters, slow drying, or poor adhesion. Always check the forecast for a clear, moderate window of weather. |
| Applying Paint Too Thickly | It’s tempting to glob on the paint to finish faster, but this leads to drips, runs, and an uneven finish that takes forever to dry. Two thin coats are always better and more durable than one thick coat. |
Frequently Asked Questions (FAQ)
What is the best paint to use on gutters?
The best paint for gutters is a high-quality 100% acrylic latex exterior paint. It is durable, flexible enough to handle temperature changes without cracking, and provides excellent protection against moisture and UV rays. Always choose a paint that is compatible with your gutter material (aluminum, vinyl, or steel).
Do I really have to use a primer on my gutters?
Yes, absolutely. Primer is essential for a long-lasting paint job. It creates a strong bond between the gutter surface and the paint, prevents peeling, and blocks stains. For metal gutters, an etching primer is especially important to ensure proper adhesion.
Can I use a paint sprayer to paint my gutters?
Yes, a paint sprayer is a great option and can make the job much faster. However, it requires significant prep work. You must carefully cover your home’s siding, windows, and landscaping with painter’s tape and plastic sheeting to protect them from overspray.
How long does it take for gutter paint to dry?
Paint is typically dry to the touch in about 1 to 2 hours in good weather. However, it needs more time to fully cure and harden. Always check the paint can for specific instructions, but it’s wise to wait at least 4 to 6 hours before applying a second coat. Full cure time can be several days to a week.
Can I paint the inside of my gutters?
It’s generally not recommended or necessary to paint the inside of your gutters. The constant flow of water, leaves, and debris would quickly wear away the paint, causing it to chip and potentially clog your downspouts. Focus your efforts on the visible exterior surfaces.
What color should I paint my gutters?
This is a matter of personal preference! Many homeowners choose to match their gutters to their trim for a classic, cohesive look. You could also match them to your siding to make them blend in, or choose a contrasting color that complements your shutters or front door to add a design accent.
How often should I repaint my gutters?
When done correctly with proper prep and quality paint, a gutter paint job should last for 5 to 10 years. You’ll know it’s time to repaint when you see signs of fading, chalking, chipping, or peeling.
Wrapping It Up
There you have it—your complete guide to giving your gutters a beautiful, durable new finish. As you can see, painting your gutters is a very achievable DIY project. It’s all about taking your time with the preparation—the cleaning, sanding, and priming. When you do that part right, the painting itself is simple and rewarding.
A weekend of work can completely transform the look of your home, adding fresh character and protecting your investment for years to come. So gather your tools, wait for a nice day, and get started. You’ve got this! Happy painting!