Can Rubio Monocoat Be Applied Over Stain Proven Best Way
Applying Rubio Monocoat over a traditional, film-forming stain is not recommended. The oil finish is designed to bond directly with raw wood fibers. Sealing the wood with stain prevents this essential molecular bond, leading to a weak, tacky, and uneven finish that will not cure properly or provide durable protection.
Hello, fellow makers! Md Meraj here. In our workshop travels, we often fall in love with two different things: the deep, rich color of a classic wood stain and the beautiful, natural feel of a hardwax oil finish like Rubio Monocoat. Naturally, the big question comes up: can we have both? It’s one of the most common questions I hear, and the confusion around it can be frustrating.
You might be picturing that perfect shade of dark walnut stain topped with the matte, durable protection of Rubio. But when you try to combine them, you can end up with a sticky, blotchy mess. Don’t worry, you’re not alone in asking this. The good news is there is a proven, reliable way to get that deep color you want with the performance you need. We’re going to walk through it step-by-step.
Understanding How Rubio Monocoat Works Its Magic
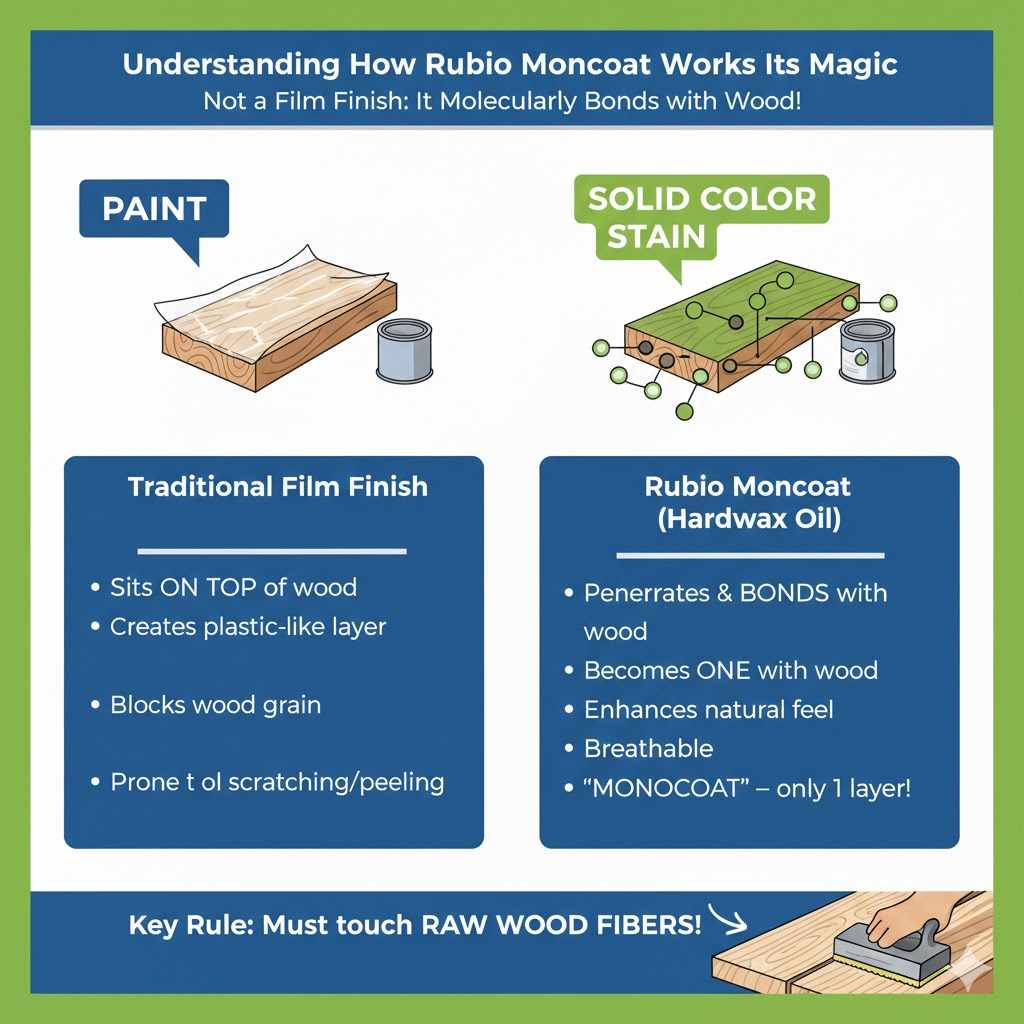
Before we dive into the “how,” it’s super important to understand the “why.” Rubio Monocoat is not like the polyurethane or lacquer you might be used to. Those are “film finishes.” They create a plastic-like layer that sits on top of the wood. Think of it like a sheet of plastic wrap over a bowl.
Rubio Monocoat is different. It’s a “penetrating hardwax oil.” It works through a cool process called molecular bonding. Here’s the simple version:
- The oil soaks into the very top layer of the wood.
- It then forms a chemical bond directly with the raw cellulose fibers of the wood itself. It becomes one with the wood.
- Once all the available wood fibers have bonded with the oil, the wood is saturated. It won’t accept any more oil.
This is why it’s called “Mono-coat”—you only need one coat! Any extra oil you apply has nothing to bond to, so you just wipe it off. This unique process is what gives you that desirable natural feel and allows for easy spot repairs, but it has one very important rule: it must be able to touch raw wood fibers.
Why Applying Rubio Monocoat Over Traditional Stain Is a Bad Idea
Now that you know Rubio needs raw wood, you can see the problem. Most common wood stains (like those from Minwax or Varathane) contain binders and sealers. They color the wood, but they also seal the pores. They create a thin film that blocks the Rubio Monocoat from reaching the wood fibers it needs to bond with.
When you apply Rubio Monocoat over a sealed stain, you end up with a number of problems. The oil has nowhere to go, so it just sits on top like oil on water. This leads to a finish that fails in almost every way.
Here’s a quick comparison to show you what happens:
| Feature | Rubio on Raw Wood (Correct Way) | Rubio on Stained Wood (Incorrect Way) |
|---|---|---|
| Bonding | Excellent molecular bond with wood fibers. | No bond at all. Oil sits on top of the stain. |
| Durability | Strong, durable, and water-resistant finish. | Very weak. Scratches and wipes off easily. |
| Appearance | Even, matte, natural look that enhances the grain. | Blotchy, greasy, and uneven sheen. Hides the grain. |
| Cure Time | Cures properly, becoming dry to the touch quickly. | Stays oily, sticky, or tacky for days or even weeks. May never fully cure. |
| Repairability | Easy to spot-repair scratches by reapplying oil. | Cannot be repaired. The whole surface would need to be stripped. |
Trying to force these two products together just doesn’t work. You spend time and money only to end up with a finish that has the weaknesses of both and the strengths of neither. But don’t be discouraged! There is a professional way to get the color you want.
The Proven Best Way: Using a Pre-Color Treatment Instead
So, how do we get a deep, custom color and still use Rubio Monocoat? The answer is to use a product designed to work as part of the Rubio system. Instead of a traditional stain, you use a reactive colorant or a specially designed “pre-color.”
Rubio Monocoat makes a line of products called Pre-Color Easy and other treatments like Fumed. These products are not stains in the traditional sense. They are designed specifically to color the wood fibers without sealing them. They change the color of the wood itself, leaving the fibers open and ready to bond with the Oil Plus 2C finish coat.
Think of it this way:
- A traditional stain is like painting a wall. It covers the surface.
- A pre-color treatment is like dyeing fabric. It changes the color of the fibers themselves.
By using this two-step system, you can achieve a huge range of colors—from light whites to deep blacks—and then lock in that color with the durable, beautiful hardwax oil finish. This is the method professionals use to get consistent, high-quality results.
Step-by-Step Guide: Achieving a Rich, Stained Look with Rubio Monocoat
Ready to do it the right way? It’s easier than you think! Follow these steps carefully for a flawless finish you can be proud of.
Step 1: Gather Your Tools and Materials
Having everything on hand before you start makes the whole process smoother. You won’t need any fancy equipment, just the right supplies.
- Safety First: Nitrile gloves and safety glasses are a must.
- Wood Preparation: An orbital sander, sandpaper (grits 80, 120, and 150), a vacuum with a brush attachment, and Rubio Monocoat Raw Wood Cleaner.
- Pre-Color Application: Rubio Monocoat Pre-Color Easy in your chosen shade, a foam brush or applicator pad, and clean cotton rags.
- Buffing: A maroon or red non-abrasive pad (can be used by hand or on a buffer).
- Final Finish: Rubio Monocoat Oil Plus 2C (Part A and B) in your chosen color, a plastic mixing cup, a stir stick, and a white non-abrasive pad or clean rags.
- Cleanup: Mineral spirits for cleaning tools and a metal can with water for safe rag disposal.
A Critical Safety Note: Rags soaked with oil-based finishes can spontaneously combust as they dry. This is a serious fire hazard. Never bunch them up and throw them in the trash. Always lay them flat to dry on a non-flammable surface, or submerge them in a water-filled metal can with a lid. The National Fire Protection Association provides excellent guidance on preventing fires from oily rags.
Step 2: Prepare Your Wood Surface (The Most Important Step!)
I can’t say this enough: your final finish will only be as good as your prep work. Rushing this step is the most common mistake beginners make. Take your time here!
- Sanding: Start with an 80-grit sandpaper to level the wood and remove any machine marks. Then, move to a 120-grit. Finish with 150-grit. Do not sand any finer than 150! Sanding with higher grits will polish the wood pores closed, preventing the oil from soaking in properly.
- Vacuuming: Once sanding is complete, vacuum the entire surface thoroughly. Use a soft brush attachment to get every last bit of dust out of the wood grain.
- Final Cleaning: Lightly dampen a cloth with Rubio Monocoat Raw Wood Cleaner and wipe down the entire piece. This removes the final layer of microscopic dust and prepares the wood fibers to accept the finish evenly. Let it dry completely.
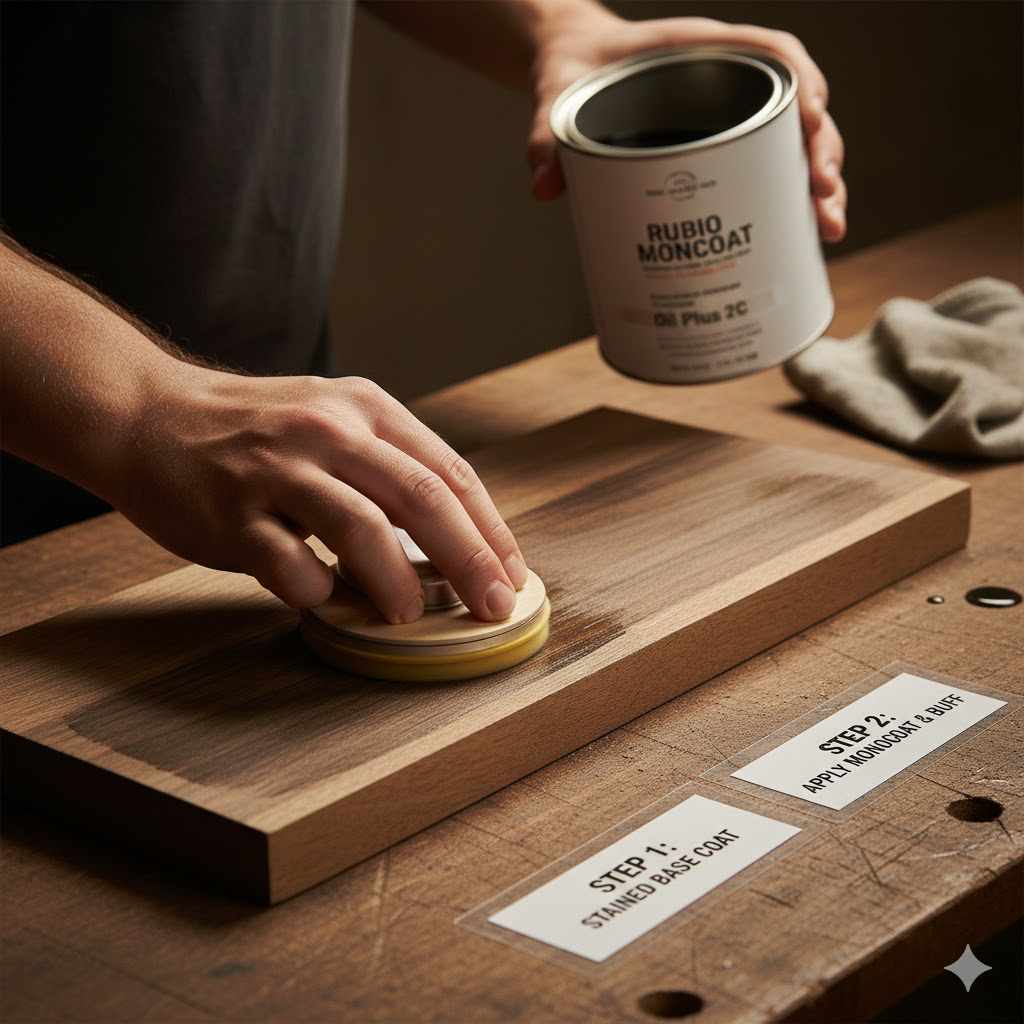
Step 3: Applying the Pre-Color Treatment
This is where your custom color comes to life. Work in manageable sections if you have a large project like a tabletop.
- Stir Well: Open your can of Pre-Color Easy and stir it thoroughly to ensure the pigments are evenly mixed.
- Apply Evenly: Use a foam brush or an applicator pad to apply a liberal, even coat to the wood. Work with the grain of the wood.
- Wipe Excess: Let the pre-color sit for a few minutes, then use clean, dry cotton rags to wipe away all the excess. Keep wiping with fresh rags until the surface feels dry and the rag comes away clean. This ensures you don’t leave a film on the surface.
- Dry Completely: Let the pre-color dry according to the instructions on the can, typically for 1 to 3 hours. It must be completely dry before moving to the next step.
Step 4: A Gentle Buff Before the Final Coat
This quick step makes a big difference in the final feel of your project.
- Once the pre-color is dry, the wood grain may feel slightly raised. Take a maroon or red abrasive pad and gently buff the entire surface by hand. This will knock down any raised grain without removing the color.
- Vacuum the surface one last time to remove any dust created by the buffing process.
Step 5: Applying Rubio Monocoat Oil Plus 2C
This is the final, rewarding step where you add protection and bring the color to its full richness.
- Mix the Oil: In a plastic cup, mix Part A (the oil) and Part B (the accelerator) at a 3-to-1 ratio. Mix well for a couple of minutes. Only mix what you can use in about 30-45 minutes.
- Apply Sparingly: Pour a small amount of the mixed oil onto the surface. Remember, a little goes a very long way!
- Spread the Finish: Use a white applicator pad or a plastic spreader to work the oil into the wood. Spread it out as thinly as possible, making sure to cover every spot.
- Let It React: Allow the oil to sit on the surface and react with the wood for about 5-10 minutes.
- Remove ALL Excess: This is the most critical part of the oil application. Using clean cotton cloths or a buffer with a white pad, wipe away every last bit of excess oil. The surface should feel completely dry to the touch when you are done. If it feels oily, you haven’t wiped enough!
And that’s it! Your piece will be dry to the touch almost immediately and can handle light use in 24-48 hours. The finish will continue to cure for about a week, so be gentle with it during that time.
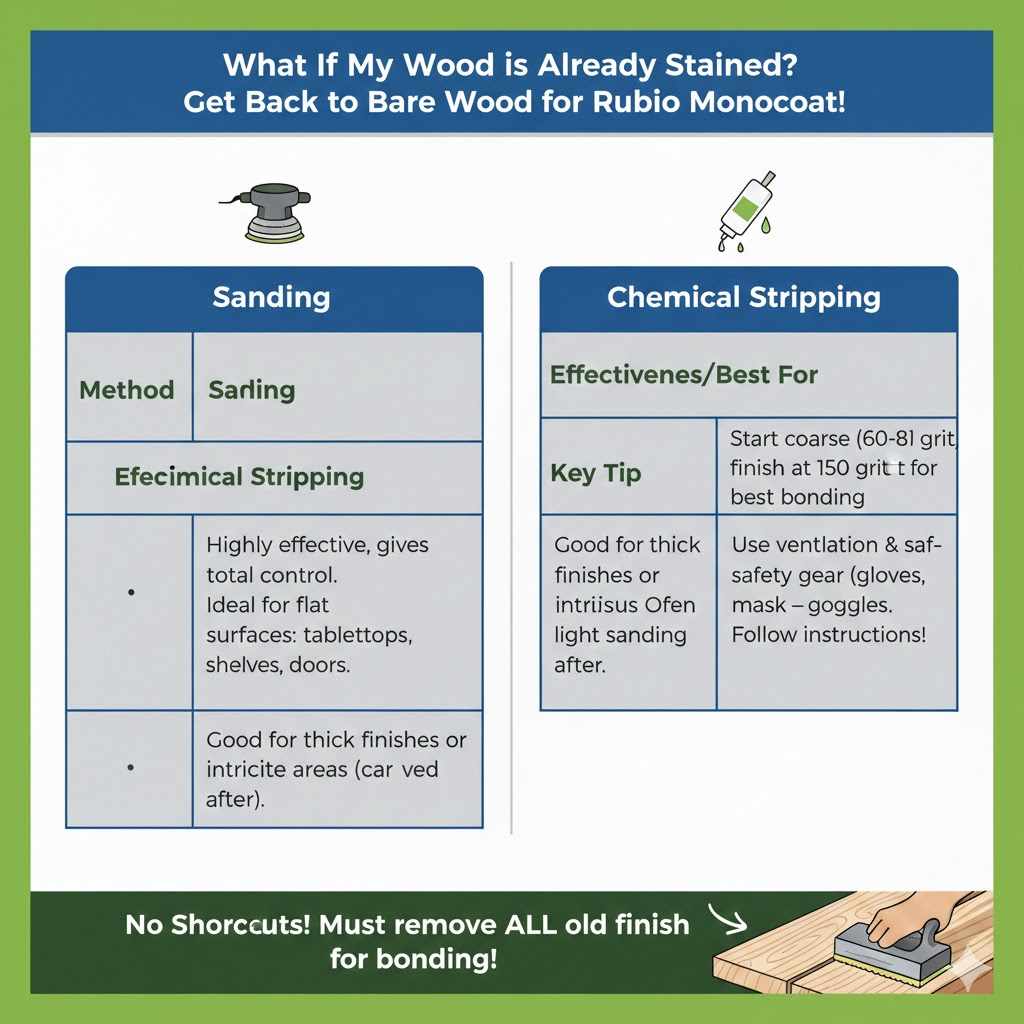
What If My Wood is Already Stained?
This is a common roadblock. Maybe you bought a piece of furniture that’s already finished, or you started with a stain before realizing it wouldn’t work with Rubio. Do you have to throw it out and start over? Absolutely not!
The only reliable solution is to completely remove the old stain and get back to bare, raw wood. There are no shortcuts here. You must remove every trace of the old finish for the Rubio Monocoat to bond properly.
| Method | Effectiveness | Best For | Key Tip |
|---|---|---|---|
| Sanding | Highly effective. Gives you total control and ensures a perfectly prepared surface for Rubio. | Flat surfaces like tabletops, shelves, and cabinet doors. The most reliable method. | Start with a coarse grit (60 or 80) to cut through the finish quickly, then work up to your final 150 grit. |
| Chemical Stripping | Good for thick finishes or intricate areas where a sander can’t reach (like carved legs). | Detailed or ornate pieces. Often followed by light sanding to finish the prep. | Always use proper ventilation and safety gear (gloves, mask, goggles). Follow the product’s instructions carefully. |
For most DIY projects, sanding is the best path forward. It may seem like a lot of work, but your patience will be rewarded with a professional-quality finish that will last for years.
Frequently Asked Questions (FAQ)
Can you put Rubio Monocoat over Minwax stain?
No, you should not. Minwax stains, whether oil-based or water-based, seal the wood pores. This prevents Rubio Monocoat from bonding to the wood, resulting in a finish that will remain sticky, not cure, and offer no durability. You must completely sand off the Minwax stain before applying Rubio.
What happens if you apply a second coat of Rubio Monocoat?
Because of its molecular bonding technology, a second coat of Rubio Monocoat has nothing to bond to. The wood fibers are already saturated after the first coat. The second coat will simply sit on the surface, making it feel oily and creating a greasy film that you’ll have to wipe off anyway.
Can you use Rubio Monocoat as a top coat over another finish like polyurethane?
No, for the same reason you can’t use it over stain. Polyurethane creates a plastic film on the wood. Applying Rubio Monocoat over it would be like trying to oil a piece of plastic. It won’t bond, penetrate, or cure. The old finish must be completely removed first.
How do you know if you’ve removed all the excess oil?
The surface should feel completely dry and smooth to the touch, not oily, slick, or greasy. A good test is to wipe a clean corner of your rag or a paper towel firmly on the surface. If it comes away with an oily residue, you need to keep wiping.
Why is my Rubio Monocoat finish sticky or tacky?
This is almost always caused by one of two things: either too much oil was left on the surface, or it was applied over a sealed surface (like stain or an old finish). To fix it, try applying a tiny amount of fresh oil to the sticky spot to reactivate it, then buff aggressively with a clean, dry cloth until all excess is gone.
Can I use a water-based stain or wood dye before Rubio Monocoat?
This is a gray area. Some pure, pigment-based water dyes that don’t contain binders or sealers might work. However, it’s risky and can lead to inconsistent results. For a guaranteed successful outcome, it is always best to use products from the Rubio Monocoat system, like their Pre-Color Easy, which are designed and tested to work together.
What is the best grit to sand to before applying Rubio Monocoat?
The ideal final sanding grit is 120 or 150. Going higher than 150-grit can start to “burnish” or polish the wood, closing the pores and making it harder for the oil to penetrate deeply. A 120-150 grit finish leaves the wood smooth but the pores open and ready for oil.
You Can Achieve the Perfect Finish
So, while the direct answer to “Can you apply Rubio Monocoat over stain?” is a clear no, the story doesn’t end there. By understanding how the product works, you can see why it needs a special approach to achieve custom colors. It’s not about finding a tricky workaround, but about using the right system for the job.
Using a pre-color treatment before applying the hardwax oil is the proven, professional method. It ensures that you get both the deep, rich color you desire and the durable, beautiful, and easily repairable finish that Rubio Monocoat is famous for. It all comes down to that perfect prep work and letting the oil bond directly to the wood.
Now you have the knowledge to do it the right way. So go ahead, choose that amazing color combination, and create a finish that feels as good as it looks. You’ve got this! Happy woodworking.