Can You Paint Teak Wood Outdoor Furniture: Proven Best Guide
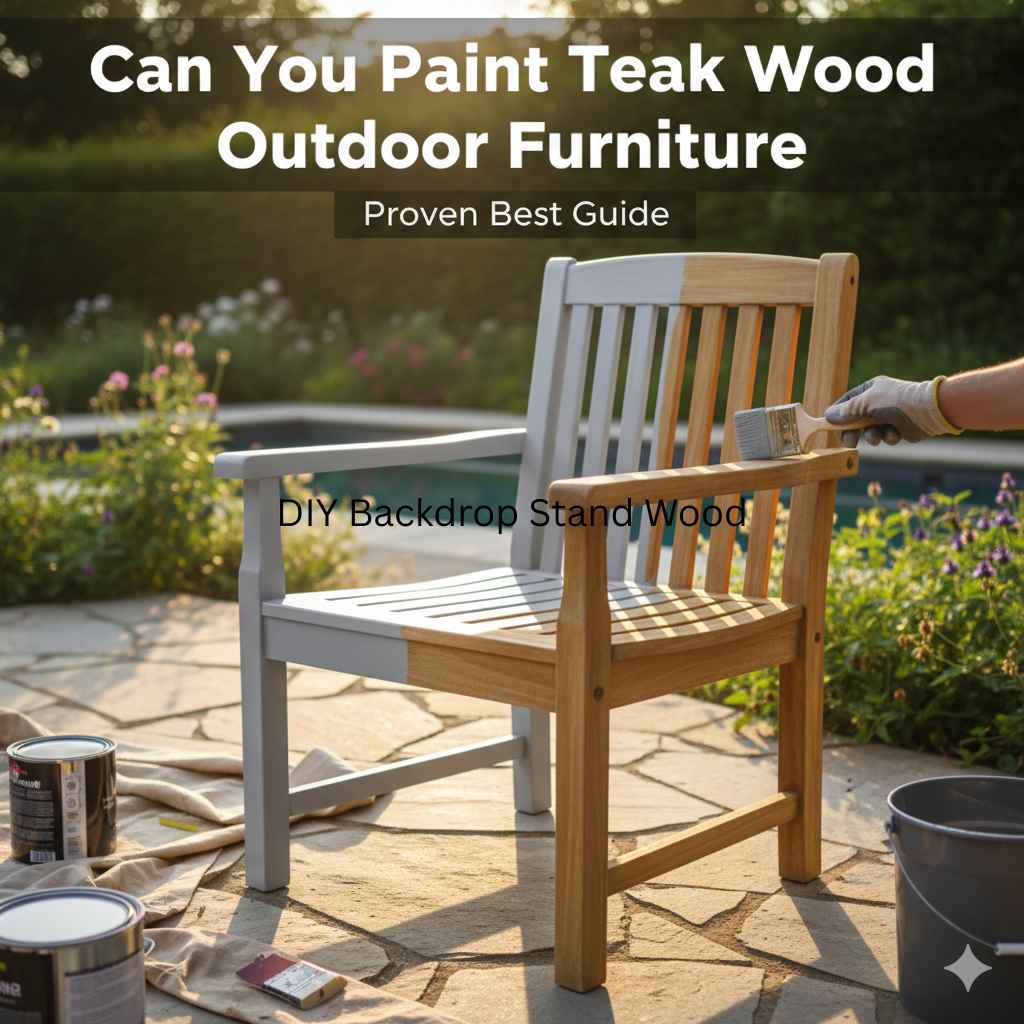
Yes, you absolutely can paint teak wood outdoor furniture! With the right preparation and proper paint, you can transform your teak pieces into a fresh, vibrant statement for your patio or garden. This guide will show you how, step-by-step, so you can achieve beautiful, lasting results with confidence.
Teak wood outdoor furniture is a popular choice for its natural beauty and impressive durability. However, over time, even the most robust teak can start to look a bit tired. You might be wondering if painting is a good option, especially if you want to change up your outdoor aesthetic. The good news is, you can indeed paint teak! It’s not as complicated as you might think, and with a little guidance, you can bring your furniture back to life. Let’s walk through the process together, from preparing the wood to applying that perfect coat of paint. You’ll be enjoying your refreshed furniture in no time!
Why Paint Teak Wood Furniture?
Teak wood is renowned for its natural oils that protect it from the elements, giving it that classic silver-grey patina over time. While this patina is a sign of its character and resilience, some homeowners prefer a different look. Painting offers a fantastic way to:
- Refresh an Aged Look: If your teak furniture has faded, developed water spots, or simply doesn’t match your current outdoor decor, painting can give it a complete makeover.
- Introduce New Colors: Move beyond the natural wood tones to vibrant blues, classic whites, bold reds, or sophisticated greys that complement your garden plants, patio cushions, or home exterior.
- Protect the Wood Further: While teak is naturally durable, a good quality exterior paint adds an extra layer of protection against UV rays, moisture, and wear and tear, prolonging its life.
- Achieve a Uniform Style: Painting can help blend older teak pieces with newer furniture or create a cohesive look across a set of chairs and tables.
It’s important to note that painting teak is a decision that changes the furniture’s appearance permanently. Once painted, it’s difficult to return the wood to its natural, unpainted state without significant sanding. However, for many, the aesthetic benefits and extended life are well worth it.
Can You Paint Teak Wood Outdoor Furniture: The Step-by-Step Guide
Getting your teak furniture ready for paint involves more than just a quick wipe-down. Proper preparation is the secret to a smooth, long-lasting finish. Think of it as laying a strong foundation for a beautiful house – it’s crucial!
Step 1: Cleaning the Teak Furniture
The first and most vital step is to thoroughly clean your teak furniture. Any dirt, grime, mildew, or old finishes will prevent the new paint from adhering properly.
What You’ll Need:
- Mild soap or detergent (like dish soap)
- Warm water
- Soft-bristled brush or sponge
- Two buckets
- Clean rags
- Optional: Teak cleaner and brightener (for stubborn stains or to restore color)
Instructions:
- Mix Cleaning Solution: In one bucket, mix warm water with a small amount of mild soap. Fill the second bucket with clean rinse water.
- Scrub the Furniture: Dip your soft-bristled brush or sponge into the soapy water and gently scrub the entire surface of the teak furniture. Work with the grain of the wood. Don’t use abrasive scrubbers, as they can damage the wood.
- Address Mold/Mildew: If you notice any mold or mildew, you can use a dedicated teak cleaner, following the product’s instructions. Some DIYers use a solution of one part bleach to ten parts water for stubborn spots, but always test this in an inconspicuous area first and wear gloves and eye protection. You can find more detailed information on cleaning teak from resources like the WoodHelp Teak Wood Preservation and Maintenance Guide.
- Rinse Thoroughly: Using the second bucket of clean water and a clean rag or sponge, wipe down the furniture to remove all soap residue.
- Allow to Dry Completely: This is extremely important! Teak needs to be completely dry before moving on. Let the furniture air dry in the sun for at least 24-48 hours, or until you’re confident there’s no moisture trapped within the grain.
Step 2: Sanding the Teak
Sanding is essential to create a smooth surface for the paint to adhere to. It also removes any loose fibers or old finishes that might still be present.
What You’ll Need:
- Medium-grit sandpaper (120-150 grit)
- Fine-grit sandpaper (220 grit)
- Sanding block or orbital sander (optional, but recommended for larger pieces)
- Tack cloth or clean, lint-free rags
Instructions:
- Start with Medium Grit: Begin with 120-150 grit sandpaper. If you’re using an orbital sander, set it on a low speed to avoid damaging the wood. Sand the entire surface of the furniture, always moving in the direction of the wood grain.
- Smooth with Fine Grit: Once you’ve sanded with the medium grit, switch to 220 grit sandpaper. This will further smooth the wood’s surface, preparing it for primer and paint. Sanding with the grain remains crucial here.
- Check for Smoothness: Run your hand over the surface. It should feel smooth to the touch.
- Remove Sanding Dust: This is critical! Use a tack cloth or a clean, lint-free rag slightly dampened with mineral spirits (ensure good ventilation when using mineral spirits) to wipe away all sanding dust. You want a perfectly clean surface. Repeat this process to make sure every bit of dust is gone.
Step 3: Priming the Teak
Primer acts as a bonding agent between the wood and your topcoat of paint. Skipping primer on an oily wood like teak can lead to peeling and chipping down the line. For outdoor furniture, you need a high-quality exterior primer designed to adhere to wood.
What You’ll Need:
- High-quality exterior oil-based or water-based primer
- Paintbrushes (angled sash brush for detail, roller for large flat areas)
- Paint tray
- Optional: Sanding sponge (220 grit)
Instructions:
- Choose the Right Primer: Opt for an exterior primer specifically formulated for wood. Oil-based primers often provide excellent adhesion to tricky surfaces like teak, but high-quality water-based “bonding” primers can also work well. Always check the product label for suitability on exotic hardwoods like teak.
- Apply a Thin Coat: Apply a thin, even coat of primer using your brush or roller. Avoid applying too thickly, as this can lead to drips and an uneven finish. Work with the wood grain.
- Allow to Dry: Let the primer dry completely according to the manufacturer’s instructions. This usually takes a few hours.
- Lightly Sand (Optional but Recommended): Once dry, lightly sand the primed surface with your fine-grit sandpaper (220 grit) or a sanding sponge. This creates a super-smooth canvas for your paint.
- Wipe Away Dust: Again, use a tack cloth or a clean, lint-free rag to remove all sanding dust.
Step 4: Painting the Teak Furniture
Now for the fun part – applying color! The type of paint you choose is just as important as the preparation.
What You’ll Need:
- High-quality exterior paint (latex, acrylic, or enamel recommended)
- Paintbrushes (again, one for details, one for larger areas)
- Paint tray
- Drop cloths to protect your work area
- Optional: Fine-grit sandpaper (220 grit) for between coats
Paint Recommendations for Teak Outdoor Furniture:
For outdoor teak furniture, you’ll want a durable exterior paint that can withstand sun, rain, and temperature fluctuations. Look for paints with these qualities:
| Paint Type | Pros | Cons |
|---|---|---|
| 100% Acrylic Latex Paint | Excellent adhesion, good flexibility, durable, easy cleanup with water. | May require a specific primer for oily woods like teak. |
| Oil-Based Enamel Paint | Very durable, hard finish, good adhesion, often used for high-traffic areas. | Requires mineral spirits for cleanup, can be prone to cracking if not applied correctly, less flexible than latex. |
| Urethane-Alkyd Enamel | Combines the durability of oil with the easier cleanup of latex. Excellent for exterior use. | Can be more expensive. |
It’s crucial to check that your chosen paint is suitable for exterior use and specifically recommended for wood furniture. For teak, aim for paints known for their adhesion and flexibility. Reputable brands often have lines specifically for outdoor furniture. For more on choosing exterior paints, consult resources like This Old House’s Exterior Paint Guide.
Instructions:
- Stir Paint Well: Always stir your paint thoroughly before and during use to ensure consistent color and consistency. Gel paints should be stirred, not shaken, to avoid creating bubbles, especially after primer.
- Apply First Coat: Apply a thin, even coat of paint. Work with the wood grain. Avoid overloading your brush, which can cause drips. If using a roller for large sections, keep a wet edge to ensure smooth transitions.
- Allow to Dry: Let the first coat dry completely. Check the paint can for recoat times – this is very important for adhesion.
- Lightly Sand Between Coats (Optional): For the smoothest finish, lightly sand between coats with 220-grit sandpaper or a sanding sponge. This removes any small imperfections or dried drips and helps the next coat adhere better. Wipe away dust with a tack cloth.
- Apply Second Coat: Apply the second coat, following the same process as the first.
- Apply Third Coat (if needed): Depending on the coverage of your paint and the desired finish, a third coat might be necessary for full opacity and durability.
- Curing Time: Note that paint needs time to “cure” – harden fully. This can take several days to even weeks, depending on the paint type and environment. Be gentle with the furniture during this period.
Step 5: Sealing and Protecting (Optional but Recommended)
While high-quality exterior paint offers protection, an extra layer of exterior-grade clear sealant can enhance durability and water resistance, especially in harsh climates. Ensure the sealant is compatible with your chosen paint (e.g., an exterior polyurethane or spar varnish).
What You’ll Need:
- Exterior-grade clear sealant (polyurethane, spar varnish)
- Applicator (brush or foam applicator)
Instructions:
- Ensure Paint is Fully Cured: Wait until your paint has fully cured, not just dried, before applying a sealant. Consult the paint manufacturer’s recommendations.
- Apply Thin Coats: Apply one or two thin, even coats of your chosen sealant, working with the wood grain.
- Allow to Dry: Let each coat dry completely according to the product instructions. Avoid direct sunlight during application if the product is sensitive to it.
When Not to Paint Teak
While painting is a great option, there are times when it might not be the best choice for your teak furniture:
- Excellent Condition, Beloved Patina: If your teak is in fantastic condition and you adore its natural weathered look, why alter it? Painting is a significant change.
- Valuable Antiques: If you suspect your teak furniture is an antique or has significant intrinsic value, consult a professional restorer. Altering its original finish could devalue it.
- You Prefer the Natural Look: If your heart is set on that beautiful, natural teak grain and silvery sheen, painting will cover it up forever.
- Lack of Patience for Preparation: Teak is naturally oily, and improper prep is the most common reason for paint failure. If you’re not prepared for thorough cleaning, sanding, and priming, it’s better to stick with oiling or sealing.
Alternative Finishes for Teak Outdoor Furniture
If painting isn’t for you, or you want to explore other options, consider these alternatives:
1. Oiling
Regular application of teak oil or a marine-grade penetrating oil replenishes the wood’s natural oils, maintaining its warm, golden-brown color and preventing it from drying out and cracking. This is a low-sheen, natural finish.
2. Sealing
Applying a clear exterior sealer or varnish (like spar varnish) protects the wood from UV rays and moisture while allowing the natural grain to show through. It provides a slightly more protective barrier than oil and can offer a satin or gloss finish.
3. Staining
You can stain teak to alter its color to something richer or darker, while still allowing the wood grain to be visible. However, ensure the stain is specifically designed for exterior use and is compatible with your chosen topcoat (if any).
Tools & Supplies Checklist
To help you get started, here’s a handy checklist of everything you might need:
| Category | Item | Purpose |
|---|---|---|
| Cleaning | Mild soap/detergent | Initial cleaning |
| Soft-bristled brush/sponge | Scrubbing without damage | |
| Clean rags | Wiping and rinsing | |
| Teak cleaner/brightener (optional) | Deep cleaning stubborn spots | |
| Sanding | Medium-grit sandpaper (120-150) | Initial smoothing |
| Fine-grit sandpaper (220) | Final smoothing and prep | |
| Sanding block / Orbital sander | Easier sanding | |
| Tack cloth / Lint-free rags | Dust removal | |
| Priming | Exterior wood primer | Adhesion and base coat |
| Paintbrushes/rollers | Application | |
| Painting | Exterior paint | Color and finish |
| Paint tray | Holding paint | |
| Drop cloths | Protecting surfaces | |
| Safety & Misc. | Gloves | Protect hands |
| Eye protection | Protect eyes | |
| Mineral spirits (if needed) | Cleaning brushes (oil-based), degreasing |
Frequently Asked Questions (FAQ)
Q1: Will painting teak outdoor furniture last?
Yes, if done correctly! The key is thorough preparation—cleaning, sanding, and priming—followed by using high-quality exterior paint. Proper maintenance, like occasional cleaning and checking for any chips, will ensure it lasts for many years.
Q2: How often should I repaint my teak furniture?
This depends on the paint quality, climate, and how much the furniture is used and exposed to the elements. Typically, you might need to repaint every 3-5 years, or sooner if you notice significant wear and tear, fading, or chipping. Regular cleaning can extend the life of the paint job.
Q3: Can I paint over existing paint or stain on teak?
If the existing finish is in good condition (no peeling or flaking), you can often paint over it. However, you’ll still need to clean thoroughly and lightly sand it to create a surface for the new paint to adhere to. If the old finish is failing, it’s best to remove it completely before repainting.