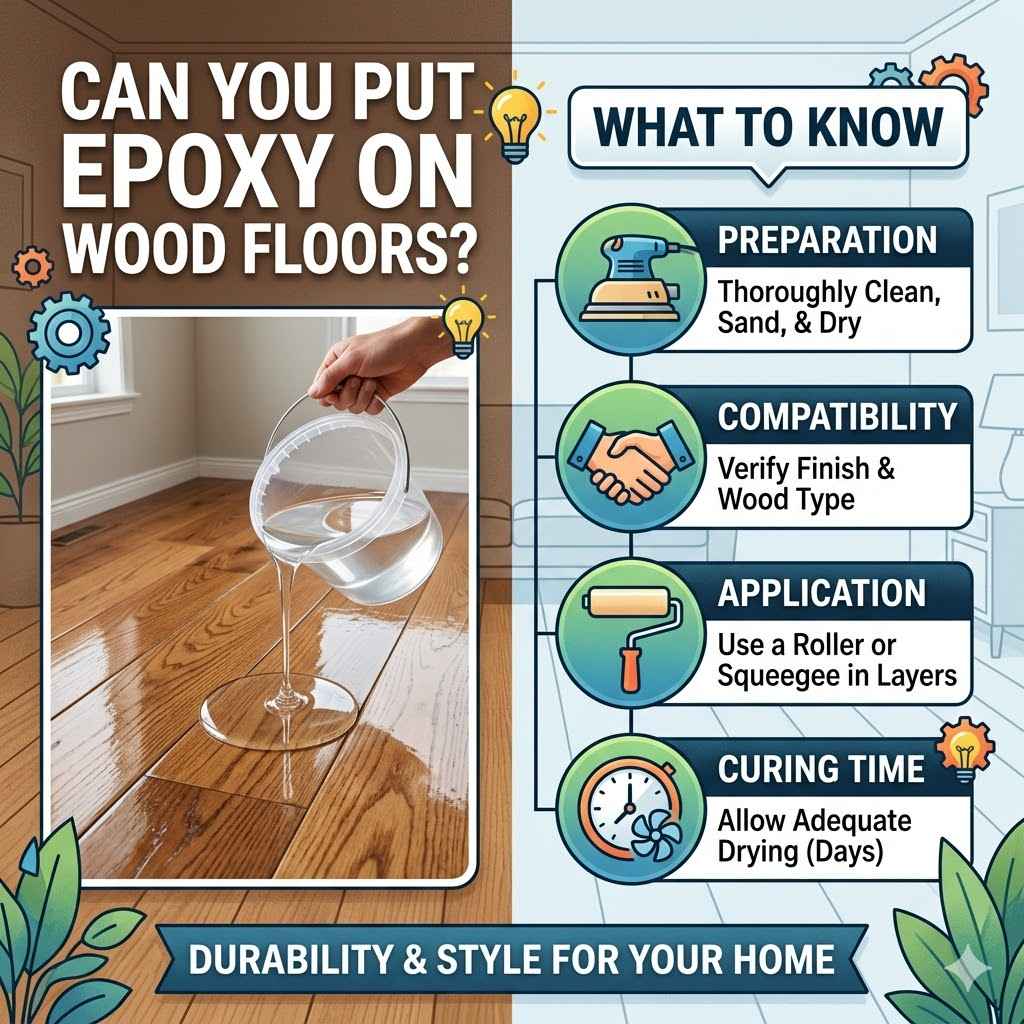
Can You Put Epoxy on Wood Floors What to Know
Thinking about giving your wood floors a brand new look with epoxy? It’s a common question for homeowners who want a durable and stylish finish. Many people find the idea a little tricky to figure out because wood is different from concrete, and you need to do things just right. But don’t worry! It’s totally doable, and we’re going to walk you through it step-by-step. We’ll cover everything you need to know to get your wood floors ready for an amazing epoxy coating.
Can You Put Epoxy on Wood Floors What to Know
Yes, you absolutely can put epoxy on wood floors! It’s a fantastic way to give your old wooden floors a fresh, modern, and super tough surface. Think of it as a protective shield that not only looks great but also stands up to daily wear and tear.
Many homeowners choose this option to revive worn-out floors or to create a unique, seamless look. This process involves preparing the wood surface carefully and then applying a special two-part coating. The result is a beautiful, glossy finish that can last for many years if done correctly. This guide will help you understand the whole process, from why it works to how to achieve it yourself.
Preparing Your Wood Floors for Epoxy
Getting your wood floors ready is the most important part of this whole project. If you don’t prep right, your epoxy might not stick well, and you could end up with problems later. This means cleaning everything thoroughly and making sure the floor is smooth and ready to accept the epoxy. Think of it like getting a canvas ready before you paint a masterpiece.
Cleaning the Wood Surface
Before anything else, your wood floor needs to be super clean. You want to get rid of all dirt, grease, wax, and any old finishes.
- Dust and Vacuum: First, sweep or vacuum your floors thoroughly. Get into all the nooks and crannies to remove loose debris. This prevents these particles from getting stuck in your epoxy later on.
- Degrease: Use a good degreaser or a strong detergent mixed with water. Scrub the floors well. Pay attention to any greasy spots, especially in kitchens or areas where spills might have happened.
- Rinse and Dry: After degreasing, rinse the floor with clean water to remove all soap residue. Then, let the floor dry completely. Wood can hold moisture, so it’s best to wait at least 24 to 48 hours, or even longer if needed, before moving on. A damp floor will prevent the epoxy from bonding properly.
Sanding for Adhesion
Even if your floor looks clean, you might need to sand it to create a surface the epoxy can grab onto. Epoxy needs a slightly rough texture to adhere well.
- Choose the Right Grit: For most wood floors, a medium-grit sandpaper, like 80-grit, is a good starting point. If your floor has a very tough finish or is uneven, you might start with a coarser grit like 60-grit.
- Sanding Technique: Use a floor sander for larger areas. For edges and corners, you’ll need an orbital sander or even sandpaper by hand. Sand the entire floor in a consistent pattern. You want to scuff up the surface, not create deep gouges.
- Clean Up Sanding Dust: After sanding, vacuum up all the dust. Then, use a tack cloth or a damp (not wet) mop to pick up any remaining fine dust particles. This step is crucial; any dust left behind will show up in your finished epoxy floor.
Repairing and Filling Gaps
Before applying epoxy, it’s important to fix any damage to the wood. This includes filling gaps between floorboards and repairing any cracks or holes.
- Fill Gaps: Use a good quality wood filler or a specialized epoxy filler for gaps. For larger gaps, you might consider using a mixture of sawdust and wood glue to fill them. Make sure the filler is dry and cured according to the manufacturer’s instructions before proceeding.
- Repair Damage: Fill any cracks, holes, or gouges with wood filler. For significant damage, you might need to replace damaged wood planks before you start the epoxy application.
- Ensure Smoothness: Once the filler is dry, gently sand the repaired areas so they are flush with the rest of the floor. Then, clean the entire floor again to remove any new dust.

Understanding Epoxy and Wood Compatibility
Epoxy coatings are known for their durability and strength, often seen on garage floors and industrial settings. When considering them for wood floors, a key factor is how the wood itself behaves. Wood is a natural material that expands and contracts with changes in temperature and humidity. This movement can affect how well epoxy adheres and if it will crack or peel over time.
The Science Behind Epoxy Adhesion
Epoxy is a two-part system made of a resin and a hardener. When mixed, they create a chemical reaction that causes them to cure into a hard, solid plastic. For epoxy to stick well to any surface, that surface needs to be porous enough to allow the epoxy to penetrate slightly and create a strong mechanical bond. Wood, especially when prepared properly with sanding, offers this porosity.
The resin component of the epoxy actually seeps into the tiny pores and grain of the wood. Once cured, it forms a very strong grip. Think of it like millions of tiny anchors holding the epoxy in place. This bond is what gives epoxy its famous toughness and resistance to peeling. Without a clean, slightly roughened surface, the epoxy would just sit on top, and it would eventually flake off.
Wood Movement and Epoxy Performance
Wood’s natural tendency to expand and contract is a primary concern when applying epoxy. If the wood moves significantly, it can put stress on the epoxy layer. This stress could lead to cracks in the epoxy or cause it to delaminate from the wood. The amount of movement depends on several factors, including the type of wood, its moisture content, and the environmental conditions (humidity and temperature).
For example, a floor in a basement with constant high humidity might experience more wood movement than a floor in a climate-controlled living room. Also, older, drier wood might be more stable than newly installed flooring. Because of this, it’s essential to control the environment as much as possible during and after the epoxy application. Keeping the temperature and humidity stable will help minimize wood movement and ensure a better, longer-lasting epoxy finish.
When Epoxy Might Not Be the Best Choice
While epoxy can be a great option for many wood floors, it’s not suitable for every situation. If your wood floor experiences extreme changes in temperature or humidity, or if it’s in an area with a lot of moisture, like a bathroom or a high-traffic entryway that gets wet regularly, epoxy might not be the most practical choice. These conditions can cause the wood to move so much that it stresses the epoxy coating.
Also, if your wood floors are very old, have significant warping, or are prone to rot, epoxy may not be able to overcome these underlying issues. In such cases, a different type of flooring or a more traditional wood finish like polyurethane might be a better option. It’s always a good idea to assess your specific floor and its environment before deciding on an epoxy coating.
Applying the Epoxy Coating
Once your wood floor is prepped and you understand how epoxy works with wood, it’s time for the application. This is where you bring your floor to life with the epoxy. It’s a multi-step process that requires care and attention to detail.
Choosing the Right Epoxy System
There are different types of epoxy systems available, and it’s important to pick one that’s suitable for wood floors. Most common are water-based epoxies or 100% solids epoxies.
- Water-Based Epoxies: These are easier to work with, have lower VOCs (volatile organic compounds), and clean up with water. They offer good durability but are generally not as thick or as tough as 100% solids systems. They are a good choice for lower-traffic areas or for beginners.
- 100% Solids Epoxies: These are much thicker, more durable, and create a more robust, protective layer. They are often used in garages and industrial settings. They typically have higher VOCs and require mineral spirits for cleanup. This type offers the strongest and most long-lasting finish but can be more challenging to apply evenly.
- Consider Your Needs: Think about where your floor is located and how much wear and tear it will get. For a living room or bedroom, a water-based epoxy might be perfect. For a high-traffic area or a workshop space, a 100% solids epoxy would be a better investment. Always read product labels carefully to ensure the epoxy is designed for interior wood flooring.
Mixing and Application Steps
Applying epoxy is a bit like painting, but you need to work quickly because it starts to cure once mixed. Always follow the manufacturer’s specific instructions for your chosen product.
- Mix Parts A and B: Carefully measure and mix the resin (Part A) and the hardener (Part B) according to the manufacturer’s ratio. Use a clean bucket and a drill with a mixing paddle for thorough mixing. Mix for the recommended time, usually 2-3 minutes, scraping the sides and bottom of the bucket to ensure everything is combined.
- Pour and Spread: Once mixed, pour the epoxy onto the floor in sections. Don’t pour it all out at once, as it will start to set before you can spread it. Use a squeegee or a roller designed for epoxy to spread the coating evenly. Work in a consistent direction, overlapping your passes slightly to avoid streaks.
- Work in Sections: For larger rooms, it’s best to work in smaller sections. This allows you to manage the epoxy before it hardens. Start at one end of the room and work your way towards an exit.
- Apply a Second Coat (Optional): Depending on the epoxy system and desired finish, you may need to apply a second coat. Wait for the first coat to cure according to the manufacturer’s instructions before applying the second. This will create an even thicker, more durable layer.
Curing Time and Considerations
The curing process is critical. It’s not just about the epoxy hardening; it’s about it reaching its full strength.
- Initial Cure: Most epoxies will be dry to the touch within 24 hours. However, this doesn’t mean they are ready for foot traffic.
- Light Foot Traffic: You can usually walk on the floor with clean socks after 2-3 days. Avoid wearing shoes on the floor during this time to prevent scratches and dirt from embedding.
- Full Cure: The epoxy will reach its full hardness and chemical resistance after 7-10 days, or sometimes longer. During this period, avoid placing heavy furniture on the floor or exposing it to spills, especially harsh chemicals.
- Environmental Factors: Temperature and humidity play a big role in curing. Colder temperatures slow down the cure, while very high humidity can affect the finish. Ensure good ventilation in the room during application and curing.
Maintenance and Care of Epoxy Wood Floors
Keeping your epoxy-coated wood floors looking great involves simple, regular maintenance. Just like any floor, a little care goes a long way in extending its life and appearance.
Daily Cleaning Practices
For everyday messes, simple cleaning methods are usually all you need. The smooth, non-porous surface of epoxy makes cleaning quite easy.
- Sweep or Dust Mop: Regularly sweep or use a dust mop to remove any loose dirt, dust, or grit. This prevents these particles from scratching the epoxy surface over time.
- Wipe Up Spills Immediately: If you spill anything, wipe it up right away. While epoxy is resistant to many substances, leaving them on the surface for extended periods can potentially cause staining or dullness.
- Use Gentle Cleaners: For general cleaning, a damp mop with plain water is often enough. If you need a bit more cleaning power, use a mild, pH-neutral cleaner designed for epoxy or sealed floors. Avoid abrasive cleaners or harsh chemicals.
Dealing with Stains and Scratches
While epoxy is tough, accidents can happen. Knowing how to handle them will keep your floor looking its best.
- Stubborn Stains: For tougher stains, you might need to use a cleaner recommended by the epoxy manufacturer. Sometimes, a paste made of baking soda and water can gently lift stains. Rub it on the stain, let it sit for a few minutes, and then wipe it away.
- Minor Scratches: Small scratches are often hard to avoid, especially in high-traffic areas. For very minor surface scratches, you might be able to buff them out with a soft cloth and a specific epoxy polish. For deeper scratches, touch-up kits might be available from the epoxy manufacturer.
- Preventing Future Damage: Use furniture pads on the legs of chairs and tables to prevent scratches. Use mats at entryways to trap dirt and moisture. Avoid dragging heavy items across the floor.
Long-Term Durability and Protection
With proper care, your epoxy-coated wood floors can maintain their beautiful finish for many years.
- Periodic Deep Cleaning: Every few months, or as needed, you might want to do a more thorough cleaning. This could involve using a slightly stronger, yet still safe, cleaner and a soft-bristled brush to gently scrub any areas that need it.
- Avoid Harsh Chemicals: Never use ammonia, bleach, or strong solvents on your epoxy floors, as these can dull or damage the finish. Always opt for cleaners specifically designed for epoxy or sealed surfaces.
- Consider a Top Coat: For extra protection, especially in very high-traffic areas, you might consider applying a clear polyurethane or a specialized epoxy top coat after a few years. This can add an extra layer of scratch and UV resistance.
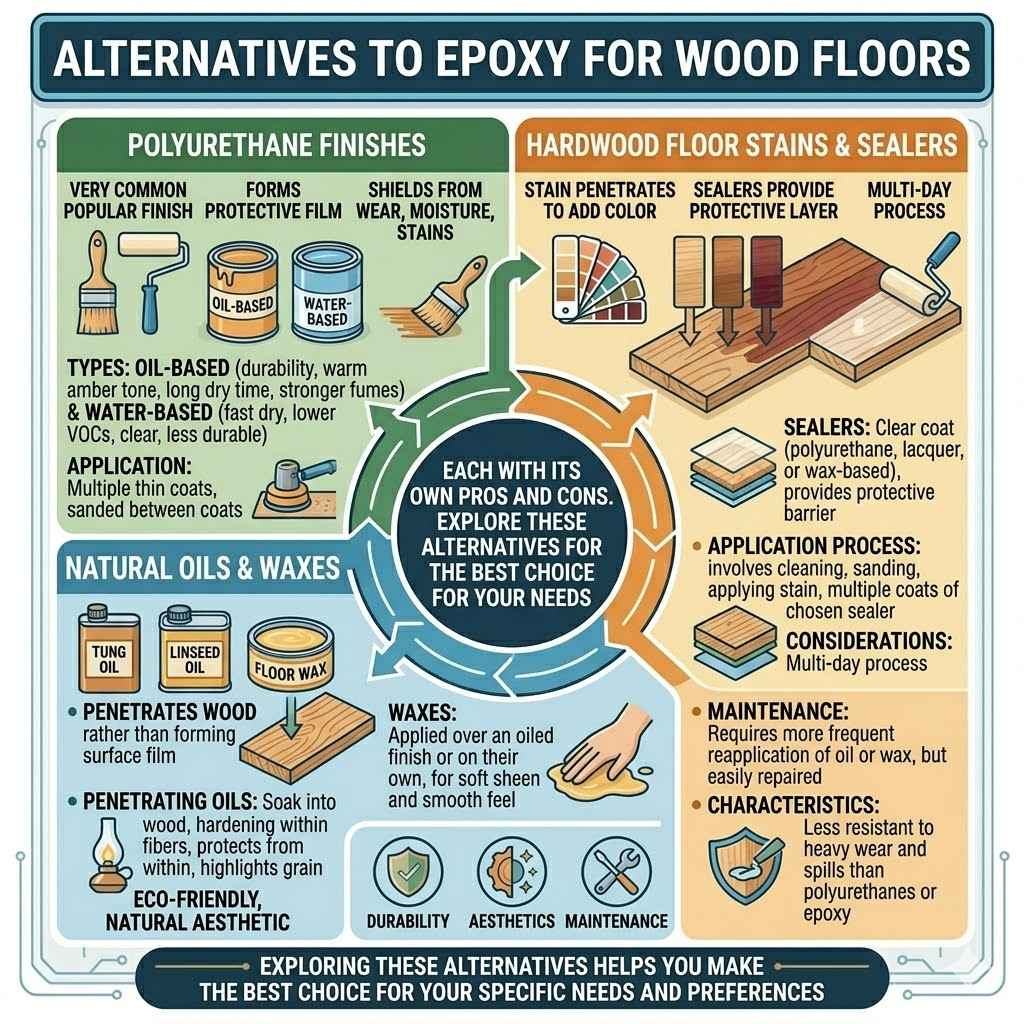
Alternatives to Epoxy for Wood Floors
While epoxy offers a unique look and great durability, it’s not the only option for refreshing your wood floors. There are other finishes that can provide excellent protection and aesthetics, each with its own pros and cons. Exploring these alternatives helps you make the best choice for your specific needs and preferences.
Polyurethane Finishes
Polyurethane is a very common and popular finish for wood floors. It forms a protective film on the surface of the wood, shielding it from wear, moisture, and stains.
- Types of Polyurethane: There are two main types: oil-based and water-based. Oil-based polyurethanes are known for their durability and warm amber tone, but they take longer to dry and have stronger fumes. Water-based polyurethanes dry faster, have lower VOCs, and dry clear, but they may not be quite as durable as oil-based versions.
- Application: Polyurethane is typically applied in multiple thin coats using a brush, roller, or applicator. The floor needs to be sanded between coats to ensure good adhesion.
- Pros and Cons: Pros include its classic wood floor look, ease of repair (you can often recoat without a full sanding), and resistance to water and wear. Cons can be the fumes from oil-based versions and the potential for scratches or wear over time, requiring recoating.
Hardwood Floor Stains and Sealers
Stains enhance the natural beauty of wood by changing its color, while sealers provide a protective layer.
- Staining: You can choose from a vast array of wood stain colors, from light natural tones to deep, rich hues. Stains penetrate the wood to add color.
- Sealers: After staining, a clear sealer is applied to protect the wood. This can be polyurethane, lacquer, or wax-based finishes. The sealer provides the actual protective barrier against damage.
- Application Process: This involves cleaning, sanding, applying stain, letting it dry, and then applying multiple coats of the chosen sealer. It’s a multi-day process.
Natural Oils and Waxes
For a more natural and matte finish, natural oils and waxes are excellent choices. These penetrate the wood rather than forming a surface film.
- Penetrating Oils: Oils like tung oil or linseed oil soak into the wood, hardening within the fibers to protect it from within. They offer a very natural look and feel, highlighting the wood grain.
- Waxes: Waxes are typically applied over an oiled finish or on their own for a soft sheen and some protection. They give the floor a lovely, smooth feel.
- Maintenance: Floors finished with natural oils and waxes often require more frequent maintenance, such as reapplication of oil or wax, but they are easily repaired and can be a good choice for those seeking an eco-friendly, natural aesthetic. They offer a beautiful, soft look but are less resistant to heavy wear and spills than polyurethanes or epoxy.
Frequently Asked Questions
Question: Is it safe to put epoxy on wood floors in a bathroom?
Answer: While epoxy can be applied to wood floors, bathrooms can be challenging due to high moisture and humidity. If your bathroom has excellent ventilation and the wood is sealed very well, it might be possible, but it’s generally riskier than in drier areas. Moisture can cause wood to expand and contract, potentially stressing the epoxy over time.
Question: Can I put epoxy over painted wood floors?
Answer: Yes, you can put epoxy over painted wood floors, but the paint must be in excellent condition. You’ll need to clean the painted surface thoroughly, lightly scuff it with fine-grit sandpaper (around 180-220 grit) to create adhesion, and then clean off all dust before applying the epoxy. Any peeling or damaged paint should be removed and repaired first.
Question: How long does epoxy on wood floors last?
Answer: With proper preparation and application, epoxy on wood floors can last for many years, often 10 years or more. However, its lifespan depends heavily on the quality of the installation, the type of epoxy used, and the amount of traffic and wear the floor experiences. Regular maintenance also plays a key role.
Question: Can I use a regular epoxy kit for wood floors?
Answer: It’s best to use epoxy kits specifically designed for flooring, and ideally, those that mention compatibility with wood. While some general-purpose epoxy kits might work if the surface is properly prepared, flooring-specific kits often have better flexibility and adhesion properties suitable for wood’s natural movement. Always check the product’s specifications.
Question: What is the cost difference between epoxy and other wood floor finishes?
Answer: The cost can vary widely depending on the product and whether you do it yourself or hire a professional. Epoxy kits can range from $100 to $500 for a typical room. Other finishes like polyurethane might be less expensive for DIY, but professional application costs can be comparable across most finishes.
The long-term durability of epoxy can make it cost-effective over time.
Final Thoughts
You can definitely put epoxy on wood floors, and with the right steps, it’s a rewarding project. Proper preparation, understanding wood’s nature, and careful application are key. Your floors will gain a durable, stylish finish that’s easy to maintain. Follow these tips to give your wood floors a beautiful, long-lasting upgrade.