Can You Spray Paint? Quick Guide for Beginners
Getting started with spray painting can feel a little tricky for new folks. You might wonder if it’s really for you or if it’s too hard to learn. This guide, Can You Spray Paint?
Beginner’s Quick Guide, is here to show you it’s totally doable. We’ll walk through it step-by-step, making it easy to follow. Get ready to learn how to get great results without any fuss.
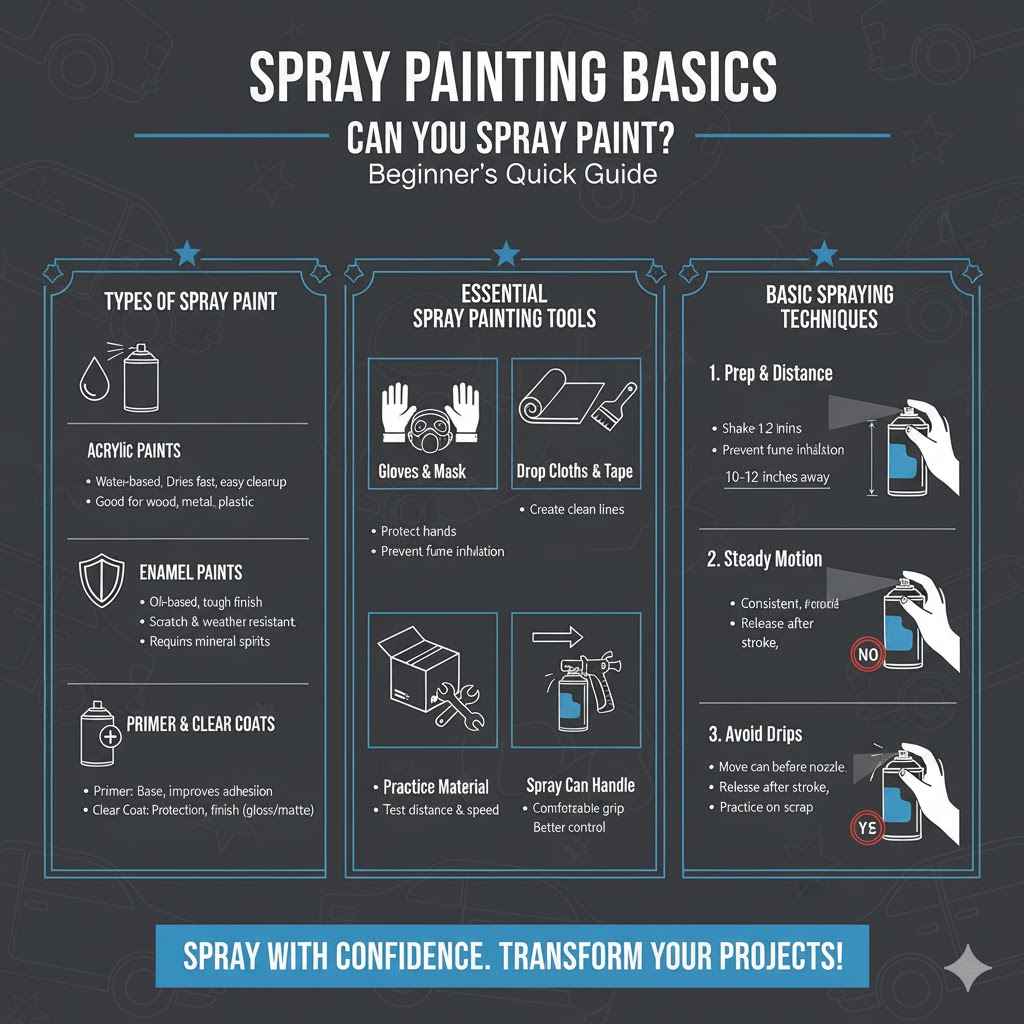
Spray Painting Basics Can You Spray Paint
This section covers the fundamental knowledge every beginner needs before picking up a spray can. We will explore the different types of spray paints available, the tools you might need, and the basic techniques for applying paint smoothly. Understanding these core elements will set you up for success and help prevent common beginner mistakes.
We aim to demystify spray painting so you can feel confident in your abilities.
Types of Spray Paint
Spray paints come in many forms, each suited for different projects and surfaces. Choosing the right type is key to getting a good finish. For instance, acrylic spray paints are popular because they dry quickly and are water-based, making cleanup easier.
Enamel spray paints, on the other hand, are known for their durability and resistance to chipping, making them great for outdoor items or furniture that gets a lot of use. Specialty paints also exist, like metallic finishes for a shiny look, or textured paints to add depth. Understanding these differences will help you select the best paint for what you want to create.
- Acrylic Paints These are water-based paints that are easy to clean up with soap and water. They dry fast and are good for most surfaces like wood, metal, and plastic. They don’t last as long as enamels in rough conditions.
- Enamel Paints These paints are oil-based and offer a very tough, long-lasting finish. They are resistant to scratches and weather. Cleanup requires mineral spirits or paint thinner, which are stronger solvents.
- Primer Sprays A primer spray acts as a base coat. It helps paint stick better to the surface and covers up stains or uneven colors. Using a primer often leads to a smoother, more even final color.
- Clear Coats and Sealants After painting, a clear coat spray adds a protective layer. It can give a glossy or matte finish and protects your work from scuffs and UV rays. This is important for items you want to last a long time.
- Essential Spray Painting Tools
Beyond the spray can itself, a few simple tools can make your spray painting experience much smoother and more successful. Having the right gear helps you achieve professional-looking results, even as a beginner. These items are not complicated or expensive, but they play a big role in the quality of your finished project.
We’ll look at what you need to have ready before you start spraying.
- Gloves and Mask A good pair of disposable gloves will keep paint off your hands. A respirator mask is very important to protect you from inhaling the paint fumes, which can be harmful.
- Drop Cloths To protect your work area from paint drips and overspray, use drop cloths. Old newspapers, cardboard, or plastic sheeting work well. Cover a wide area around your project.
- Painter’s Tape This is used to mask off areas you don’t want to paint. It helps create clean, straight lines for designs or to keep paint off certain parts of an object.
- Spray Can Handle A spray can handle fits over the nozzle, giving you a more comfortable grip and better control, similar to using a real spray gun. This can help prevent finger fatigue on longer projects.
Basic Spraying Techniques
Applying spray paint effectively involves a few key techniques that make a big difference in the final look. It’s not just about pressing the nozzle and hoping for the best. With a little practice, you can master these methods to avoid drips, achieve an even coat, and get smooth coverage.
These steps are crucial for anyone asking Can You Spray Paint? Beginner’s Quick Guide and wanting good results.
The first step is to shake the can well for at least one to two minutes. This mixes the paint and propellant inside. Hold the can upright and about 10-12 inches away from the surface you are painting.
Always move the can in a steady, consistent motion, from one side to the other. Start moving the can before you press the nozzle and stop moving after you release it. This helps avoid thick spots or drips at the start and end of your spray stroke.
For even coverage, apply thin, light coats rather than one thick coat. This prevents runs and drips. Let each coat dry for a few minutes before applying the next one.
Overlap each stroke by about 50 percent. This ensures no gaps are missed and creates a uniform finish. If you see any drips while the paint is still wet, you can try to gently brush them away with a dry cloth or a softer brush.
However, it’s often best to let it dry and then gently sand the drip flat.
Practice on a piece of scrap material, like cardboard or old wood, before you spray your actual project. This helps you get a feel for the distance, speed, and pressure needed. It also lets you experiment with different techniques to see what works best for you.
Getting comfortable with the can on a practice surface will boost your confidence greatly.
Preparing Your Project For Spray Painting
Proper preparation is the most critical step for a successful spray paint job. This stage involves ensuring your surface is clean, smooth, and ready to accept the paint. Skipping these steps can lead to a finish that peels, cracks, or looks uneven.
This section will guide you through the essential preparations that make all the difference for your spray painted items.
Cleaning the Surface
Before you even think about spraying, the surface you’re painting must be perfectly clean. Any dirt, grease, dust, or old paint can interfere with how the new paint adheres. This can lead to peeling or an uneven finish.
Thorough cleaning is the first defense against a poor paint job. Taking your time here will save you a lot of frustration later.
Start by washing the object with soap and water. For stubborn grease or grime, you might need a degreaser. Rinse the object thoroughly to remove all soap residue.
Let it dry completely. You can speed this up with a clean, lint-free cloth or a hairdryer on a low setting. For metal objects, especially if they might have any rust, you’ll want to address that too.
Sanding rust away is a good first step before washing.
If you are painting over a glossy surface, it needs to be dulled down so the new paint can stick. This is called scuff-sanding. You can use fine-grit sandpaper (around 180-220 grit) for this.
Lightly rub the surface until it no longer has a shine. After scuff-sanding, wipe the object down again with a clean, damp cloth to remove any dust from the sanding. Then, let it dry fully.
Sanding and Filling
Achieving a smooth finish often requires some sanding and filling. This process smooths out imperfections, fills in dents, and prepares the surface for paint adhesion. Even if an object looks smooth to the eye, a light sanding can reveal small bumps or rough spots that would show up under a coat of paint.
Filling small holes or cracks ensures a perfectly even surface.
For minor scratches or surface imperfections, use fine-grit sandpaper (220-320 grit). Sand in a consistent direction. If you need to fill holes or larger dents, use a lightweight spackling paste or wood filler.
Apply the filler with a putty knife, pressing it into the hole. Smooth the excess filler flush with the surface as much as possible. Let the filler dry completely according to the product instructions.
This can take several hours.
Once the filler is dry, sand it smooth. Start with a slightly coarser grit sandpaper if needed (like 150-180 grit) to level the filler, then move to a finer grit (220-320 grit) to make it perfectly smooth. The goal is for the filled area to be undetectable and feel as smooth as the surrounding surface.
After sanding any filled areas or the entire object for smoothness, wipe away all dust with a tack cloth or a damp lint-free cloth. This removes all fine particles that could mar the finish.
Masking Off Areas
Masking is a crucial step when you want to protect parts of your project that should not be painted. This includes hardware, different colored sections, or edges where you need a sharp line. Using the right tape and applying it carefully ensures clean, crisp lines and prevents paint from getting where you don’t want it.
This is a key part of the Can You Spray Paint? Beginner’s Quick Guide that helps achieve professional results.
Use high-quality painter’s tape for the best results. This tape is designed to create clean lines and remove easily without damaging the surface or leaving sticky residue. For very precise lines or curved edges, consider using a liquid mask or frisket film.
These can be applied and then trimmed with a craft knife.
Apply the tape firmly to the surface, pressing down the edges to create a seal. This prevents paint from seeping underneath. Run your fingernail or a plastic burnishing tool along the edge of the tape.
If you are painting a project with multiple colors, ensure the tape covers the already painted section completely and has a clean edge where the new color will start. For areas that need to be completely protected, use masking paper or plastic sheeting in addition to the tape.
Applying Spray Paint Effectively
Once your project is prepped and ready, it’s time to apply the paint. This section provides practical advice on how to use the spray can to achieve the best possible finish. We will cover techniques for applying multiple coats, dealing with common issues, and understanding drying times.
Priming Your Surface
Using a primer spray before applying your color coat is a vital step, especially for beginners. A primer acts as a base, creating a uniform surface for the paint to adhere to. It also helps to hide any underlying colors or stains, ensuring that your final color appears true and vibrant.
For many projects, especially those made of wood, metal, or plastic, priming is a non-negotiable step for a lasting, professional finish.
A primer helps paint stick better. Imagine trying to paint on a slippery surface; the paint would just slide off. A primer creates a slightly rougher texture at a microscopic level, giving the topcoat something to grip onto.
This significantly improves the durability of your paint job. It prevents chipping and peeling down the road. If you’re painting a dark object a light color, or vice versa, primer is essential for full coverage without multiple color coats.
There are different types of primers for various needs. For general use, an all-purpose spray primer works well. If you’re painting over rust on metal, a rust-inhibiting primer is necessary.
For slick surfaces like plastic, a special bonding primer is recommended. Always choose a primer that is compatible with your topcoat paint. For example, if you are using an oil-based enamel paint, an oil-based primer is often a good choice.
If you are using latex or acrylic spray paint, a water-based primer is suitable.
When applying primer, use the same technique as you would for color coats: shake the can well, hold it at a consistent distance, and use steady, overlapping strokes. Apply thin coats. Allow the primer to dry completely according to the manufacturer’s instructions before applying your color coat.
Most primers need at least 30 minutes to an hour to dry to the touch, but longer curing times may be needed before painting over them.
Applying Color Coats
Applying the actual color coat is where your project starts to transform. The key here is patience and applying multiple thin coats. This approach is much better than trying to get full coverage in one go, which almost always leads to drips and an uneven finish.
Remember the advice from our Can You Spray Paint? Beginner’s Quick Guide: thin coats are your friend.
Start by shaking the spray can vigorously for at least one minute to ensure the paint and propellant are well mixed. Hold the can about 10 to 12 inches away from the surface. Begin your spray stroke off the edge of the object.
Move the can in a smooth, consistent motion across the surface, making sure to overlap each previous stroke by about 50 percent. Release the spray nozzle only after you have moved past the edge of the object. This technique prevents heavy buildup at the start and end of each pass.
Apply your first coat lightly. It may look streaky or uneven, and that’s okay. The purpose of this first coat is to provide a base for subsequent coats to adhere to.
Let this coat dry for a few minutes—typically 5 to 15 minutes, depending on the paint type and humidity. Check the paint can for specific drying times between coats.
Apply a second light coat, again using the same sweeping motion and overlapping strokes. Continue this process, applying thin coats and allowing brief drying times in between, until you achieve the desired opacity and coverage. Usually, three to four thin coats are sufficient for most projects.
Avoid the temptation to apply heavy coats, as this is the quickest way to create drips and runs.
If you notice any small drips or runs while the paint is still wet, you can try to gently tip the can and feather the drip out with a light spray from a distance. However, if the paint has started to set, it’s usually better to let it dry completely, then carefully sand the imperfection smooth with fine-grit sandpaper and reapply a light coat over the area. Patience is crucial for a smooth, professional-looking finish.
Using Clear Coats and Sealants
Once you’ve applied your final color coat and it has dried completely, the next step is to apply a clear coat or sealant. This layer adds protection to your painted surface, making it more durable and resistant to wear and tear. It also enhances the appearance by adding gloss, a satin finish, or a matte look, depending on the type of clear coat you choose.
This step is essential for projects that will be handled often or exposed to the elements.
Clear coats come in various finishes, just like color paints. You can choose from high gloss for a shiny, reflective surface, satin for a subtle sheen, or matte for a non-reflective, flat appearance. Select the finish that best complements your project.
For example, a matte clear coat might be ideal for a piece of furniture meant to look vintage, while a high gloss could be perfect for a decorative item.
Apply clear coats using the same technique as the color coats: shake the can well, hold it at the recommended distance (usually 10-12 inches), and use steady, overlapping strokes. Apply thin coats. Avoid applying too much in one pass, as this can lead to cloudiness or an uneven finish, especially with high-gloss clear coats.
Allow each coat to dry for the time recommended on the can before applying the next. Two to three thin coats are generally sufficient for good protection.
For projects that require extra durability, such as outdoor furniture or items exposed to heavy use, consider using a clear coat specifically designed for outdoor use or one with UV protection. These products offer enhanced resistance to weather, fading, and abrasion. Always ensure that the clear coat you choose is compatible with the type of paint you have used for your base coats.
Most common spray paints and clear coats are compatible, but it’s always wise to check the product labels.
Drying and Curing Times
Understanding the difference between drying and curing times is crucial for a successful spray paint project. Drying time is when the paint is no longer wet to the touch. Curing time, however, is when the paint reaches its full hardness and durability.
Rushing the process before the paint has fully cured can compromise the finish.
When a spray paint can states “dry to touch” in 15 minutes, that’s the initial drying stage. You can handle the object lightly after this period, and recoat after a short interval. However, the paint is still soft and vulnerable to scratches, dings, or smudging.
This is when it’s still considered “wet” at a molecular level.
Full curing can take anywhere from 24 hours to several weeks, depending on the paint formula, temperature, humidity, and thickness of application. Enamel paints, for example, typically take longer to cure than acrylics. For optimal durability, it’s best to treat your painted object gently during the curing period.
Avoid heavy use, washing, or exposure to extreme temperatures.
Here’s a general guideline for different paint types:
| Paint Type | Dry to Touch | Recoat Time | Full Cure |
|---|---|---|---|
| Acrylic Latex | 15-30 Minutes | 1 Hour | 7-10 Days |
| Enamel (Oil-Based) | 2-4 Hours | 4-6 Hours | 2-3 Weeks |
| Lacquer | 10-20 Minutes | 30 Minutes | 7 Days |
Always check the manufacturer’s instructions on the spray can for the most accurate drying and curing times. These times can be affected by environmental factors. For instance, high humidity or cold temperatures will slow down the drying and curing process.
Conversely, warm, dry conditions will speed it up. Proper ventilation is also important for allowing solvents to evaporate effectively.
Troubleshooting Common Spray Painting Issues
Even with careful preparation and application, beginners might encounter a few common problems. This section provides solutions to these issues so you can fix them and get back to creating your project. Knowing how to handle these problems will boost your confidence and improve your results.
Dealing with Drips and Runs
Drips and runs are perhaps the most common issue for new spray painters. They happen when too much paint is applied at once, or the can is held too close to the surface, causing the paint to pool and slide downwards. Fortunately, they are usually fixable.
If you catch a drip while the paint is still wet, you have a few options. You can try to gently brush the excess paint off the drip with a clean, dry brush. Another method is to hold the can further away and lightly spray over the drip area, feathering the edges.
However, be careful not to spread the drip further. If the paint has already started to set, the best approach is to let it dry completely. Once dry, carefully sand the raised drip smooth with fine-grit sandpaper.
After sanding, wipe the area clean and apply a light, thin coat of paint over the repaired spot, blending it into the surrounding area.
To prevent drips in the future, always use thin, even coats. Make sure you hold the can at the correct distance (10-12 inches). Move the can in a steady, sweeping motion, starting and stopping the spray off the object.
Overlap your strokes by about half to ensure even coverage without overloading any one area.
Avoiding Streaky or Uneven Coverage
Streaky or uneven coverage can make a project look unfinished. This often occurs when the paint isn’t applied consistently, or the can isn’t shaken properly. Even strokes and proper overlap are key to a smooth finish.
First, ensure you are shaking the can thoroughly before and during use. Listen for the rattle of the mixing ball inside; shake until you can no longer hear it. If the can is not properly mixed, the paint might not come out evenly, leading to splotchy results.
Also, make sure you are moving the can at a consistent speed. Stopping and starting in one spot will create a thicker patch of paint, while moving too quickly can leave bare spots.
The overlap of your spray strokes is also critical. Aim for a 50% overlap. This means that each pass of the spray can should cover half of the previous stroke.
This ensures there are no gaps and that the paint is distributed evenly across the surface. If you notice a streaky area after a coat has dried, you can lightly sand it with very fine-grit sandpaper (320 or higher) and then apply another thin, even coat, ensuring proper overlap and speed.
Fixing Clogged Spray Nozzles
A clogged spray nozzle can be frustrating, but it’s usually a simple fix. Clogging typically happens when paint dries in the nozzle after use or if the can was not stored properly.
If the nozzle appears clogged with dried paint, try removing it carefully. You can often pull it straight off. Soak the nozzle in a small amount of mineral spirits or acetone for a few minutes.
Use a fine needle or a straightened paper clip to gently poke through the opening and clear any blockages. Be sure to rinse the nozzle thoroughly with the solvent afterward. Reattach the nozzle securely to the can.
Before using it again, test spray it on scrap material to ensure it’s working correctly and to clear out any remaining solvent. Some spray cans have a small wire brush or cleaning tool included for this purpose.
If the nozzle is beyond repair or you can’t clear the clog, replacement nozzles are available at most hardware stores and art supply shops. These are often adjustable and can provide better control than the standard nozzle.
Addressing Overspray
Overspray is the fine mist of paint that settles on surfaces surrounding your project. While some is unavoidable, excessive overspray can be a nuisance and require extra cleanup. Using the right techniques and protective measures can minimize it.
The best way to combat overspray is through preparation. Use large drop cloths or plastic sheeting to cover anything you don’t want to get paint on. Extend the coverage well beyond the dimensions of your project.
If you’re painting outdoors, consider painting on a calm day to prevent wind from carrying the overspray too far. Painting in a well-ventilated indoor space with proper masking can also help contain overspray.
When spraying, try to keep the spray pattern focused on the object. Avoid spraying from too far away, as this can increase the amount of airborne mist. If overspray does settle on unwanted surfaces, it can often be wiped away with a damp cloth while it’s still wet.
If it has dried, you may need to use a mild solvent or cleaner, depending on the surface type. Always test any cleaning solution on an inconspicuous area first to ensure it doesn’t damage the finish.
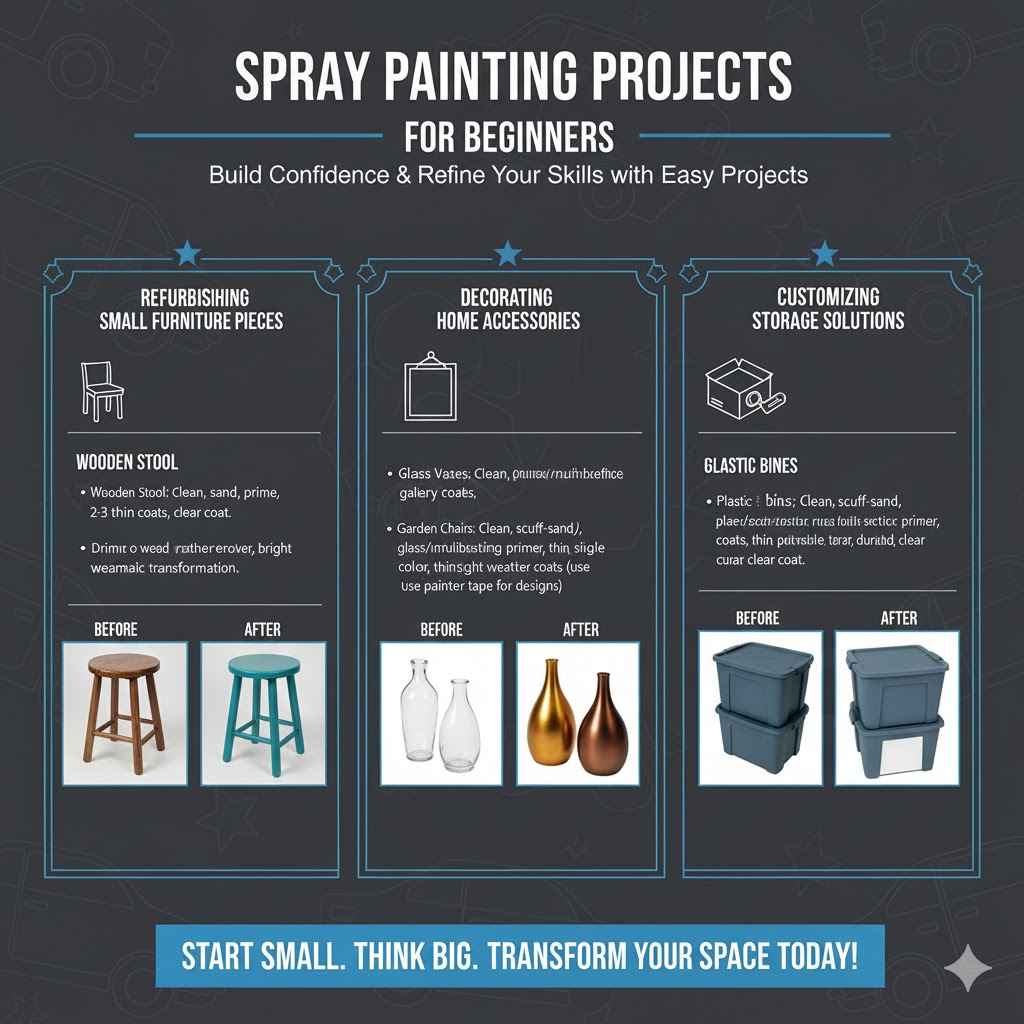
Spray Painting Projects for Beginners
Once you’ve got a handle on the basics, there are many fun and rewarding projects you can tackle. These starter projects are designed to help you build confidence and refine your skills. They don’t require complex techniques or large areas, making them perfect for your first steps into the world of spray painting.
Here are some ideas to get you started.
Refurbishing Small Furniture Pieces
Small furniture items are excellent for spray painting practice. Think about things like a wooden stool, a side table, a chair frame, or decorative shelves. These items often have relatively simple shapes with flat surfaces and some details, allowing you to practice smooth application and masking techniques.
For example, you could take an old wooden stool. First, clean it thoroughly and sand it smooth. If there are any deep gouges, fill them with wood filler and sand them flush once dry.
Apply a good spray primer, let it dry, then apply two to three thin coats of your chosen color spray paint. Finish with a clear coat for durability. The transformation can be dramatic, turning a drab piece into a stylish accent for your home.
This project allows you to experience the satisfaction of breathing new life into an old item.
Another great project is updating a set of plain metal garden chairs. Clean them, remove any rust with a wire brush and apply a rust-inhibiting primer. Then, spray them with a bright, weather-resistant color.
A clear topcoat will help them withstand the elements. The result is a refreshed set of chairs that look brand new and add a pop of color to your outdoor space.
Decorating Home Accessories
Home accessories are fantastic for practicing your spray painting skills because they are usually smaller and allow for more creative freedom. Items like picture frames, vases, light fixtures, decorative boxes, or even planters can be completely transformed with a fresh coat of spray paint.
Imagine taking plain glass vases and giving them a metallic finish. Clean the vases thoroughly. You might want to scuff-sand glass slightly for better adhesion, though some paints adhere well to glass without it.
Apply a primer specifically designed for glass if needed, or use a multi-surface spray primer. Then, apply thin, even coats of your metallic spray paint. You can experiment with different colors like gold, silver, or copper to match your decor.
A clear sealant can add durability and adjust the sheen.
Picture frames are another easy win. You can spray paint a collection of old frames in coordinating colors to create a gallery wall. Or, spray them all in a single bold color to make your artwork stand out.
For more intricate frames, use painter’s tape carefully to mask off any existing decorative elements or to create color-blocking designs. This project is quick and can have a big impact on your room’s style.
Customizing Storage Solutions
Spray paint is a great way to update and personalize storage solutions, making them both functional and attractive. Old plastic bins, metal shelves, wooden crates, or even IKEA furniture can be given a makeover with spray paint.
Consider updating plain plastic storage bins. Many spray paints adhere well to plastic if you use the right preparation. Clean the bins thoroughly with soap and water, then a degreaser if necessary.
Lightly scuff-sand the surface to create a better grip for the paint. Use a spray primer specifically designed for plastic, or a good quality multi-surface primer. Once primed and dry, apply your chosen color in thin, even coats.
You can create a unified look for your garage or closet by painting all your bins in the same color, or use different colors to categorize your items. A clear coat can add extra protection against scuffs.
Wooden crates used for storage can also be easily spray painted. Clean them and sand them smooth. Prime them with a wood primer.
Then, spray them in a color that matches your room’s aesthetic. You can paint the inside and outside for a complete look, or just the outside for a more subtle touch. If you’re using them for books or heavy items, a durable clear coat is recommended.
Frequently Asked Questions
Question: Can I spray paint over existing paint?
Answer: Yes, you can often spray paint over existing paint, but it depends on the type of paint and its condition. The surface should be clean, dry, and free of grease or grime. If the existing paint is glossy, you should lightly sand it to create a dull surface for better adhesion.
For best results, apply a primer suitable for your project and paint type before spraying your color coats.
Question: How many coats of spray paint do I need?
Answer: For most projects, two to four thin coats are sufficient. It’s always better to apply multiple light coats rather than one thick coat, as this prevents drips and ensures even coverage. Allow each coat to dry for the recommended time before applying the next.
Question: Can I spray paint in cold weather?
Answer: Spray painting in cold weather can cause issues. Cold temperatures can make the paint thicker and harder to spray evenly, leading to drips and poor adhesion. It also slows down the drying and curing process significantly.
It’s best to spray paint in temperatures between 50°F (10°C) and 85°F (30°C), ideally in a dry environment.
Question: How do I clean spray paint off my skin?
Answer: For fresh spray paint on your skin, you can often use soap and water, or a gentle oil-based cleanser like baby oil or olive oil. Rub the area gently. If the paint is dried on, you might need to use a product specifically designed for removing paint from skin, or a bit of mineral spirits applied with a cotton ball, followed by thorough washing with soap and water.
Question: How do I store leftover spray paint cans?
Answer: To store leftover spray paint cans properly, turn the can upside down and spray for a second or two until only clear propellant comes out. This clears the nozzle and prevents it from clogging. Then, screw the cap back on tightly and store the can upright in a cool, dry place away from heat or open flames.
Summary
You absolutely can spray paint with great success. This beginner’s guide showed you the right way. From picking your paint to prepping your surface and applying thin coats, it’s all manageable.
Remember to work in a well-ventilated area and use protective gear. You now have the knowledge to tackle projects and achieve a smooth, professional finish with confidence.