Can You Use Drywall Primer On Painted Walls? Essential Guide
Yes, you can often use drywall primer on already painted walls, especially if the paint is glossy, damaged, or you are planning a drastic color change. However, choosing the right primer—like a bonding or stain-blocking formula—is key for a successful, lasting finish. This guide shows you when and how to make it work.
Welcome to the workshop! As a DIY mentor, I know the confusion that pops up when planning a painting project. You might have leftover drywall primer sitting around, or maybe the wall’s current paint job looks less than perfect. A common question I hear is: “Can you use drywall primer on painted walls?” It’s a frustrating roadblock when you’re ready to move forward.
The simple answer is yes, but timing and preparation matter a lot. We aren’t just slapping primer over glossy paint and hoping for the best. Done right, using primer on existing paint saves time, ensures your new color looks rich, and prevents headaches down the road. This guide will break down exactly why, when, and how to successfully apply drywall primer over established paint coatings, keeping things simple and ensuring a professional-looking outcome every time.
Why Primer Matters (Even Over Existing Paint)
Primer isn’t just for bare drywall. Think of primer as the crucial sticky foundation for your new paint. When you paint over an existing surface, the primer does several important jobs that just splashing new paint on top won’t accomplish.
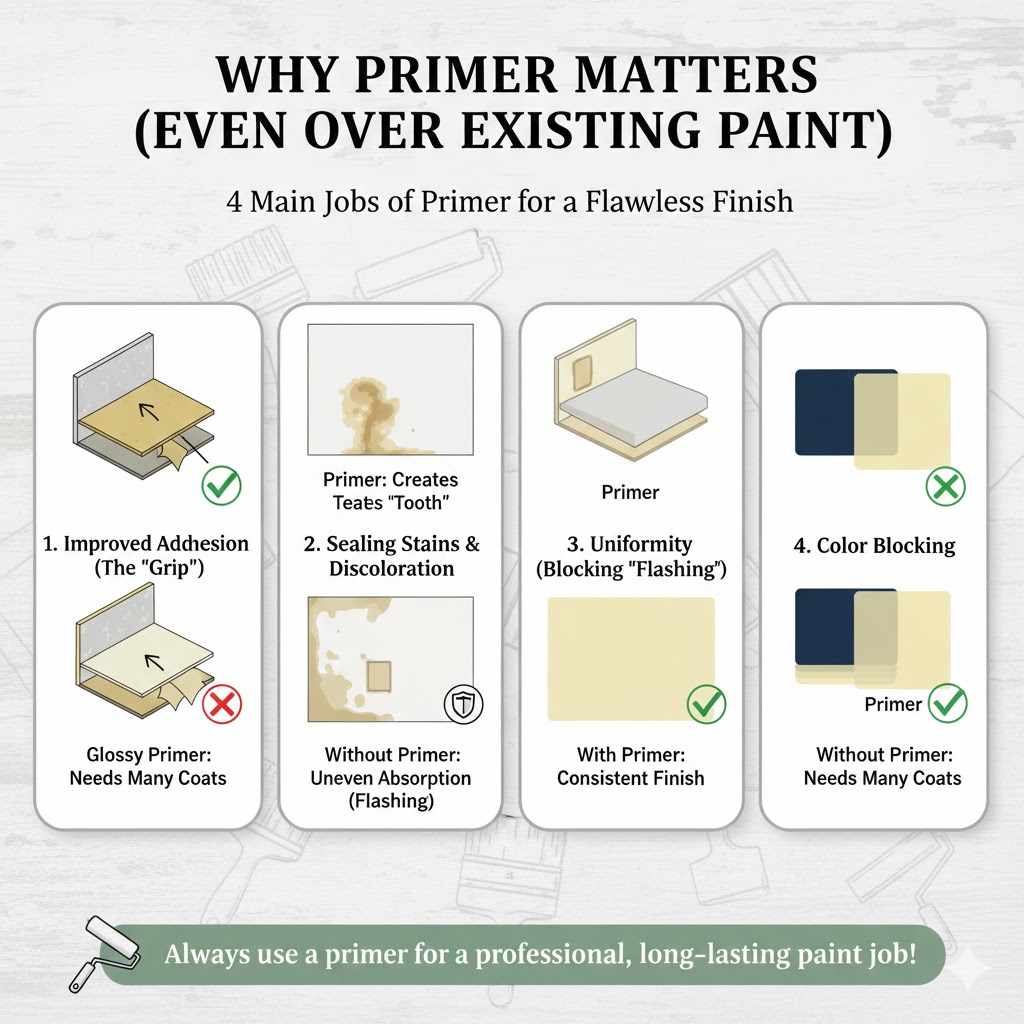
The Four Main Jobs of Primer on Painted Surfaces
When preparing a painted wall, primer ensures adhesion, covers imperfections, seals stains, and evens out the surface absorption. It’s a game-changer for quality paint jobs.
- Improved Adhesion (The “Grip”): Fresh paint needs something to grab onto. If the existing wall paint is glossy (like satin or semi-gloss), new topcoats can easily peel or flake off because they slip on the slick surface. Primer creates a slightly textured, porous surface for the new paint to anchor securely.
- Sealing Stains and Discoloration: Old paint might hide stains from smoke, water, or grease. Primer seals these in. If you don’t seal them, they can bleed right through even several coats of your new expensive paint color.
- Uniformity (Blocking ‘Flashing’): Different paints absorb paint differently. If you patch a spot or if one area of the wall had a different paint sheen years ago, your new paint will look uneven—a patchy effect called “flashing.” Primer ensures the entire wall accepts the new topcoat at the same rate.
- Color Blocking: If you are covering a very dark color (like navy blue) with a very light color (like pale yellow), primer provides an opaque, neutral base coat, meaning you’ll need far fewer topcoats.
Can You Use Drywall Primer on Painted Walls? Making the Right Choice
This is where we address the core question. While general drywall primer is formulated for bare drywall (which is very porous), using it on top of existing, sealed paint can sometimes be tricky. The surface chemistry is different.
For this specific task, you usually want a specialized primer rather than the standard, ultra-cheap PVA drywall primer meant only for sealing new Sheetrock. If you try to use regular PVA primer over a glossy oil-based or even modern latex paint, the primer might not “stick” well enough, leading to peeling later on.
When Standard Drywall Primer Might Be Okay
You might be okay using standard drywall primer if the existing paint meets specific conditions:
- The existing paint is flat or matte (low sheen).
- The existing paint is in excellent condition (no peeling or chipping).
- You have thoroughly cleaned and scuffed the surface (sanding).
However, for maximum success and durability, I strongly suggest using a product designed for adhesion to existing coatings.
The Best Primers for Existing Painted Walls
When the paint surface is less than ideal, or you are switching between oil-based and water-based paints, you need an adhesion promoter or a stain-blocking primer. These products are specifically designed to grab onto slick surfaces like old paint or glossy finishes.
Here is a quick guide on which primer shines in which situation:
| Situation | Recommended Primer Type | Why It Works |
|---|---|---|
| Changing from Glossy to Flat Paint | Bonding Primer (High Adhesion) | Forms a tough film that sticks securely to slick surfaces, preventing peeling. |
| Covering Dark Colors | High-Hide Tinted Primer (Gray or Neutral) | Blocks dark pigments effectively, requiring fewer topcoats of your new light color. |
| Sealing Water Stains or Smoke Damage | Oil-Based or Shellac-Based Primer | These formulas effectively encapsulate stubborn stains that water-based primers struggle with. |
| Minor Patching on Existing Good Paint | All-Purpose Latex Primer | Acceptable if the existing paint is flat and lightly scuffed, as it seals patched drywall mud. |
For detailed information on paint adhesion properties, checking resources from paint manufacturers, like those provided by the Paint Quality Institute, can offer great insights into substrate preparation.
Essential Prep Work: Making Sure Your Primer Sticks
Listen up, friends. You could buy the most expensive, specialized primer in the world, but if you skip the prep work, your project is doomed. Preparing a previously painted surface is different from prepping raw drywall. Raw drywall drinks up primer; painted walls need to be coaxed into accepting it.
Step 1: Inspection and Repair
Walk the walls slowly, using a good light source. Look for anything that needs fixing before you prime. Remember, primer helps smooth things out, but it won’t hide major damage.
- Nail Pops and Holes: Fill all holes, cracks, and imperfections with joint compound (drywall mud). Let it dry completely.
- Sanding Repairs: Once the mud is dry, sand the patched areas smooth. Then, sand the entire wall lightly. This is key!
- The Importance of Scuffing: You don’t need to sand down to the bare surface (unless you have major peeling paint). You are just “de-glossing” the surface. Lightly run fine-grit sandpaper (like 180-grit or higher) over the whole wall. This provides “tooth” for the primer to bite into. This step is especially critical on semi-gloss or glossy paints.
Step 2: The Deep Clean
Dirt, grime, dust, and grease are the sworn enemies of paint adhesion. They will repel your primer just as easily as they repel your topcoat.
- Wipe Down: Use a soft sponge or a tack cloth to remove all the sanding dust. Dispose of the dust outside—don’t let it settle back onto the wall.
- Degreasing: Mix a gentle cleaning solution. TSP (Trisodium Phosphate) substitutes are excellent for cutting kitchen grease or stubborn residue, though a simple mixture of mild dish soap and warm water works well for general dirt. Be sure to rinse the walls thoroughly afterward with clean water and let them dry completely before proceeding.
Safety Note from Your Mentor: When sanding or using strong cleaners like TSP substitutes, always wear safety glasses and gloves. Dust masks are a good idea when sanding fine particles.
The Application Process: Priming Over Existing Paint
Now that the wall is clean, prepped, and ready, we move to applying the primer you selected. Since you are priming over paint, your goal is an even, consistent, thin coat.
Tool Checklist for Priming
- Your chosen Primer (Bonding, Stain-blocking, or Interior Latex)
- High-quality synthetic brush (for cutting in corners)
- Roller cover appropriate for your wall texture (usually 3/8″ nap for smooth walls)
- Paint tray and liners
- Stir stick
Step-by-Step Priming Guide
Follow these steps carefully to ensure the primer seals the old surface perfectly:
- Stir Thoroughly: Mix your primer well using a stir stick. Do not shake the can, as this creates tiny bubbles that show up in the finish. Scrape the bottom of the can to incorporate any settled pigments.
- Cut In Edges: Use your high-quality brush to carefully paint a two-inch border (the “cut-in area”) along the ceiling line, baseboards, and window/door frames. Work methodically in small sections.
- Rolling Technique: Start rolling in the center of the wall section you just cut in. Work in small, manageable sections (about three feet by three feet). Load your roller evenly, avoiding dripping.
- Apply in ‘W’ or ‘M’ Pattern: Roll the primer onto the wall in a large “W” or “M” pattern without lifting the roller. Then, immediately roll back over that area using straight up-and-down strokes to smooth and even out the coverage. This technique ensures you lay down a uniform film without leaving roller marks.
- Avoid Overloading: Use a thin, even coat. If you are using a bonding primer, you might feel like it’s not covering 100% of the old paint color yet—that’s fine! You are focusing on adhesion right now, not color coverage. A heavy coat takes much longer to dry and increases the risk of wrinkling or peeling later.
- Check for Coverage: Inspect the area before moving on. Look for areas where the primer looks thin, shiny, or where the old color is still clearly dominating. Address these small spots immediately with more primer.
- Allow Full Dry Time: This is non-negotiable. Check the can for the recommended recoat time (often 2–4 hours). Do not rush this step, especially if using an oil-based bonding primer, which can require longer curing times. Rushing to apply the topcoat traps solvent vapors, causing adhesion failure later.
When Should I Apply a Second Coat of Primer?
While one coat is often enough when priming over smooth, pre-painted surfaces, a second coat becomes necessary in a few key scenarios:
- Heavy Stains: If you notice a stain trying to bleed through the first primer coat, stop immediately and apply a second coat directly over the stained area (spot prime), letting it dry completely. For severe odor or stain issues, use a specialized shellac-based product, which seals aggressively.
- Drastic Color Changes: If you are going from a very dark brown or red to a pale off-white, a second primer coat helps you achieve a true base color faster, saving topcoat paint.
- Highly Absorbent Patches: If you had to use a lot of drywall compound for repairs, those patches might look dull or drink up the paint differently than the original painted area. A second overall primer coat ensures everything looks exactly the same before the topcoat goes on.
Primer vs. Paint: When to Use One Over the Other
A common temptation for budget DIYers is to skip primer and just use the topcoat paint—especially if the can says, “Paint and Primer in One.” I want to save you the frustration this usually causes on older painted surfaces.
The Misconception of “Paint and Primer in One”
These products are fantastic for new, pre-primed drywall or for simple touch-ups where the previous paint job is in great shape. However, they generally lack the specialized adhesion chemicals needed to effectively stick to slick, glossy, or previously shellacked surfaces. They rely on the surface already being porous or perfectly prepared.
When dealing with walls that have seen previous coats of paint, dedicating time and money to a separate, specialized primer almost always yields a far superior, longer-lasting result.
Table: Primer vs. Topcoat When Starting Over Paint
| Goal | Recommended Action | Why Not Use Topcoat Only? |
|---|---|---|
| Changing Sheen (e.g., Satin to Flat) | Use a dedicated Bonding Primer followed by Topcoat. | Topcoat won’t bond well to the slick satin/semi-gloss texture; it may crack or peel. |
| Painting Over Unmatched Patchwork | Use an All-Purpose Primer over repairs, then topcoat the whole wall. | Different paint types or drywall compounds absorb paint differently, causing patchy “flashing. |
| Sealing Water Marks | Use a Shellac/Oil-Based Stain-Blocking Primer. | Standard latex topcoats will not seal the stain; it will bleed through quickly. |
Remember what we learned about the science behind paint adhesion. When dealing with established coatings, you need a dedicated bonding agent—which is precisely what specialized primers are designed to be. To explore the science of paint formulation further, resources from organizations like the American Society for Testing and Materials (ASTM) often provide standards on coating performance.
Troubleshooting Common Priming Problems Over Existing Paint
Even with the best intentions, things can sometimes go sideways. As your mentor, I want to walk you through the common pitfalls when applying primer over painted surfaces and how to fix them right away.
Problem 1: The Primer Wrinkles or Bubbles
This usually happens for two main reasons:
- Applying Too Thick: You put on a coat that is too heavy, especially noticeable with oil-based primers. The top layer dries faster than the bottom, causing the skin to wrinkle as it tries to cure over the wet layer underneath.
- Applying Over Incompatible Paint: You used a water-based primer directly over a fresh, soft, oil-based paint without proper flash-off time or scuffing. The two chemistries repel each other.
The Fix: If it’s fresh and still tacky, wipe off as much as possible with a soft rag and thinner recommended for that primer type (if oil-based). If it’s already dry but wrinkled, you must sand down the rough spots until they are smooth and re-prime thinly with the appropriate primer type.
Problem 2: Peeling or Flaking Primer
This is a severe adhesion failure, almost always caused by improper preparation.
- Not Sanding Glossy Paint: The surface was too slick, and the primer never got a grip.
- Dirty Surface: Grease or dust was present under the primer coat.
The Fix: Scrape or peel off all the loose primer immediately. Clean the area thoroughly with degreaser. Then, lightly sand the surrounding area to feather the edge. Use a high-quality Bonding Primer—this is the prime time to use that specialized product.
Problem 3: Poor Color Coverage (Flashing Through)
This happens when covering dark paint with light paint, and you see the dark spots showing through after the primer dries.
The Fix: While standard drywall primer can struggle here, a high-hide primer or a tinted primer (often tinted gray or to a color close to your final topcoat) will solve this quickly. Don’t trust that the first coat of topcoat will hide it; apply a second primer coat first, focusing only on the stubborn spots.
Choosing Your Tools Like a Pro (Even When You’re Learning)
In my years in the workshop, I’ve learned that buying quality tools saves you money and massive amounts of frustration in the long run. Cheap brushes and rollers leave fibers behind and apply paint unevenly.
When applying primer over existing paint, since adhesion is the main goal, you want your application smooth and thin, which means quality roller covers are crucial.
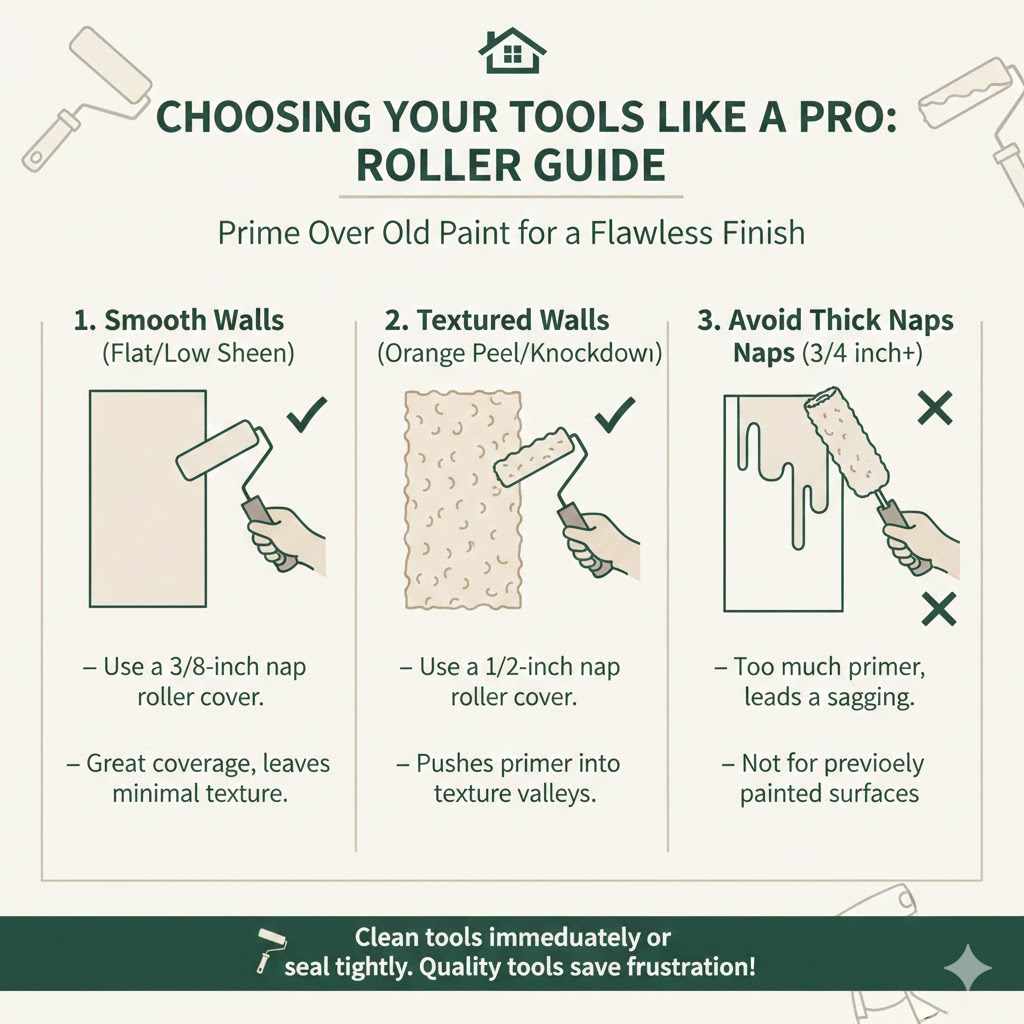
Roller Selection Guide for Priming Over Old Paint
- For Smooth Walls (Low Sheen/Flat Paint): Use a 3/8-inch nap roller cover. This nap size provides great coverage without leaving deep texture behind.
- For Slightly Textured Walls (Orange Peel, Knockdown): Move up to a 1/2-inch nap roller cover. This will help push the primer into the valleys of the texture.
- Avoid Thick Naps (3/4 inch+): These are great for rough stucco but tend to push too much primer on a formerly painted surface, leading to uneven coats and potential sagging.
Remember, whatever tools you use for the primer, clean them immediately or seal them tightly if using a water-based product. Reusing slightly stiff tools for the topcoat will compromise the final look!
Conclusion: Finishing Strong with Confidence
So, can you use drywall primer on painted walls? Absolutely, you can, and in many cases, you should! The secret isn’t just about using any primer; it’s about understanding the substrate—the surface underneath. If that surface is slick, old, or highly variable, swap out your standard drywall primer for a specialized bonding or stain-blocking formula.
Take the time for proper prep: sand for tooth, clean for adhesion, and then apply a thin, even coat of the correct primer. Once that primer coat is fully cured, you will have built the perfect, resilient foundation. This careful approach ensures your final paint job looks professional, lasts for years, and truly transforms your space. Go tackle that project with confidence—you’ve got this!
Frequently Asked Questions (FAQ)
Q1: Does primer actually cover up old paint color?
A: Primer’s main job is adhesion, but high-quality primers, especially those designed for covering dark colors, significantly help mask the old shade. For drastic color changes, one coat of primer plus two coats of topcoat is usually better than three or four coats of topcoat alone.
Q2: Can I use standard PVA (Polyvinyl Acetate) drywall primer on a glossy kitchen wall?
A: It’s highly risky. PVA primers are designed to soak into porous surfaces like bare drywall mud. They often won’t adhere properly to smooth, sealed glossy paint, which can lead to the primer and subsequently the topcoat peeling off.
Q3: How much should I sand the existing paint before priming?
A: You need to “scuff” or “de-gloss” the surface. Lightly sand the entire area with a fine-grit sandpaper (180 to 220 grit). The goal is not to remove the paint but to create tiny scratches that give the primer something mechanical to grip onto.
Q4: What if the existing paint is oil-based and I want to use a water-based (latex) primer?
A: This requires extra caution. You MUST thoroughly clean the surface and scuff sand it well. Then, use a specialized oil-based or shellac-based bonding primer first. This intermediate layer separates the two incompatible paint types and ensures adhesion.
Q5: Should I primer patchy repairs differently than the rest of the painted wall?
A: Yes. If the repairs were done with fresh joint compound, the compound areas need sealing, often with standard drywall primer. Then, applying a coat of bonding primer over the entire wall helps equalize the surface absorption before the final topcoat goes on.
Q6: How long should I wait between priming and applying the final coat of paint?
A: Always check the manufacturer’s label on your primer can, but generally, allow the primer to dry completely for 2 to 4 hours. If you used a heavy oil-based primer or it is humid, allow up to 24 hours to ensure full curing for the best results.