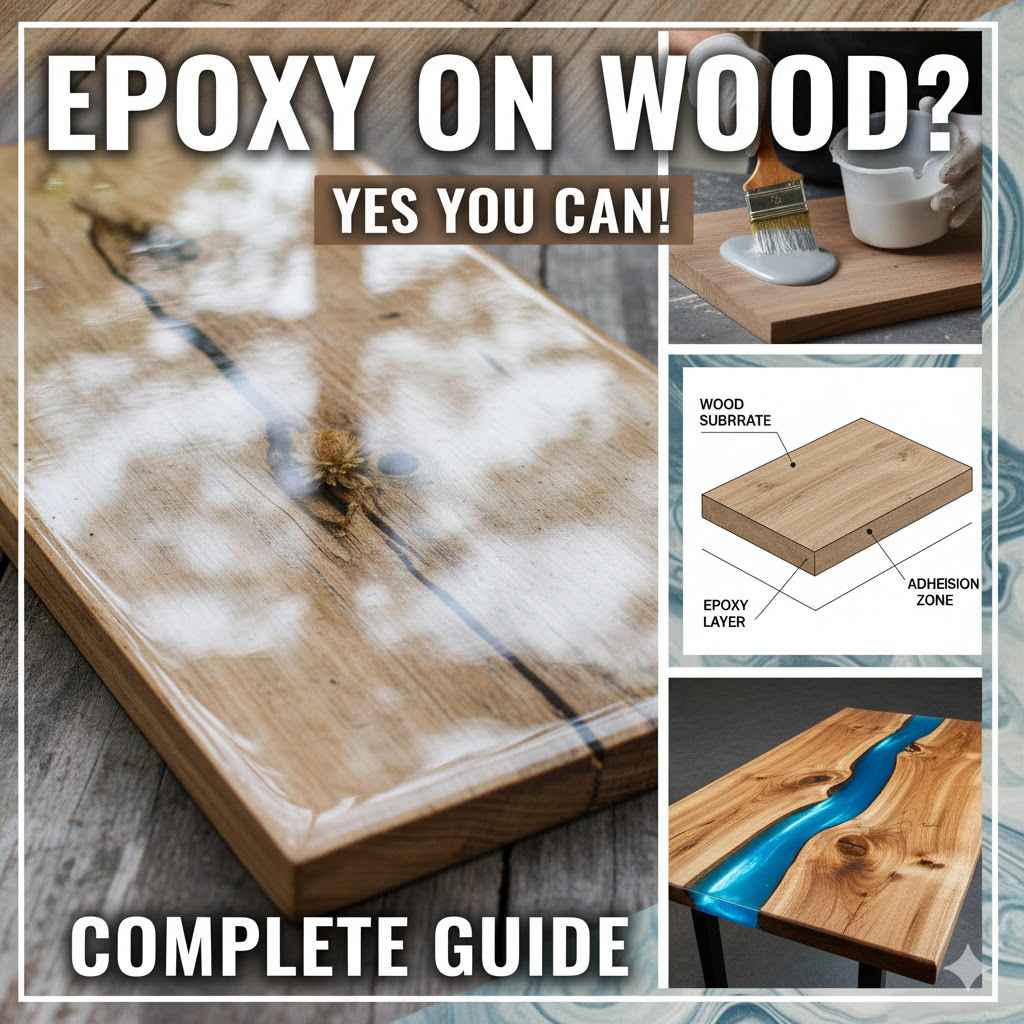
Can You Use Epoxy on Wood? Complete Guide
Many folks wonder if they can use epoxy on wood. It can seem a bit tricky, especially if you’re new to DIY projects. But don’t worry, it’s actually quite simple to get great results!
This guide will walk you through everything you need to know, step by step. We’ll show you how to make your wood projects look amazing using epoxy. Get ready to learn how Can You Use Epoxy on Wood?
Complete Guide is a straightforward process.
Can You Use Epoxy on Wood? Yes Here’s How
The answer is a resounding yes, you absolutely can use epoxy on wood. It’s a fantastic way to protect, beautify, and add unique finishes to your wooden creations. Epoxy resin creates a hard, durable, and often clear coating that seals the wood and can transform its appearance.
For beginners, the idea of mixing and pouring resin can sound intimidating, but with the right knowledge and a little practice, anyone can achieve stunning results. This section will cover the basics of why epoxy is a great choice for wood and what makes it a popular option for countless projects, from small crafts to large furniture pieces.
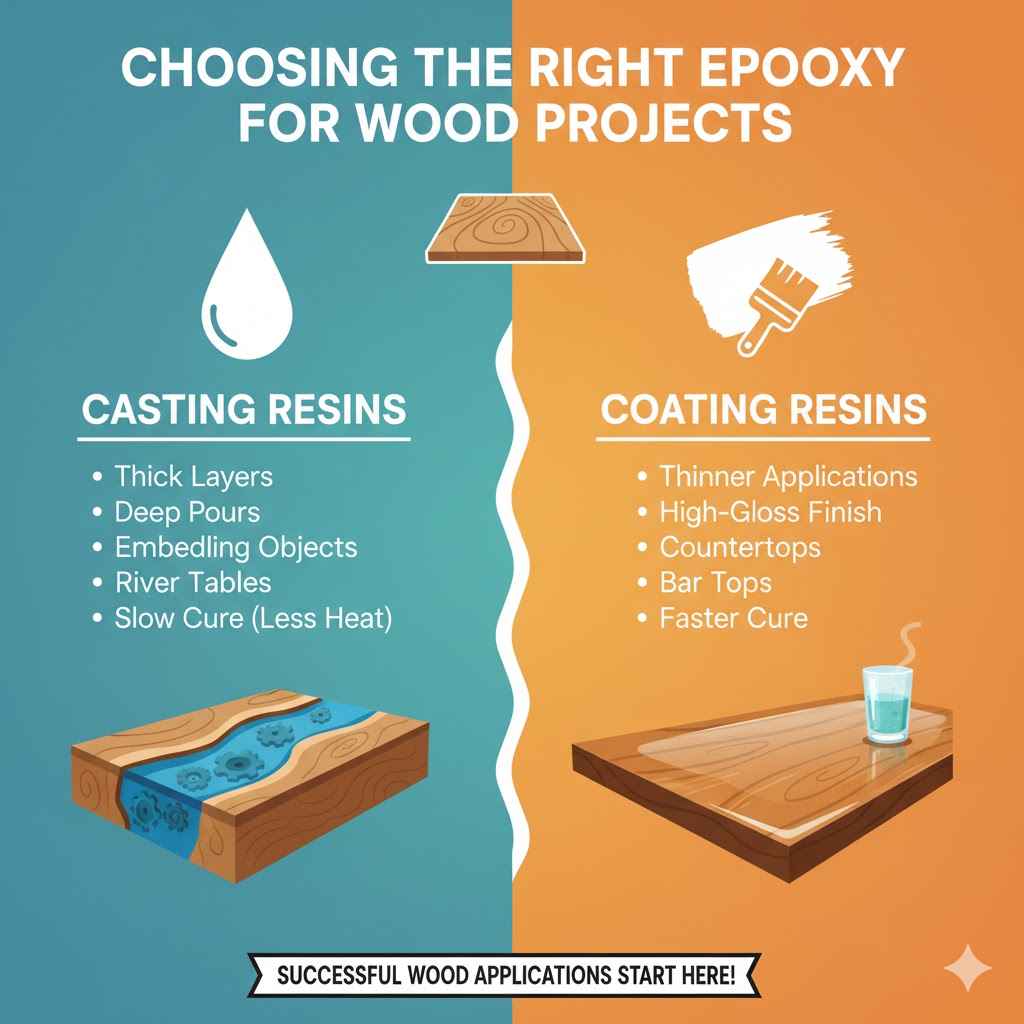
Choosing the Right Epoxy for Wood Projects
Not all epoxy resins are created equal, and selecting the correct type is vital for successful wood applications. There are generally two main categories: casting resins and coating resins. Casting resins are designed for pouring thick layers, ideal for creating deep pours, embedding objects, or making river tables.
They cure slowly to avoid excessive heat buildup, which can crack thicker pours. Coating resins, also known as table top epoxy, are formulated for thinner applications, providing a high-gloss, protective finish over surfaces like countertops, bar tops, or finished wood pieces. They typically cure faster than casting resins.
Coating Epoxy
Coating epoxy is perfect for giving your wood a durable, glossy seal. It’s designed to be spread thinly over a surface, like a tabletop or a bar. This type of epoxy cures relatively quickly and creates a hard, protective layer that resists scratches and moisture.
It’s a popular choice for finishing wooden furniture or sealing wood for outdoor use because it provides a beautiful, long-lasting shine. When applied correctly, it can make the wood grain pop and give your piece a professional, high-end look. Many DIYers choose coating epoxy because it’s easier to work with for surface applications compared to thicker casting resins.
Casting Epoxy
Casting epoxy is made for pouring thicker amounts, often used to create decorative effects or to embed items within the resin. Think of stunning river tables where the colored epoxy flows between two slabs of wood, or custom jewelry pieces. This resin cures more slowly, which helps prevent it from overheating and cracking when poured in deep sections.
It’s essential for projects where you want a substantial resin component, like filling knots or creating artistic effects. If your project involves creating three-dimensional resin art or encasing objects in clear resin on wood, casting epoxy is the way to go.
Art Resin vs. High-Heat Epoxy
Beyond the basic coating and casting types, you might also encounter “art resins” which are often a type of casting resin optimized for clarity and UV resistance, minimizing yellowing over time. High-heat epoxies are specialized and usually not necessary for typical wood projects unless the piece will be exposed to significant heat. For most wood applications, focusing on a quality coating epoxy for finishes or a good casting epoxy for deeper pours will cover your needs effectively.
Essential Tools and Materials for Epoxy on Wood
Before you start, gather all your supplies. Having everything ready ensures a smooth process. You’ll need the epoxy resin and hardener, of course, along with mixing containers and stirring sticks.
Safety gear is a must: gloves, safety glasses, and a respirator mask are crucial for protecting yourself from fumes and skin contact. You’ll also need a level surface to work on, as epoxy needs to cure flat. For preparing your wood, sandpaper in various grits is important for a smooth finish.
Painter’s tape is used to create dams or protect areas you don’t want resin on. You might also want a heat gun or torch to remove bubbles. Ensuring you have all these items will set you up for success.
Safety First Epoxy Gear
Your health and safety are the most important things. Epoxy resin and hardener can irritate your skin and their fumes can be harmful. Always wear nitrile gloves to keep your hands protected.
Safety glasses are essential to prevent any splashes from getting into your eyes. A respirator mask, specifically designed for organic vapors, is highly recommended, especially when working in an enclosed space or with larger batches of epoxy. Proper ventilation is also key, so work in a well-aired room or open windows and doors.
Mixing and Application Tools
You’ll need clean, disposable mixing cups, typically made of plastic or silicone. For stirring, use disposable craft sticks, wooden stirrers, or plastic spatulas. It’s vital to mix the resin and hardener thoroughly to ensure a proper cure.
Have a few different sizes of cups ready, as you’ll need one for each component and then a larger one for combining them. For spreading the epoxy, plastic spreaders, squeegees, or even chip brushes can be used, depending on the application and desired finish.
Surface Preparation Supplies
The wood surface must be clean, dry, and free of dust or debris. Sanding the wood is usually necessary to create a smooth surface and to open the pores of the wood, allowing the epoxy to bond better. Start with a coarser grit sandpaper (like 80 or 100) and progress to finer grits (like 220) for a smooth finish.
If you’re preventing epoxy from seeping into unwanted areas, high-quality painter’s tape is your best friend. It creates a clean edge and is easy to remove once the epoxy has cured.
Bubble Removal Tools
Tiny air bubbles can appear in your epoxy, especially when mixing. A heat gun or a kitchen torch is commonly used to gently pass over the surface of the uncured epoxy. The heat causes the bubbles to rise to the surface and pop.
It’s important to use these tools carefully and keep them moving to avoid overheating or scorching the epoxy or wood. Some people also use a small butane torch for more precise bubble popping.
Preparing Your Wood for an Epoxy Finish
Proper wood preparation is the secret to a flawless epoxy finish. First, ensure your wood is completely dry and free from any oils, waxes, or finishes. Sand the wood surface smoothly, starting with a coarser grit and moving to finer grits until it’s silky to the touch.
This abrasion helps the epoxy adhere better. For porous woods or projects where you want to prevent epoxy from soaking too deeply, applying a seal coat is recommended. This can be a thin layer of the epoxy itself, applied and allowed to cure partially, or a specialized wood sealer.
Sealing also helps prevent air bubbles from escaping the wood into the epoxy as it cures.
Cleaning and Drying Wood
Before you even think about sanding, make sure your wood is thoroughly clean and completely dry. Any dust, dirt, or grime will be trapped under the epoxy and ruin the finish. Wipe the wood down with a tack cloth or a lint-free cloth slightly dampened with mineral spirits or denatured alcohol.
This helps remove fine dust. Moisture in the wood can cause issues with curing and adhesion, so allow plenty of drying time, especially if the wood has been exposed to humidity or water.
Sanding for Adhesion
Sanding is critical for creating a surface that the epoxy can grip onto. Start with a medium grit sandpaper, like 120 or 150, to remove any rough spots or imperfections. Then, move to finer grits, such as 220, to create a smooth surface.
The smoother the wood, the better the epoxy will lay flat and adhere. After sanding, always wipe down the wood with a tack cloth to remove all sanding dust. This step is non-negotiable for a professional-looking outcome.
Sealing Wood Pores
Wood is naturally porous, meaning it has tiny holes that can trap air. When you pour epoxy over wood, this trapped air can escape, creating unsightly bubbles. To prevent this, you need to seal the wood’s pores.
You can do this by applying a thin coat of your epoxy resin mixture (a “seal coat”) and letting it become tacky or partially cured before applying your main pour. Alternatively, use a dedicated wood sealer. This layer acts as a barrier, preventing air from escaping into the epoxy.
For very porous woods like oak or pine, multiple seal coats might be necessary.
The Epoxy Pouring Process Explained
Pouring epoxy onto wood is where the magic happens. It involves careful measuring, thorough mixing, and patient pouring. The key is to follow the manufacturer’s instructions precisely regarding the ratio of resin to hardener.
Incorrect ratios can lead to incomplete curing or a sticky surface. Once mixed, the epoxy has a limited pot life, so work efficiently. For larger projects, pour the epoxy slowly and steadily, allowing it to self-level.
For more artistic effects, like river tables, you might pour different colors side-by-side or in stages. Proper ventilation and a level workspace are crucial throughout this entire process for safety and optimal results.
Measuring and Mixing Epoxy Resin
Accurate measurement is the absolute most important step in using epoxy resin. Most epoxies come in two parts: the resin (Part A) and the hardener (Part B). They are mixed in a specific ratio, often by volume or weight.
This ratio is printed on the product’s label or in its instructions. Using a digital scale for weight measurements or graduated mixing cups for volume is highly recommended for precision. Once measured, mix the two parts slowly but thoroughly for several minutes, scraping the sides and bottom of the container to ensure no unmixed portions remain.
Over-mixing can introduce more air bubbles, so mix until just combined and consistent.
Understanding Resin to Hardener Ratios
The ratio of resin to hardener is critical for the epoxy to cure properly. This ratio is usually expressed as “X parts resin to Y parts hardener” (e.g., 2:1 or 1:1). It’s essential to follow these instructions exactly.
If you use too much hardener, the epoxy might cure too quickly and generate excessive heat, potentially damaging your project or even cracking. If you use too little hardener, the epoxy may never fully cure, remaining sticky and soft. Always check the specific product’s instructions for the correct ratio.
The Importance of Thorough Mixing
Simply pouring the two parts together and giving them a quick stir is not enough. You need to mix them thoroughly to ensure the hardener is evenly distributed throughout the resin. Use a clean stirring stick and scrape the sides and bottom of your mixing container multiple times as you stir.
This process usually takes 3-5 minutes. Incomplete mixing is a common cause of soft spots or areas that don’t cure properly. Many epoxy manufacturers suggest mixing until the mixture is clear and no streaks are visible.
Pot Life and Working Time
Epoxy has a “pot life,” which is the amount of time you have to work with the mixed product before it starts to gel and cure in the mixing container. This time varies greatly depending on the epoxy type and the ambient temperature. Casting resins typically have longer pot lives than coating resins.
It’s crucial to be aware of the pot life so you can plan your pouring and spreading accordingly. If you’re working on a large project, you might need to mix smaller batches more frequently to stay within the working time before it cures.
Pouring Techniques for Wood Projects
Once your epoxy is mixed and your wood is prepared, it’s time to pour. For coating applications, pour the epoxy onto the center of the wood and use a spreader to gently guide it to the edges. Let gravity help you.
For deeper pours, like in river tables, pour slowly and evenly into the pre-built dams or cavities. If you’re working with colored epoxy, you can pour different colors next to each other or create swirl patterns with a stir stick. For best results, pour in a temperature-controlled environment, as this affects cure time and bubble formation.
Creating a Self-Leveling Surface
For a smooth, even finish on surfaces like tabletops, the key is to let the epoxy self-level. Pour the mixed epoxy onto the center of your prepared wood. Using a notched spreader or a plastic putty knife, gently spread the epoxy outwards towards the edges.
Don’t force it too much; the epoxy will naturally flow and level itself out. As it reaches the edges, let it drip over the sides. You can then use a brush or spreader to ensure the sides are fully coated.
Make sure your surface is perfectly level to ensure an even coating across the entire piece.
Pouring Colored or Deep Pours
When working with colored epoxy or for deep pours, like in river tables, patience and precision are key. Mix your epoxy with pigments or dyes according to the manufacturer’s instructions. For river tables, ensure your molds or dams are completely sealed to prevent leaks.
Pour the epoxy slowly and steadily into the prepared areas. If you’re pouring multiple colors, you can pour them next to each other, or slightly overlap them. For deep pours, you might need to do them in stages to avoid overheating.
This layering approach also allows for interesting visual effects.
Dealing with Spills and Runoff
Epoxy will drip over the edges. It’s best to have a plan for this. Some people like to tape off the underside of their project to catch drips, while others prefer to let it drip and then trim or sand the excess once cured.
If you’re not taping, lay down plastic sheeting or old newspapers beneath your project to protect your work area. The excess epoxy can be cleaned up with denatured alcohol while it’s still wet, or it can be chipped or sanded off once fully cured.
Removing Air Bubbles
Air bubbles are a common challenge when working with epoxy on wood. As the epoxy cures, any trapped air within the wood or introduced during mixing will try to escape. The most common method to remove these bubbles is by using a heat gun or a small propane torch.
Gently pass the flame or heat over the surface of the uncured epoxy. The heat causes the bubbles to rise and pop. It’s crucial to keep the heat source moving and at a safe distance to avoid scorching the epoxy or the wood.
Multiple passes may be needed over the first hour of curing.
Using a Heat Gun
A heat gun is an excellent tool for removing bubbles. Set it to a medium heat setting and hold it a few inches above the surface of the epoxy. Move the heat gun in a sweeping motion across the entire project.
You’ll see the bubbles rise to the surface and pop. Be careful not to hold the heat gun in one spot for too long, as this can overheat and damage the epoxy or even char the wood. It may take several passes over the first hour or so as new bubbles appear.
Using a Propane Torch
A small propane torch, like those used for culinary purposes, is also effective. The flame from a torch is more concentrated and can pop bubbles quickly. Again, the key is speed and motion.
Quickly sweep the flame across the surface of the epoxy from a distance of about 4-6 inches. You’ll see the bubbles pop almost instantly. Never let the flame linger on one spot.
Like the heat gun, multiple passes might be needed. Always ensure good ventilation when using a torch.
Preventing Bubbles in the First Place
While removing bubbles is important, preventing them is even better. Proper wood preparation, including thorough sealing of pores, is the best defense. When mixing, stir slowly and deliberately to avoid whipping air into the mixture.
Pouring the epoxy from a height of about 8-12 inches can also help break up small bubbles as it falls. Letting the mixed epoxy sit for a few minutes before pouring can also allow some bubbles to rise to the surface on their own.
Curing and Finishing Your Epoxy Wood Project
Once your epoxy is poured and any bubbles are dealt with, the next critical phase is curing. This is when the liquid epoxy hardens into a solid, durable finish. Curing times vary greatly depending on the type of epoxy and the ambient temperature and humidity.
It’s essential to let the epoxy cure undisturbed in a stable environment. After it has fully cured, you might want to further finish the surface. This can involve sanding to achieve a matte finish or polishing to a high gloss.
Following these steps ensures your epoxy wood project is not only beautiful but also built to last.
Understanding Epoxy Cure Times
Epoxy cure times are not just about waiting for it to harden; they involve different stages. Initially, the epoxy will be liquid, then it will start to gel, and finally, it will harden. The “tack-free” time is when the surface is no longer sticky to the touch, but it’s still relatively soft.
A “full cure” can take several days, or even up to a week for some thicker pours, during which the epoxy reaches its maximum hardness and chemical resistance. Always refer to the manufacturer’s specific instructions for cure times, as they can vary significantly between products. Environmental factors like temperature and humidity play a significant role.
Factors Affecting Cure Time
Several factors influence how long your epoxy takes to cure. The most significant is temperature. Warmer temperatures speed up the curing process, while cooler temperatures slow it down.
Humidity can also play a role; excessively high humidity can sometimes interfere with the curing process, especially for certain types of epoxy. The thickness of the pour is also a factor; thicker pours generate more heat internally, which can accelerate curing, but also increase the risk of cracking if not managed. Always aim for the temperature range recommended by the manufacturer.
Dry to Touch vs. Full Cure
It’s important to distinguish between when an epoxy is “dry to touch” and when it is “fully cured.” When an epoxy is dry to touch, it means the surface is no longer sticky and you can likely handle it without leaving fingerprints. However, it is still soft and vulnerable to scratches or damage. A full cure is when the epoxy has reached its maximum hardness, durability, and chemical resistance.
This typically takes much longer than becoming dry to touch, sometimes up to 7 days. Avoid heavy use or cleaning with harsh chemicals until the full cure is achieved.
Working in Ideal Conditions
To ensure the best cure, work in an environment with stable temperatures, ideally between 70-80°F (21-27°C). Avoid areas with drafts or significant temperature fluctuations. Proper ventilation is also important, not just for safety but because airflow helps with the curing process.
Ensure your workspace is free from dust and debris, as these can settle into the uncured epoxy and mar the finish. Protecting your project from direct sunlight during curing is also a good idea, as UV rays can affect some epoxies.
Sanding and Polishing for a Perfect Finish
After your epoxy has fully cured, you can sand it to achieve different finishes. For a smooth, almost glass-like surface, start with a fine-grit sandpaper (e.g., 220 or 320) and gradually work your way up to very fine grits, such as 1000, 2000, or even 3000. Wet sanding, where you use sandpaper with water, can help prevent dust and create a smoother finish.
Once you’ve achieved the desired level of smoothness through sanding, you can polish the surface. Use a plastic polish or a rubbing compound with a buffer or soft cloths to bring out a high gloss. This step is optional but really makes the epoxy shine.
The Art of Wet Sanding
Wet sanding is a technique used to achieve an ultra-smooth finish and remove minor imperfections or the slight orange peel texture that can sometimes appear on epoxy surfaces. You’ll need waterproof sandpaper in progressively finer grits. Keep the sandpaper and the epoxy surface wet as you sand.
This lubricates the surface, reduces dust, and helps prevent the sandpaper from clogging. Start with a medium-fine grit (e.g., 400 or 600) and work your way up through 1000, 1500, 2000, and even higher grits if you desire a mirror-like finish. Rinse the surface frequently to remove sanding residue.
Achieving a High-Gloss Polish
Once you’ve sanded your epoxy to a high grit (e.g., 2000 or 3000), it will look dull but feel very smooth. To bring out the shine, you need to polish it. Use a plastic polish or a rubbing compound specifically designed for resins or plastics.
Apply a small amount to a clean, soft cloth or a buffing pad attached to a drill or orbital sander. Work in small sections, applying moderate pressure and moving the polish around. You’ll see the surface transform from dull to brilliantly reflective.
Buff out any residue with a clean, soft cloth.
Creating a Matte or Satin Finish
Not everyone wants a mirror-like shine. You can achieve a matte or satin finish by stopping your sanding process at a lower grit, typically around 400-600. If you want a consistent matte finish, you can also use specific matte finishes or sealers after sanding.
Another method is to lightly buff the surface with a fine Scotch-Brite pad (like the grey or white ones). This subtly scuffs the surface, reducing shine and creating a soft, tactile feel. Experiment on a scrap piece first to see which grit or method gives you the desired look.
Protecting Your Finished Epoxy Wood Project
Your epoxy-coated wood project is now beautiful and durable, but a little extra care can ensure its longevity. While epoxy is tough, it’s not indestructible. Avoid exposing it to extreme heat or harsh chemicals.
For regular cleaning, use a soft, damp cloth. For tougher spots, a mild, pH-neutral soap can be used, but always rinse thoroughly. Prolonged exposure to direct sunlight can eventually cause some epoxies to yellow or degrade, so consider UV-protective finishes or coatings if your project will be in a sunny location.
Proper care will keep your project looking great for years to come.
Daily Cleaning and Maintenance
Keeping your epoxy wood project clean is straightforward. For daily maintenance, simply wipe down the surface with a soft, lint-free cloth. If you notice smudges or light dirt, a cloth slightly dampened with water usually does the trick.
Avoid using abrasive cleaners, scouring pads, or harsh chemicals like ammonia or bleach, as these can dull the finish or even damage the epoxy over time. Gentle cleaning preserves the shine and integrity of your work.
Dealing with Stains and Scratches
If a stain occurs, try using a mild, pH-neutral dish soap mixed with water and a soft cloth. For stubborn stains, you might need to use a cleaner specifically designed for epoxy surfaces. For minor scratches that haven’t penetrated the epoxy layer, light wet sanding with very fine grits (2000+) followed by polishing can often restore the surface.
Deeper scratches may be more challenging to repair seamlessly and might require a more involved process, potentially involving another thin coat of epoxy in the damaged area.
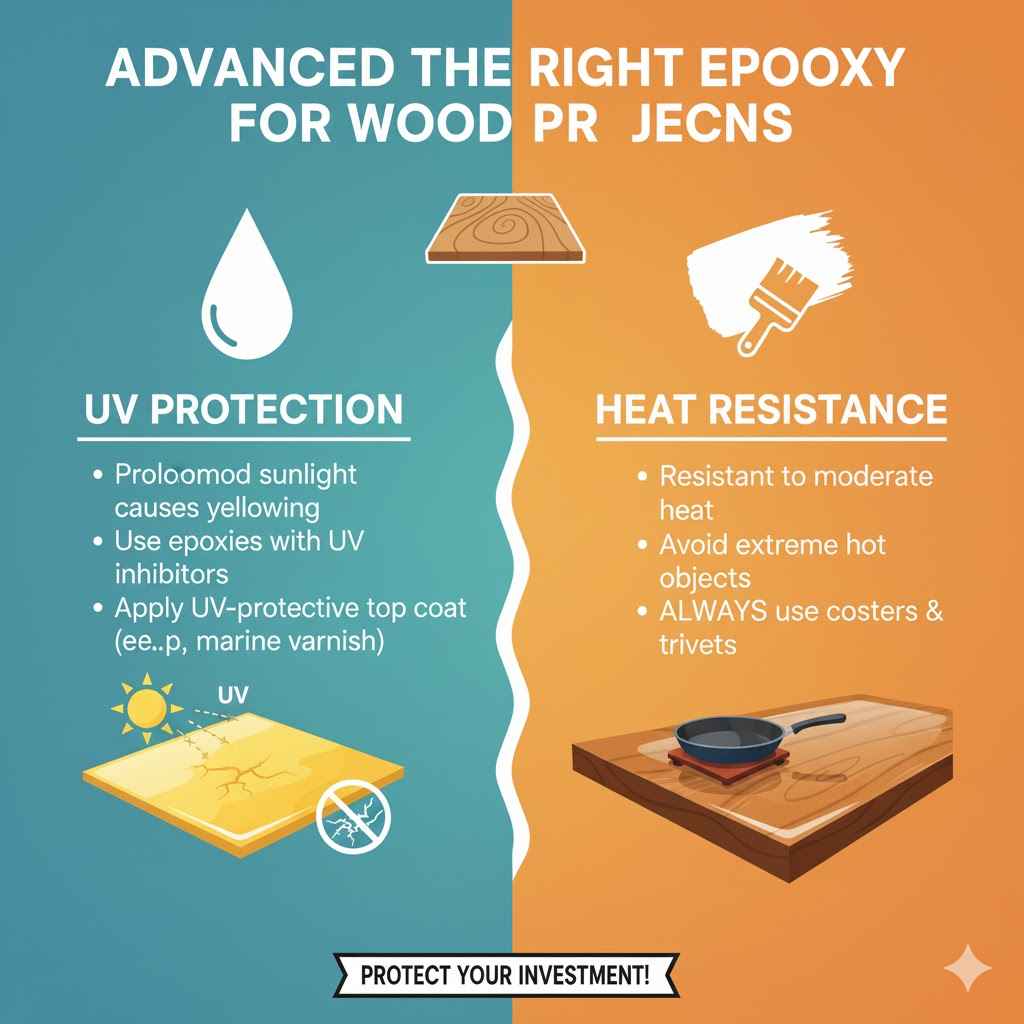
UV Protection and Heat Resistance
While many modern epoxies offer good UV resistance, prolonged direct sunlight can still cause yellowing or degradation over many years. If your project will be exposed to a lot of sun, consider using an epoxy with built-in UV inhibitors or applying a top coat with UV protection, like a marine varnish or a specialized UV-resistant sealant. Most epoxies have decent heat resistance, but they can be damaged by extremely hot objects (like direct contact with hot pans).
Always use coasters and trivets to protect your epoxy surfaces from excessive heat.
Frequently Asked Questions
Question: Is epoxy safe to use on wood for food surfaces
Answer: Yes, many epoxy resins are food-safe once fully cured. Look for products specifically labeled as food-safe or FDA-approved for food contact applications. Always follow the manufacturer’s instructions for mixing and curing to ensure it becomes completely inert and safe.
Question: Can I use epoxy on unfinished wood
Answer: Yes, epoxy adheres well to unfinished wood. In fact, it’s often recommended to use epoxy on bare wood after proper sanding and preparation. Sealing the wood first is important to prevent air bubbles.
Question: How thick can I pour epoxy on wood
Answer: The maximum pour depth depends on the type of epoxy. Casting resins are designed for thicker pours (often several inches at a time), while coating resins are meant for thin layers. Always check the product’s specifications for maximum pour depth to avoid overheating issues.
Question: What if I make a mistake with my epoxy pour
Answer: Mistakes can happen. For uncured epoxy, you can often wipe it up with denatured alcohol or a suitable solvent. For partially cured or cured epoxy, sanding is usually the best method to remove mistakes or imperfections.
Some mistakes might require a complete removal and reapplication.
Question: Do I need to seal my wood before pouring epoxy
Answer: Yes, sealing your wood is highly recommended, especially for porous woods. This prevents air from escaping the wood pores into the epoxy, which causes bubbles. A seal coat of epoxy or a dedicated wood sealer works well.
Summary
You absolutely can use epoxy on wood for a durable and beautiful finish. By choosing the right epoxy type, preparing your wood correctly, and following careful measuring and pouring techniques, you can achieve professional results. Remember safety gear, proper ventilation, and patience during curing are key.
Sanding and polishing can elevate your project further. With this guide, you’re ready to confidently tackle your epoxy wood projects.