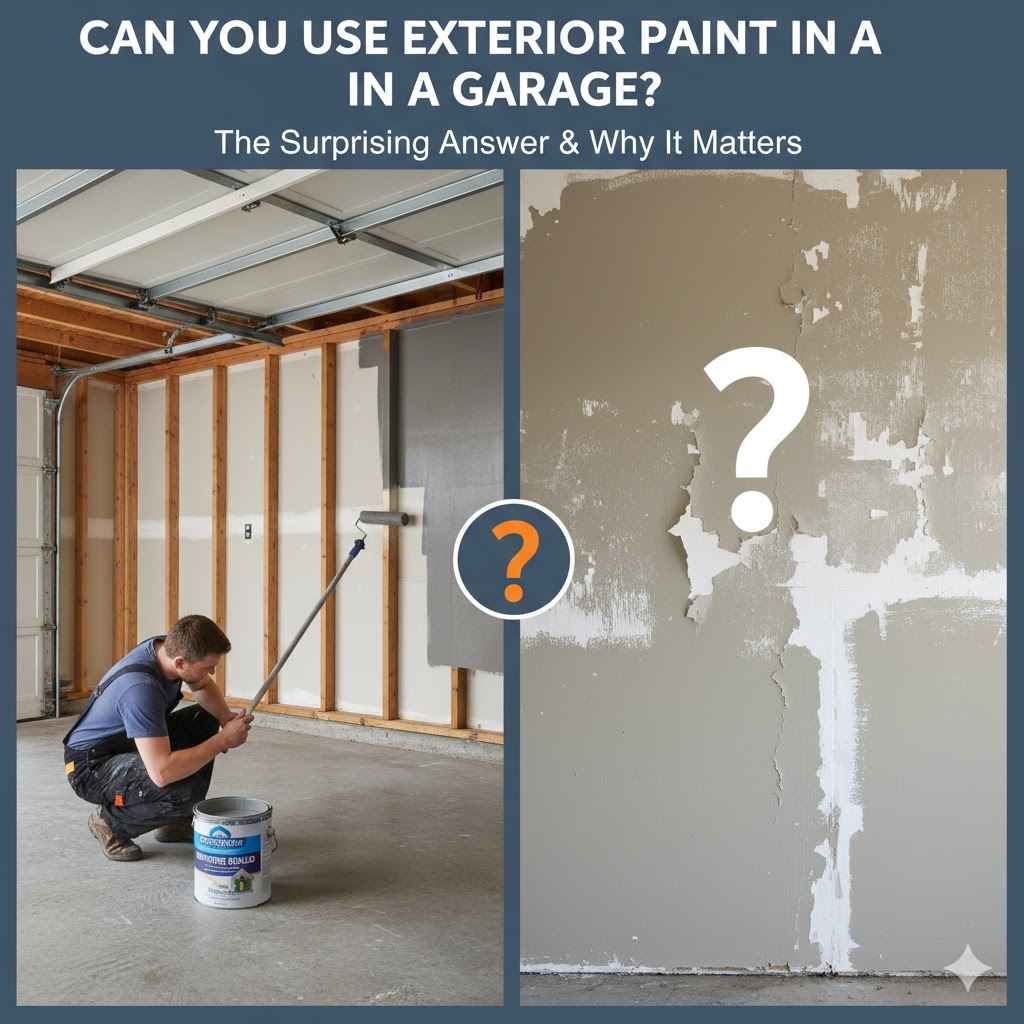
Can You Use Exterior Paint in a Garage?
Lots of people wonder Can You Use Exterior Paint in a Garage? It sounds like a simple question, but for folks new to painting projects, it can feel a bit tricky. You want your garage to look good, but you also need the paint to last and be safe. Don’t worry, figuring this out is easier than you think.
We’ll walk through it step by step to make sure you get the right paint for your garage space. Let’s get your garage looking its best.
Choosing the Right Garage Paint
When you’re thinking about painting your garage, the most important decision is what kind of paint to use. Garages face unique challenges that standard interior paints might not handle well. This section will explore why certain paints are better suited for garage environments and what factors to consider when making your choice.
We will look at durability, resistance to common garage issues, and how different paint types perform over time.
Understanding Paint Types for Garages
Not all paint is created equal, especially when it comes to the demanding environment of a garage. Garages can experience significant temperature swings, moisture, and exposure to chemicals like oil and gasoline. These conditions require a paint that is more robust than what you’d typically use in a living room.
The right paint needs to be tough enough to withstand impacts, resist staining, and adhere well to various garage surfaces like concrete, drywall, or wood.
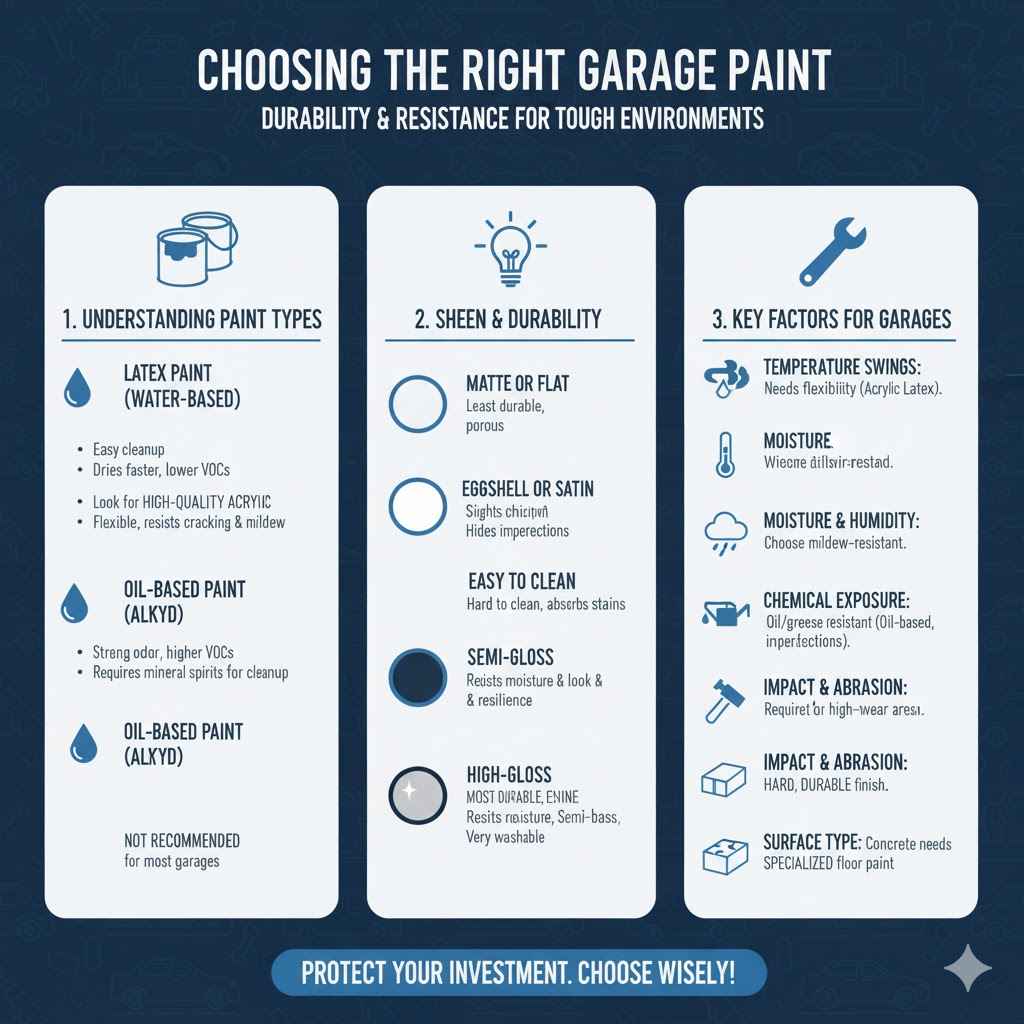
When we talk about paint, we’re usually referring to latex (water-based) or oil-based options. Both have pros and cons for garage use. Latex paints are generally easier to clean up and have lower fumes, making them a popular choice.
Oil-based paints, while having stronger fumes and requiring more difficult cleanup, can offer a harder, more durable finish. However, modern latex paints have improved significantly and many are formulated for high-traffic areas and challenging conditions.
The finish of the paint also matters. Glossier finishes are typically more durable and easier to clean, which is a big plus for a garage where spills and dirt are common. A satin or semi-gloss finish offers a good balance of appearance and resilience.
Matte finishes tend to show scuffs and dirt more easily, making them less ideal for most garage applications unless you’re going for a very specific look.
Latex Paint Explained
Latex paint, also known as water-based paint, uses a binder that is dispersed in water. This means it’s easy to clean up with just soap and water, which is a significant advantage. It also dries faster than oil-based paints and emits fewer volatile organic compounds (VOCs), leading to less odor in your garage.
For garage use, you’ll want to look for high-quality acrylic latex paints. Acrylic latex offers enhanced durability and flexibility compared to standard latex. This flexibility helps prevent the paint from cracking or peeling as temperatures change, which is common in unconditioned garages.
These paints are also resistant to mildew and fading, making them a good choice for garages that might experience humidity or direct sunlight.
The adhesion properties of good latex paints are excellent. This means they stick well to properly prepared surfaces, providing a long-lasting finish. When applied over a primer, latex paint can create a smooth, attractive surface that is also practical for a workspace like a garage.
Oil-Based Paint Explained
Oil-based paint, also known as alkyd paint, uses a solvent (like mineral spirits) for thinning and cleaning. This type of paint is known for its extremely hard and durable finish, which can be very beneficial in a high-traffic area like a garage. It’s less prone to chipping and scratching, offering superior protection to surfaces.
However, oil-based paints come with some drawbacks for garage application. They have a strong odor due to higher VOC levels, requiring excellent ventilation during application and drying. Cleanup is also more involved, needing solvents rather than soap and water.
The drying time is typically longer, which means your garage might be out of commission for a longer period.
Despite the challenges, for areas that experience extreme wear and tear or chemical spills, the robust nature of oil-based paint can be an attractive option. It often provides a superior barrier against moisture and stains. If you choose oil-based, ensure you have proper ventilation and safety measures in place.
Sheen and Durability
The sheen or finish of your paint significantly impacts its durability and how easy it is to maintain in a garage. Different sheens reflect light differently and have varying levels of resistance to wear and cleaning.
- Matte or Flat Finish: This finish has the least amount of shine. It’s good at hiding imperfections on the wall surface, which can be helpful for older garages. However, matte finishes are the least durable. They are more porous and can absorb stains easily, making them very difficult to clean without damaging the paint. For a garage, this is generally not recommended unless it’s for a very low-traffic area or a decorative purpose.
- Eggshell or Satin Finish: These finishes offer a slight sheen. They are more durable than matte finishes and easier to clean. A satin finish has more shine than eggshell and is a popular choice for many areas, including some garage walls. They can withstand moderate scrubbing and resist staining better than flat paints.
- Semi-Gloss Finish: This is a very popular choice for garage walls. It has a noticeable shine and is quite durable. Semi-gloss paints are excellent at resisting moisture and stains, and they can be easily wiped clean with a damp cloth. This makes them ideal for areas prone to dirt, grease, or water splashes.
- High-Gloss Finish: This is the most durable and easiest to clean finish. It has a very shiny, reflective surface. While extremely practical for garages due to its toughness and washability, some people find it too reflective or it can highlight imperfections in the wall surface.
For most garage walls, a satin or semi-gloss finish is the best compromise. It provides good durability and easy cleaning without being overly shiny. If you are painting a garage floor, you will need an even more specialized, heavy-duty coating.
Can You Use Exterior Paint in a Garage
This is the big question many homeowners ask. The simple answer is often yes, but with important considerations. Exterior paint is designed to withstand harsh weather, UV rays, and moisture, which are all qualities that sound good for a garage.
However, the specific formulation and your garage’s conditions play a large role in whether it’s the best choice.
Exterior paints are built to be durable and resistant to the elements. This resilience can translate well to the sometimes harsh environment of a garage. If your garage experiences a lot of temperature fluctuation, humidity, or is exposed to direct sunlight through a window, exterior paint’s protective qualities might seem appealing.
It offers a good defense against moisture and can be scrubbed clean relatively easily, similar to some interior finishes.
However, exterior paints are not designed for indoor air quality concerns. They often contain higher levels of VOCs (Volatile Organic Compounds) than interior paints. When used in an enclosed space like a garage, these VOCs can off-gas for an extended period, potentially affecting the air you breathe, especially if the garage is attached to your home or frequently entered.
This is a primary reason why specialized interior paints are usually recommended.
Furthermore, exterior paints might have different drying times and curing processes compared to interior paints. They are formulated to handle outdoor conditions, and their performance in a controlled indoor environment, even a garage, might differ. For instance, some exterior paints might become brittle over time in less fluctuating temperatures or their flexibility might not be as beneficial indoors.
The key takeaway is that while technically possible and offering some benefits, using exterior paint in a garage isn’t always the ideal or safest solution. It’s crucial to weigh the pros and cons against specialized interior paints designed for durability and low VOCs.
Benefits of Using Exterior Paint
There are several reasons why someone might consider using exterior paint for their garage, and these benefits stem from its intended purpose: protecting surfaces from the outdoors.
- Weather Resistance: Exterior paints are formulated to stand up to rain, snow, wind, and sun. This means they can offer excellent protection against moisture and UV damage, which can be relevant for garages, especially those with uninsulated walls or windows that let in sunlight. This resistance can help prevent mold and mildew growth in humid conditions.
- Durability and Toughness: To survive the elements, exterior paints are made to be durable. They can resist chipping, peeling, and fading better than many standard interior paints. This toughness can be advantageous in a garage where walls might get bumped or scraped by tools, vehicles, or storage items.
- Washability: Many exterior paints offer a finish that is easy to wipe down. You can often clean off dirt, dust, and even some minor spills with a damp cloth or mild soap and water. This makes maintenance simpler in a space that tends to accumulate dirt.
- Mold and Mildew Resistance: Exterior formulations often include additives to prevent the growth of mold and mildew. This can be a significant benefit in garages that are prone to dampness or poor ventilation, helping to keep the space healthier and the walls looking cleaner longer.
- Color Retention: Exterior paints are designed to maintain their color vibrancy even when exposed to sunlight. This means your garage walls will likely look brighter and newer for a longer period compared to interior paints that might fade over time.
These protective qualities make exterior paint seem like a strong candidate for garage walls, especially if you’re looking for a paint that can handle a lot of wear and tear. The resilience it offers against the elements can be a valuable asset in a utilitarian space like a garage.
Drawbacks of Using Exterior Paint
Despite the appealing durability of exterior paint, there are significant downsides to using it inside a garage. These drawbacks primarily concern health, odor, and specific performance characteristics in an indoor environment.
- Higher VOC Content: A major concern with exterior paints is their typically higher level of Volatile Organic Compounds (VOCs). VOCs are chemicals that can evaporate into the air and contribute to indoor air pollution. In a garage, especially one attached to your home or used frequently, these fumes can be harmful and cause health issues like headaches, dizziness, and respiratory problems.
- Stronger Odor: Related to VOCs, exterior paints often have a much stronger and more persistent odor than interior paints. This smell can linger for weeks or even months after painting, making the garage unpleasant to be in. If the garage is not well-ventilated, or if it’s attached to your living space, this odor can permeate into your home.
- Not Formulated for Indoor Air Quality: Interior paints are specifically designed with indoor air quality in mind. They have lower VOC levels and are formulated to cure properly within the consistent temperatures and humidity levels found inside a home. Exterior paints are made for the fluctuating conditions outdoors and may not perform optimally or safely indoors.
- Potential for Brittleness Indoors: While flexible outdoors, exterior paints can sometimes become brittle in the more stable, drier indoor environment. This can make them more susceptible to cracking or flaking over time, which might not be an issue outdoors where expansion and contraction are common.
- Cost and Availability of Alternatives: While exterior paint might seem like a readily available option, specialized interior paints designed for garages are often a better value in the long run. These interior paints offer the durability needed without the health and odor concerns associated with exterior formulas, making them a more practical choice.
Considering these drawbacks is vital for making an informed decision about painting your garage. The long-term health and comfort of your home should be a top priority.
Specialized Interior Garage Paints
For the best results and a safer environment, consider using interior paints specifically formulated for garages or high-traffic areas. These paints offer the durability you need without the drawbacks of exterior paints.
- Low-VOC or Zero-VOC Formulas: Many interior paints are now available in low-VOC or zero-VOC options. These significantly reduce the amount of harmful chemicals released into the air, making them much safer for use in enclosed spaces like garages. You can paint your garage and then use it shortly after with minimal odor.
- Enhanced Durability and Scuff Resistance: Paints marketed for garages or high-traffic areas are often formulated with stronger binders and additives that provide superior resistance to scuffs, scratches, and impacts. This means they can withstand the wear and tear of tools, bikes, and general garage activity.
- Stain and Moisture Resistance: Just like exterior paints, these specialized interior paints are often formulated to resist common garage stains, such as oil, grease, and car fluids. They are also designed to handle moisture and humidity, preventing issues like mold and mildew.
- Excellent Adhesion: These paints adhere well to various garage surfaces, including concrete, drywall, wood, and previously painted surfaces, when properly prepared. Good adhesion ensures a long-lasting finish that won’t peel or flake.
- Variety of Sheens Available: You can find these specialized interior paints in a range of sheens, from matte to semi-gloss. This allows you to choose the look and level of washability that best suits your needs and preferences for your garage space. A satin or semi-gloss is often recommended for balance.
Investing in a paint specifically designed for garage interiors ensures you get a finish that is both practical and safe for your home. It addresses the unique demands of a garage environment effectively.
Preparing Your Garage for Painting
Before you even think about rolling on paint, proper preparation is key to a long-lasting and professional-looking finish in your garage. This involves more than just a quick sweep; it’s about creating a clean, smooth, and receptive surface for your chosen paint.
The condition of your garage walls can vary greatly. You might have bare concrete, dusty drywall, old peeling paint, or even wood paneling. Each surface type requires a slightly different approach to ensure the new paint adheres correctly and stands up to the garage environment.
Skipping any of these steps can lead to peeling, bubbling, or a finish that just doesn’t last.
We will cover cleaning the walls thoroughly, repairing any damage like cracks or holes, and the critical step of priming. A good primer not only helps the paint stick better but also seals the surface, prevents stains from bleeding through, and can even improve the final color’s vibrancy. Taking your time with preparation will save you headaches and extra work down the line.
Cleaning Garage Surfaces
The first and most crucial step in preparing any surface for paint is thorough cleaning. Garages tend to accumulate a lot of dust, dirt, cobwebs, oil stains, and grease. If you paint over these contaminants, the paint will not adhere properly, leading to peeling and an uneven finish.
- General Dust and Cobweb Removal: Start by using a broom or a long-handled duster to sweep down all walls and ceilings, paying close attention to corners and edges where cobwebs tend to collect. A shop vacuum with a brush attachment is also very effective for removing loose dust and debris from walls and floors.
- Washing Walls: For most garage walls, a good wash with a mild detergent or a dedicated wall cleaner is necessary. Mix your cleaning solution in a bucket of warm water. Use a sponge or a soft-bristled brush to scrub the walls. Work in sections, rinsing thoroughly with clean water immediately after washing each section. This prevents streaks and removes soap residue, which can also interfere with paint adhesion.
- Addressing Grease and Oil Stains: If you have stubborn grease or oil stains on concrete or drywall, you might need a stronger cleaner. For concrete floors and lower walls, a degreaser specifically designed for concrete is effective. For drywall, a solution of trisodium phosphate (TSP) or a TSP substitute can help break down grease. Always test cleaners in an inconspicuous area first. Ensure adequate ventilation when using strong cleaners.
- Rinsing and Drying Time: Proper rinsing is as important as washing. Make sure to rinse all cleaning solution residue off the walls. After rinsing, allow the walls to dry completely. This can take 24 hours or more, especially in humid or cool garages. Painting over damp surfaces is a recipe for disaster.
A clean surface is the foundation of a great paint job. Don’t rush this step; it’s essential for the longevity of your paint.
Repairing Wall Damage
Once your garage walls are clean, it’s time to address any imperfections that could show through the paint or affect its adherence. Cracks, holes, and damaged drywall need to be repaired before you can proceed.
- Filling Small Holes and Cracks: For small nail holes or minor cracks, use a lightweight spackling compound or drywall joint compound. Apply it with a putty knife, pressing it firmly into the hole or crack. Smooth it flush with the wall surface, removing any excess. Allow it to dry completely according to the product’s instructions.
- Repairing Larger Holes: Larger holes in drywall might require a drywall patch or a piece of new drywall. For medium-sized holes, you can often use a self-adhesive mesh patch over the hole, then apply multiple thin layers of joint compound over the patch, feathering the edges out onto the surrounding wall. For very large holes, cutting out the damaged section and fitting in a new piece of drywall might be necessary.
- Sanding Repaired Areas: After the joint compound or spackling has dried, you’ll need to sand the repaired areas smooth. Use fine-grit sandpaper (around 120-150 grit) and a sanding block for even pressure. Sand until the repaired area is perfectly flush with the surrounding wall. Be careful not to over-sand the surrounding wall, as this can create dips.
- Cleaning Dust After Sanding: Sanding creates a lot of fine dust. Use a damp cloth or a tack cloth to wipe down all sanded areas and remove all dust. You can also use your shop vacuum. Dust left on the surface will show through the paint and hinder adhesion.
- Addressing Peeling or Damaged Paint: If there are areas of old, peeling paint, you need to scrape them away until you reach a stable edge. Then, lightly sand the feathered edges of the remaining paint to blend them into the wall. If the old paint is in good condition, you might only need to give it a light sanding to help the new paint adhere.
Taking the time to repair these issues will result in a much smoother and more durable paint job. It’s worth the extra effort.
Priming Garage Walls
Priming is a vital step that many people overlook, especially when painting a garage. A good primer acts as a bridge between your prepared wall surface and your topcoat of paint, ensuring better adhesion, coverage, and a more uniform finish.
- Purpose of Primer: Primer is a preparatory coating that seals the surface, making it more uniform in texture and porosity. This is especially important in a garage where you might have different materials like drywall, concrete, or patched areas. Primer prevents the topcoat from soaking unevenly into the surface, which can lead to patchy color and wasted paint.
- Stain Blocking: Many garages have older, stubborn stains from oil, grease, or even water damage. A good stain-blocking primer is essential to prevent these stains from bleeding through your new paint color. Look for primers specifically labeled as stain blockers for the best results.
- Adhesion Promotion: Primer helps the topcoat of paint adhere better to the surface. This is particularly important for surfaces like bare concrete or previously glossy paint. Good adhesion is critical for the durability of your garage paint job, preventing peeling and chipping.
- Color Uniformity: If you’re making a significant color change, or if your walls are stained or unevenly colored, primer helps create a uniform base. This means you’ll need fewer coats of your topcoat to achieve full coverage and a consistent color.
- Types of Primers: For garages, consider using a high-quality latex primer, especially if you’re using latex paint. If you have significant stain issues or are painting over oil-based paint, an oil-based or shellac-based primer might be more effective. Always ensure the primer is compatible with your chosen topcoat.
Apply primer evenly using a roller and brush, just as you would with paint. Allow it to dry completely according to the manufacturer’s instructions before applying your topcoat. This step significantly enhances the quality and longevity of your garage paint job.
Applying Paint to Garage Surfaces
With your garage walls prepped and primed, you’re ready for the exciting part: applying the paint. This stage requires attention to detail, the right tools, and a methodical approach to ensure a smooth, even, and lasting finish. We’ll cover how to apply paint effectively to different garage surfaces.
Your choice of paint, whether it’s a specialized interior garage paint or carefully considered exterior paint, will dictate some of the application steps. However, the general principles of painting remain the same. This includes using the right tools, applying paint in thin, even coats, and working methodically to avoid mistakes.
We’ll discuss how to use rollers and brushes, the importance of cutting in, how to achieve even coverage, and what to do about common issues like drips. Understanding these techniques will help you achieve a professional-looking result that enhances your garage’s appearance and functionality.
Using Rollers and Brushes
The right tools make a big difference in how smoothly and effectively you can paint your garage. Rollers are great for covering large areas, while brushes are essential for details and edges.
- Choosing the Right Roller: For most garage walls (drywall or concrete), a medium-nap roller cover (typically 1/2 inch nap) is a good choice. This nap length is effective at holding paint and distributing it evenly on slightly textured surfaces. If your walls are very smooth, a shorter nap might be preferred.
- Using a Roller Tray: Pour paint into a roller tray, filling it to the recommended line. Load the roller by rolling it back and forth in the tray, ensuring it’s evenly coated but not overloaded with paint. Excess paint can lead to drips and uneven coverage.
- Technique for Rolling Walls: Start by “cutting in” the edges of the wall with a brush (explained below). Then, use the roller to apply paint in a “W” or “M” pattern, working from the ceiling down. Overlap each stroke by about 50% to ensure seamless coverage and avoid lap marks.
- Choosing the Right Brush: A good quality angled brush (around 2-3 inches wide) is ideal for “cutting in” around trim, corners, and edges where the roller can’t reach. Synthetic bristles are best for latex paints, while natural bristles are preferred for oil-based paints.
- Brush Technique: Dip only about one-third of the brush bristles into the paint. Tap excess paint off on the side of the can or tray, don’t wipe it. Apply the paint with smooth, even strokes. For edges, use light pressure to create a clean line.
Proper tool usage ensures that paint is applied evenly and efficiently, leading to a much better final appearance.
Cutting In and Edging
Cutting in is the process of painting the edges and corners of a wall where a roller cannot easily reach. It’s a critical step that defines the clean lines of your paint job. Doing this carefully before rolling large areas ensures a professional look.
- What is Cutting In: This refers to painting along the edges of walls, ceilings, doors, windows, and around fixtures. It creates a neat border that the roller can then seamlessly meet. Precision here is key to avoiding paint on surfaces you don’t want painted.
- Using Your Brush for Cutting In: Load your angled brush with paint, removing any excess. Start at a corner or edge. Use light, steady pressure to apply a thin, even line of paint. Work slowly and deliberately, keeping the brush straight against the surface you’re painting next to (like the ceiling or trim).
- Feathering the Edges: As you paint a line, lightly feather the edge of the paint stroke. This means using very light pressure on the brush towards the end of the stroke. This helps blend the cut-in edge with the area you will later paint with the roller, preventing a harsh line.
- Working in Sections: Cut in along one wall or a section of the room first. Then, immediately roll the adjacent wall area. This wet-on-wet application helps to blend the brush strokes into the roller marks, creating a smoother transition and avoiding visible lines where the brush and roller meet.
- Dealing with Trim and Fixtures: For baseboards or window frames, you can either tape them off with painter’s tape for a perfectly sharp line, or carefully cut in by hand if you have a steady hand. For areas like light fixtures or outlets, ensure they are turned off and use your brush to paint carefully around them.
Mastering the art of cutting in takes practice, but it’s one of the most impactful techniques for achieving a professional finish in your garage.
Applying Multiple Coats
Most painting projects, especially in a garage, benefit from more than one coat of paint. Applying multiple thin coats is far better than trying to get full coverage with one thick coat, which can lead to drips, unevenness, and a less durable finish.
- Why Multiple Coats are Necessary: The first coat of paint often acts as a primer or base layer. It might look streaky or uneven because it’s soaking into the surface or covering existing colors. Subsequent coats build upon this base, deepening the color and providing a more uniform, solid finish.
- Drying and Curing Times: It’s crucial to allow each coat of paint to dry properly before applying the next. Check the paint can for recommended drying times. “Dry to touch” is not the same as “ready for recoat.” Rushing this can trap moisture or solvents, causing the paint to peel or blister later. Curing is the process where paint reaches its maximum hardness, which can take days or even weeks.
- Application of Second Coat: Once the first coat is dry to the touch and ready for recoating, apply the second coat using the same roller and brush techniques. You might find that the second coat goes on more smoothly and requires less effort to achieve full coverage.
- Third Coat if Needed: For very dark or vibrant colors, or if you’re covering a dark color with a lighter one, a third coat might be necessary to achieve the desired opacity and color depth. Always assess the coverage after the second coat in good lighting before deciding if a third coat is needed.
- Maintaining Wet Edges: When applying subsequent coats, continue to work from a “wet edge” to the next. This means always painting into an area that is still wet. This technique helps to avoid visible lap marks where one section of painted wall meets another that has already dried.
Patience is key when applying multiple coats. The extra time and effort will result in a superior, longer-lasting finish for your garage.
Can You Use Exterior Paint in a Garage Floor
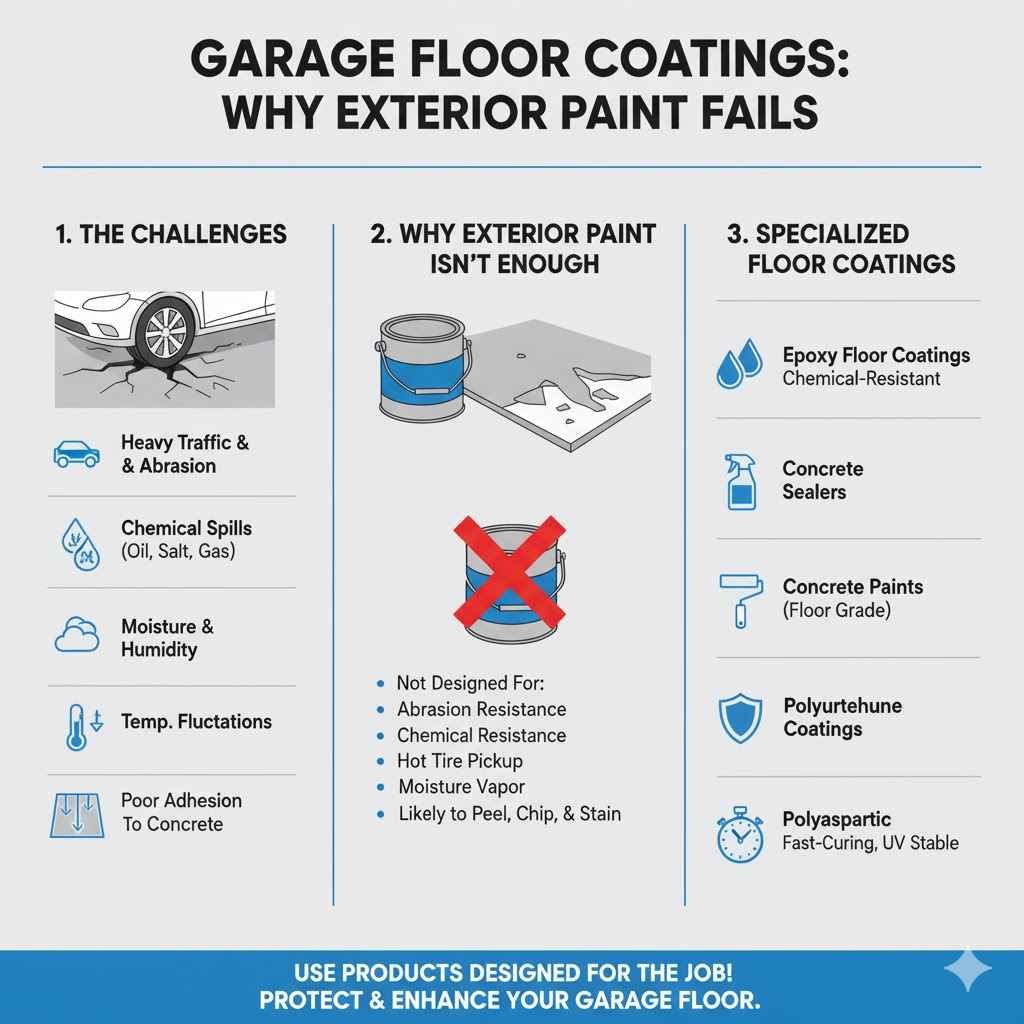
Painting a garage floor presents a different set of challenges compared to walls. Floors bear heavy weight, endure constant foot traffic, and are exposed to spills of oil, chemicals, and road salt. Therefore, the question of using exterior paint on a garage floor needs careful consideration, and the answer is generally no, not without significant caveats.
While exterior paint is durable, it’s not designed to withstand the abrasion, impact, and chemical resistance required for a garage floor. Standard exterior wall paint will likely peel, chip, and wear away very quickly under such conditions. The surfaces are also different; concrete floors require specific primers and coatings that can handle moisture from the ground and the stresses placed upon them.
We’ll delve into why regular exterior paint isn’t the best choice for garage floors and explore the specialized products that are designed for this demanding application. Understanding the unique needs of a garage floor will help you select the right coating to protect and enhance it.
Challenges of Garage Floor Painting
Garage floors are one of the most abused surfaces in a home. They are subjected to a relentless barrage of wear and tear that most wall paints simply cannot withstand. Understanding these challenges is crucial to choosing the right coating.
- Heavy Traffic and Abrasion: Cars, bikes, tools, and heavy storage items all put immense pressure on the floor. This constant friction and weight can easily scuff, scratch, and wear down a less durable coating. Standard exterior paint isn’t formulated to resist this kind of abrasion.
- Chemical Spills: Oil, gasoline, antifreeze, brake fluid, and road salt are common contaminants in a garage. These chemicals can break down or stain many types of paint, leading to damage and an unsightly appearance. The paint needs to be chemically resistant.
- Moisture and Humidity: Concrete can absorb moisture from the ground, and garages can be prone to condensation and water tracked in from outside. The coating needs to be able to breathe or resist moisture penetration to prevent peeling, bubbling, or mold growth.
- Temperature Fluctuations: Garages often experience significant temperature swings, from freezing in winter to extremely hot in summer. These changes can cause the concrete to expand and contract, putting stress on the coating. The coating needs to remain flexible enough to accommodate this movement without cracking.
- Adhesion to Concrete: Concrete surfaces can be porous and dusty. Achieving proper adhesion requires specific cleaning, etching, and priming procedures, which are often different from those for walls. Many exterior paints do not have the necessary bonding agents for concrete.
These factors mean that a simple coat of exterior paint applied to a garage floor is unlikely to last long or provide adequate protection.
Specialized Floor Coatings
For a garage floor, you need products specifically designed for this environment. These coatings are engineered to handle the unique stresses and exposures found on garage floors.
- Epoxy Floor Coatings: This is a popular and highly effective choice. Epoxy coatings are a two-part system (resin and hardener) that, when mixed, create a chemical reaction that cures into a very hard, durable, and seamless surface. They offer excellent resistance to chemicals, abrasion, and impact. Epoxy floors can last for many years if applied correctly.
- Concrete Sealers: These are less of a “paint” and more of a protective barrier. Sealers penetrate the concrete to protect it from stains and moisture. They are typically clear or offer a slight tint. They are less decorative than epoxy but offer good protection, especially for bare concrete.
- Concrete Paints: Some paints are specifically formulated for concrete floors. These are typically much thicker and more durable than wall paints. They often contain additives for better adhesion, flexibility, and resistance to abrasion and chemicals. Look for paints labeled for concrete floors, often in a satin or semi-gloss finish.
- Polyurethane Floor Coatings: These can be used as a topcoat over epoxy or as a standalone coating. Polyurethanes are known for their excellent UV resistance and abrasion tolerance. They are often used in commercial or industrial settings for their extreme durability and are a premium option for garages.
- Polyaspartic Floor Coatings: This newer technology offers many benefits of epoxy but cures much faster and can be applied in a wider range of temperatures. They are extremely durable, resistant to chemicals and UV light, and offer a high-gloss finish. They are often considered a premium, fast-drying solution.
When choosing a garage floor coating, always follow the manufacturer’s instructions for surface preparation, mixing, and application. A properly installed floor coating will protect your concrete and make your garage look fantastic.
Frequently Asked Questions
Question: Can I use leftover exterior paint for my garage walls
Answer: While technically possible, it’s generally not recommended unless the exterior paint is a high-quality acrylic latex with low VOCs and you are painting a detached garage with excellent ventilation. Standard exterior paints often have higher VOCs and stronger odors that are not ideal for enclosed indoor spaces.
Question: Will exterior paint peel off garage walls
Answer: High-quality exterior paint, especially acrylic latex, is designed to be durable and resistant to peeling, even in fluctuating temperatures. If properly applied over a well-prepared and primed surface, it should not peel easily from garage walls, though specialized interior garage paints are formulated specifically for this environment.
Question: Is exterior paint safe for attached garages
Answer: It is generally not recommended for attached garages due to higher VOCs and stronger odors. These can off-gas for an extended period and potentially enter your living space, affecting air quality and comfort. Specialized low-VOC interior paints are a safer choice for attached garages.
Question: How do I clean garage walls before painting
Answer: Thorough cleaning is essential. Start by removing dust and cobwebs with a broom or vacuum. Then, wash the walls with a mild detergent or cleaner and warm water, rinsing thoroughly.
For tough grease or oil stains, use a dedicated degreaser or a TSP substitute, ensuring good ventilation and testing in an inconspicuous area first.
Question: What is the best paint finish for a garage
Answer: For garage walls, a satin or semi-gloss finish is usually best. These finishes offer a good balance of durability, washability, and appearance. They are easier to clean than matte finishes and resist moisture and stains well, making them practical for a utilitarian space.
Summary
So, Can You Use Exterior Paint in a Garage? Yes, but with caution. While it offers durability, consider its VOCs and odor for attached garages. Specialized interior garage paints are often a safer and more effective choice.
Proper preparation like cleaning, repairing, and priming is key for any paint job, ensuring a lasting finish on both walls and floors. Your garage deserves a durable, attractive, and safe coating.