DIY Table Saw Push Sticks: Essential Safety Gear
Diy table saw push sticks are an essential tool for table saw safety, particularly when the distance between the blade and fence is narrow. Using a simple push stick or push block can prevent accidents while using a table saw.
Softwoods such as radiata pine are often preferred when making push sticks, as they give easily when catching the edge of the saw blade. Additionally, there are many DIY tutorials available online for making your own push sticks and push blocks.
By taking proper safety precautions and using the right tools, you can enjoy woodworking with peace of mind.
Introduction To DIY Table Saw Push Sticks
Introducing DIY Table Saw Push Sticks: Enhance safety and precision in woodworking with homemade push sticks for your table saw. Crafted from wood and designed to keep your hands at a safe distance from the blade, these essential tools provide added control and stability during cutting.
The Role Of Push Sticks In Workshop Safety
When it comes to woodworking, safety should always be a top priority. One essential tool for ensuring safety while using a table saw is the push stick. A push stick is a simple yet effective device that helps keep your hands and fingers away from the blade, reducing the risk of accidents and injuries.
Varieties Of Push Sticks
There are various types of push sticks available, each designed to provide a secure grip and control while guiding the workpiece through the saw. Let’s take a look at some common varieties:
- Basic Push Stick: This is the most straightforward type of push stick, typically made of solid wood or plywood. It features a handle for a comfortable grip and a narrow, flat end that applies pressure to the workpiece.
- Double-Sided Push Stick: As the name suggests, this push stick has a flat end on one side and a hook-shaped end on the other. The hook-shaped end allows for better control when pushing the workpiece, especially when making long, narrow cuts.
- V-Shape Push Stick: This push stick is designed with a V-shaped end, providing additional support and stability when feeding the workpiece through the saw. The V-shape helps prevent the workpiece from tipping or twisting during the cut.
- Adjustable Push Stick: This type of push stick allows for customization to fit different workpiece sizes and shapes. It typically features adjustable arms or clamps that can be set to the desired position for optimal control and safety.
Regardless of the type of push stick you choose, the key is to ensure it fits comfortably in your hand and provides a secure grip. Additionally, always follow proper safety guidelines and techniques when using a push stick to maximize its effectiveness and minimize the risk of accidents.
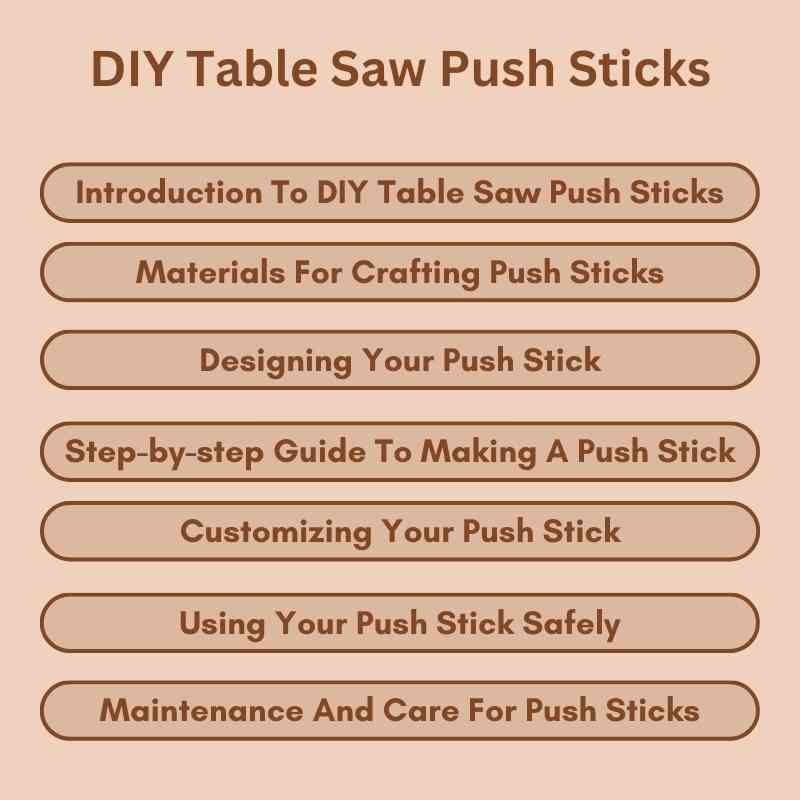
Materials For Crafting Push Sticks
When it comes to crafting DIY table saw push sticks, the choice of materials is crucial. The right material ensures the effectiveness and safety of the push sticks, while alternatives to wood can also offer practical solutions. Let’s delve into the different materials for crafting push sticks.
Choosing The Right Wood
Wood selection is critical when making push sticks. Softwood such as radiata pine is a popular choice due to its ability to give easily when catching the edge of the saw blade. This flexibility helps prevent damage to the blade and enhances safety during use. Additionally, hardwoods like oak or maple are durable options that offer longevity and stability when crafting push sticks.
Alternatives To Wood
While wood is a traditional and reliable material for push sticks, alternatives such as acrylic or plastic can provide durability and visibility during use. Moreover, composite materials like MDF or plywood can offer cost-effective options with the advantage of being easily customizable to suit specific push stick designs.
Designing Your Push Stick
Designing your own push stick for your DIY table saw is essential for safety and precision. By customizing the shape and material of your push stick, you can ensure a comfortable grip and effective control while keeping your hands away from the blade.
Follow these guidelines to create a push stick that suits your needs and enhances your woodworking experience.
Ergonomics And Grip
When it comes to designing your push stick for your table saw, one important factor to consider is ergonomics and grip. Your push stick should be comfortable to hold and easy to maneuver, reducing the risk of strain or fatigue during prolonged use.
To ensure a secure grip, you can design your push stick with a textured handle or add rubberized grips for better traction. This will help you maintain control and prevent slippage, especially when pushing materials through the saw blade. Additionally, the handle should be wide enough to fit comfortably in your hand, allowing for a firm and stable grip.
Safety Features To Include
To enhance the safety of your push stick, there are a few key features you should consider incorporating into its design:
- Notches or Hooks: Adding notches or hooks to your push stick can provide added stability and control while pushing materials through the blade. These features help prevent your hand from slipping forward and coming into contact with the blade.
- Extended Handle: Including an extended handle on your push stick allows you to maintain a safe distance from the blade while operating the table saw. This feature is particularly useful when working with larger or wider materials.
- Angled Push Pad: Designing the push pad at an angle can improve the efficiency and safety of your push stick. The angled surface allows for better contact with the material being pushed, reducing the risk of kickback and improving control.
- Built-in Push Block: Consider integrating a push block into your push stick design. This provides an additional layer of safety and stability when guiding materials through the saw blade.
By incorporating these safety features into your push stick design, you can ensure a safer and more efficient woodworking experience.
Remember, when using a table saw, it’s crucial to prioritize safety at all times. Always wear appropriate protective gear, follow proper operating procedures, and keep your fingers and hands away from the blade.
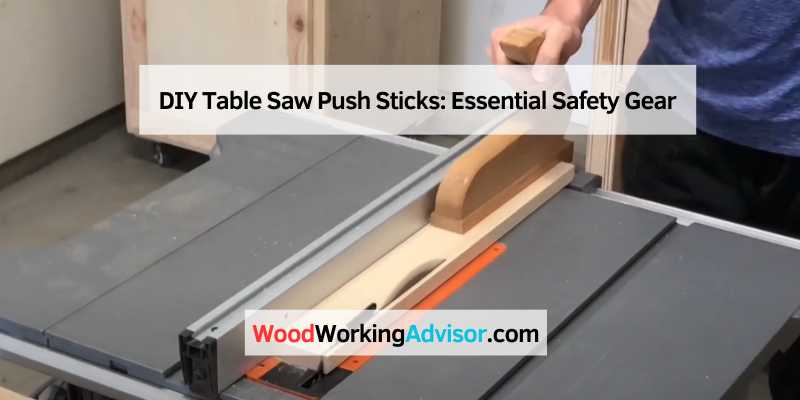
Step-by-step Guide To Making A Push Stick
Discover how to create your own DIY table saw push sticks with this step-by-step guide. Keep your hands safe and your cuts accurate by crafting push sticks that are easy to use and effective. With this simple tutorial, you can make push sticks that are perfect for your woodworking projects.
Cutting The Basic Shape
When making a push stick, start by cutting a 1/2-inch thick piece of hardwood to a size of 3 inches by 12 inches. Use a table saw or a bandsaw to cut the basic rectangular shape for the push stick.
After cutting the basic shape, measure and mark 2 inches from one end of the stick and draw a line across the width of the stick. Then, draw a diagonal line from the top corner of the 2-inch mark to the bottom corner of the opposite end. This will create the angled front edge of the push stick.
Adding Details And Functionality
Next, add details and functionality to the push stick. Use a jigsaw to cut along the marked lines to create the angled front edge. Smooth out any rough edges with sandpaper to ensure a comfortable grip.
Then, on the opposite end of the angled edge, cut a notch using a bandsaw to hook onto the end of the workpiece, providing added control and stability during the cutting process.
For added safety, drill a small hole near the end of the push stick and attach a piece of string or cord. This will allow you to hang the push stick within easy reach and prevent it from getting lost or misplaced in the workshop.
Customizing Your Push Stick
Customizing your push stick is a crucial step in ensuring safety and efficiency while using a table saw. By personalizing your DIY push sticks, you can tailor them to your specific needs and preferences, providing a comfortable grip and better control during cutting tasks.
Personalization ideas:
Customizing your push stick can not only make it look cool but also make it more comfortable to use. One popular personalization idea is to add a foam grip to the handle, which can improve the overall grip and control. Another idea is to add a magnet to the push stick, which can help keep it close by when not in use. You could even add your initials or a design to the push stick using a wood burning tool.
Improving grip and control:
When it comes to using a push stick, having a good grip and control is critical. One way to improve the grip is to add a rubber or foam handle to the push stick. You could also add ridges or texture to the handle to help prevent your hand from slipping. Additionally, you could attach a sandpaper strip to the bottom of the push stick, which can help provide additional grip and control when pushing the wood through the saw.
In conclusion, customizing your push stick is a simple and effective way to improve your woodworking experience. By personalizing your push stick and improving grip and control, you can ensure that each cut is made safely and accurately. So, take some time to experiment with different customization ideas and find the perfect push stick for you.
Using Your Push Stick Safely
Using DIY table saw push sticks safely is crucial to avoid accidents. Make sure to use softwood like radiata pine to create push sticks and always keep your hands away from the blade. Additionally, it is useful to have different designs of push sticks to ensure you have the right one for the job.
Proper Hand Positioning
When using a push stick, it is important to ensure that your hands are properly positioned. Your dominant hand should grip the push stick at the back, while your other hand should be placed on the workpiece. This allows you to guide the piece through the saw while also maintaining control with the push stick.
When To Use Your Push Stick
Push sticks should be used whenever you are cutting narrow pieces of wood or when the distance between the blade and fence is less than 3 inches. This ensures that your hands are kept at a safe distance from the blade, reducing the risk of injury. It is also important to use a push stick when the piece you are cutting is too small to safely guide with your hands.
Using a push stick is an essential safety practice when working with a table saw. Proper hand positioning and knowing when to use a push stick can help prevent accidents and injuries in the workshop. Remember to always keep your hands at a safe distance from the blade and use a push stick whenever necessary.
Maintenance And Care For Push Sticks
Proper maintenance and care for your table saw push sticks are crucial for ensuring their effectiveness and your safety during woodworking projects. By regularly checking and adjusting your push sticks, as well as knowing when to replace them, you can maintain a high level of safety and precision in your work.
Regular Checks And Adjustments
Regular inspection of your push sticks is essential to ensure that they are in optimal working condition. Check for any signs of wear and tear, such as splintering or cracks, and promptly address any issues to prevent safety hazards. Additionally, ensure that the grip surfaces are clean and free from debris to maintain a secure hold during use.
When To Replace Your Push Stick
Knowing when to replace your push stick is vital for maintaining a safe working environment. If you notice significant damage, such as deep cuts or a loss of structural integrity, it’s time to retire the push stick and invest in a new one. Additionally, if the push stick becomes warped or bent, it may not provide adequate support and should be replaced promptly.
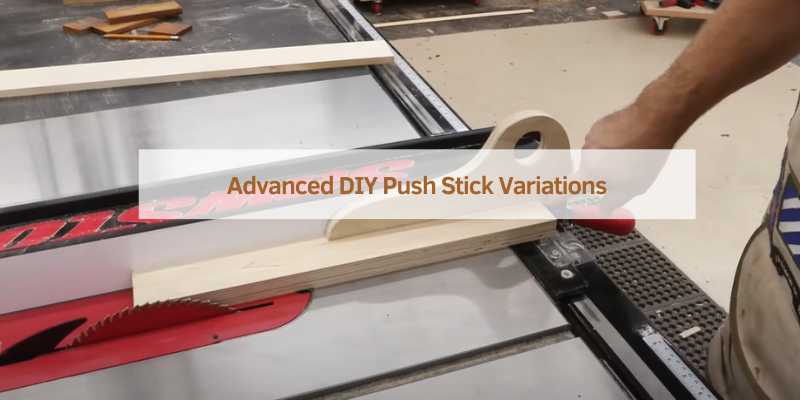
Advanced DIY Push Stick Variations
When it comes to table saw safety, using a push stick is essential. These simple tools help keep your hands at a safe distance from the blade, reducing the risk of accidents. While basic push sticks are effective for most tasks, advanced DIY push stick variations are designed to cater to specific woodworking tasks and provide even greater control and precision.
Creating Push Sticks For Specific Tasks
One of the advantages of DIY push sticks is the ability to create variations tailored to specific woodworking tasks. By customizing the shape, size, and features of your push stick, you can optimize its performance for different cutting techniques and materials.
For example, if you frequently work with narrow pieces of wood, you can design a push stick with a narrower profile to provide better control and stability. Conversely, if you often cut large sheets of plywood, a longer push stick with a wider base can help you maintain balance and prevent kickback.
By understanding the specific requirements of your woodworking projects, you can design push sticks that offer enhanced safety and efficiency.
Exploring Innovative Designs
In addition to customizing push sticks for specific tasks, woodworkers are also exploring innovative designs that push the boundaries of traditional push stick functionality.
One such design is the adjustable push stick, which allows for precise control over the pressure applied to the workpiece. By incorporating an adjustable mechanism, such as a threaded rod or a cam system, woodworkers can fine-tune the amount of pressure exerted by the push stick, ensuring optimal cutting performance while minimizing the risk of kickback.
Another innovative design is the ergonomic push stick, which focuses on maximizing comfort and reducing fatigue during prolonged use. These push sticks feature contoured handles and grip-enhancing materials, such as rubber or foam, to provide a secure and comfortable hold. By reducing hand strain, woodworkers can maintain better control over the workpiece and minimize the chances of accidents caused by fatigue-induced errors.
Furthermore, push sticks with built-in safety features, such as anti-kickback devices and blade guards, are gaining popularity among DIY enthusiasts and professionals alike. These advanced push sticks offer an added layer of protection by preventing kickback and keeping the workpiece securely in place.
With the advent of 3D printing technology, woodworkers are also experimenting with push stick designs that can be printed from durable materials, such as ABS or nylon. These printable push sticks allow for greater customization and can incorporate intricate features that are difficult to achieve with traditional woodworking techniques.
Overall, the world of advanced DIY push stick variations is constantly evolving, with woodworkers pushing the boundaries of design and functionality to enhance safety and performance.
Frequently Asked Questions
Should You Use A Push Stick On A Table Saw?
Yes, you should use a push stick on a table saw, especially when the distance between the blade and fence is narrow. It helps keep your hands safe and prevents accidents. Simple push sticks made of softwood like radiata pine are effective when cutting thin slivers of timber.
Always prioritize safety when working with power tools.
What Is The Best Wood For Push Sticks?
The best wood for push sticks is softwood, such as radiata pine. Softwood is preferred because it gives easily when catching the edge of the saw blade, minimizing the risk of injury.
How To Make A Wood Pusher?
To make a wood pusher, cut a piece of wood to the desired size and shape. Sand the edges and handle for a smooth finish. Ensure the pusher is sturdy and comfortable to hold. Use it to safely guide wood through a saw or other tools.
At What Width Is It Necessary To Use A Push Stick On A Table Saw?
When the distance between the blade and fence on a table saw is narrow, it is necessary to use a push stick. This ensures safety and helps prevent accidents. Push sticks are especially useful for cutting thin slivers of timber.
Softwood, such as radiata pine, is often preferred for making push sticks.
Conclusion
DIY table saw push sticks are a crucial tool for ensuring safety while working with a table saw. By using these simple yet effective devices, you can keep your hands at a safe distance from the blade and reduce the risk of accidents.
Whether you choose to make your own push sticks or purchase them, incorporating them into your woodworking routine is a wise decision. Remember to prioritize safety and always use push sticks when necessary to protect yourself and achieve accurate and precise cuts.