Drill vs Hammer Drill: Which Tool Fits Your Needs?
Figuring out the difference between a Drill vs Hammer Drill: When to Use Each Tool can be tricky when you’re just starting. It’s easy to get confused by the different names and what they do. Don’t worry, many people find it a little perplexing at first! This guide will break it all down simply, showing you step-by-step how to choose the right tool for any project. You’ll soon feel confident picking the perfect drill for your job. Next, we’ll begin exploring the key differences and uses.
Basic Drill Types and Functions
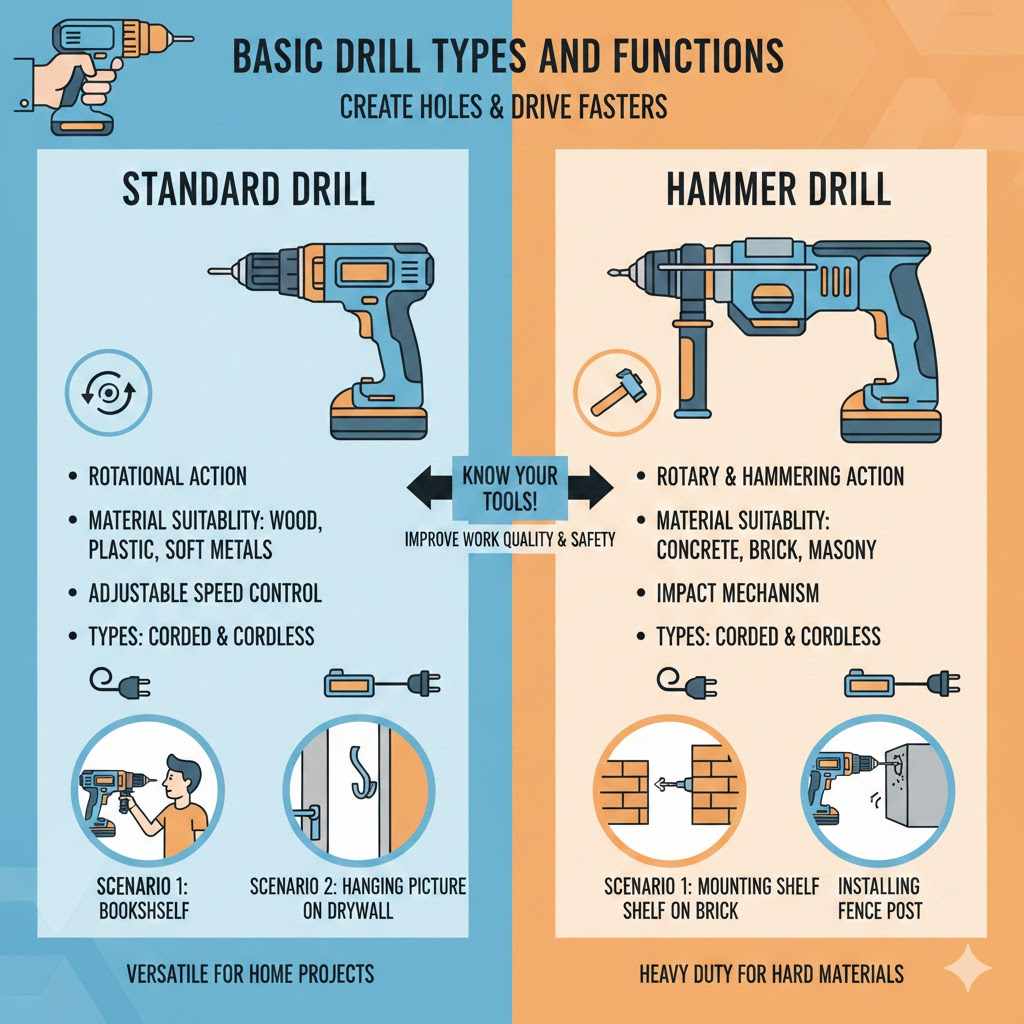
At their core, drills are power tools used to create holes or drive fasteners into various materials. They come in several forms, each designed for specific tasks. For anyone beginning their home improvement or DIY experience, knowing the variations between a standard drill and a hammer drill is a necessary first step. This fundamental knowledge allows you to select the appropriate tool, improving the quality of work and ensuring safety.
What is a Standard Drill?
A standard drill is a versatile tool used primarily for drilling holes and driving screws in softer materials. This includes wood, plastic, and metal. The drill operates with a rotational motion, which allows the drill bit to cut into the material. Standard drills are perfect for assembling furniture, hanging pictures, or working on simple crafts. Many models have adjustable speed settings, giving you control over the rate at which the bit turns, as well as the direction the bit is turning. You can find both corded and cordless options; corded drills provide continuous power, while cordless drills provide mobility.
- Rotational Action: The primary function is to rotate the drill bit to bore holes or insert screws.
- Material Suitability: Excellent for use on wood, plastic, and softer metals.
- Speed Control: Adjustable speed settings offer flexibility for different tasks.
- Types: Corded drills are powered by an electrical outlet, and cordless drills operate with rechargeable batteries.
Consider a scenario: you are assembling a bookshelf. A standard drill is ideal for pre-drilling holes and driving screws to secure the shelves to the frame. The drill’s adjustable speed will give you greater control. Another example is hanging a picture on a drywall; a standard drill can easily make a pilot hole for your picture-hanging hook. These examples emphasize the standard drill’s adaptability for many projects around the house.
Hammer Drill Explained
A hammer drill adds a percussive action to the standard rotational motion. This means that in addition to spinning, the drill also hammers the drill bit into the material. This feature makes it highly efficient at drilling into tough surfaces like concrete, brick, and stone. If you are ever doing any serious construction work or renovation that involves these materials, this is the tool to use. The hammer drill is designed to handle tough jobs that other drills can’t.
How a Hammer Drill Works
The hammer drill functions by combining rotation with a hammering action. The hammering action is created by internal mechanisms that cause the drill bit to rapidly move in and out while it rotates. This percussive force breaks the material, while the rotation removes the debris. The key is in its design: a special clutch mechanism allows the drill bit to move forward and backward as it spins, creating a hammering effect. The hammer action is measured in blows per minute (BPM), with higher BPM indicating greater hammering power. This action is essential for working with hard materials.
- Percussive Action: In addition to rotation, hammer drills have a hammering mechanism.
- Material Compatibility: Effective for drilling into concrete, brick, and stone.
- BPM: Hammer action is measured in blows per minute, higher BPM means more hammering power.
- Mechanism: Uses a clutch to create the forward and backward motion of the drill bit, creating the hammering effect.
Picture this: you are installing a fence post in concrete. A hammer drill is essential for drilling the holes to secure the post. The hammering action allows the drill bit to penetrate the concrete efficiently. This is why hammer drills are preferred in professional construction scenarios, where fast and effective drilling into tough materials is necessary.
Choosing Between a Drill vs Hammer Drill: Key Considerations
Choosing between a Drill vs Hammer Drill: When to Use Each Tool depends on the project’s specific requirements. The primary factor is the type of material you will be working with. For materials like wood or plastic, a standard drill is adequate. However, when working with concrete, brick, or stone, a hammer drill is the only effective choice. Consider the frequency and intensity of your projects. If you frequently work with tough materials, a hammer drill is a worthwhile investment.
Material Type and Project Needs
The type of material is the main aspect. A standard drill is excellent for softer materials. A hammer drill is made for hard materials. The hammer drill also has the force needed to quickly and effectively drill into hard materials. Consider the project itself: Is it for building a deck, or for hanging a simple shelf? The scope of the project greatly affects your tool selection. Always assess the material type and the expected intensity of the work to choose the right tool.
- Material Type: Identify the material you’ll be working with—wood, plastic, or harder materials like concrete.
- Project Scope: Understand the project to estimate the level of drilling required.
- Frequency of Use: Consider how often you will be using the drill, and on what materials.
- Professional vs DIY: Professional use will likely involve tougher materials, demanding a hammer drill.
Let’s consider two examples. First, suppose you want to hang a mirror on a drywall. A standard drill is sufficient. However, if you’re building a retaining wall and need to drill into concrete blocks, a hammer drill is essential. The type of project and the materials directly determine the tool that’s best suited for the task.
Power and Features: What to Look For
When picking a drill, power and features are important. Drills and hammer drills come in various power ratings, measured in volts for cordless models and amps for corded ones. Higher voltage or amperage means more power. This affects how easily the drill can handle tough materials. Besides power, look at features such as variable speed settings, which offer flexibility for different tasks, and the type of chuck, which determines the bit capacity. Some drills also have built-in lights for improved visibility and ergonomic designs for comfort during use.
- Power Ratings: Cordless drills use volts, corded ones use amps—more power is generally better.
- Variable Speed: Essential for controlling the drill’s speed depending on the task.
- Chuck Type: Determines the size and type of drill bits that the drill can accept.
- Ergonomics: Design for comfort and ease of use, making long projects less tiring.
Consider the power difference. A DIY user might find a 12V or 18V drill sufficient. A professional who regularly drills into tough materials should consider a drill with a higher voltage. Furthermore, variable speed settings let you control how fast the drill turns, essential for working on delicate projects or different materials.
Real-Life Examples and Practical Applications
Understanding the use cases of a Drill vs Hammer Drill: When to Use Each Tool becomes clear when you see it in real-world applications. Several scenarios demonstrate when to choose each tool. These examples highlight the core tasks for each tool.
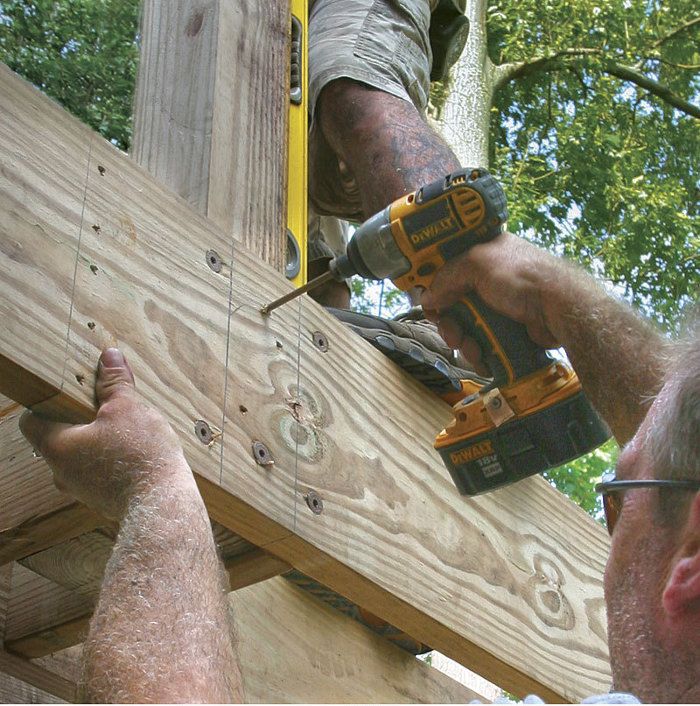
Case Study 1: Installing a Deck
Building a deck showcases the versatility of a standard drill. The process involves multiple steps where a standard drill works best. This is an example of when a standard drill shines. You will need to pre-drill holes in the wood for screws. It’s also necessary to drive in the screws to attach the deck boards. The standard drill’s variable speed setting lets you control the speed of the bit, avoiding damage to the wood. The standard drill is ideal for assembly and finishing tasks.
- Pre-Drilling: Drill pilot holes in the deck boards to prevent splitting.
- Screw Driving: Drive screws into the wood to attach deck boards to the frame.
- Assembly: Using a drill for various parts of the deck’s structure, like rails and posts.
- Versatility: Its usefulness for cutting, smoothing, and assembling the deck.
Imagine you’re constructing a deck with wooden planks. The standard drill can handle every aspect of the wood assembly. This is an example of the ideal application for a standard drill.
Case Study 2: Hanging Shelves on Concrete Walls
Hanging shelves on concrete walls is a task where a hammer drill shows its importance. Concrete is extremely dense. A standard drill won’t make holes quickly or effectively. You’ll need a hammer drill for this job. You first mark the locations for the shelf brackets on the concrete wall. Then, you use a hammer drill to make holes for the anchors. Finally, you insert the anchors and attach the shelf brackets with screws. The hammer action of the hammer drill allows it to quickly bore through the concrete. It ensures a firm and safe shelf installation.
- Marking Locations: Mark the places for shelf brackets on the concrete wall.
- Drilling Holes: Using a hammer drill to drill holes for anchors into the concrete.
- Anchor Insertion: Insert anchors into the holes.
- Bracket Attachment: Secure the shelf brackets to the wall using screws.
For example, installing shelves in a basement with concrete walls demands a hammer drill. Without it, you would struggle to make the required holes for secure shelf attachment. These cases clearly define the situations where each tool excels.
How to Use Each Tool Safely
Safe operation is essential when using either a drill or hammer drill. Proper practices protect you from injury and ensure the quality of your work. Every tool, regardless of its type, must be treated with respect and caution.
Safety Guidelines for Standard Drills
When working with a standard drill, always wear safety glasses. They’ll protect your eyes from debris. Also, wear gloves to improve your grip and protect your hands. Make sure to choose the correct drill bit for the task. Always apply gentle, even pressure when drilling. Avoid forcing the drill, which can cause it to stall or break. Be aware of the surroundings, making sure the work area is clear of obstacles. Make sure the drill is unplugged or the battery removed before changing the bit.
- Eye Protection: Always wear safety glasses to guard against flying debris.
- Gloves: Wear gloves to get a better grip and protect your hands.
- Bit Selection: Use the right drill bit for the job, depending on the material.
- Pressure: Apply constant, gentle pressure, avoiding forceful movements.
Suppose you are drilling into metal. Always use a metal-specific drill bit and use cutting oil to lower friction and heat. Taking these precautions protects your eyes, hands, and the quality of your work. It also helps to prevent accidents.
Safety Guidelines for Hammer Drills
Hammer drills have the potential to deliver greater force, therefore, extra caution is needed. Along with the safety measures for standard drills, always wear a dust mask. This protects your lungs when drilling into concrete or brick. Make certain the hammer drill is set to the correct mode—hammering for hard surfaces and rotation only for softer materials. Use the side handle included with many hammer drills for better control. This lowers the risk of injury from the drill’s percussive action. Always examine the drill bit for wear and tear before using it.
- Dust Mask: Protect your lungs from dust with a dust mask.
- Mode Selection: Set the drill to the correct mode for the surface being drilled.
- Side Handle: Use the side handle to maintain better control during operation.
- Bit Condition: Regularly inspect drill bits for wear and damage.
Consider a situation where you are drilling into brick. Using a dust mask is vital to avoid inhaling harmful particles. The side handle gives you the control needed to maintain stability and accuracy. These steps are key for your safety and the quality of your work.
Maintaining Your Drills for Long Life
Proper maintenance ensures that your drills work well for years. Routine care protects your investment. This maintenance involves several easy steps to help extend the life of your tools.
Cleaning and Storage
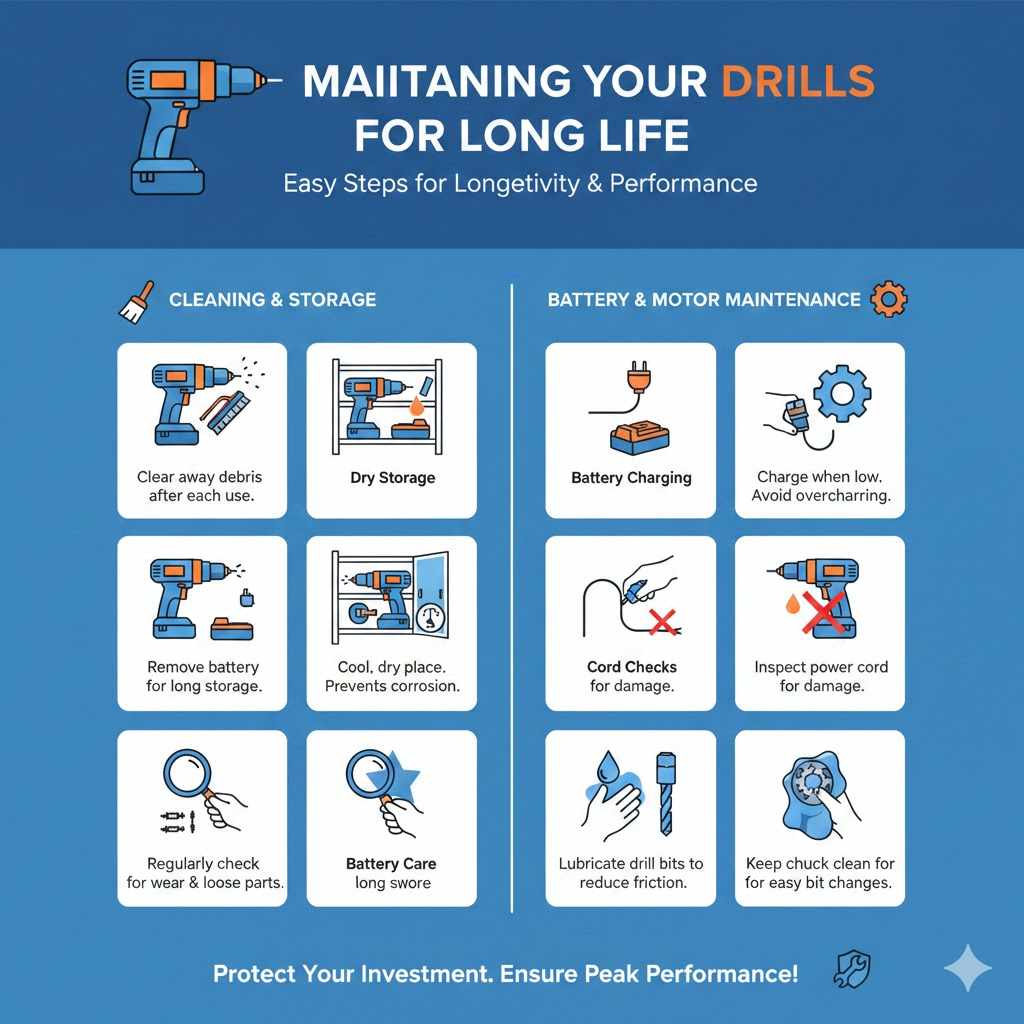
After each use, clean your drill. Use a brush or compressed air to remove debris from the drill body and bit. This ensures it performs at its best next time. Store your drills in a clean, dry place. Keep them away from extreme temperatures and moisture, which can damage the motor and batteries. For cordless drills, remove the battery when storing for a long time. This stops the battery from discharging and ensures it’s ready when you need it.
- Cleaning: Clear away debris after each use to keep it working well.
- Dry Storage: Keep drills in a cool, dry place to prevent corrosion and damage.
- Battery Care: Remove batteries from cordless drills during extended storage.
- Inspection: Regularly check your drills for any loose parts or wear.
Think about a scenario where you’ve finished drilling holes for a project. Taking a moment to clean the drill will keep it from getting clogged with sawdust. Clean storage protects it from environmental damage. Regular maintenance is key for a well-functioning tool.
Battery and Motor Maintenance
For cordless drills, proper battery maintenance is vital. Always charge the battery when it is low. Don’t leave it fully discharged for extended periods, as this can reduce its life. Avoid extreme temperatures. For corded drills, check the motor for wear, and inspect the power cord. If the cord is damaged, replace it immediately. Lubricate the drill bits regularly to reduce friction and wear. Keep the chuck clean, as this ensures bits can be changed easily.
- Battery Charging: Keep your battery charged, and avoid overcharging.
- Cord Checks: Inspect the power cord for any damage regularly.
- Lubrication: Lubricate drill bits to reduce friction.
- Chuck Maintenance: Keep the chuck clean and working correctly.
Imagine you have finished a series of drilling tasks. Charging the battery right away increases its lifespan. Inspecting the cord helps prevent electrical hazards. This extra care ensures your drills keep working for years.
Frequently Asked Questions
Question: Can I use a hammer drill on wood?
Answer: Yes, you can use a hammer drill on wood, but it’s not the best choice. A standard drill is usually better because it’s designed for precision on wood. Using the hammer function might cause splintering.
Question: Are hammer drills louder than standard drills?
Answer: Yes, hammer drills are typically louder than standard drills because of the hammering action. It’s advisable to use hearing protection, especially indoors.
Question: What’s the main difference in cost?
Answer: Hammer drills typically cost more than standard drills. This is due to the more complex mechanism and added capabilities.
Question: Can I use a standard drill to drill into concrete?
Answer: While you can attempt to drill into concrete with a standard drill, it is not recommended. It’s difficult and damages the drill. Use a hammer drill for this task.
Question: How do I know when to replace a drill bit?
Answer: Replace a drill bit when it becomes dull or damaged. Signs of wear include reduced drilling efficiency, rounded edges, or visible damage to the bit.
Final Thoughts
You now have a better grip on Drill vs Hammer Drill: When to Use Each Tool. Understanding the different functions of a standard drill and a hammer drill is the first step. You’ve learned the different materials each tool handles best, and what to consider when picking the right one. You’ve also seen real-world examples that bring the uses of each tool to life, as well as essential safety tips to keep you safe and your tools functioning well.
Remember to choose the tool based on the material and the job you have to do. Consider the power, features, and safety when making your decision. With this information, you can confidently take on projects that require either a standard drill or a hammer drill. This knowledge makes every project smoother and safer. You are now better prepared for any task!