How Much to Paint Window Shutters: Essential Guide
The amount of paint needed for your window shutters depends on their size, material, and style. Generally, a quart of paint covers about 100 square feet, sufficient for 4-6 standard shutters. Measure your shutters carefully and factor in an extra coat for thorough coverage to ensure a beautiful, long-lasting finish.
Hey there, fellow DIYers and wood enthusiasts! Md Meraj here, your friendly guide to making your home projects shine. Ever looked at your window shutters and thought, “How much paint is actually going to be enough for this job?” It’s a common question, and one that can lead to frustrating trips back to the store or, worse, an unfinished project staring back at you. But don’t worry! With a little planning and some simple measurements, you’ll know exactly how much paint to grab. Let’s break down this easy task step-by-step, so you can get those shutters looking fantastic without any guesswork.
Why Knowing “How Much” Matters for Your Shutters
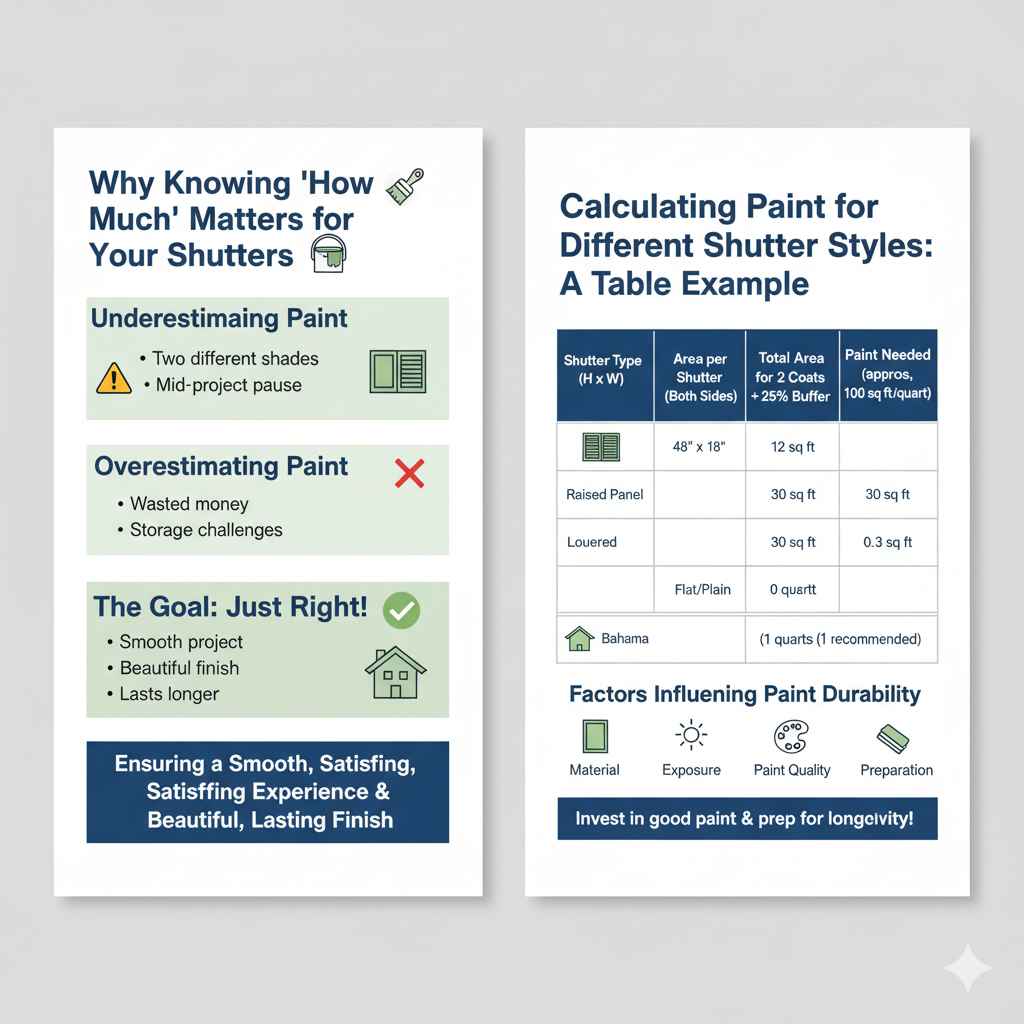
Painting your window shutters is a fantastic way to boost your home’s curb appeal. It’s a project that makes a big visual impact without requiring advanced woodworking skills. However, underestimating the amount of paint needed can be a real headache. You might end up with two different shades if you have to buy more paint later, or you might run out mid-job, forcing a pause that can be hard to restart. On the flip side, buying too much paint means wasted money and storage challenges. Our goal today is to equip you with the knowledge to buy just the right amount, ensuring a smooth, satisfying painting experience and a beautiful finish that lasts.
Understanding Shutter Types and Their Paint Needs
Before we get to the numbers, it’s helpful to understand that not all shutters are created equal. The type of shutter you have will influence how much paint you’ll need. Let’s look at the most common ones:
1. Raised Panel Shutters
These are your classic, solid shutters with distinct raised panels. The depth and shadows of the panels mean you’ll need to ensure paint gets into all those nooks and crannies. This can sometimes require a bit more paint than a flat shutter.
2. Louvered (or louvered) Shutters
These shutters have horizontal slats, or louvers. Painting louvered shutters means you have to carefully coat the top and bottom of each slat, plus the spaces between them. This intricate design can soak up more paint than you might expect.
3. Flat/Plain Shutters
Simpler in design, these shutters are often made of a single flat piece or have minimal decorative elements. They typically require less paint as there are fewer surfaces and details to cover.
4. Bahama/Board-and-Baton Shutters
Bahama shutters are hinged at the top and open outward, while board-and-batten shutters consist of vertical boards held together by narrower horizontal “battens.” Both styles have a distinct look that might influence paint coverage slightly, with the overlapping elements of board-and-batten potentially needing a little extra attention.
Measuring Your Window Shutters for Paint Calculation
This is where the magic happens! Accurate measurements are key to an accurate paint estimate. You’ll need to measure the surface area of each shutter you plan to paint.
What You’ll Need:
- A reliable tape measure
- A notepad or your phone to record measurements
- A calculator (or you can use your phone’s calculator)
Step-by-Step Measuring Process:
- Measure Height: Extend your tape measure from the very top to the very bottom of one shutter. Write this measurement down (e.g., 36 inches).
- Measure Width: Measure the width of the same shutter from one side to the other. Write this down (e.g., 15 inches).
- Calculate Area per Shutter: Multiply the height by the width. This gives you the area of one side of the shutter in square inches.
Formula: Height x Width = Surface Area (in square inches).
Example: 36 inches x 15 inches = 540 square inches per shutter. - Account for Both Sides: Most shutters are visible from both the inside and outside of your home. If you’re painting both sides, double the area you just calculated.
Example: 540 square inches x 2 = 1080 square inches for both sides of one shutter. - Note the Number of Shutters: Count how many shutters you’ll be painting.
- Calculate Total Surface Area: Multiply the area of one shutter (both sides, if applicable) by the total number of shutters.
Example: 1080 square inches/shutter x 4 shutters = 4320 square inches total.
Converting Measurements for Paint Coverage
Paint cans usually state their coverage in square feet, not square inches. So, we need to convert our total square inches to square feet. There are 144 square inches in 1 square foot (12 inches x 12 inches).
Conversion Formula:
Total Surface Area (in square inches) / 144 = Total Surface Area (in square feet).
Example: 4320 square inches / 144 = 30 square feet total.
Understanding Paint Coverage Rates
This is a crucial piece of information that you’ll find on every paint can. Paint coverage can vary depending on the paint’s quality, sheen, and the surface being painted. However, a good general rule of thumb is:
Most exterior paints cover about 350-400 square feet per gallon. A quart of paint typically covers about 80-100 square feet.
Always check the specific paint can you’re buying for its stated coverage. For an in-depth look at paint formulations and what affects coverage, you can consult resources like the Building Science Corporation, which offers detailed insights into building material performance.
Calculating How Much Paint You’ll Need
Now, let’s put it all together to figure out how much paint to buy.
The Formula:
Total Surface Area (in square feet) / Paint Coverage per Gallon (or Quart) = Gallons (or Quarts) Needed.
Scenario 1: Using Gallon Coverage (approx. 400 sq ft/gallon)
Example (from above): 30 square feet total surface area.
30 sq ft / 400 sq ft/gallon = 0.075 gallons.
Since you can’t buy 0.075 gallons, this means a single quart will be more than enough for this project. In fact, you might even have some leftover!
Scenario 2: Using Quart Coverage (approx. 100 sq ft/quart)
Example (from above): 30 square feet total surface area.
30 sq ft / 100 sq ft/quart = 0.3 quarts.
Again, this confirms that one quart of paint should be sufficient. For projects like this, it’s often wise to buy one quart and if the coverage seems a little low, you’ll know to get a second quart.
Adding Extra for Coats and Touch-ups
It’s crucial to factor in that you’ll likely need at least two coats of paint for proper coverage and durability, especially with exterior shutters. Some dark colors might also require a tinted primer or an extra coat to achieve full opacity.
Recommendation: Always buy at least 20-25% more paint than your initial calculation suggests. This buffer accounts for:
- Second Coat: Essential for a smooth, even finish and longevity.
- Primer: If you’re making a drastic color change or painting over a dark color with a light one, a primer is necessary. Many primers also have specific coverage rates you’ll need to consider.
- Application Method: Brushing or rolling can be more paint-intensive than spraying, depending on technique.
- Surface Porosity: Older or unpainted wood might absorb more paint.
- Waste: Some paint is always left in the tray, on the brush, or in the can.
- Future Touch-ups: Having a little extra paint on hand means you can easily touch up any nicks or wear and tear down the road.
Calculation with Extra Paint:
Let’s recalculate our example of 30 square feet, assuming we need two coats and a 25% buffer.
- Total Area for 2 Coats: 30 sq ft x 2 coats = 60 sq ft.
- Add 25% Buffer: 60 sq ft x 1.25 = 75 sq ft.
Now, using the quart coverage of 100 sq ft/quart:
75 sq ft / 100 sq ft/quart = 0.75 quarts.
This still means one quart should be enough, but you’ll be using most of it, with a nice bit left for touch-ups. If your shutters were larger, say totaling 100 sq ft for one coat, two coats would be 200 sq ft. Adding a 25% buffer for touch-ups brings it to 250 sq ft. This would mean you need 2.5 quarts. In this case, you’d buy 3 quarts.
Paint Sheen and Its Impact on Coverage
While the sheen (e.g., satin, semi-gloss, gloss) primarily affects the look and durability of the paint, it generally doesn’t drastically change the paint’s coverage rate listed on the can. However, thicker, higher-gloss paints might sometimes cover slightly less surface area than their matte counterparts due to their formulation. Always rely on the coverage information provided by the paint manufacturer.
Tools Affecting Paint Usage
The tools you use can also play a role in how much paint you use:
- Brushes: High-quality brushes can hold more paint and apply it more evenly, potentially leading to more efficient use.
- Rollers: The nap of the roller (how thick the fuzzy surface is) can affect paint pickup and spread. Thicker naps can hold more paint but might also use more.
- Sprayers: While sprayers can offer a beautiful finish, they can also be the most wasteful if not used correctly. Overspray can significantly increase the amount of paint needed. For shutters, a sprayer might use considerably more paint than brushing or rolling, especially if you’re not spraying them in place or on a protected surface.
For shutters, painting them while they are off the house, laid flat on sawhorses, often provides the best control and can help minimize paint waste. If you’re spraying, consider enclosing the area to catch overspray, or get ready to use more paint!
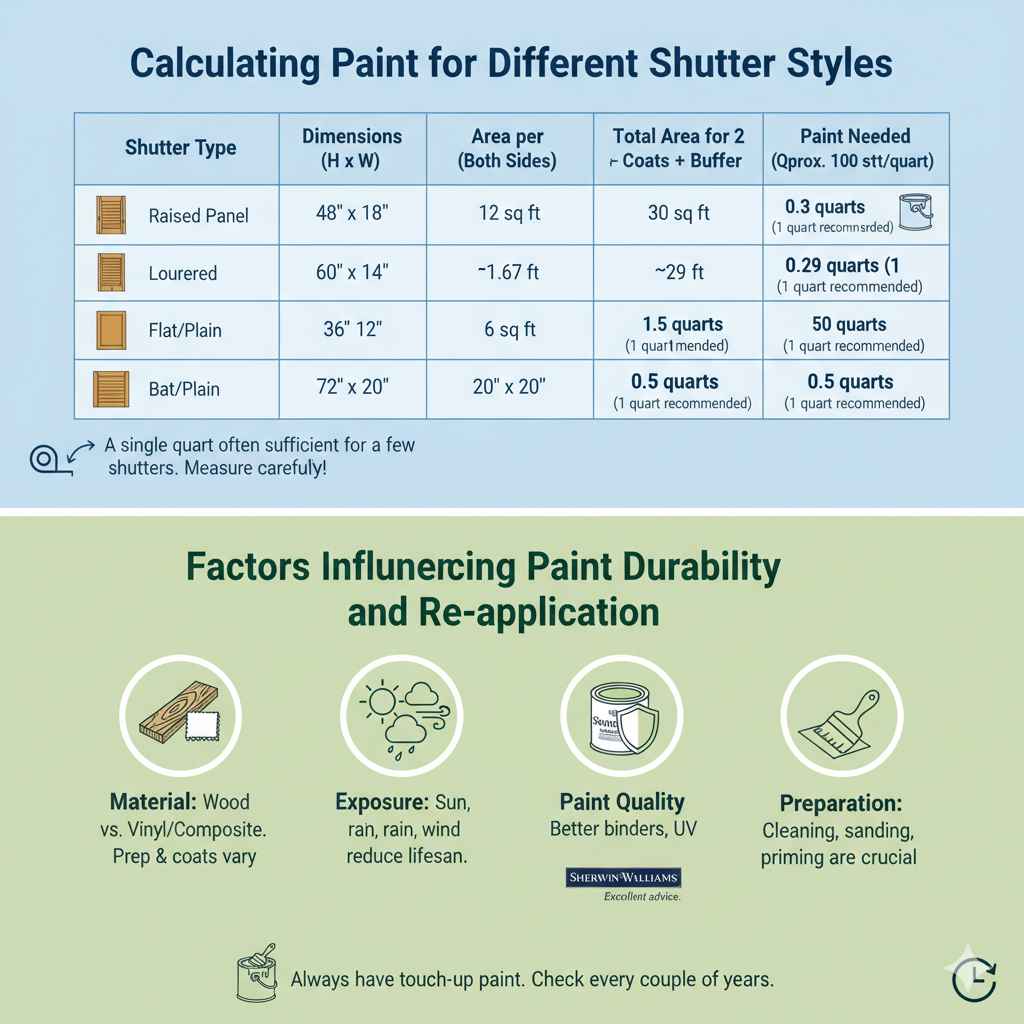
Calculating Paint for Different Shutter Styles: A Table Example
Let’s look at a practical example with different shutter types and sizes to illustrate how the calculation might vary. We’ll assume each shutter needs to be painted on both sides and we’re planning for two coats plus a small buffer.
| Shutter Type | Dimensions (H x W) | Area per Shutter (Both Sides) | Total Area for 2 Coats + 25% Buffer | Paint Needed (Quarts, approx. 100 sq ft/quart) |
|---|---|---|---|---|
| Raised Panel | 48″ x 18″ | (48″ x 18″) x 2 = 1728 sq in / 144 = 12 sq ft per shutter. 12 sq ft x 2 coats = 24 sq ft. 24 sq ft x 1.25 = 30 sq ft | 30 sq ft | 0.3 quarts (1 quart recommended) |
| Louvered | 60″ x 14″ | (60″ x 14″) x 2 = 1680 sq in / 144 = 11.67 sq ft per shutter. 11.67 sq ft x 2 coats = 23.34 sq ft. 23.34 sq ft x 1.25 = 29.18 sq ft | ~29 sq ft | 0.29 quarts (1 quart recommended) |
| Flat/Plain | 36″ x 12″ | (36″ x 12″) x 2 = 864 sq in / 144 = 6 sq ft per shutter. 6 sq ft x 2 coats = 12 sq ft. 12 sq ft x 1.25 = 15 sq ft | 15 sq ft | 0.15 quarts (1 quart recommended) |
| Bahama | 72″ x 20″ | (72″ x 20″) x 2 = 2880 sq in / 144 = 20 sq ft per shutter. 20 sq ft x 2 coats = 40 sq ft. 40 sq ft x 1.25 = 50 sq ft | 50 sq ft | 0.5 quarts (1 quart recommended) |
As you can see from the table, even for larger shutters, a single quart can often be sufficient for a few depending on the dimensions, provided you’re using a standard coverage paint. This is why careful measurement is so important!
Factors Influencing Paint Durability and Re-application
When you’re painting shutters, you’re not just doing it for looks; you’re also protecting the material from the elements. Factors affecting how long your paint job will last include:
- Material: Wood shutters might require more intensive prep and potentially more coats than vinyl or composite shutters. A properly sealed wood surface will hold paint better.
- Exposure: Shutters facing direct sun, heavy rain, or harsh winds will wear down faster than those in more sheltered locations.
- Paint Quality: Higher-quality exterior paints are formulated with better binders and pigments, offering superior adhesion and UV resistance. Investing in good paint is key for longevity. For guidance on selecting exterior paints, the Sherwin-Williams website offers excellent advice for homeowners.
- Preparation: Proper cleaning, sanding, and priming are critical. A clean, properly prepped surface ensures the paint adheres well and lasts longer.
Because of these factors, it’s always a good idea to have a small amount of paint left over for touch-ups. If your shutters are in rough shape or you’re painting them for the first time, be prepared to check them every couple of years for wear.
Frequently Asked Questions (FAQ) About Painting Shutters
Q1: Do I really need to paint both sides of my shutters?
A: Yes, absolutely! Painting both sides protects the shutter from moisture and environmental damage equally and prevents warping. It also ensures a consistent look, even if the inside isn’t often seen.
Q2: How many coats of paint do I need for shutters?
A: For best results and durability, plan for at least two coats of paint. If you’re covering a dark color with a light one, or painting raw wood, you may also need a coat of primer.
Q3: What’s the best way to paint louvred shutters?
A: Painting louvred shutters can be tricky. For the best results, remove them and lay them flat. Use a good quality synthetic brush and work from top to bottom, ensuring you paint the top, bottom, and front of each louver. A small brush can help get into tight spaces.
Q4: Should I use an oil-based or water-based (latex) paint for shutters?
A: For exteriors, water-based (latex) paints are generally recommended. They are flexible, resist cracking and peeling better, are easier to clean up, and have lower VOCs (Volatile Organic Compounds).