How to Buff Wood: Achieve a Flawless Finish in 5 Steps
To buff wood, use a clean cloth or buffing pad with a fine abrasive compound. Apply even pressure while moving in circular motions.
Buffing wood enhances its appearance and protects the surface. This process smooths out imperfections and adds shine, making wood surfaces look brand new. Whether working on furniture, cabinetry, or floors, buffing offers lasting benefits. The right technique not only improves aesthetics but also prolongs the wood’s life.
Choosing the appropriate buffing compound is crucial for achieving optimal results. Regular maintenance through buffing can prevent wear and tear, ensuring your wood surfaces remain beautiful over time. This guide will walk you through the essential steps and tips for effective wood buffing, helping you achieve professional-looking results at home.
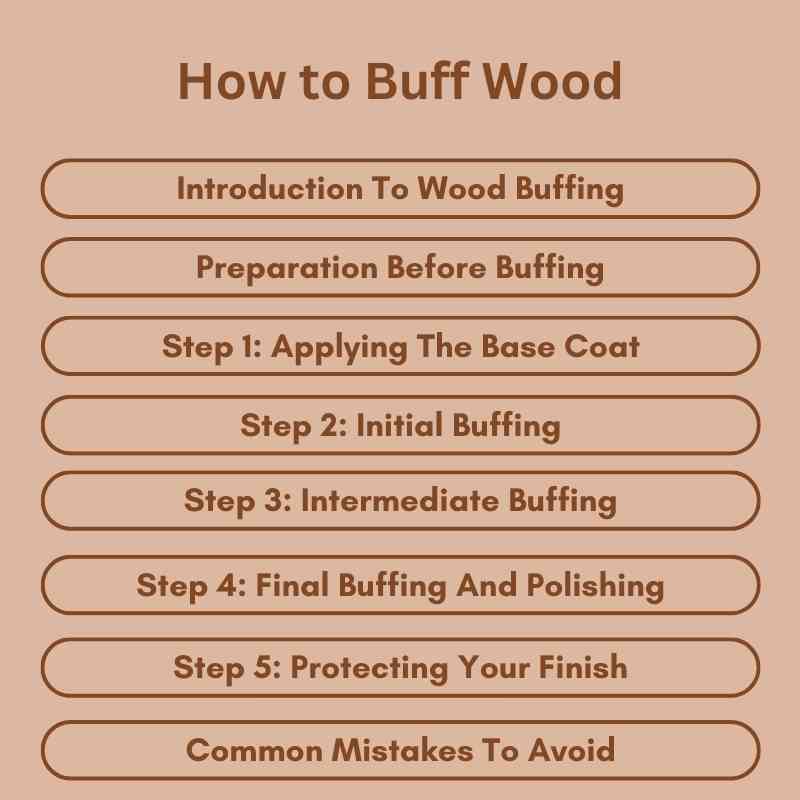
Introduction To Wood Buffing
Buffing wood creates a smooth and shiny finish. It removes imperfections and enhances the wood’s natural beauty. This technique makes furniture and decor look more appealing.
Benefits of buffing wood include:
- Improved aesthetic appeal
- Enhanced durability and protection
- Increased value of the piece
- Better feel and texture
Using the right tools is important. Buffing pads and compounds can make a big difference. A smooth finish is not just about looks; it also helps to protect the wood.
Materials And Tools Needed
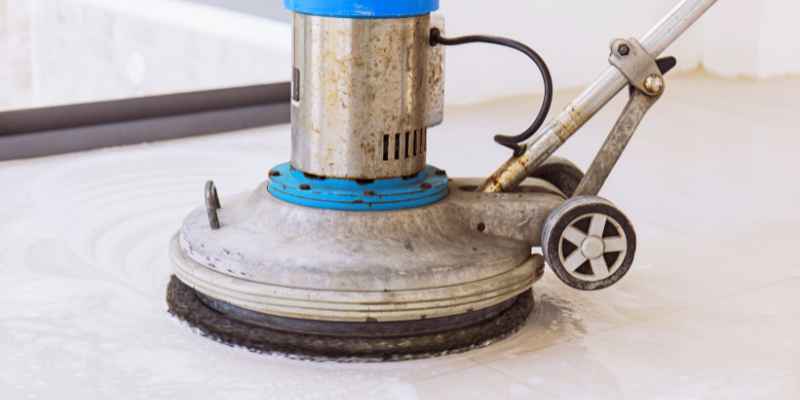
Choosing the right buffing equipment is essential for great results. Look for a buffing wheel that fits your needs. Variable speed options help you control the buffing process. Select a soft wheel for polishing and a hard wheel for cutting.
Always wear safety glasses to protect your eyes. Use gloves to keep your hands safe from dust and splinters. A mask helps filter out harmful particles in the air. Make sure your workspace is well-ventilated to avoid inhaling dust.
Check your equipment regularly for any signs of wear. Maintain your tools to ensure they work properly. Follow the manufacturer’s instructions for best practices. This will help you achieve a smooth and shiny finish.
Preparation Before Buffing
Start by removing any dust or dirt from the wood surface. Use a soft cloth or a vacuum cleaner. Make sure to get into all the corners.
Next, use a gentle wood cleaner. Apply it with a clean cloth. This will help to remove any grease or old polish.
After cleaning, let the wood dry completely. This ensures the buffing process works better.
Sanding is the next step. Use fine-grit sandpaper for smooth results. Sand in the direction of the grain.
Remove any dust created by sanding. A clean surface is vital for the best finish.
Step 1: Applying The Base Coat
Choosing the right base coat is crucial for wood buffing. Look for a product that suits your wood type. Oil-based coats work well for durability. Water-based options are great for easy clean-up.
Application techniques can impact the finish. Use a brush or roller for even coverage. Start at one corner and work your way across. Apply thin layers to avoid drips. Allow each coat to dry completely before adding more. Sand lightly between coats for a smoother surface.
Step 2: Initial Buffing
Start with coarse buffing compounds. These help remove scratches and imperfections. Use a buffer or polishing pad for even application. Apply the compound evenly across the wood surface.
Work in small sections. This ensures thorough coverage and better results. Always follow the manufacturer’s instructions for the best outcome.
Use a low speed to prevent damage. Too much speed can harm the wood. Keep the buffer moving to avoid overheating any area.
Check your progress regularly. Wipe away any excess compound with a clean cloth. This step helps reveal the surface finish.
Step 3: Intermediate Buffing
Transitioning to finer compounds is key for achieving a smooth finish. Start with a medium-grade compound to prepare the surface. Use a buffing wheel that matches the compound. Apply a small amount of compound to the wheel.
Master the buffing motion by moving the wheel in gentle circles. Keep the wheel flat against the wood surface. Avoid pressing too hard to prevent damage. Check your progress often to ensure an even shine.
Switch to a fine-grade compound once the medium-grade is complete. This step enhances the shine and smoothness. Always clean the wheel between different compounds for the best results.
Step 4: Final Buffing And Polishing
To achieve a high gloss finish, use a fine polishing compound. Apply it evenly with a soft cloth. This step helps remove any scratches or imperfections. Always work in small areas for the best results.
For a deeper shine, use a buffing wheel. A rotary tool can speed up the process. Keep the speed low to avoid damaging the wood. Move the wheel in a circular motion for even coverage.
After buffing, wipe off any excess compound. Inspect the surface for a smooth finish. Repeat the process if needed to reach your desired gloss level. Patience is key for a stunning look!
Step 5: Protecting Your Finish
Using sealants and protectants is essential for preserving your wood finish. These products create a barrier against dirt and moisture. Choose a sealant that suits your wood type for the best results.
Common options include polyurethane, lacquer, and oil finishes. Each has unique benefits and drying times. Always read the label for application instructions.
Regular maintenance helps maintain a long-lasting shine. Wipe surfaces with a soft, damp cloth. Avoid harsh chemicals that can damage the finish.
Consider reapplying sealants every few years. This will keep your wood looking fresh and vibrant. Always test a small area first to ensure compatibility.
Common Mistakes To Avoid
Over-buffing can harm the wood’s surface. It leads to uneven textures and damage. Always check the pad’s condition before use. Using worn pads can cause scratches.
Choosing the wrong buffing pads is another common mistake. Different woods require specific pads. Soft woods need softer pads, while hard woods need firmer ones. Using the right pad ensures a smooth finish and prevents damage.
Always test on a small area first. This helps avoid costly mistakes. Remember, patience is key to achieving the best results.
Troubleshooting Buffing Problems
Uneven finishes can happen while buffing wood. This issue often stems from using the wrong technique. Make sure to apply even pressure across the surface. Move the buffer in a consistent pattern.
If you notice streaks, change the buffing pad. A worn-out pad can cause uneven results. Always use a clean pad for the best finish.
Adjusting the speed of the buffer also helps. A slower speed can improve control and prevent mistakes. Always keep the buffer flat against the wood.
| Problem | Solution |
|---|---|
| Uneven finish | Use even pressure and consistent movement |
| Streaks | Change to a clean buffing pad |
| Loss of control | Adjust speed to a slower setting |
Advanced Techniques For Professionals
Buffing intricate woodwork requires special attention to detail. Use a soft cloth to apply polish evenly. Choose a high-quality buffing compound for best results. Work in small sections for an even shine.
Innovations in buffing technology improve the process. Electric buffers save time and energy. They provide consistent results across different wood types. Dust collection systems keep workspaces clean and safe. Newer products are more user-friendly and efficient.
| Innovation | Benefits |
|---|---|
| Electric Buffers | Faster and consistent results |
| Dust Collection Systems | Cleaner workspace |
| User-Friendly Products | Easy to use for everyone |
Conclusion: The Rewards Of Mastering Buffing
Buffing wood brings great satisfaction. Mastering this skill gives a sense of achievement. Seeing the wood shine makes all the effort worth it.
DIY buffs enjoy the creative process. It allows them to express their style. Each project teaches new techniques and skills. This journey can be very rewarding.
Sometimes, calling a professional is best. Complex projects may need expert help. Professionals have tools and experience that can save time.
Evaluate your project carefully. If unsure, seek advice from a specialist. This choice can lead to stunning results.
Frequently Asked Questions
How Do You Prepare Wood For Buffing?
Preparing wood for buffing involves cleaning and sanding. Start by removing any dust or debris with a damp cloth. Use fine-grit sandpaper to smooth the surface and eliminate imperfections. This step ensures an even finish and helps the buffing compound adhere better to the wood.
What Tools Are Needed To Buff Wood?
To buff wood effectively, you need a few essential tools. A buffing wheel attached to a drill or a dedicated buffing machine is ideal. Soft cloths and buffing compounds are also necessary. These tools help achieve a high-gloss finish and enhance the wood’s natural beauty.
Can You Buff Stained Wood?
Yes, you can buff stained wood, but caution is essential. Ensure the stain has completely dried before buffing. Use a gentle touch to avoid removing the stain. Buffing can enhance the depth of the color and add a beautiful shine, showcasing the wood’s grain.
How Often Should You Buff Wood Surfaces?
Buffing wood surfaces depends on their usage and wear. Generally, buffing every six months to a year is recommended for high-traffic areas. Regular maintenance helps preserve the finish and luster. Keeping an eye on the surface’s appearance will guide you on when it’s time to buff again.
Conclusion
Buffing wood enhances its natural beauty and prolongs its lifespan. With the right tools and techniques, anyone can achieve a polished finish. Regular maintenance keeps your wooden surfaces looking fresh. Embrace these methods, and transform your wood projects into stunning pieces.
Start buffing today for remarkable results!