How To Darken Pine Wood Without Stain Easily
Many folks want to give their pine projects a darker look but are hesitant about using traditional wood stain. It can sometimes be tricky for beginners, leading to blotchy finishes or unexpected color results. You might worry about chemicals or the mess involved.
But don’t fret! It’s totally possible to achieve a beautiful, richer tone on pine without ever touching a can of stain. This guide will walk you through simple, effective methods step-by-step, so you can get that look you love with ease.
We’ll show you the tricks that make How to Darken Pine Wood Without Stain Easily a reality for any project.
Naturally Darkening Pine Wood Methods
Exploring ways to make pine wood darker without relying on traditional stains opens up a world of creative possibilities. Many people seek these methods because they want a more natural look, are concerned about VOCs (volatile organic compounds) found in some stains, or simply find stains difficult to work with. Pine is a softwood, which means it can absorb stain unevenly, leading to blotchiness that can be frustrating to fix.
Alternative methods often leverage household items or simple chemical reactions to achieve a beautiful, deep color that looks both rich and authentic. This section will explore some of the most effective and beginner-friendly ways to achieve this transformation, setting the stage for beautiful, darker wood finishes.
The Steel Wool and Vinegar Technique
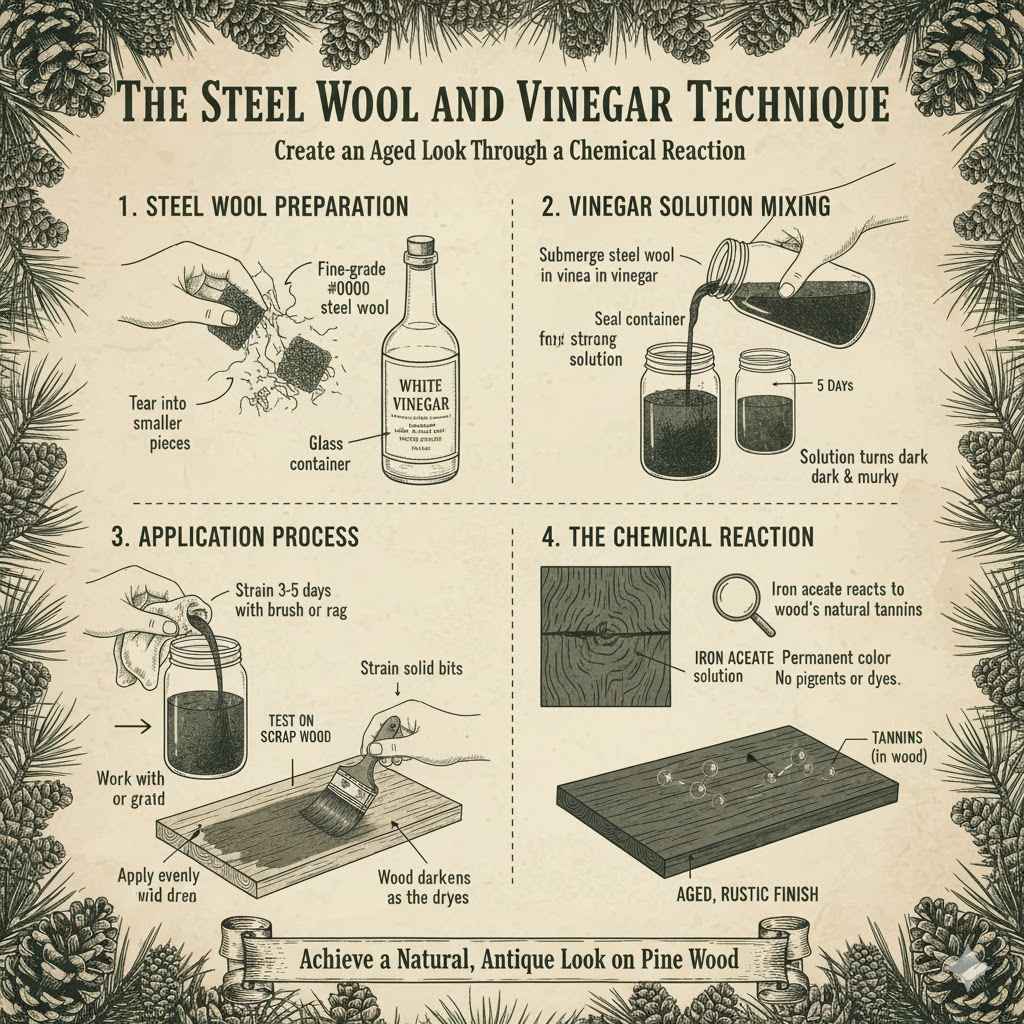
One of the most popular and surprisingly effective ways to darken pine is by using steel wool and vinegar. This method creates an “aged” look through a chemical reaction. The vinegar, typically white vinegar, is allowed to react with steel wool.
This process produces iron acetate, which then reacts with the tannins naturally present in the wood. The result is a dark, often grayish-brown or blackish finish that looks like it’s aged over many years. It’s a great way to achieve a rustic or antique appearance without any pigments or dyes.
- Steel Wool Preparation
- The vinegar you’ll use can be plain white vinegar or apple cider vinegar. White vinegar is generally preferred for its clarity and predictable results.
- You’ll need fine-grade steel wool, ideally #0000 or #000. This is important because coarser grades can leave visible scratches in the wood that are hard to remove. The fine steel wool will dissolve almost completely in the vinegar, leaving behind the reactive iron particles without damaging the wood surface.
- For each jar or container you use, you’ll want to fill it with steel wool, gently breaking it apart to create air pockets. This allows the vinegar to permeate the steel wool effectively.
- Do not use stainless steel wool as it does not contain enough iron to create the necessary chemical reaction with the vinegar.
The preparation of the steel wool is a key step. You want to shred or tear the steel wool into smaller pieces. This increases the surface area that comes into contact with the vinegar, speeding up the reaction process.
Place these pieces into a glass jar or a plastic container. Avoid metal containers, as the vinegar can corrode them. The idea is to let the steel wool rust and break down in the acidic environment provided by the vinegar.
This creates the iron acetate solution that will later color your wood.
- Vinegar Solution Mixing
- Pour vinegar over the steel wool in your container. You want enough vinegar to fully submerge the steel wool.
- The amount of steel wool and vinegar will depend on how much solution you need. A good starting ratio is about one pad of steel wool for every cup of vinegar.
- Seal the container tightly to prevent evaporation.
- Let the mixture sit for at least 24 hours, though 3-5 days is even better for a stronger solution. The longer it sits, the darker the reaction will be.
- You will notice the steel wool beginning to dissolve and the vinegar will become cloudy and brownish.
- This creates your ebonizing solution.
Once you have mixed the steel wool and vinegar, the waiting game begins. It’s crucial to let this mixture sit for a minimum of 24 hours. Many woodworkers recommend letting it steep for three to five days to achieve a more potent solution.
During this time, the steel wool will rust and break down, infusing the vinegar with iron. The liquid will turn murky, sometimes appearing dark brown or black. This liquid is your wood-darkening agent.
It’s important to shake the container occasionally to ensure even reaction and to keep the steel wool submerged.
- Application Process
- After the steeping period, strain the solution through a cheesecloth or fine sieve to remove any solid bits of steel wool. You want a clear liquid to apply to your wood.
- Use a brush, sponge, or cloth to apply the solution evenly to your sanded pine wood. Work in the direction of the wood grain.
- You may need multiple coats to achieve your desired darkness. Let each coat dry completely before applying the next.
- The wood will darken as the solution dries and reacts.
- It’s a good idea to test the solution on a scrap piece of pine first to see how dark it gets and if it’s the color you want.
Applying the solution is straightforward. Make sure your pine wood is clean and sanded smooth. Use a brush, rag, or sponge to apply the strained vinegar and steel wool solution generously and evenly across the wood surface.
Always work with the grain. The magic happens as it dries. The iron acetate reacts with the wood’s natural tannins, creating a permanent color change.
You can apply multiple coats for a deeper, richer look, allowing each coat to dry fully in between. This process requires patience but yields a wonderfully natural-looking dark finish.
The Tea and Steel Wool Method
Similar to the vinegar and steel wool technique, using tea can also darken pine wood, but it produces a slightly different, often warmer, tone. Tea, particularly black tea, contains tannins. When combined with the iron acetate from the steel wool and vinegar, these tannins react to create a richer, more complex dark color.
This method is excellent for achieving an antique brown or even a dark, almost ebony appearance, depending on the strength of the tea and the steel wool solution used. It’s a fantastic way to layer color and depth onto pine.
- Brewing Strong Tea
- You’ll want to use strong black tea for this method. The stronger the brew, the more tannins you’ll introduce to the wood, which helps in the darkening process.
- Use several tea bags (4-6 for a standard mug of water) or a generous amount of loose-leaf tea.
- Boil water and steep the tea for at least 15-30 minutes. The longer, the better for maximum tannin extraction.
- Allow the tea to cool completely before use.
- This tea solution will be applied as a pre-treatment or a base coat before the steel wool and vinegar solution.
The first step is brewing a very strong cup of black tea. You want as many tannins as possible from the tea leaves. Use a good amount of tea bags or loose-leaf tea in boiling water and let it steep for an extended period, at least 15 to 30 minutes, or even longer.
The goal is to create a dark, concentrated liquid. Once it has steeped and cooled down, you’ll use this as a base coat on your pine wood. This adds natural tannins that will interact with the iron in the next step.
- Combining Tea and Steel Wool Vinegar
- Prepare your steel wool and vinegar solution as described in the previous method. Let it steep for at least 24 hours.
- After straining the steel wool vinegar solution, you’ll apply it over the dried tea coat.
- The tea provides the tannins, and the steel wool vinegar provides the iron. Together, they create a reaction that darkens the wood.
- The order is important: tea first, then the steel wool vinegar.
- This layered approach often gives a richer, more nuanced dark color than using just one method.
Once your strong tea has cooled, apply it generously to your sanded pine wood. Let this coat dry completely. This tea acts as a natural pre-treatment, infusing the wood with tannins.
After the tea is dry, you’ll then apply your prepared steel wool and vinegar solution. The iron in the solution reacts with the tannins from the tea, creating a beautiful, aged dark color. You can apply multiple coats of either the tea or the steel wool vinegar solution, allowing drying time between each, to build up the desired darkness and depth of color.
This layered effect is key to achieving a sophisticated dark hue.
Using Coffee Grounds for a Subtle Darkening
For a milder, more subtle darkening effect, coffee grounds can be a surprising agent. Like tea, coffee contains tannins that can react with the wood. When you create a paste or a strong brew from coffee grounds, you can apply it to the wood.
This method is less aggressive than the steel wool and vinegar approach, offering a gentler way to deepen the natural color of pine. It’s ideal for projects where you want a warm, medium-dark brown rather than a very dark or black finish.
- Creating the Coffee Paste
- You will need used coffee grounds. Fresh grounds can be used, but used grounds tend to have less oils, which can interfere with adhesion.
- Mix the coffee grounds with a small amount of water to form a thick paste. Think of the consistency of peanut butter.
- The goal is to create a paste that will stick to the wood surface and allow the tannins to penetrate.
- This paste can be applied directly to the wood.
- This is a more organic and less chemical approach to darkening wood.
To use coffee grounds, you first need to create a paste. Mix used coffee grounds with just enough water to form a thick, spreadable consistency, similar to peanut butter. This paste is then applied directly onto your sanded pine wood.
It’s a simple, accessible method that utilizes common household items. The tannins in the coffee will react with the wood fibers, gradually darkening the surface. It’s a good option if you’re looking for a very natural and non-toxic way to modify the wood’s color.
- Applying the Coffee Paste
- Apply the coffee paste evenly over the sanded wood surface using a brush or spatula.
- Let the paste sit on the wood for at least an hour, or longer for a deeper color.
- Scrape off the excess paste and then wipe the wood clean with a damp cloth.
- Allow the wood to dry completely. You may find that a second application is needed for a darker hue.
- This method provides a subtle, warm brown tone.
After applying the coffee paste, let it sit on the wood for at least an hour. The longer it sits, the more it will darken. Once you’ve achieved the desired color, scrape off the excess paste and then wipe the wood clean with a damp cloth.
Allow the wood to dry thoroughly. You might find that one application isn’t enough to get a significantly dark color, so repeating the process can be beneficial. This method is gentle and adds a warm, earthy tone to the pine, making it a great choice for a subtler transformation.
Boiling Wood for Natural Darkening
A less common but effective method for darkening wood is by boiling it. This process can alter the wood’s chemical composition and color naturally. Different types of wood react differently, and pine, being a softwood, can absorb water and undergo changes that lead to a darkened appearance.
This method is more involved and requires careful preparation and execution. It’s a way to achieve a deep, integral color change throughout the wood itself, rather than just on the surface.
- Wood Preparation
- Select pieces of pine that you wish to darken. Ensure they are clean and free of any finishes or sealants.
- The pieces should be small enough to fit into a pot for boiling. Large furniture pieces cannot be treated this way.
- Some suggest that pre-treating the wood with certain solutions before boiling can enhance the darkening effect.
- This method works best for smaller projects or components.
- Consider the grain and density of the pine, as this can affect the final color outcome.
For this method, you’ll need to be able to submerge the wood in boiling water. This is best suited for smaller projects or components of larger items. Ensure the wood is clean and stripped of any previous finishes.
Some experimentation might be needed to determine the optimal boiling time and water temperature for your specific pine wood to achieve the desired darkness. This technique aims to bring out natural color changes within the wood itself.
- The Boiling Process
- Fill a large pot with water. Add any desired natural darkening agents to the water, such as bark, nuts, or other tannins-rich materials.
- Submerge the wood pieces completely in the water.
- Bring the water to a boil and maintain a rolling boil for several hours. The duration will depend on the wood and the desired color.
- Monitor the water level and add more water as needed to keep the wood submerged.
- Carefully remove the wood from the boiling water and allow it to dry completely.
Place your prepared wood pieces into a large pot filled with water. You can add natural darkening agents like certain barks or nut hulls to the water to enhance the effect. Bring the water to a rolling boil and let the wood simmer for several hours.
The exact time will vary, but you’re looking for a noticeable change in the wood’s color. After boiling, carefully remove the wood and let it dry completely. This method penetrates the wood, offering a deep, stable color change that is part of the wood itself.
Using Black Tea and Iron Acetate (A Combined Powerhouse)
This approach combines the best of two worlds: the natural tannins from black tea and the chemical reaction from steel wool and vinegar. It’s a highly effective method for achieving a deep, rich, and complex dark brown or even black color on pine. The tea acts as a tannin-rich base, and the iron acetate solution reacts with these tannins, creating a permanent, beautiful dark stain that looks incredibly natural and aged.
This is often considered the go-to method for achieving a sophisticated dark wood finish without commercial stains.
- Preparing the Tannin Base
- Brew a very strong batch of black tea. Use at least 5-10 tea bags or an equivalent amount of loose-leaf tea per liter of water.
- Steep for a minimum of 30 minutes, or even an hour, to extract maximum tannins.
- Allow the tea to cool completely.
- Apply this strong tea to your sanded pine wood as a base coat. This is the foundation for the darkening reaction.
- Multiple coats of tea can be applied to increase the tannin content in the wood.
Start by brewing an extra-strong batch of black tea. You want the liquid to be very dark and concentrated. Let it cool completely.
Then, apply this tea to your sanded pine wood. This step saturates the wood with tannins, which are natural compounds found in tea that will later react with iron. Multiple coats of tea can be applied to build up the tannin content, leading to a deeper final color.
Allow each coat to dry thoroughly.
- Creating and Applying the Iron Acetate
- Prepare your steel wool and vinegar solution as previously described, letting it steep for at least 24-48 hours.
- Strain the solution to get a clear liquid.
- Apply this iron acetate solution over the dried tea-coated wood.
- The iron in the solution will react with the tannins from the tea, causing the wood to darken significantly.
- You can reapply both the tea and the iron acetate solution to achieve desired darkness, allowing drying between applications.
In parallel, prepare your steel wool and vinegar solution. Let it steep for at least 24-48 hours. Strain this solution well.
Once your tea-coated wood is completely dry, apply the strained steel wool and vinegar solution over it. The iron acetate will react with the tannins from the tea, creating a dramatic darkening effect. This two-step process is highly reliable for achieving a deep, dark, and beautiful finish on pine wood without using any traditional stains.
Real-Life Examples and Results
Imagine Sarah wanted to build a rustic coffee table from pine. She used the steel wool and vinegar method on her sanded pine planks. After letting the mixture steep for three days, she applied it with a brush.
The wood quickly transformed from a pale yellow to a rich, aged gray-brown. She applied a second coat for a deeper hue. The resulting table had a beautiful, weathered look that perfectly matched her farmhouse decor.
She then sealed it with a clear polyurethane for protection.
Another example is Mark, who was refinishing an old pine bookshelf. He wanted a dark, almost black finish. He opted for the combined tea and iron acetate method.
He brewed a very strong black tea and applied several coats to the sanded shelves, letting each dry. Then, he applied his steel wool and vinegar solution. The shelves darkened to a deep, rich charcoal color.
He was thrilled with the antique appearance and the fact that he achieved it naturally.
Sample Scenario 1
- Prepare your pine wood by sanding it smooth.
- Brew a strong batch of black tea and let it cool.
- Apply the cooled tea to the wood and let it dry completely.
- In a sealed jar, combine steel wool (#0000) and white vinegar. Let it sit for at least 24 hours.
- Strain the steel wool and vinegar mixture.
- Apply the strained mixture over the dried tea-coated wood.
- Watch as the wood darkens. Apply additional coats of tea or the vinegar mixture as needed to achieve the desired shade.
- Once dry, seal with a clear topcoat.
Sample Scenario 2
- Sand your pine wood thoroughly.
- Mix used coffee grounds with a little water to form a thick paste.
- Apply the coffee paste evenly onto the wood.
- Let the paste sit for at least one hour.
- Scrape off excess paste and wipe the wood with a damp cloth.
- Allow the wood to dry completely.
- Repeat the process if a darker shade is desired.
- Finish with a protective clear coat.
These methods aren’t just theoretical; they produce tangible results. Many DIY enthusiasts share their successes online, showing off transformed pine furniture and decor. The key is patience and a willingness to experiment on scrap pieces first.
You can achieve a variety of dark wood looks, from warm browns to deep grays and almost black, all without relying on commercial stains.
Understanding the Science Behind the Darkening
It’s fascinating to understand why these simple methods work so well to darken pine wood. The magic lies in chemical reactions between natural elements and the compounds within the wood itself. Pine wood, like most woods, contains tannins.
These are natural organic compounds that, when exposed to certain substances, can change color. The methods we’ve discussed leverage these tannins to create the desired dark effect, essentially ‘aging’ the wood quickly.
The Role of Tannins in Wood
Tannins are complex organic polyphenolic compounds found in many plants, including wood. They are responsible for the astringent taste in foods like tea and wine. In wood, tannins contribute to its color, durability, and resistance to decay.
Different wood species have varying amounts of tannins. Oak, for instance, is rich in tannins, which is why it’s often used for wine barrels and can react well with iron to produce dark colors. Pine has a moderate amount of tannins, enough to react with iron but not so much that it becomes overly dark or difficult to work with using these methods.
- Tannins and Color
- Tannins are complex molecules that can bind to proteins and other organic matter. This binding process can alter the light-reflecting properties of the wood, making it appear darker.
- The color of tannins themselves can range from yellow to brown. When they react with other elements, this initial color can be intensified or changed significantly.
- The concentration of tannins in a wood species directly influences its natural color and its potential to be darkened by reactive agents.
- Understanding tannin levels helps predict how a wood will react to different darkening methods.
The color of wood is largely due to the presence of tannins and other extractives. These compounds absorb certain wavelengths of light and reflect others, giving the wood its characteristic hue. When you introduce a substance that reacts with these tannins, you can change how they absorb and reflect light, thus altering the perceived color of the wood.
For example, the dark color of black tea comes from its high tannin content.
- Tannin Extraction
- To maximize the darkening effect, it’s important to extract as many tannins as possible from your source material, like tea leaves or coffee grounds.
- Methods like steeping for longer periods, using more material, or boiling can help release more tannins into the water.
- The goal is to create a concentrated solution that can be absorbed by the wood.
- Once absorbed, these tannins are ready to react with any introduced agents.
Extracting tannins effectively is key to getting a good result. This means using a high concentration of the tannin-rich material. For tea, this involves using plenty of tea bags or loose leaves and steeping them for a long time.
For coffee, using more grounds and creating a thick paste helps. The more tannins that penetrate the wood, the more material there is to react and create the dark color.
The Iron Acetate Reaction
The iron acetate solution, created by steeping steel wool in vinegar, is the reactive agent in many of these darkening methods. Vinegar is an acid (acetic acid), and steel wool is primarily iron. When iron is exposed to acid, it rusts, and this rust (iron oxide) reacts with the acetic acid to form iron acetate.
Iron acetate is a compound that, when it comes into contact with tannins in wood, undergoes a chemical reaction. This reaction creates dark-colored compounds, often iron-tannate complexes, which permanently alter the wood’s color.
- Formation of Iron Acetate
- Steel wool (iron) + Vinegar (acetic acid) → Iron Acetate + Hydrogen Gas
- The rustier the steel wool, the more readily it forms iron acetate.
- Fine steel wool (#0000) dissolves more completely, leading to a cleaner solution.
- The longer the steel wool steeps, the more iron acetate is produced.
The chemical equation is simple but powerful. Iron reacts with acetic acid to form iron acetate. The cleaner the iron and the more potent the acid, the more iron acetate is formed.
This solution is essentially a source of reactive iron ions that are ready to bind with the tannins in the wood.
- Reaction with Tannins
- Iron Acetate + Tannins → Iron-Tannate Complexes (Dark Color)
- The iron ions from the iron acetate bind to the tannin molecules in the wood.
- This binding forms new, larger molecules that absorb and reflect light differently, appearing much darker.
- The intensity of the color depends on the concentration of both iron acetate and tannins.
When this iron acetate solution is applied to wood that is rich in tannins, a noticeable color change occurs. The iron ions latch onto the tannin molecules, forming new, darker compounds. This is a permanent chemical change, not just a surface stain that can be washed off.
The resulting color is often a deep brown, gray, or even black, depending on the specific wood and the concentrations of the reactants.
Why These Methods Are Beginner-Friendly
The beauty of these non-stain methods lies in their simplicity and forgiving nature. Unlike commercial stains, which can sometimes leave lap marks or be difficult to get perfectly even, these natural methods tend to be more forgiving. The color change is a reaction, and it often develops gradually, allowing you to build up the color to your liking.
Furthermore, the materials used are readily available and often already in your home, making it an accessible DIY project for anyone looking to darken pine wood without stain easily.
- Ease of Material Sourcing
- You can find steel wool, white vinegar, tea bags, and coffee grounds at almost any grocery store. These are common household items.
- This eliminates the need to purchase specialized wood finishing products, saving money and making the project more accessible.
- No need to worry about specific VOC levels or hazardous waste disposal associated with some commercial stains.
The ingredients are easy to find. You don’t need to go to a specialty store. This makes the project very convenient for beginners who might not have easy access to specialized woodworking supplies.
- Forgiving Application
- The reactive nature of these methods means the color develops over time, rather than being applied all at once. This gives you more control and time to correct mistakes or unevenness.
- If you miss a spot, you can often reapply the solution without leaving noticeable lap marks, unlike with some liquid stains.
- The color is not just on the surface; it’s a chemical change, making it more durable and less prone to flaking or chipping over time.
Mistakes are easier to fix. If you get an uneven application, you can often reapply the solution to blend it in. The color develops as it dries, giving you a chance to adjust.
This makes it much less stressful for someone who is new to woodworking and finishing.
Choosing the Right Method for Your Project
Selecting the best method to darken your pine wood depends on the look you’re trying to achieve, the size of your project, and how much time you have. Each of these natural techniques offers a slightly different aesthetic and requires varying levels of effort. It’s important to consider these factors to ensure you choose a method that will yield the results you desire and fits within your woodworking capabilities.
Desired Color Tone and Depth
The color outcome can vary significantly between methods. The steel wool and vinegar method tends to produce a gray or grayish-brown tone, often reminiscent of aged, weathered wood. The tea and steel wool combination can yield a richer, warmer brown, sometimes leaning towards a deep ebony depending on the strength and application.
Coffee grounds offer a subtler, warmer brown, ideal for a gentle darkening. Boiling wood can produce a range of tones depending on what else is added to the water, but it generally offers a deep, integral color.
- Steel Wool and Vinegar
- Best for: Grayish browns, weathered, antique looks.
- Depth: Can achieve very dark colors, even black, with multiple applications or prolonged steeping of the solution.
- Surface Appearance: The reaction can sometimes highlight the wood grain beautifully.
If you want a weathered, gray-brown look, steel wool and vinegar is your best bet. It’s great for giving wood an antique feel.
- Tea and Steel Wool Vinegar
- Best for: Rich, warm browns to dark ebony.
- Depth: Excellent for achieving deep, complex colors by layering tannins and iron.
- Surface Appearance: Often gives a more nuanced, layered color than other methods.
For a deeper, more sophisticated brown, the tea and vinegar combination is excellent. It creates a beautiful, layered effect.
- Coffee Grounds
- Best for: Subtle, warm, medium browns.
- Depth: Generally provides a lighter darkening effect compared to the other methods.
- Surface Appearance: Adds a natural, earthy tone.
If you’re after a gentle, natural warmth, coffee grounds are the way to go. They provide a subtle enhancement to the pine’s natural color.
Project Size and Complexity
The size and complexity of your project will influence which method is most practical. For smaller items like picture frames, coasters, or drawer pulls, any method can work. For larger pieces like tabletops or cabinets, methods that are easier to apply evenly over a large surface are preferable, such as the tea and steel wool vinegar combination.
Boiling wood is generally only suitable for small, manageable pieces that can fit into a pot.
- Small Projects (e.g., picture frames, boxes)
- All methods are suitable. You have more control over application and can easily manage any potential inconsistencies.
- Experimentation is easy on small scraps before committing to the main piece.
- You can afford to spend more time on precise application for a perfect finish.
Small items are great for trying out any of these techniques. You can experiment easily and ensure a perfect finish without much risk.
- Medium to Large Projects (e.g., coffee tables, shelves, small cabinets)
- Tea and steel wool vinegar combination is often ideal due to its relatively even application and rich color development.
- Steel wool and vinegar can also work but requires careful application to avoid blotchiness on large, flat surfaces.
- Avoid boiling wood for these sizes.
For larger projects, focus on methods that are forgiving and can be applied evenly. The tea and vinegar combination is a strong contender.
- Very Small Components or Intricate Details
- Coffee grounds paste can be very useful for detailed work where you want a localized darkening effect.
- Cotton swabs or fine brushes can be used for precise application of any of the liquid solutions.
- Ensure thorough sanding even on small parts for best results.
Tiny details or very small components can benefit from the controlled application of coffee paste.
Time Commitment and Patience Required
Some methods require more waiting time than others. The steel wool and vinegar method needs at least 24 hours of steeping time for the solution. The tea brewing and application also require drying time between coats.
Boiling wood can take several hours of active simmering. If you need a quick solution, these natural methods might not be ideal. However, if you have patience, the results are often worth the wait, and the process itself can be quite rewarding.
- Steel Wool and Vinegar
- Steeping time: Minimum 24 hours, but 3-5 days is better for strength.
- Application time: Relatively quick, but multiple coats and drying between them add time.
- Overall: Requires planning ahead due to steeping time.
This method demands foresight. Plan to prepare your solution a few days in advance.
- Tea and Steel Wool Vinegar
- Steeping time: Tea needs to steep; solution needs 24+ hours.
- Application time: Similar to steel wool and vinegar, with drying time between coats of tea and solution.
- Overall: A layered approach means more time investment but richer results.
The layered approach means you invest more time, but the color depth is often superior.
- Coffee Grounds
- Preparation time: Minimal to create paste.
- Application time: Relatively quick application and drying time.
- Overall: Can be a faster method if a subtle darkening is all that’s needed.
For a quicker transformation, coffee grounds can be a good option if you only need subtle darkening.
Testing and Finishing Your Darkened Pine
Before applying any darkening method to your main project, it’s always a wise idea to test it on a scrap piece of the same pine wood. This allows you to see exactly how the method will affect your wood and whether the resulting color is to your liking. Once you’ve achieved the desired darkness, proper finishing is crucial to protect your work and enhance its appearance.
A good finish not only adds durability but can also deepen the color and bring out the wood’s natural beauty.
The Importance of Testing
Pine wood can vary in its tannin content and grain structure, even within the same board. What works perfectly on one piece might look slightly different on another. Testing on a scrap piece allows you to preview the final color and finish.
You can experiment with the number of coats, the steeping time of your solutions, and the overall application technique. This step is invaluable for avoiding disappointment on your main project. It’s also the best way to ensure you understand the process fully before committing.
- Selecting Test Samples
- Use pieces of pine that are similar to your project wood in grain and quality.
- Cut them to a manageable size, like 6×6 inches or 12×12 inches.
- Ensure the test pieces are sanded just as you would sand your project wood.
- This step is crucial for accurate results.
Always use scrap wood that matches your project wood. Sand it the same way you plan to sand your project. This ensures your test is as close to the real thing as possible.
- Application and Observation
- Apply your chosen darkening method to the test samples according to your plan.
- Allow the wood to dry completely, noting the color changes as it dries.
- Apply additional coats if you are aiming for a deeper color.
- Observe how the grain accepts the color and if any blotchiness occurs.
Apply your chosen method carefully. Watch how the color develops as it dries. This observation period is key to understanding the process.
- Adjusting Your Method
- Based on the test results, you might decide to steep your steel wool and vinegar solution for longer, use more tea bags, or apply another coat.
- This is your chance to fine-tune the process before applying it to the main piece.
- Don’t skip this step if you want predictable and beautiful results.
Use your test results to make any necessary adjustments. This fine-tuning is what leads to professional-looking results.
Selecting a Protective Finish
Once your wood is darkened and completely dry, it needs a protective finish. This finish will seal the wood, prevent it from absorbing moisture or dirt, and enhance its appearance. For projects darkened with natural methods, a clear topcoat is usually best.
This allows the rich, dark color you’ve achieved to show through without altering it further. Options include polyurethane (water-based or oil-based), lacquer, or a natural oil finish like tung oil or linseed oil.
- Polyurethane
- Types: Water-based (clearer, faster drying, less odor) and oil-based (warmer amber tone, more durable, longer drying time).
- Application: Usually applied in 2-3 thin coats with a brush or foam applicator. Lightly sand between coats for a smooth finish.
- Durability: Excellent for high-traffic surfaces like tabletops.
Polyurethane is a popular choice for a reason. Water-based versions dry clear and fast, while oil-based ones add a warm, amber glow.
- Lacquer
- Types: Spray lacquer is common for DIY projects.
- Application: Sprayed on in thin coats. Dries very quickly.
- Durability: Offers good protection but can be less durable than polyurethane in some applications. It can also be sensitive to heat.
Lacquer dries quickly and provides a smooth finish, often applied by spraying for evenness.
- Oil Finishes (Tung Oil, Linseed Oil)
- Application: Wiped on and allowed to penetrate the wood. Multiple coats are often applied, wiping away excess.
- Appearance: Enhance the wood’s natural beauty and often deepen the color slightly. They offer a more matte or satin finish.
- Durability: Good, but may require periodic reapplication, especially for high-wear surfaces.
Natural oils soak into the wood, enhancing its natural look and feel. They offer a more organic finish.
Applying the Topcoat
Apply your chosen topcoat in a clean, dust-free environment. Follow the manufacturer’s instructions for application and drying times. For polyurethane and lacquer, thin coats are key to avoiding drips and achieving a smooth finish.
Lightly sanding with very fine-grit sandpaper (220-grit or higher) between coats of polyurethane can help create a silky-smooth surface. For oil finishes, apply them liberally and then wipe off any excess that doesn’t penetrate after a short period. Allow the final coat to cure fully before using your project.
- Preparation
- Ensure your darkened wood is completely dry and free of dust.
- Work in a well-ventilated area.
- Use clean brushes, rags, or spray equipment.
Before you start, make sure your workspace is clean and the wood is totally dry and dust-free.
- Application Techniques
- For brushed finishes (polyurethane, oil), use long, even strokes in the direction of the grain.
- For sprayed finishes (lacquer), maintain a consistent distance from the surface and use overlapping passes.
- For oil finishes, saturate the wood and then wipe off excess.
Use smooth, even strokes when brushing or spraying. For oils, let them soak in before wiping off the excess.
- Sanding Between Coats (for Polyurethane/Lacquer)
- After each coat has dried, lightly sand the surface with fine-grit sandpaper (e.g., 220-grit).
- Wipe away all dust with a tack cloth before applying the next coat.
- This step is vital for a smooth, professional finish.
A light sanding between coats of polyurethane or lacquer makes the final surface incredibly smooth.

Conclusion
You now have several easy and effective ways to darken pine wood without using traditional stain. From the classic steel wool and vinegar to the layered tea and iron acetate, these methods provide beautiful, natural-looking results. Testing on scrap wood is your best friend for perfect color.
With a little patience and the right finishing touches, your pine projects will look rich and custom-made.
Frequently Asked Questions
Question: Can I use other types of vinegar besides white vinegar
Answer: Yes, you can use other types of vinegar like apple cider vinegar or even red wine vinegar, but white vinegar is often preferred because it’s clear and won’t add its own color to the mix. The main goal is the acidity to react with the steel wool and create iron acetate.
Question: How long does the steel wool and vinegar solution last
Answer: The steel wool and vinegar solution can be stored in a sealed glass container for a long time, potentially months or even years. The iron acetate will remain reactive as long as it’s kept from evaporating and reacting with air.
Question: Will these methods work on other types of wood
Answer: These methods work best on woods that contain tannins, like pine, oak, and walnut. Woods with very low tannin content may not react as strongly, or at all, and might require a pre-treatment to add tannins.
Question: Do I need to sand the wood before applying these darkening agents
Answer: Yes, sanding is very important. It opens up the wood grain, allowing the darkening agents to penetrate more evenly and effectively. Always sand with the grain.
Question: How do I know if my wood is dark enough
Answer: You can build up the darkness by applying multiple coats. Let each coat dry completely to see the final color. It’s best to test on scrap wood first to gauge how many coats you’ll need to achieve your desired look.
Final Thoughts
Darkening pine wood without stain is achievable with simple, natural methods. By using common items like tea, coffee, vinegar, and steel wool, you can transform your projects. These techniques offer control and unique, aged aesthetics.
Just remember to test first and apply a protective finish for lasting beauty.