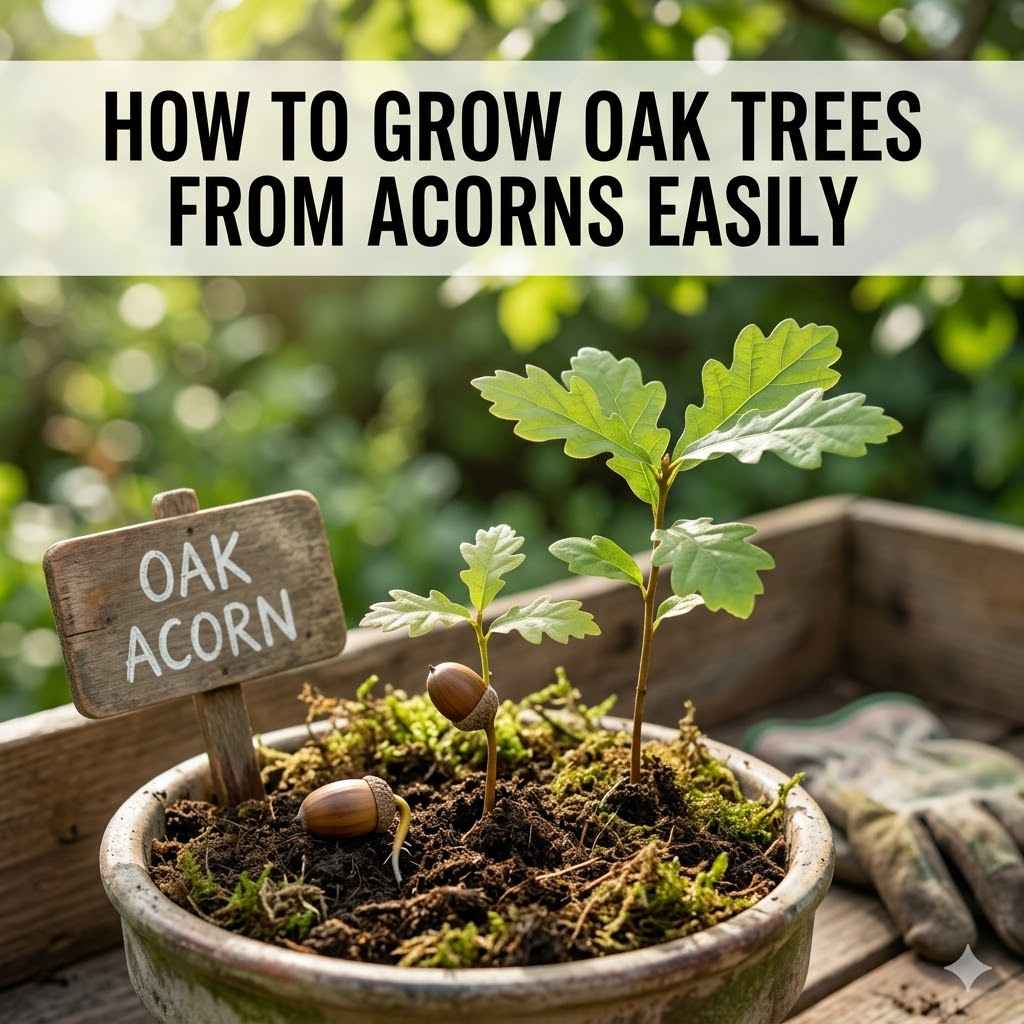
How to Grow Oak Trees From Acorns Easily
Many people think growing an oak tree from an acorn is really hard, maybe even impossible for beginners. It can seem a little tricky at first, with all the steps involved and wondering if your little acorn will even sprout. But it doesn’t have to be complicated!
With a few simple tricks, you can learn How to Grow Oak Trees from Acorns Easily. We’ll go through it step-by-step, making it super simple so you can start your own majestic oak in no time. Get ready to learn what to do next to give your acorn the best chance to grow.
Gathering Your Acorns
The first step to growing an oak tree from an acorn is finding the right acorns. This might sound simple, but there are a few things to keep in mind to pick the best ones. You want to find acorns that are healthy and ready to sprout.
This section will guide you through selecting acorns that have the highest chance of success, so you don’t waste time on ones that won’t grow.
When to Collect Acorns
The best time to collect acorns is usually in the fall. This is when oak trees drop their acorns, and they are ripe and ready to grow. You’ll see them falling from the trees onto the ground.
Look for acorns that have recently fallen, as they are less likely to be dried out or damaged by insects.
Acorns collected too early might not have fully developed seeds inside. Acorns that are too old and have been on the ground for a long time might be moldy or have already started to rot. Aim for the peak of fall collection, when the ground beneath oak trees is scattered with fresh acorns.
Choosing the Right Acorns
Not all acorns are created equal. For the best results when you want to learn How to Grow Oak Trees from Acorns Easily, pick acorns that look plump and healthy. They should have a nice, smooth shell without any cracks or holes.
A good acorn will feel firm and heavy in your hand.
- Look for intact caps: The little cap on top of the acorn is a good indicator. If it’s still attached, the acorn might be fresher. However, acorns without caps are still viable as long as they look good.
- Avoid damaged acorns: Check for any signs of mold, wormholes, or soft spots. These acorns are unlikely to sprout. Any acorn that looks shriveled or has a dull color is probably not a good choice.
- Test for viability: A simple float test can help. Place your acorns in a bowl of water. The ones that sink to the bottom are usually good, while those that float might be empty or not viable. This is a quick way to weed out the bad ones.
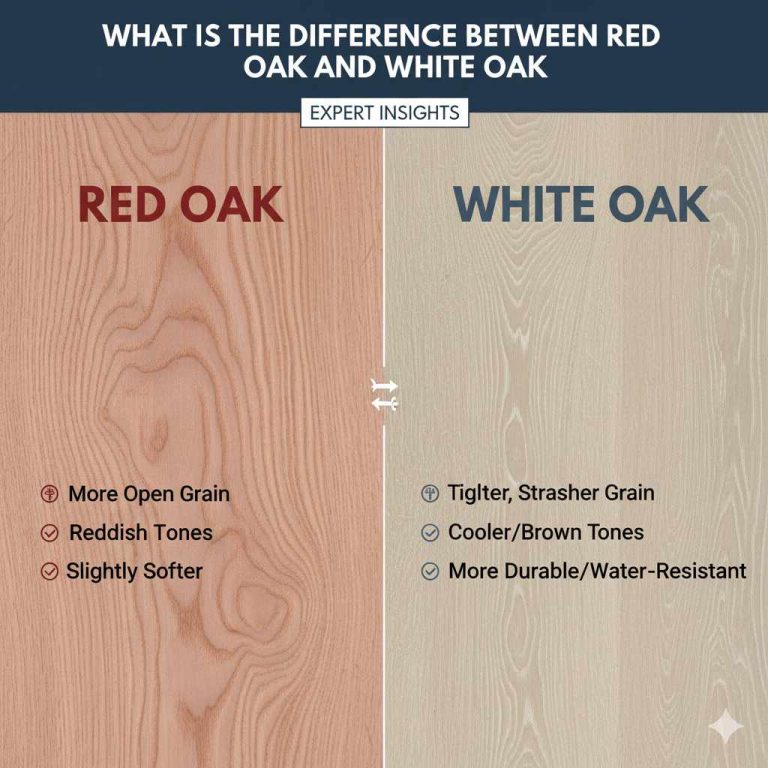
Identifying Oak Species
There are many different types of oak trees, and their acorns can look a bit different. Knowing the type of oak can help you understand its growth habits. For most beginners, the exact species isn’t critical, but it’s good to know if you’re looking at a Red Oak or a White Oak, for example, as their leaves and mature tree shapes differ.
Red Oak acorns often have a bitter taste due to tannins and take two years to mature. White Oak acorns tend to be sweeter and mature in one year. For ease of sprouting, white oaks are often considered slightly easier for beginners.
A statistic from the U.S. Forest Service indicates that acorns can have a dormancy period that needs to be broken for germination, varying by species. This is why some collection and stratification methods are important for success.

Preparing Your Acorns for Planting
Once you have your acorns, it’s time to get them ready to sprout. This stage is crucial for encouraging germination and making sure your acorn has the best start. We’ll cover cleaning and a special process called stratification that mimics nature’s way of preparing seeds.
Cleaning the Acorns
Before you do anything else, you need to clean your acorns. This removes any dirt, debris, or unwanted pests that might be clinging to them. A good cleaning helps prevent mold and disease from affecting your acorns as they prepare to sprout.
Start by rinsing your acorns under cool running water. You can use a soft brush to gently scrub away any dirt. After rinsing, it’s a good idea to let them air dry on a towel for a day or two.
This helps ensure they are completely dry, which is important for the next steps, especially if you plan to stratify them in the refrigerator.
Stratification The Key to Easy Sprouting
Stratification is a process that mimics the cold, moist conditions acorns experience over winter in nature. It’s a vital step for many oak species to break their dormancy and signal them that it’s time to grow. This process is key to making How to Grow Oak Trees from Acorns Easily a reality.
Without stratification, acorns might not sprout even when planted. They need that period of cold to trigger the germination process. This step is like giving your acorn a head start by telling it spring has arrived.
Here’s how to stratify your acorns:
- Prepare your storage: You will need a resealable plastic bag or a small container with a lid.
- Moisten the medium: Get some damp, but not soaking wet, peat moss, vermiculite, or even paper towels. This material will hold moisture around the acorns.
- Place acorns inside: Put your cleaned acorns into the bag or container.
- Add the moist medium: Gently mix the damp peat moss, vermiculite, or paper towels with the acorns. The goal is to have everything slightly moist, like a wrung-out sponge.
- Seal and refrigerate: Seal the bag or close the container. Place it in the refrigerator. The ideal temperature is between 35°F and 41°F (1.7°C to 5°C). This is typically your vegetable crisper drawer.
- Monitor moisture: Check the bag or container every week or two. If the medium starts to dry out, add a little more water to keep it damp. You don’t want the acorns to dry out completely.
- Duration: Stratify for about 60 to 90 days. During this time, you might see some acorns start to sprout with a small root emerging. This is a good sign!
It’s important to check your acorns regularly during stratification. If you see mold growing, carefully remove the affected acorns and ensure the remaining ones are in a clean, moist environment. Some sources suggest a pre-soak in water for 24 hours before stratification can also help jumpstart the process.
The length of stratification can vary. Some white oaks may need less time, while some red oaks might benefit from a longer period. For simplicity, aiming for 2-3 months is a good general guideline for beginners.
Checking for Sprouting
As you check your acorns during stratification, look for signs of germination. The most obvious sign is a small, white root (called a radicle) emerging from the acorn. If you see this, your acorn is ready to be planted very soon!
If an acorn hasn’t sprouted after the recommended stratification period, don’t despair immediately. Some may take a little longer. However, if it shows no signs of life after several months and looks shriveled, it’s likely not viable.
The float test done earlier can help you discard those that are unlikely to sprout even before stratification.
Planting Your Sprouted Acorns
Now that your acorns have been stratified and ideally have a little root emerging, it’s time to give them a home in soil. This section covers how to choose the right pot, the best soil mix, and the simple planting technique to encourage healthy growth.
Choosing Pots and Soil
For starting your oak saplings, good drainage is key. You want pots that have holes at the bottom to let excess water escape. This prevents the roots from sitting in soggy soil, which can lead to rot.
A pot that is about 4-6 inches deep is usually a good size to start. You can use plastic or terracotta pots. For soil, a good quality potting mix is best.
You can also create your own by mixing equal parts potting soil, peat moss, and perlite or sand. This mix provides nutrients, retains some moisture, and ensures good aeration for the roots.
Avoid using heavy garden soil directly in pots, as it can become too compacted and prevent proper drainage and root growth. The goal is to create an environment where the young roots can easily spread and breathe.
The Planting Process
Planting your sprouted acorn is straightforward. You want to give the emerging root plenty of space to grow downwards. This is a key part of learning How to Grow Oak Trees from Acorns Easily.
- Fill the pot: Fill your chosen pot with your prepared potting mix, leaving about an inch of space at the top.
- Position the acorn: Gently place the acorn in the soil. If it has a sprout, make sure the sprout is pointing upwards, and the root is pointing downwards. Bury the acorn about 1-2 inches deep. You can plant it with the flat end down or sideways.
- Water gently: Water the soil thoroughly after planting. You want the soil to be moist but not waterlogged. Use a watering can with a fine spray to avoid disturbing the acorn or the soil too much.
- Provide light: Place the pot in a location where it will receive bright, indirect sunlight. A sunny windowsill is often a good spot.
You should start to see a shoot emerging from the soil within a few weeks if the acorn is viable and conditions are right. If you planted multiple acorns, you can transplant them into individual pots once they have a few true leaves and are large enough to handle.
Initial Care After Planting
After planting, consistent care is important. Keep the soil consistently moist, but never soggy. Check the soil moisture by sticking your finger about an inch into the soil.
If it feels dry, it’s time to water.
Protect your young sapling from harsh direct sunlight, especially if it’s very intense. Bright, indirect light is ideal for young oak seedlings. Also, keep the pot away from extreme temperature fluctuations.
A stable environment helps the seedling establish itself.
It’s also a good idea to protect your seedlings from pests like slugs or snails, which can be attracted to young, tender plants. If you notice any signs of pests, you can use natural remedies like diatomaceous earth or a mild soap spray.
Transplanting Seedlings
When your oak seedling has grown a few sets of true leaves and the roots are filling the pot (you might see roots coming out of the drainage holes), it’s time to transplant it into a larger container or eventually into the ground. This usually happens after its first growing season.
When transplanting, try to disturb the root ball as little as possible. Gently remove the seedling from its current pot. Place it in a larger pot with fresh potting mix, ensuring the top of the root ball is level with the soil surface.
Water well after transplanting. This transition phase is crucial for its long-term health and is part of the overall process for How to Grow Oak Trees from Acorns Easily.
Caring for Your Young Oak Sapling
Once your acorn has sprouted and is growing into a small sapling, it needs consistent care to thrive. This section covers watering, sunlight needs, and protecting your young tree as it grows stronger.
Watering Needs
Young oak trees need regular watering, especially during their first few years. The soil should be kept consistently moist but not waterlogged. The best way to check if it needs water is to feel the soil about an inch deep.
If the soil feels dry, it’s time to water. Water thoroughly until you see water draining from the bottom of the pot or the soil is well-moistened. Overwatering can be as harmful as underwatering, leading to root rot, so good drainage is essential.
As your oak tree grows larger and becomes more established, its watering needs will decrease. Mature oak trees are quite drought-tolerant once their root systems are well-developed. However, during prolonged dry spells, even mature trees can benefit from deep watering.
Sunlight Requirements
Oak trees, in general, are sun-loving plants. Your young sapling will need plenty of sunlight to grow strong and healthy. Aim for at least 6-8 hours of direct sunlight per day, if possible.
If your sapling is indoors, place it in the sunniest window you have. If it’s outdoors, choose a location that receives ample sun throughout the day. Some protection from the harshest afternoon sun might be necessary in very hot climates, especially for very young seedlings, but mature oaks thrive in full sun.
Insufficient sunlight can lead to weak, leggy growth as the sapling stretches to find light. This makes it more susceptible to pests and diseases. Providing adequate light is a simple yet critical aspect of successful oak tree cultivation.
Protection and Support
Young oak saplings can be vulnerable to various threats. Protecting them will significantly increase their chances of survival and healthy growth.
- Pest Control: Keep an eye out for common pests like aphids, caterpillars, or deer. You can use natural insecticidal soaps or neem oil for aphids. For deer, fencing or repellents might be necessary if they are a problem in your area.
- Weed Control: Weeds compete with your young oak for water and nutrients. Keep the area around the base of the tree free of weeds. A layer of mulch can help suppress weeds and retain soil moisture, but keep the mulch a few inches away from the trunk to prevent rot.
- Wind and Weather: Very young saplings might need some support if they are in a windy location. A stake can provide stability, but make sure it’s not tied too tightly, allowing the trunk some movement which helps it strengthen.
A study published in the Journal of Arboriculture highlighted that proper protection during the first 3-5 years of a sapling’s life significantly improves survival rates, especially in challenging environments. This period is when the tree is most vulnerable and requires attention.
Consider using tree guards to protect the trunk from rodents or lawnmowers when planting in more open areas. These guards are readily available and offer an easy layer of defense.
Fertilizing Your Oak Sapling
Oak trees generally do not require a lot of fertilizer, especially when they are young and planted in good quality soil. In fact, over-fertilizing can harm them by encouraging rapid, weak growth or burning their roots.
If you are concerned about nutrient deficiencies, a slow-release, balanced fertilizer designed for trees can be used sparingly, typically once in the spring. Follow the product instructions carefully, and always water the tree well after applying any fertilizer. For most home growers, focusing on good soil and consistent watering will be sufficient.
The nutrient needs of oak trees are often met by the soil’s natural decomposition processes. Introducing too many external nutrients can disrupt this balance. For beginners learning How to Grow Oak Trees from Acorns Easily, it’s often best to start with minimal fertilization and observe the tree’s growth.
Long-Term Growth and Transplanting
As your oak sapling matures, its needs change. This section covers when and how to transplant it into its permanent home and what to expect as it grows into a mighty tree.
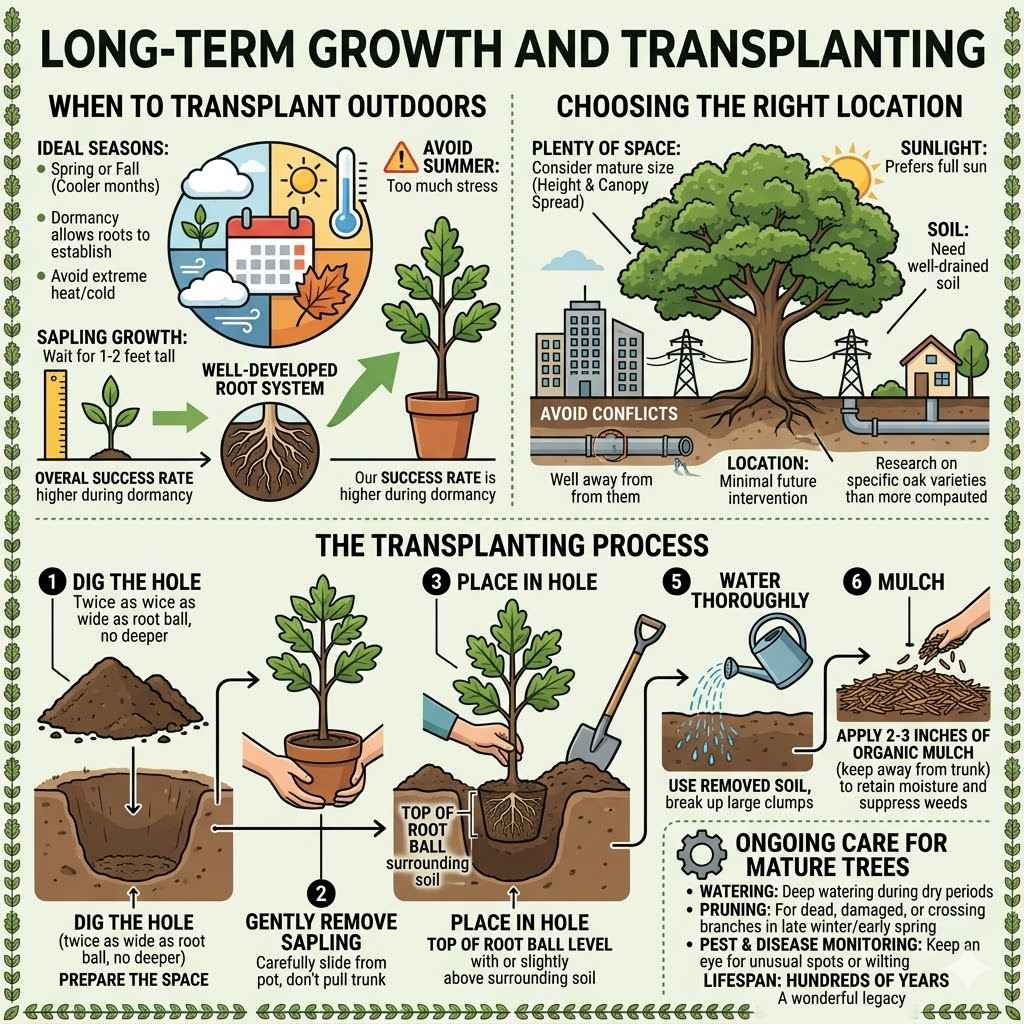
When to Transplant Outdoors
The ideal time to transplant your oak sapling from its pot into the ground is typically in the spring or fall. These cooler seasons allow the roots to establish themselves without the stress of extreme heat or cold.
Wait until your sapling is at least one to two feet tall and has a well-developed root system. You might see roots starting to circle the pot, which is a good indicator it’s time for a bigger space. Avoid transplanting during the hot summer months, as the young tree will struggle to recover from the shock.
The success rate of transplanting is significantly higher when done during the dormant periods of the tree. This allows the plant to focus its energy on root development rather than leaf and shoot growth.
Choosing the Right Location
Selecting the perfect spot for your oak tree is crucial for its long-term health and growth. Oak trees need plenty of space, both above and below ground.
Consider the mature size of the oak species you are growing. Most oaks grow very large, both in height and canopy spread. Ensure the location has ample room, away from power lines, buildings, and underground utilities.
Also, oak trees prefer well-drained soil and full sun. Avoid areas that tend to stay waterlogged.
Research the specific needs of the oak variety you are planting. Some oaks tolerate different soil types or light conditions better than others. A good location means your tree will thrive with minimal intervention later in life.
The Transplanting Process
Transplanting an oak sapling requires care to minimize root shock. When you’re ready to move it:
Dig the hole: Dig a hole that is at least twice as wide as the root ball of your sapling, but no deeper than the root ball. This allows the roots to spread outwards easily.
Gently remove sapling: Carefully slide the sapling out of its pot. If it’s stuck, you can gently tap the sides or use a trowel to loosen the edges. Try not to pull on the trunk.
Place in hole: Set the sapling in the center of the hole. The top of the root ball should be level with or slightly above the surrounding soil.
Backfill the hole: Fill the hole with the soil you removed, breaking up any large clumps. Gently firm the soil around the base of the sapling to remove air pockets.
Water thoroughly: Water the newly planted sapling deeply to help settle the soil and reduce transplant shock.
Mulch: Apply a 2-3 inch layer of organic mulch around the base of the tree, keeping it a few inches away from the trunk. This helps retain moisture and suppress weeds.
A survey by the International Society of Arboriculture found that proper transplanting techniques, including correct hole depth and mulching, can increase the survival rate of new trees by up to 20% in the first year.
Ongoing Care for Mature Trees
Once your oak tree is established in its permanent location, its care needs will decrease. However, continued observation is still important.
Watering: While established oaks are drought-tolerant, deep watering during extended dry periods can be beneficial, especially for young trees.
Pruning: Pruning is usually done to remove dead, damaged, or crossing branches. It’s best done in late winter or early spring when the tree is dormant. Avoid excessive pruning.
Pest and Disease Monitoring: Keep an eye out for any signs of unusual spots on leaves, wilting, or insect infestations. Early detection can help you address problems before they become severe.
The lifespan of an oak tree can be hundreds of years, making them a wonderful legacy to plant. By following these steps, you’re not just growing a tree; you’re cultivating a piece of nature that will endure for generations. Learning How to Grow Oak Trees from Acorns Easily is a rewarding experience that connects you directly with the natural world.
Frequently Asked Questions
Question: How long does it take for an acorn to sprout?
Answer: After stratification and planting, acorns typically sprout within 2 to 6 weeks. However, some may take longer, up to a few months, if their dormancy hasn’t been fully broken.
Question: Can I plant acorns directly outside in the fall?
Answer: Yes, you can plant acorns directly outdoors in the fall. Nature does the stratification process through winter. Just plant them about an inch deep in a sheltered spot where they are protected from pests and won’t be disturbed.
Question: What if my acorn sprouts a root but no shoot?
Answer: This is perfectly normal. The root always emerges first, anchoring the seedling and beginning to absorb water and nutrients. The shoot will follow shortly after, pushing up towards the light.
Question: How big should my oak sapling be before I can plant it outside permanently?
Answer: It’s generally recommended to wait until your oak sapling is at least one to two feet tall and has a well-established root system. This usually takes one to two years of growth in a pot.
Question: Do I need to worry about squirrels digging up my planted acorns?
Answer: Yes, squirrels are notorious for digging up acorns. Planting them in pots or covering them with a wire mesh or netting can help protect them from being found and eaten by squirrels.
Summary
Growing oak trees from acorns is a simple and rewarding process. Start by selecting healthy acorns in the fall and cleaning them. Stratifying your acorns by refrigerating them in a moist medium for 60-90 days is a key step.
Plant sprouted acorns in pots with good drainage and potting mix, then provide bright, indirect light. Care for your sapling with consistent watering and ample sunlight. Transplant it to its permanent outdoor location when it’s a foot or two tall, choosing a sunny spot with plenty of space.
With a little patience, you’ll soon have a strong young oak tree.