How to Lay Hardwood Floor Over Concrete: Expert Tips & Tricks
Are you dreaming of a beautiful hardwood floor but worried about the concrete slab beneath your feet? You’re not alone.
Laying hardwood over concrete can seem tricky, but with the right steps, you can achieve a stunning, durable floor that transforms your space. This guide will walk you through everything you need to know, from preparing the concrete to choosing the best installation method.
By the end, you’ll feel confident and ready to bring warmth and style to your home with hardwood flooring. Keep reading, and let’s make your flooring project a success!
Choosing The Right Hardwood
Choosing the right hardwood is key for a successful floor over concrete. The right choice affects durability, look, and comfort. This guide helps you pick the best hardwood for your concrete floor.
Solid Vs Engineered Hardwood
Solid hardwood is made from one piece of wood. It feels natural and can be sanded many times. But it can expand or shrink with moisture changes. Engineered hardwood has layers of wood pressed together. It handles moisture better and stays stable on concrete. Engineered hardwood is easier to install over concrete than solid hardwood.
Wood Species And Durability
Different woods have different hardness levels. Hard woods like oak and maple resist dents and scratches. Softer woods like pine may wear out faster. Pick a wood species that fits your lifestyle. High-traffic areas need tougher wood. Think about how much wear your floor will get before choosing.
Moisture Resistance Considerations
Concrete can hold moisture, which harms some hardwood floors. Engineered hardwood resists moisture better than solid wood. Choose wood with good moisture resistance to avoid warping. Also, use a moisture barrier under the floor. This keeps your hardwood safe and lasting longer on concrete.
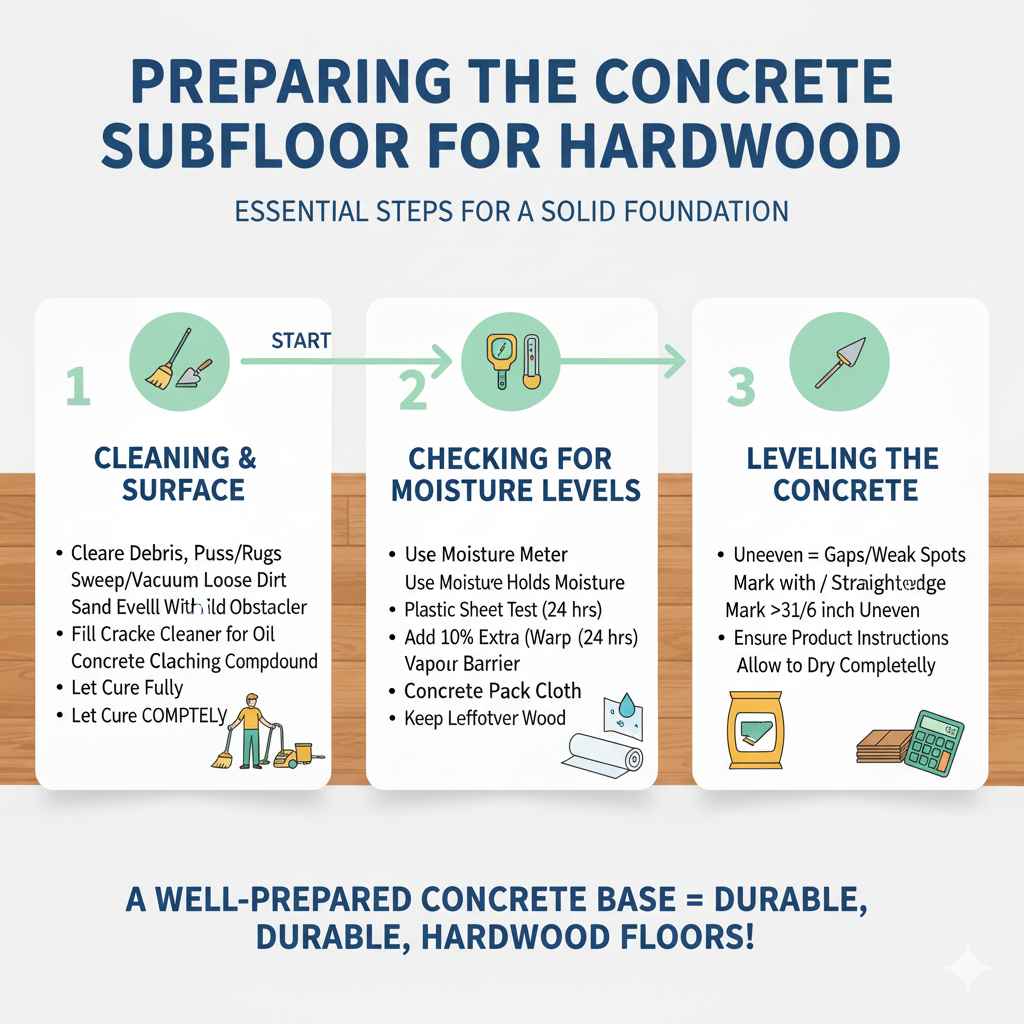
Preparing The Concrete Subfloor
Preparing the concrete subfloor is an important step before laying hardwood floors. A clean, dry, and level surface helps the hardwood last longer. Proper preparation prevents issues like warping or gaps later.
Follow these key steps to prepare your concrete subfloor well.
Cleaning And Repairing Surface
Clear all debris, dust, and grease from the concrete. Use a broom and vacuum to remove loose dirt. For grease or oil, apply a concrete cleaner and scrub the area. Allow it to dry fully.
Check for cracks, holes, or uneven spots. Fill cracks and holes with a concrete patching compound. Smooth the patched areas and let them cure according to instructions. This creates a flat, solid base for your hardwood.
Checking For Moisture Levels
Concrete often holds moisture, which can damage hardwood. Test moisture levels using a moisture meter or plastic sheet test. Tape a plastic sheet on the floor for 24 hours. If water collects underneath, moisture is high.
High moisture can cause wood to warp or mold. Use a vapor barrier or moisture sealant to protect the hardwood. Make sure the concrete is dry before installing the floor.
Leveling The Concrete
Uneven concrete causes gaps and weak spots in hardwood floors. Check the floor with a level or straightedge. Mark any areas more than 3/16 inch uneven over 10 feet.
Use a self-leveling compound to even out low spots. Follow the product instructions for mixing and application. Allow the compound to dry completely before continuing. A smooth, level floor ensures a perfect hardwood installation.
Moisture Barriers And Underlayment
Moisture barriers and underlayment play a key role in laying hardwood floors over concrete. Concrete can release moisture that damages the wood. Installing the right moisture barrier prevents this damage. Underlayment adds cushioning and helps with sound reduction. Both layers protect your floor and improve comfort.
Types Of Moisture Barriers
Plastic sheets are the most common moisture barriers. They block water vapor from rising into the wood. Another option is a liquid-applied membrane. It creates a seamless, waterproof layer. Some moisture barriers combine plastic with foam for extra protection. Choose a barrier that matches your concrete’s moisture level.
Selecting Proper Underlayment
Underlayment should provide cushioning and support. Foam and cork are popular choices. Foam absorbs sound and adds comfort. Cork is natural and resists mold. Some underlayments include built-in moisture protection. Check the thickness and material to fit your hardwood type.
Installation Tips
Clean the concrete surface before starting. Roll out the moisture barrier smoothly, overlapping edges. Seal seams with waterproof tape to stop leaks. Lay underlayment over the barrier without gaps. Avoid wrinkles or bubbles to keep the floor even. Follow manufacturer instructions for best results.
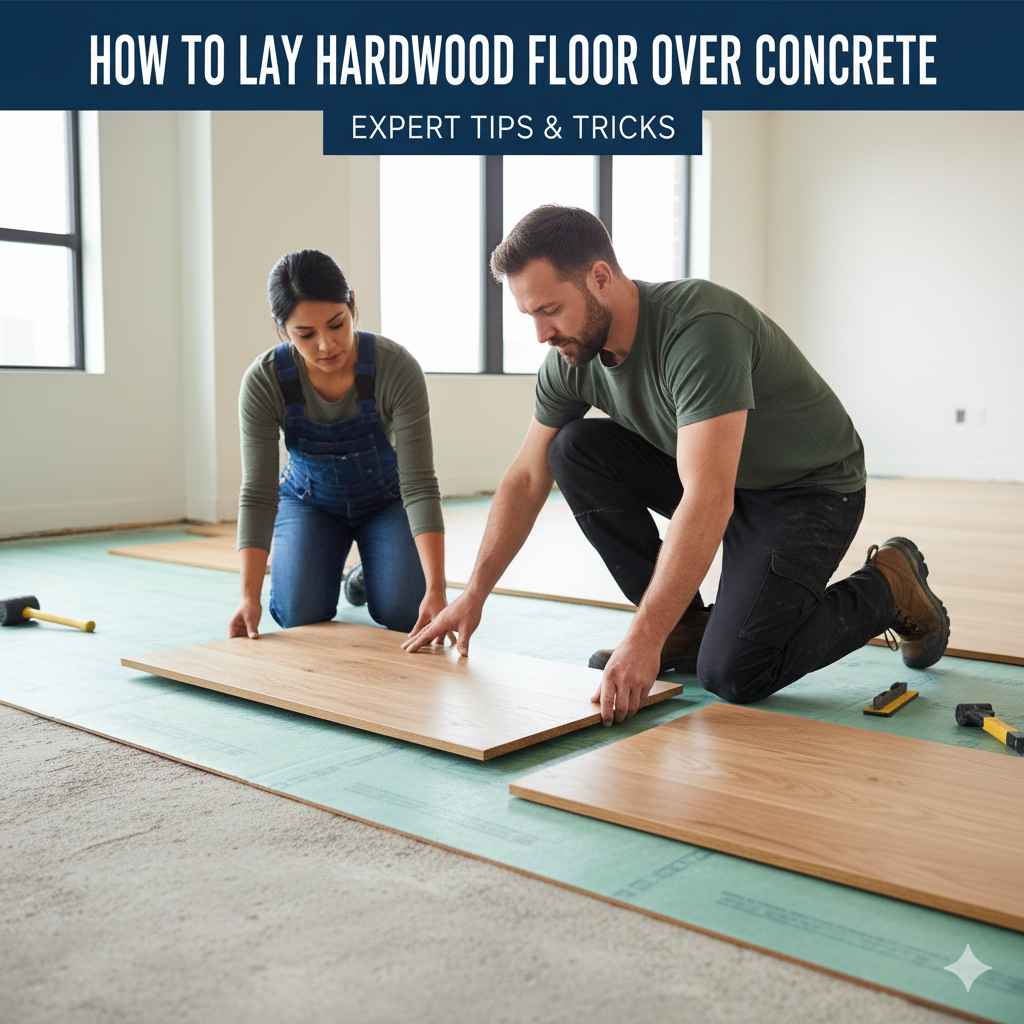
Installation Methods
Choosing the right installation method is important when laying hardwood floors over concrete. Each method suits different needs and skill levels. Understanding these methods helps you pick the best option for your project. Here are the main ways to install hardwood flooring on concrete.
Floating Floor Technique
The floating floor technique means the hardwood planks are not attached to the concrete. The planks connect to each other and rest over a foam or cork underlayment. This method is easy and fast to install. It allows the floor to expand and contract with temperature changes. Floating floors also reduce noise and add comfort underfoot.
Glue-down Method
The glue-down method involves spreading adhesive directly on the concrete. Hardwood planks stick firmly to the surface. This creates a solid and stable floor. Proper moisture testing is important before glue-down installation. It works well for engineered hardwood and some solid wood types. This method requires more skill and time than floating floors.
Nail-down And Staple-down Options
Nail-down and staple-down methods use fasteners to fix the hardwood to a wood subfloor. Concrete needs a plywood layer first to use these methods. They offer a strong and durable hold. These options are common for solid hardwood floors. Installation takes more effort and tools compared to floating or glue-down methods.
Tools And Materials Needed
Installing hardwood floors over concrete needs specific tools and materials. Having the right items makes the job easier and ensures a strong floor. Preparing before starting saves time and avoids mistakes.
Essential Tools List
- Measuring tape to get exact room dimensions
- Chalk line for straight guidelines on the floor
- Hammer for tapping boards into place
- Rubber mallet to avoid damaging wood
- Power saw or handsaw to cut boards to size
- Drill with bits for pre-drilling holes
- Trowel for spreading adhesive evenly
- Level to check floor flatness
- Knee pads for comfort during installation
- Vacuum or broom to clean the concrete surface
Recommended Adhesives And Fasteners
- Moisture barrier or vapor barrier to protect wood
- High-quality wood flooring adhesive suited for concrete
- Construction adhesive with strong bonding power
- Flooring nails or staples for securing boards
- Concrete screws or anchors for added stability
- Wood filler for covering nail holes and gaps
Step-by-step Installation Guide
Laying hardwood flooring over concrete requires care and the right steps. This guide breaks down the process into easy parts. Follow each step to get a smooth, strong floor that lasts.
Acclimating Hardwood Planks
Start by letting the hardwood planks adjust to the room’s temperature and humidity. Place them flat in the installation area for 3 to 5 days. This helps prevent warping or gaps later. Keep the room dry and well-ventilated during this time.
Laying The First Row
Begin along the longest wall. Use a moisture barrier on the concrete first. Then, place the first row of planks with the tongue side facing the wall. Leave a small gap for expansion. Secure the planks with adhesive or fasteners designed for concrete.
Continuing The Installation
Fit the next rows tightly against the first. Stagger the joints for strength and a natural look. Use a tapping block to fit planks without damage. Check for levelness often. Keep the expansion gap around the edges clear.
Finishing Touches
Remove spacers after the floor is complete. Install baseboards or molding to cover the expansion gap. Clean the floor gently to remove dust and adhesive residue. Let the floor settle for a few days before heavy use.
Common Challenges And Solutions
Laying hardwood floors over concrete presents some common challenges. These issues can affect the floor’s durability and look. Knowing these challenges helps you prepare better and avoid mistakes.
Concrete slabs often have moisture, uneven surfaces, and need space for wood to expand. Each problem needs a clear solution to ensure your floor lasts long and looks great.
Dealing With Uneven Floors
Concrete floors are rarely perfectly flat. Uneven surfaces can cause hardwood to creak or crack. Use a self-leveling compound to smooth the floor before installation. This creates a flat surface for the hardwood to sit on. Check the floor with a level tool to find low or high spots. Fixing these spots prevents problems later.
Managing Expansion Gaps
Wood expands and contracts with temperature and humidity changes. Without space, the floor can buckle or warp. Leave a small gap around the edges of the room. This space allows the wood to move safely. Cover the gap with baseboards or molding. Expansion gaps keep the floor stable and prevent damage.
Handling Moisture Issues
Concrete can trap moisture under the hardwood floor. Moisture causes wood to swell, warp, or rot. Use a moisture barrier like plastic sheeting or special underlayment. Test the concrete for moisture before laying the floor. Proper moisture control protects the wood and extends floor life.
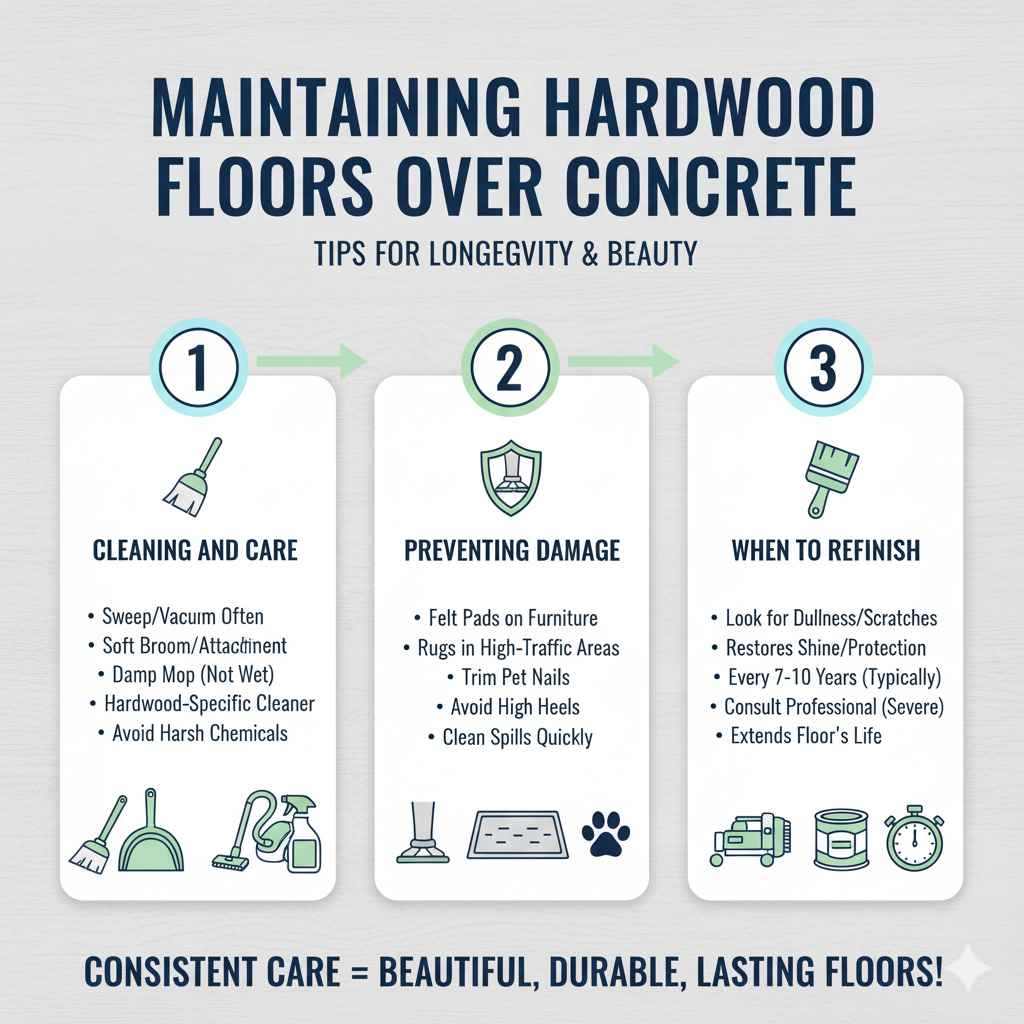
Maintenance Tips For Longevity
Hardwood floors over concrete look beautiful and last long with the right care. Proper maintenance keeps the wood strong and attractive. Small daily efforts can prevent big problems later. Follow these tips to protect your floor and enjoy it for years.
Cleaning And Care
Sweep or vacuum your floor often to remove dirt and dust. Use a soft broom or vacuum with a hardwood floor attachment. Mop with a damp cloth, not wet, to avoid water damage. Choose a cleaner made for hardwood floors to keep the finish safe. Avoid harsh chemicals that can dull or harm the wood.
Preventing Damage
Place felt pads under furniture legs to stop scratches. Use rugs in high-traffic areas to reduce wear. Keep pet nails trimmed to avoid marks. Avoid walking on the floor with high heels or shoes with sharp soles. Clean spills quickly to prevent stains and warping.
When To Refinish
Look for signs like dullness, deep scratches, or worn spots. Refinishing restores the wood’s shine and protects it from damage. Usually, floors need refinishing every 7 to 10 years. If damage is severe, consult a professional for the best approach. Proper refinishing can extend your floor’s life significantly.
Frequently Asked Questions
Can Hardwood Be Installed Directly On Concrete?
No, hardwood cannot be installed directly on concrete. A moisture barrier and underlayment are necessary to prevent damage and ensure durability.
What Is The Best Underlayment For Hardwood On Concrete?
A foam or cork underlayment with a vapor barrier is best. It protects against moisture and provides cushioning for hardwood floors.
How To Prevent Moisture Under Hardwood Floors On Concrete?
Use a high-quality vapor barrier and seal the concrete slab. Proper ventilation and moisture testing before installation are essential.
Can Engineered Hardwood Be Laid Over Concrete?
Yes, engineered hardwood is suitable for concrete subfloors. It is more stable and less prone to moisture damage than solid hardwood.
Conclusion
Laying hardwood floors over concrete takes careful steps. Start with a clean, dry surface. Use a moisture barrier to protect your wood. Choose the right underlayment for comfort and stability. Measure and plan your layout before you begin. Take your time to fit each plank well.
With patience, your floor will look great and last long. Enjoy the warmth and beauty hardwood brings to your space. Simple steps lead to strong, beautiful floors.