How to Make a Hole in Acrylic Sheet Without a Drill
You can put a clean hole in a thin acrylic sheet without a drill using a heated tool, a punch, or a hand-turned awl – the right method depends mostly on the sheet’s thickness. Punch tools work well under about 1/8 inch; anything thicker generally needs a heated point to melt through cleanly. Here are five methods that actually work, in order of how much control they give you.
Method 1: Revolving Leather Punch (Best for Thin Sheets)
Best No-Drill, No-Heat Option
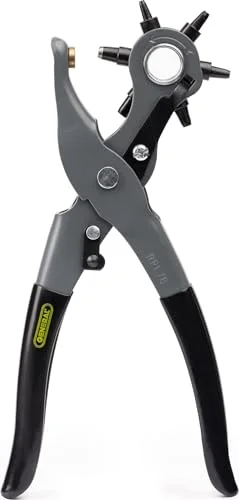 |
General Tools Revolving Leather Hole Punch, Model 72 No heat, no melted plastic fumes, and no drill bit walking off your mark – just a clean punched hole in one squeeze.
|
A revolving leather punch works the same way on thin acrylic as it does on leather – select the hole size on the wheel, position it over your mark, and squeeze firmly in one motion. This is genuinely the cleanest no-heat, no-drill method, but it only works reliably on sheet acrylic thin enough for the punch to shear through without cracking, generally 1/16″ to 1/8″. Thicker cast acrylic sheet will crack or chip instead of punching cleanly.
Method 2: Heated Nail or Awl
Hold a thick nail or metal awl with pliers (never your fingers) and heat the tip with a lighter or small torch until it glows. Press it straight down onto your marked spot and let the heat melt through the acrylic under its own weight – don’t force it, since pushing too hard cracks the surrounding plastic instead of melting a clean hole. Reheat the tip as needed if it cools before it’s through. Work in a ventilated area; melting acrylic releases fumes that are irritating to breathe in an enclosed space, even though acrylic (unlike PVC) doesn’t release chlorine gas when heated.
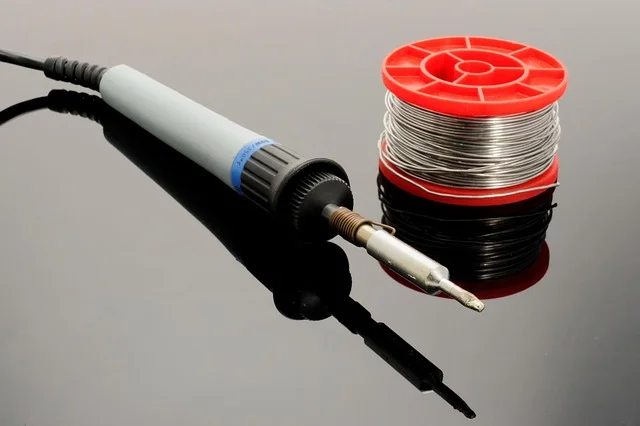
Method 3: Soldering Iron
A soldering iron is the more controlled version of the heated-nail method – the temperature stays consistent instead of cooling every few seconds like an open-flame nail does. Use the iron’s tip (not a flat soldering blade) and let it melt straight down through your marked spot. This method gives the roundest, most consistent hole of any no-drill technique, and it’s the one to reach for if you need more than one hole of the same size.
Method 4: Hammer and Punch (Thin Sheets Only)
Support the acrylic on a scrap wood backer so it isn’t resting on a hard, unforgiving surface, mark your spot, and hold a metal center punch or nail set perpendicular to the sheet. Tap it lightly and gradually increase force until the tip breaks through. This works, but it’s the highest-risk method for cracking – acrylic is more brittle than it looks, and an off-center or overly hard strike will spider-crack the sheet instead of punching a clean hole. Reserve this method for scrap-testing first.
Method 5: Hand-Turned Awl (Thinnest Sheets)
For very thin acrylic (under 1/16″), a sharp awl turned by hand like a hand drill can work through without heat at all – press the point into your mark and rotate it steadily, applying gentle downward pressure. It’s slow and only practical for one or two holes, but it avoids both heat and impact entirely, which matters if you’re working near a finished edge that might crack from either.
Which Method Should You Use?
| Method | Best Sheet Thickness | Risk of Cracking |
|---|---|---|
| Revolving punch | Up to 1/8″ | Low |
| Heated nail/awl | 1/16″ to 1/4″ | Low if not forced |
| Soldering iron | 1/16″ to 1/4″ | Low, most consistent |
| Hammer and punch | Under 1/8″ | High – test on scrap first |
| Hand-turned awl | Under 1/16″ | Low, but slow |
Finishing the Hole
- Smooth rough edges with progressively finer sandpaper (start around 220-grit, finish around 400-600) if the hole edge is rough from melting or punching.
- Ream out a slightly undersized hole with a round needle file rather than trying to redo the whole hole with a bigger tool.
- Clean the surface with a soft cloth and mild soap and water – avoid ammonia-based glass cleaners, which can cause acrylic to craze (develop fine surface cracks) over time.
Safety Notes for Every Method
- Wear safety glasses for every method, including the punch – brittle acrylic can chip unpredictably.
- Work in a ventilated space for any heated method; melted acrylic fumes are an irritant, not something to breathe in an enclosed room.
- Always hold hot tools with pliers or a handle, never bare fingers, and let the acrylic cool fully before touching the hole edge.
- Test your exact method and pressure on a scrap piece of the same thickness before committing to your actual project.
Why Acrylic Cracks More Easily Than You’d Expect
Acrylic (PMMA) is a rigid thermoplastic with almost no give before it fails – where wood bends and metal dents, acrylic transfers stress directly to the nearest weak point, usually an edge, corner, or existing scratch, and cracks there instead of flexing. This is why every no-drill method above stresses letting heat or a punch do the work gradually rather than forcing a tool through: a sudden, concentrated force finds the nearest flaw in the sheet and splits it, sometimes well beyond the hole you’re making. Cast acrylic (poured into a mold, thicker and more common in hardware store sheet) is somewhat more crack-resistant than extruded acrylic (rolled thin, common in picture-frame glazing and craft sheet), so if you know which type you have, that affects how much force is actually safe to use. Most hardware store sheet sold as “acrylic” or “Plexiglas” for glazing and signage is cast; thinner craft-store sheet used for stencils and picture framing is usually extruded.
Common Mistakes That Crack the Sheet
- Working too close to an edge. A hole placed within about 3/8″ of the sheet’s edge is far more likely to crack outward than one placed further in – give yourself margin whenever the project allows it.
- Skipping the scrap test. Every method above behaves differently depending on the sheet’s exact thickness and whether it’s cast or extruded acrylic – a technique that works cleanly on one sheet can crack a different batch.
- Leaving the protective film off during heated methods. The film helps dissipate heat slightly and protects the surrounding surface from scorch marks; peel it back only right at the hole location, not across the whole sheet.
- Rushing a heated tool. Pushing before the tool has actually melted through – rather than letting gravity and heat do the work – is the single most common cause of a cracked hole in the heated methods.
Getting Practice Material Before You Start
If you don’t already have acrylic offcuts, most sign shops and plastics fabricators will sell or give away drop pieces too small for their own jobs – call ahead and ask, since most don’t advertise it. Craft stores also sell small precut acrylic sheets specifically sized for stencils and ornaments, which is inexpensive practice material that matches the thin, extruded acrylic most hobby projects actually use. Practicing on the same thickness and type you’ll use for your real project matters more than practicing on “similar” scrap, since thickness and cast-vs-extruded differences change how every method behaves.
Frequently Asked Questions
How do I make a hole in an acrylic sheet without a drill?
Use a revolving leather punch for thin sheets, or a heated nail, awl, or soldering iron to melt through – let the heat do the work rather than forcing the tool through.
How do I punch a hole in an acrylic sheet?
A revolving leather hole punch works on acrylic sheet up to about 1/8″ thick – select the size on the wheel and squeeze firmly in one motion, the same way you’d punch a belt.
What’s the difference between using a drill and these no-drill methods?
A drill with a proper plastic or acrylic bit is still the most precise option for thicker sheet (over 1/4″) or a large batch of identical holes. These no-drill methods are for when you don’t have a drill on hand, need one or two holes in thin sheet, or want to avoid a drill’s tendency to crack acrylic near an edge.
How do I cut an acrylic sheet by hand with a saw?
Use a fine-toothed saw, keep the sheet clamped flat to prevent vibration, and cut slowly along a clearly marked line. Leave the protective film on until the cut is finished to reduce scratching, and sand the cut edge smooth afterward.
Conclusion
For thin acrylic, a revolving leather punch is the cleanest no-heat option; for anything thicker, a heated nail, awl, or soldering iron will melt through with the least risk of cracking. Always test your exact method on a scrap piece of the same thickness first – acrylic’s brittleness is the one thing every method here has to work around.
Sponsored / affiliate links. As an Amazon Associate I earn from qualifying purchases. I may earn additional commission from eligible campaigns.