How to Make Miter Box: Easy DIY Guide for Beginners
To make a miter box, gather wood, nails, and a saw. Cut the wood into the desired dimensions, then assemble the pieces into a rectangular box.
Creating a miter box is a straightforward project that enhances your woodworking capabilities. This tool allows for precise angled cuts, essential for crown molding and other projects. Building your own miter box not only saves money but also gives you a sense of accomplishment.
A well-constructed miter box ensures accuracy in your cuts, leading to professional-looking results. Whether you’re a seasoned carpenter or a DIY enthusiast, knowing how to make a miter box can significantly improve your craft. This guide will take you through the simple steps to create an effective and reliable miter box. Get ready to elevate your woodworking skills!
Introduction To Miter Boxes
A miter box is a useful tool for woodworkers. It helps make precise angled cuts. These cuts are important for framing, molding, and other projects. Understanding miter boxes can improve your woodworking skills.
The Role Of A Miter Box
The primary role of a miter box is to guide your saw. It ensures accurate angles, usually 45 or 90 degrees. Here are some key points:
- Guides the saw: Keeps the saw steady and straight.
- Prevents mistakes: Reduces errors in cutting.
- Improves safety: Minimizes chances of injury.
Miter boxes come in different types. They can be manual or powered. Each type serves the same purpose, but offers unique features.
Advantages Of DIY Miter Boxes
Building your own miter box has many benefits. Here are some advantages:
- Cost-effective: Saves money compared to store-bought ones.
- Customization: Tailor it to your specific needs.
- Learning experience: Gain woodworking skills while building.
DIY miter boxes can be made from simple materials. Wood, screws, and a saw are usually all you need. This makes it easy for anyone to create a functional tool.

Essential Tools And Materials
Building a miter box requires some specific tools and materials. Having the right supplies makes the process easier and more efficient. Below are the essential items you’ll need to create your own miter box.
Gathering Your Supplies
Start by collecting these basic tools and materials:
- Wood pieces: Use plywood or solid wood.
- Saw: A hand saw or a miter saw works well.
- Wood glue: Strong adhesive to hold pieces together.
- Screws: For securing joints.
- Measuring tape: Essential for accurate measurements.
- Square: Ensures perfect right angles.
- Pencil: For marking cut lines.
Safety Equipment
Safety should always come first. Use the following gear to protect yourself:
| Safety Gear | Purpose |
|---|---|
| Safety glasses | Protects eyes from debris. |
| Dust mask | Prevents inhaling sawdust. |
| Hearing protection | Reduces noise exposure from power tools. |
| Gloves | Protects hands from cuts. |
Wear this safety gear at all times. It helps you work safely and efficiently.
Designing Your Miter Box
Creating a miter box is a fun and rewarding project. It helps in making precise angled cuts. Start with the right design. This ensures accuracy and stability.
Determining The Dimensions
Size matters. Here are key dimensions to consider:
| Dimension | Measurement (inches) |
|---|---|
| Length | 24 |
| Width | 10 |
| Height | 4 |
These dimensions work well for most projects. Adjust based on your needs.
Consider these factors:
- Type of cuts you will make
- Size of wood pieces
- Available workspace
Choosing The Right Wood
Selecting the right wood is crucial. It affects strength and durability. Here are some good options:
- Pine: Affordable and easy to work with.
- Birch: Strong and smooth finish.
- Oak: Durable and long-lasting.
Consider the following:
- Local availability
- Budget constraints
- Desired appearance
Choose wood that fits your project needs. Strong wood prevents breakage during cuts.
Cutting The Wood
Cutting the wood is a crucial step in making a miter box. Accurate cuts ensure a precise fit for your projects. Follow these steps to achieve clean and straight cuts.
Measuring And Marking
Correct measurements lead to better results. Use these tips to measure and mark your wood:
- Gather your tools: tape measure, square, and pencil.
- Measure the length of the wood needed.
- Use a square to mark a straight line.
- Double-check your measurements for accuracy.
Mark each cut clearly. This helps avoid mistakes. Use distinct lines for different cuts. A sharp pencil ensures clear markings.
Using A Saw For Straight Cuts
Choose the right saw for your cuts. A hand saw or miter saw works well. Follow these steps:
- Position the wood securely on a stable surface.
- Align the saw blade with the marked line.
- Hold the saw firmly and apply even pressure.
- Make the cut slowly for better control.
Check each cut for accuracy. A straight cut improves the fit of your miter box. Practice makes perfect. Keep your saw sharp for cleaner cuts.
Assembling The Miter Box
Assembling a miter box is an easy and rewarding project. Follow these steps carefully. You will create a sturdy tool for precise cuts.
Securing The Sides
Start by securing the sides of the miter box. Use these materials:
- Wood boards (1×6 inches)
- Wood glue
- Wood screws
- Drill
- Clamps
Follow these steps:
- Cut two boards for the sides. Length depends on your needs.
- Apply wood glue on the edges of the boards.
- Position the boards upright. Use clamps to hold them.
- Drill holes and insert screws to secure the sides.
Make sure everything is tight. This ensures stability.
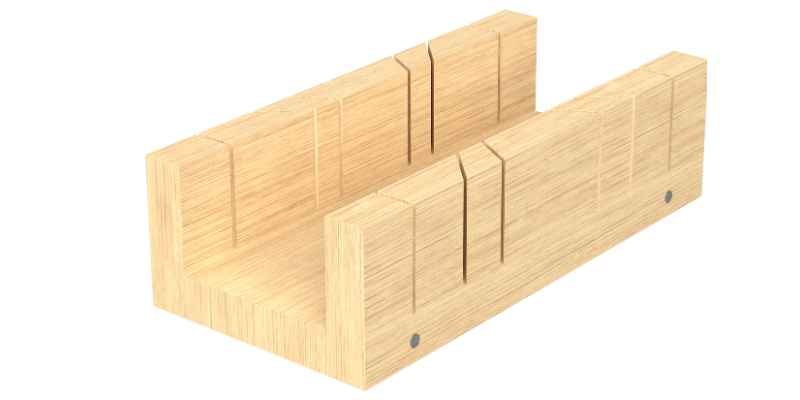
Ensuring Angled Slots Are Accurate
Accurate angled slots are crucial for clean cuts. Use a protractor to measure angles. Follow these steps:
- Mark the desired angles on the bottom board.
- Use a saw to cut the slots at marked angles.
- Check the depth of each slot. Ensure they are even.
Double-check your angles. This step is important for precision.
After cutting the slots, test with a piece of wood. Adjust if necessary. Your miter box will now be ready for use.
Finishing Touches
After building your miter box, it’s time for the finishing touches. These steps will enhance its appearance and durability.
Sanding For Smoothness
Sanding is essential for a smooth surface. Follow these steps:
- Start with coarse grit sandpaper (80-120 grit).
- Sand all edges and surfaces evenly.
- Switch to finer grit sandpaper (220 grit) for a smooth finish.
- Pay extra attention to corners and joints.
Use a sanding block for flat areas. This helps maintain an even surface. Always sand in the direction of the wood grain.
Applying A Finish
A finish protects your miter box and adds beauty. Choose from these options:
- Varnish: Provides a hard, protective coat.
- Wood Stain: Adds color while enhancing grain.
- Oil: Penetrates wood, providing natural beauty.
Follow these steps for applying a finish:
- Ensure the surface is clean and dust-free.
- Apply the finish with a brush or cloth.
- Follow the manufacturer’s instructions for drying time.
- Sand lightly between coats for a smoother finish.
Multiple coats provide better protection. Always let each coat dry completely.
Using Your Miter Box
A miter box helps you make accurate cuts. Proper usage ensures clean edges and precise angles. Follow these tips to maximize your tool’s effectiveness.
Proper Placement Of Material
Correctly placing your material is crucial for accuracy. Here are some steps to follow:
- Position the material against the back of the miter box.
- Align the edge with the desired cut angle.
- Secure the material using clamps if necessary.
Double-check your alignment before cutting. This ensures you achieve the right angle every time.
Making Precise Cuts
Making precise cuts is key to a successful project. Follow these tips:
- Use a sharp saw blade for clean cuts.
- Start the cut slowly to avoid mistakes.
- Maintain steady pressure as you saw through the material.
Consider practicing on scrap material first. This will help you build confidence.
For angled cuts, keep your eyes on the marked line. Adjust your speed based on the material thickness.
| Cut Type | Angle | Recommended Blade |
|---|---|---|
| Cross Cut | 90° | Fine-tooth Blade |
| Bevel Cut | 45° | Medium-tooth Blade |
| Miter Cut | Compound Angle | Specialty Blade |
Following these steps helps you achieve perfect cuts every time. Enjoy using your miter box with confidence!
Maintenance And Care
Proper maintenance and care of your miter box ensure long-lasting performance. Regular cleaning and correct storage protect your tool from damage and wear.
Cleaning After Use
Cleaning your miter box after each use is essential. Follow these steps:
- Remove any debris or sawdust.
- Use a soft brush to clean the grooves.
- Wipe down the surfaces with a damp cloth.
- Dry the miter box thoroughly to prevent rust.
For stubborn stains, use a mild soap solution. Avoid harsh chemicals that can damage the material.
Storage Tips
Proper storage keeps your miter box in good shape. Consider these tips:
- Store in a dry, cool place.
- Keep away from moisture and humidity.
- Use a protective cover if storing for long periods.
- Ensure it is placed on a stable surface.
Check your miter box regularly for any damage. Repair or replace parts as needed to maintain functionality.
Troubleshooting Common Issues
Building a miter box can be rewarding. Yet, problems may arise. Here are solutions for common issues you might face. These tips help ensure accuracy and stability in your cuts.
Dealing With Inaccurate Cuts
Inaccurate cuts can lead to frustration. Check these factors:
- Blade Alignment: Ensure the saw blade is aligned properly.
- Measurement Accuracy: Double-check all measurements before cutting.
- Material Thickness: Ensure the material is consistent in thickness.
Use a square to verify angles. Make adjustments as needed. Here’s a quick checklist:
| Issue | Solution |
|---|---|
| Misaligned blade | Realign the blade with the miter box. |
| Incorrect measurements | Measure twice, cut once. |
| Uneven material | Use a planer to even out the material. |
Fixing Loose Joints
Loose joints can weaken the structure of your miter box. Follow these steps to fix them:
- Tighten Screws: Use a screwdriver to tighten any loose screws.
- Use Wood Glue: Apply wood glue to joints for added strength.
- Reinforce with Brackets: Add brackets for additional support.
Regularly check joints for stability. A strong miter box improves cutting precision.
Advanced Customizations
Enhancing your miter box can improve its functionality. Customizations allow for better precision and ease of use. Here are two advanced modifications to consider.
Adding A Clamping System
A clamping system secures your workpiece firmly. This prevents movement during cutting. Follow these steps to add one:
- Choose a sturdy clamp.
- Attach it to the miter box.
- Ensure it aligns with the cutting slot.
Benefits of a clamping system include:
- Increased Accuracy: Keeps pieces in place.
- Improved Safety: Reduces risk of accidents.
- Versatility: Works with various materials.
Creating Multiple Angled Slots
Multiple angled slots allow for various cut options. This enhances your miter box’s versatility. Here’s how to create them:
- Measure desired angles.
- Mark slots on the miter box.
- Use a saw to cut angled slots.
The table below shows common angles and their degrees:
| Angle | Degrees |
|---|---|
| 45° | 45 |
| 30° | 30 |
| 60° | 60 |
These slots make cutting easy and quick. Enjoy the flexibility of multiple angles!
Miter Box Projects For Practice
Creating projects with a miter box is fun and rewarding. These projects help improve your skills. Start with simple ideas to build confidence. Below are two great projects to try.
Picture Frames
Making a picture frame is a simple yet fulfilling project. It allows you to practice precise cuts and angles. Here’s how to create your own:
- Gather your materials: wood, glue, and a miter box.
- Cut four pieces of wood at 45-degree angles.
- Assemble the pieces into a frame shape.
- Use glue to secure the corners.
- Once dry, paint or stain your frame.
- Insert your favorite picture.
Try different sizes and styles. Experiment with colors and finishes. This project helps develop your miter box skills.
Simple Woodworking Projects
Many simple woodworking projects can enhance your skills. Here are some easy ideas:
- Coasters: Cut wood into square pieces. Miter the edges for a polished look.
- Small Shelves: Create small shelves for knick-knacks. Use a miter box for clean cuts.
- Birdhouses: Build a birdhouse with angled cuts. It’s fun and useful.
Each project focuses on precision. You’ll gain experience while creating useful items. Enjoy the learning process!
Frequently Asked Questions
How Do You Use A Miter Box?
A miter box is used to make precise angled cuts. Place your workpiece in the box and align it with the desired angle. Use a hand saw to cut along the guide. This ensures clean, accurate cuts for projects like framing or molding.
What Materials Do You Need For A Miter Box?
To make a miter box, you’ll need wood or plywood for the base and sides. A hand saw is essential for cutting. Additionally, screws or nails will help secure the structure. You might also want a measuring tape and a pencil for marking angles.
Can You Buy A Miter Box?
Yes, miter boxes are available for purchase. They come in various sizes and materials, including plastic and wood. Buying a pre-made miter box can save time and ensure accuracy. Consider your project needs when choosing the right one for you.
What Angles Can A Miter Box Cut?
A miter box can typically cut at 45 and 90-degree angles. Some models allow for additional angles, providing versatility for different projects. Ensure you check the specifications of your miter box for available angles. This feature is crucial for tasks like framing or trim work.
Conclusion
Building a miter box is a rewarding project that enhances your woodworking skills. It allows for precise cuts, making your work more efficient. With the right materials and techniques, anyone can create a functional tool. Start your DIY journey today and enjoy the benefits of a custom miter box in your workshop.