
How to Program a Woods Outdoor Timer
Quick answer: Woods makes two very different timer families — digital (button-based) and mechanical (pin/dial-based) — and the programming steps are completely different for each. If your timer has a small LCD screen and buttons, skip to the Digital section below. If it has a round dial with plastic pins around the edge, skip to the Mechanical section.
A Woods outdoor timer automates lights, pumps, and holiday displays so you’re not flipping switches by hand every evening. The steps below match the actual button layout and dial mechanism printed in Woods’ own manuals — not a generic “press On, press Off” guess — so whether you have a 50015-style digital timer, a 50012WD-style mechanical timer, or a photocell dusk-to-dawn model, you’ll find the real steps here.
Quick Answer
Digital Woods timers use CLOCK+HOUR+MINUTE+DAY to set the clock, then PROG to store up to 20 on/off pairs. Mechanical Woods timers use 48 pull-up/push-down pins around a 24-hour dial, each pin controlling a 30-minute block. Photocell/dusk-to-dawn Woods timers skip manual on/off times entirely and switch based on ambient light instead.
Gather Your Tools
- Your Woods timer (check the model number printed on the back or side — the steps differ by type)
- A small flathead screwdriver or toothpick (needed to press the recessed reset button on digital models)
- Your printed instruction manual, if you still have it, or the model number so you can find the right manual below
Safety precautions: unplug the timer before making any adjustments to the dial or wiring, keep it away from standing water even though outdoor models are weather-resistant, never handle it with wet hands, and inspect the housing and cord for cracks or exposed wire before every use.
Digital Woods Timer: Real Button-by-Button Steps
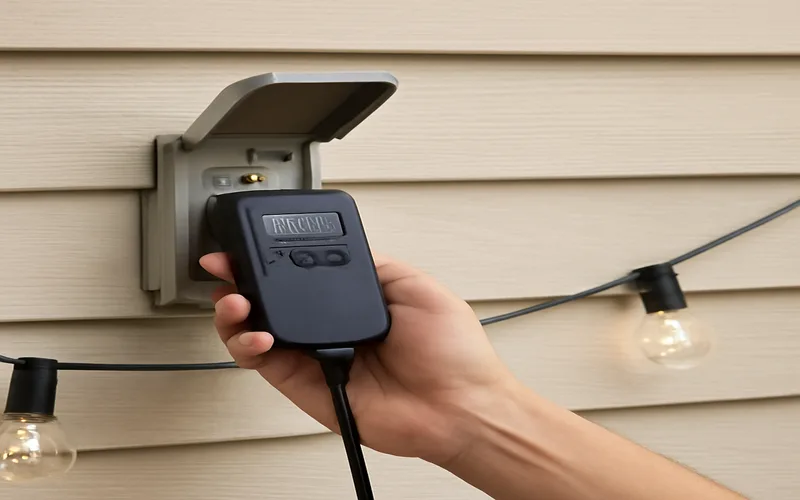
Digital Woods timers (the 50014/50015/50016-style models with an LCD display) use five labeled buttons: CLOCK, HOUR, MINUTE, DAY, and PROG. Two of these buttons double as secondary functions when held: HOUR doubles as the random/security mode (RND), and CLOCK doubles as the daylight-saving toggle (DST).
- Charge the internal battery first. Plug the timer into a live outlet and leave it alone for about 10 minutes before programming anything — this charges the backup battery that keeps your schedule saved through a power blip. Skipping this step is the #1 reason a “freshly programmed” timer loses its settings the next day.
- Set the day and time. Press and hold CLOCK, then press DAY repeatedly until the correct day of the week shows. Press HOUR to set the hour and MINUTE to set the minutes, then release CLOCK.
- Program an on/off pair. Press PROG once — the display shows “ON 1”. Use HOUR/MINUTE/DAY to set the on-time, press PROG again to move to “OFF 1”, and set the off-time the same way. Repeat this pattern to store up to 20 separate on/off pairs — useful if you want different schedules on weekdays versus weekends.
- Review, revise, or clear a setting. Press PROG repeatedly to scroll through your stored settings. To erase one you no longer want, scroll to it and press and hold RCL (recall/reset) — a paperclip or toothpick works if it’s a small recessed button on your model.
- Use countdown mode for a one-time event (e.g., “keep this on for the next 2 hours” without touching the weekly schedule) — press and hold PROG to enter RCL-CD countdown mode, then set the duration.
- Turn on random/security mode if you want the outlet to cycle on and off unpredictably while you’re away (so a porch light doesn’t look robotically regular) — press and hold HOUR to enable RND. In this mode the outlet typically stays on for roughly 10–26 minutes and off for roughly 26–42 minutes, varying each cycle.
- Adjust for daylight saving time without resetting your whole schedule — press and hold CLOCK to toggle DST forward or back an hour.
- Use the manual override for a one-off change tonight without touching your saved schedule — most digital models have a 3-position switch marked ON / OFF / AUTO. AUTO runs your programmed schedule; ON and OFF manually force the outlet regardless of the schedule until you switch back to AUTO.
If a step doesn’t match what your screen shows, check the exact model number (printed on the back or bottom of the housing) against the Woods support line below — small button-layout differences exist between the 50013WD, 50014, 50015, and 50016 models even though the core CLOCK/HOUR/MINUTE/DAY/PROG logic is shared across the line.
Mechanical (Pin/Dial) Woods Timer: Real Steps
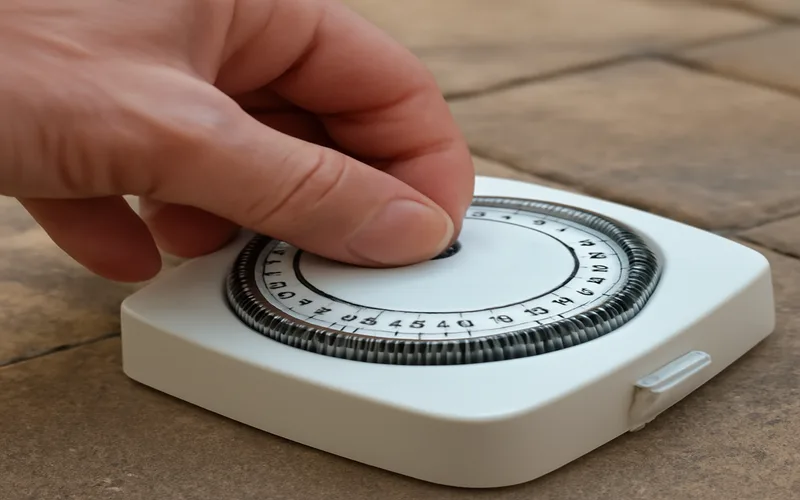
Mechanical Woods timers (the 50011/50012WD-style models with a round dial and no screen) divide the day into 48 pins spaced 30 minutes apart around a 24-hour dial instead of a digital schedule.
- Set the current time. Turn the dial by hand until the arrow or indicator lines up with the current time on the outer ring. Double-check against a clock you trust — a mechanical timer has no way to correct itself if you set this wrong.
- Push down the pins for the periods you want power ON, and leave the remaining pins pulled up (off). Each pin controls one 30-minute block, so two pins pushed down in a row gives you one hour of on-time.
- Check your model’s on/off convention before assuming. Most Woods mechanical timers use “pin pushed in = ON,” but this isn’t universal across every model and production run — if your device behaves opposite to what you expect on the first test cycle, that’s the reason, not a defect.
- Plug your device into the timer, then plug the timer into a grounded outdoor outlet. The dial will now rotate slowly with real time and trip the outlet on and off at the pins you’ve set.
Dusk-to-Dawn and Astronomic Timers: A Different Setup Entirely
If you searched for how to cancel or use the “astronomic function,” you likely have a photocell or astronomic model (like the Woods 50013WD, 50121WD/50122WD, or the 59019WD in-wall 7-day astronomical digital timer) rather than a standard on/off digital or mechanical unit. These models use a built-in light sensor or a stored sunrise/sunset table instead of fixed clock times — the light turns on automatically at dusk and off at dawn, adjusting itself through the seasons without you resetting anything. If your unit is stuck in astronomic mode and you want fixed on/off times instead, look for a MODE or FUNCTION button (separate from the standard PROG button covered above) that switches the unit out of astronomic/photocell mode into manual scheduling.
Coleman Cable Woods 50014 7-Day Outdoor Digital Timer
Same Southwire/Woods button family (CLOCK/HOUR/MINUTE/DAY/PROG) covered in this guide, with 7-day scheduling for different weekday/weekend routines.
- Best for: Anyone who wants different on/off schedules on different days of the week
- Why we picked it: Uses the exact digital button layout this guide walks through, so the steps above transfer directly
- Main drawback: Small LCD screen can be hard to read in bright direct sunlight
 OPTION 1 Southwire Woods Mechanical Outdoor Timer
|
 OPTION 2 Woods 50013WD Photocell Dusk-to-Dawn Timer
|
 OPTION 3 Kasa Outdoor Smart Wi-Fi Plug
|
As an Amazon Associate we earn from qualifying purchases.
Test The Timer
After programming, set a short test cycle a few minutes in the future and watch to confirm the outlet actually switches. If nothing happens: confirm the timer is fully seated in the outlet, re-check that AM/PM (digital) or the dial position (mechanical) is correct, and on digital models confirm the battery had its initial 10-minute charge. If it still won’t hold a schedule after a fresh reset, that’s usually a sign the backup battery itself has worn out over several years of use rather than a programming mistake.
Maintenance Tips
Wipe the housing with a dry or barely damp soft cloth — never spray water directly into the outlet ports, even on weather-resistant models. Check the cord and outlet cover for cracking each season, especially after winter. On mechanical models, dust and grit can build up around the pin dial over a year outdoors; a soft brush keeps the pins moving freely.
If your exact model number doesn’t quite match the button layout above, Florafelt’s reproduction of the official Woods digital timer manual covers model-specific variations, and Southwire (the parent company behind the Woods brand) can be reached through their contact page for further support.
Frequently Asked Questions
How do I set the current time on my digital Woods timer?
Press and hold CLOCK, then use DAY to set the day of the week and HOUR/MINUTE to set the time, releasing CLOCK when finished.
How can I program multiple on/off settings?
On digital models, press PROG to store an on/off pair, then press PROG again to move to the next pair — you can store up to 20 separate on/off pairs. On mechanical models, push down any pins for the time blocks you want power on; each pin covers 30 minutes.
What is the override switch on my Woods timer?
Most digital models have a 3-position ON/OFF/AUTO switch. AUTO runs your saved schedule; ON or OFF manually forces the outlet regardless of the schedule until you switch back to AUTO.
How do I reset my Woods outdoor timer?
Press and hold the RCL (recall/reset) button — often a small recessed button you’ll need a toothpick or paperclip for — while viewing the setting you want to clear. Some models also support a full reset by unplugging for several minutes; this clears all programmed settings, so you’ll need to reprogram the clock and schedule afterward.
How do I cancel the astronomic function on my Woods timer?
Look for a MODE or FUNCTION button separate from PROG — it switches the timer out of astronomic/photocell dusk-to-dawn mode into manual on/off scheduling. The exact button varies by model, so check the manual for your specific unit or check Florafelt’s reproduction of the official manual linked above.
What does random/security mode do on a Woods timer?
Press and hold HOUR to enable RND mode. Instead of a fixed schedule, the outlet cycles on for roughly 10–26 minutes and off for roughly 26–42 minutes at random intervals, making a home look occupied while you’re away.
Conclusion
Whether your Woods timer is digital, mechanical, or a photocell dusk-to-dawn model, the trick is matching the steps to the right timer family instead of guessing at generic “press On, press Off” instructions. Charge a digital model’s battery before you program it, double-check a mechanical model’s pin convention on the first test cycle, and check the linked manual reproduction above if your exact model number doesn’t quite match the button layout shown here.