How to Effortlessly Remove Blade from Circular Saw: Quick and Easy Guide
To remove the blade from a circular saw, first, disconnect the power source. Next, loosen the blade screw, remove the outer washer, and pull off the blade.
Removing the blade from a circular saw is a straightforward process that requires proper precautions. Before starting, it is essential to disconnect the power source to avoid any potential accidents. Once the power is off, you can proceed by locating the blade screw, usually positioned at the center of the saw’s base plate.
With the appropriate-sized wrench, loosen the blade screw by turning it counterclockwise. Afterward, remove the outer washer, and carefully lift off the blade from the saw’s arbor. Remember to handle the blade with caution to avoid injury. By following these steps, you can safely and efficiently remove the blade from your circular saw.
Essential Tools For Blade Removal
To remove the blade from a circular saw, essential tools such as a wrench and a blade removal tool are required. Firstly, disconnect the saw from the power source, then use the wrench to loosen the blade bolt before utilizing the blade removal tool to complete the process.
Safety Gear
Prioritize safety when removing the blade from a circular saw. Ensure you have the necessary safety gear to protect yourself from potential injuries. The key safety gear includes:
- Safety Glasses: Protect your eyes from flying debris.
- Gloves: Shield your hands from sharp edges and potential cuts.
- Earplugs or Earmuffs: Guard your ears against the loud noise produced by the saw.
Wrench Or Blade Removal Tool
The essential tool for removing the blade from a circular saw is either a wrench or a dedicated blade removal tool.
A wrench is a versatile tool typically included with the saw. It is used to secure or loosen the blade’s mounting screw or arbor nut. Ensure the wrench is the correct size for the mounting screw.
Alternatively, you can utilize a blade removal tool designed specifically for this purpose. This tool often features a retractable blade guard and a locking mechanism that securely holds the blade in place during removal.
Both options are effective in safely detaching the blade, but the choice depends on your preference and the tools available to you.
Preparing The Saw For Blade Removal
To remove the blade from your circular saw, make sure to prepare the saw properly. Follow these steps to ensure a safe and efficient blade removal process.
Switch Off The Power
To safely remove the blade from your circular saw, the first and most crucial step is to switch off the power. This might seem like common sense, but it’s essential to emphasize safety precautions. Locate the power switch on your saw, typically found either on the handle or just below it. Slide the switch to the “off” position to ensure that the saw is completely powered down.
Secure The Saw
Once the power is switched off, it’s time to secure the saw before proceeding further. Place the circular saw on a stable and flat surface, such as a workbench or table. This ensures stability during the blade removal process and minimizes the risk of accidents. Make sure that the saw is firmly positioned and won’t tip over while you are working on it.
Loosen The Blade Guard
Now that the saw is secure, it’s necessary to loosen the blade guard. The blade guard is designed to protect you from accidental contact with the sharp blade. Locate the blade guard release lever or knob, typically located either near the blade or on the top of the saw housing. Loosen the blade guard by sliding the lever or turning the knob counterclockwise. This action will expose the blade, allowing you to proceed with the removal process.
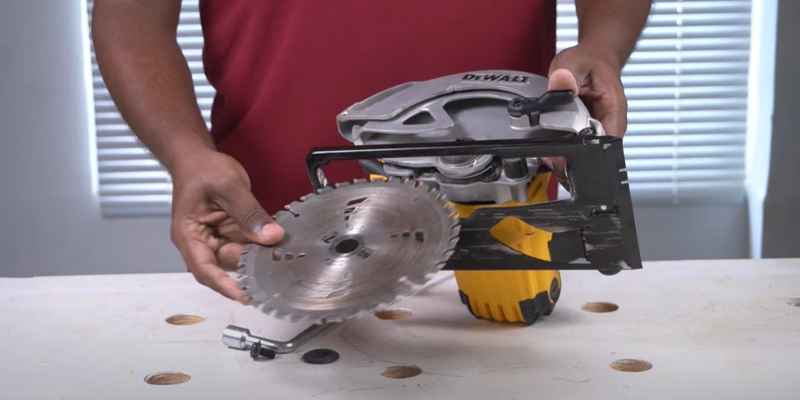
Remove The Blade
With the blade guard loosened, it’s time to remove the blade from the circular saw. Locate the arbor nut, which holds the blade in place. Using a wrench that fits the arbor nut, grip the nut firmly and turn it clockwise to loosen it. Remember, “righty tighty, lefty loosey.” Once the arbor nut is loosened, carefully slide the blade off the arbor, being cautious of the sharp teeth. Set the blade aside, ensuring it is placed in a safe and secure location where it won’t pose a risk to yourself or others.
Inspect The Saw And Blade
Before you move forward with replacing the blade or performing any other task on the saw, take a moment to inspect both the saw and the removed blade. Ensure there are no visible signs of damage or wear that may hinder the saw’s performance or compromise your safety. Additionally, inspect the blade for any excessive wear, broken teeth, or other issues that may require replacement. If everything looks in order, you can proceed with either installing a new blade or completing any other necessary maintenance tasks on your circular saw.
Remember, taking the time to prepare your saw for blade removal is crucial to maintain your safety and the integrity of your equipment. By following these steps, you can easily remove the blade from your circular saw and carry out any necessary maintenance or repairs.
Removing The Circular Saw Blade
To remove the blade from a circular saw, follow these simple steps for a hassle-free process. Firstly, ensure the saw is unplugged, then loosen the blade bolt with a wrench, and gently remove the blade, being cautious of its sharp edges.
Locate the Blade Lock
To start, locate the blade lock on your circular saw. Typically, it’s a small button or lever near the blade housing. Once you’ve found it, engage the lock to prevent the blade from moving during the removal process.
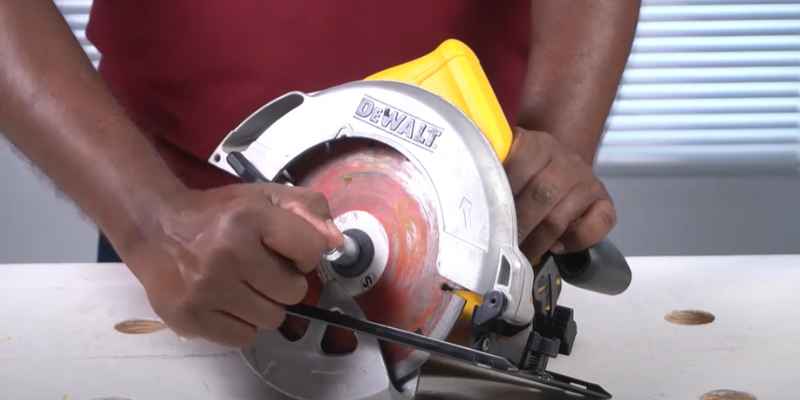
Use the Wrench to Loosen the Blade
After securing the blade lock, you will need to use the wrench that was included with your circular saw to loosen the blade. Insert the wrench into the blade bolt and turn it counterclockwise to loosen the bolt. Keep turning until the bolt is fully loosened, then carefully remove the blade from the saw.
With these steps, you can safely and effectively remove the blade from your circular saw, allowing for blade replacement or maintenance. Always remember to prioritize safety and follow the manufacturer’s guidelines for your specific saw model.
Ensuring Safe Blade Removal
Ensure safe blade removal by following these steps when removing the blade from a circular saw. Start by disconnecting the power source, then use a wrench to loosen the blade nut. Once the nut is removed, carefully take out the blade, ensuring not to touch the sharp edges.
Removing the blade from a circular saw is a necessary task that every DIY enthusiast or professional needs to know. However, it’s essential to prioritize safety when performing this task. By following a few simple steps and guidelines, you can ensure a safe blade removal process.
Inspect The Blade
Before removing the blade, it’s crucial to inspect its condition. A damaged or worn-out blade can pose serious risks during removal. Look for any signs of chipping, missing teeth, or warping. Additionally, check for any corrosion or rust that may compromise the blade’s integrity. If you notice any issues, replace the blade before proceeding with the removal.
Proper Blade Disposal
Once you have successfully removed the blade, proper disposal is necessary to avoid any accidents. Improperly discarded blades can cause injuries to unsuspecting individuals. Here are a few methods you can follow to ensure safe disposal:
- Use a blade disposal container: A blade disposal container is specifically designed to safely hold used blades. These containers typically have a locking mechanism to prevent accidental blade exposure. Store the used blades in the container until you can dispose of them properly.
- Wrap in cardboard or heavy-duty tape: If you don’t have a disposal container, you can wrap the blade in thick cardboard or heavy-duty tape. This will prevent accidental cuts and minimize the risk of injury during disposal.
- Take to a recycling center: Many recycling centers accept used saw blades for proper disposal. Check with your local recycling facility for guidelines on how to drop off the blades safely.
Remember, when handling blades, always prioritize safety. By inspecting the blade beforehand and following proper disposal methods, you can ensure a safe blade removal process. So, next time you need to replace your circular saw blade, make sure to incorporate these steps into your routine for a safe and efficient blade removal experience.
Final Checks And Maintenance
Once you have successfully removed the blade from your circular saw, there are a few final checks and maintenance tasks you should perform to ensure your saw remains in optimum condition. These steps will help extend the lifespan of your saw and ensure its continued performance and safety.
Clean And Lubricate
The first step in the final checks and maintenance process is to clean and lubricate your circular saw. Cleaning off any dust, debris, or residue will prevent any buildup that could impact the saw’s performance. Lubricating the moving parts of the saw will help reduce friction and ensure smooth operation.
To clean your saw, you can use a soft brush or a compressed air canister to carefully remove any sawdust or debris from the blade, motor, and housing. Be sure to wear protective gloves and safety goggles while doing this. Additionally, it is important to keep the air vents clear of dust and debris to prevent overheating.
After cleaning, lubricate the moving parts, such as the blade guard hinge, the depth adjustment mechanism, and the arbor. Use a small amount of lightweight oil or lubricant recommended by the manufacturer. Apply a light coating to prevent rust and corrosion and ensure smooth movement.
Reassemble The Circular Saw
Once your circular saw is clean and lubricated, it’s time to reassemble it. Start by aligning the blade with the arbor, making sure that the teeth are facing the right direction.
Tighten the blade nut securely using the wrench provided or a suitable adjustable wrench. Ensure that the blade is properly installed and tightened before proceeding further.
Next, reattach any other components you removed earlier, such as the blade guard and the blade lock button. Carefully follow the manufacturer’s instructions for proper reassembly to avoid any errors.
Once all the components are securely reattached, do a final check of the blade and all the other parts to ensure everything is in place and tightened properly.
With these final checks and maintenance tasks performed, your circular saw is now ready for its next usage. By regularly cleaning and lubricating your saw, you can help prolong its lifespan and ensure safe and efficient operation with every use.
Frequently Asked Questions On How To Remove Blade From Circular Saw
Which Way Do You Remove A Circular Saw Blade?
To remove a circular saw blade, follow these steps:
1. Unplug the saw for safety.
2. Locate the blade arbor nut at the center of the blade.
3. Use a wrench to turn the nut counterclockwise until it’s loose.
4.Remove the nut and the outer washer.
5. Lift the blade off the saw carefully.
What Tool Is Used To Remove Circular Saw Blade?
A wrench is used to remove circular saw blades. It is simple and easy to use for changing the blade.
How Do You Remove A Stuck Circular Saw Blade?
To remove a stuck circular saw blade, use a wrench to turn the blade bolt counterclockwise. Apply penetrating oil if needed. Be cautious and use protective gloves. Once the bolt is loose, remove it and carefully lift the blade from the saw.
How Do You Change The Blade On A Skilsaw Circular Saw?
To change the blade on a Skilsaw circular saw, follow these simple steps:
1. Unplug the saw for safety.
2. Press the blade lock button and use the wrench to remove the hex bolt holding the blade.
3. Replace the old blade with a new one, ensuring the arrows on the blade match the rotation direction.
4. Tighten the hex bolt securely.
5. Plug in the saw and test the new blade.
Conclusion
Removing the blade from a circular saw is a straightforward but essential task for maintenance and safety. By following the step-by-step guide, you can safely and effectively change the blade as needed. Remember to prioritize safety precautions and consult the saw’s manual for specific instructions.
With these tips, you can confidently tackle blade removal and replacement with ease.
![Can You Cut Laminate Flooring With a Circular Saw? [Proper Guide]](https://cdn.woodworkingadvisor.com/2022/12/Can-You-Cut-Laminate-Flooring-With-a-Circular-Saw-_Proper-Guide_-768x384.webp)