How To Seal A Wood Table: Proven Essential Guide
To successfully seal a wood table, start by preparing a clean, smooth surface through sanding, then choose the right clear protective finish—like polyurethane or tung oil—apply thin, even coats according to the product instructions, allowing ample drying time between coats for a durable, lasting finish.
How To Seal A Wood Table: Proven Essential Guide
Have you ever finished building a beautiful new wooden table, or maybe you’ve inherited a classic piece, only to watch spills soak in instantly or worry about every coffee cup placement? It’s frustrating when all that hard work is left unprotected! Water spots, stains, and daily wear and tear can ruin the look of unfinished wood fast.
Don’t worry; sealing your table is easier than you think. I’m Md Meraj, and I’ve guided countless DIYers through this exact process. By following these simple, proven steps, you will give your table the strong, beautiful, and lasting protection it deserves. We’ll cover everything from choosing the best sealer to the final buff. Let’s get started on making your table truly family-proof!
Why Sealing Your Wood Table Is Non-Negotiable
Sealing a table isn’t just about making it shiny; it’s about defense. Wood is naturally porous, meaning it loves to absorb liquids. Once wood soaks up water, oils, or even juice, it can lead to warping, swelling, discoloration, and mildew growth over time. A good seal creates an invisible barrier that sits right on top of the wood fibers.
Think of the finish as a suit of armor for your beautiful tabletop. It offers:
- Water Resistance: No more frantic wiping when a glass sweats or a glass spills.
- Stain Protection: Ink, wine, and food colors sit on top, ready to be wiped away cleanly.
- Durability: It protects against everyday nicks, scratches, and general abrasion from use.
- Aesthetics: Sealants can enhance the wood’s natural grain, adding depth and richness to the color.
The goal here is simple: durability meets beauty. When you know how to seal a wood table correctly, you ensure it stays looking like a centerpiece for decades.

Step 1: Preparing Your Surface – The Key to Success
I cannot stress this enough: a finish is only as good as the surface it adheres to. If your table is brand new (raw wood) or an old piece you are refinishing, preparation is where you spend most of your time—and it’s crucial.
Assessing Your Table’s Condition
Before you start sanding, what state is your table in?
- Raw/New Wood: If you just assembled the table or it has never been sealed, you only need light sanding to open the grain for absorption.
- Old, Worn Finish: If the table has old varnish or paint that is peeling, cracked, or heavily scratched, you must remove the old coating entirely.
The Stripping Process (If Necessary)
If you have old paint or thick varnish, sanding alone won’t work. You’ll need a chemical stripper. Always follow the manufacturer’s directions for safety, ensuring you are in a well-ventilated area (perhaps even outside, weather permitting).
- Apply the chemical stripper thickly using an old, cheap brush.
- Let it sit as directed—you’ll see the old finish bubble up.
- Use a plastic scraper or an old putty knife (not metal on wood if possible) to gently lift the dissolved finish.
- Wipe down the residue using mineral spirits, as specified by the stripper instructions.
Sanding: Smoothing the Path to Perfection
Sanding is critical for achieving a professional-looking seal. Think of sanding grits like stepping stones—you start coarse and end fine. Never jump from a very coarse grit straight to a very fine one; you’ll trap scratches underneath.
Here is the sequence I recommend for most medium-density hardwoods (like oak or maple):
| Sanding Step | Grit Number | Purpose |
|---|---|---|
| Initial Smoothing | 80 or 100 Grit | Removes minor imperfections or stubborn finish residue. Use sparingly on softwoods. |
| Standard Smoothing | 120 Grit | The workhorse grit; removes marks left by the previous grit. |
| Pre-Finish Prep | 150 or 180 Grit | Refines the surface texture, getting rid of the noticeable sanding scratches. |
| Final Polish | 220 Grit | The absolute final sanding step before applying any sealer or topcoat. |
Pro Tip: Always sand with the wood grain. Sanding against the grain leaves visible scratches that the finish will highlight, not hide.
Dust Removal: Be Meticulous!
Dust equals bumps in your final finish. If you leave fine sawdust behind, your sealer will dry on top of the dust, causing that spot to be weak and look bumpy later.
- Use a shop vacuum with a brush attachment to suck up the bulk of the dust.
- Wipe the entire table surface down thoroughly with a tack cloth. A tack cloth is a slightly sticky cheesecloth designed specifically to pick up the finest particles.
- For a perfect, sealed look, some experts use denatured alcohol on a clean rag (on solid wood only—test first!) to remove final oils and fine dust before sealing.
Step 2: Choosing Your Protective Sealer
This is the fun part! What do you want your table to look like, and how much abuse will it take? The finish you choose dictates the look, feel, and maintenance level of your table. For beginners, the two most accessible and reliable options are Polyurethane (for maximum protection) and Natural Oils (for a traditional feel).
Comparing Top Beginner-Friendly Sealers
| Sealer Type | Best For | Pros | Cons |
|---|---|---|---|
| Water-Based Polyurethane | Light-colored woods; projects needing quick turnaround. | Clears dries fast, low odor, cleans up with soap/water, good protection. | Slightly less durable than oil-based; can look slightly “plastic-y.” |
| Oil-Based Polyurethane | High-traffic tables; achieving a traditional amber glow. | Extremely durable, rich warm color depth, great scratch resistance. | Strong odor (needs good ventilation), dries very slowly, cleans up with mineral spirits. |
| Tung Oil or Linseed Oil | Antique or natural-look finishes; pieces that might get future small repairs. | Penetrates the wood deeply, feels silky, easy to repair localized damage. | Offers lighter protection; requires frequent re-oiling over years of heavy use. |
| Wipe-On Varnish (Wipe-On Poly) | High readability desired; achieving thin, durable layers easily. | Easy to apply—no streaks or drips, excellent durability in thin coats. | Takes longer to build up thick protection than brushing traditional poly. |
A Note on Penetrating vs. Film Finishes: Oils (like Tung Oil) soak into the wood and harden there (penetrating). Polyurethane builds a hard plastic-like layer on top of the wood (film). For a kitchen table that sees daily meals and homework, a film finish like polyurethane offers superior resistance.
Getting the Right Tools Ready
Having the right application tools prevents drips, streaks, and frustration. Never try to apply a high-quality finish with a cheap, shedding brush.
Essential Application Tools Checklist:
- High-Quality Synthetic Brush: Look for one specifically labeled for polyurethane or “fine finishing.” For large areas, foam brushes work well for water-based products, as they minimize air bubbles.
- Natural Bristle Brush: Required for oil-based finishes.
- Rags/Applicators: Clean, lint-free cotton rags (like old t-shirts cut up) or dense foam applicators are great for oil finishes or wipe-on poly.
- Ventilation Mask: Even low-VOC (Volatile Organic Compound) finishes need good airflow. Always have windows open! For oil-based or heavy sanding, look into appropriate respirators—your lungs will thank you. Check resources from OSHA on proper respirator use during finishing projects.
- Trays and Stir Sticks: Dedicated paint tray for pouring finish, and wooden stir sticks (never shake the can, as this introduces air bubbles!).
Step 3: Applying the First Coat (The Sealer Coat)
The first coat is technically a “sealer coat.” Its main job is to block the raw wood from absorbing too much of the subsequent finish coats. This prevents blotchiness and saves you money on expensive topcoats.
Thinning for Penetration (Optional but Recommended)
If you are using oil-based polyurethane or natural oil, it helps significantly to thin the first coat down. This allows it to soak deep into the wood fibers and seal them completely.
- For Oil-Based Polyurethane: Mix the finish with mineral spirits, typically at a 50/50 ratio (1 part mineral spirits to 1 part poly) for the first coat only.
- For Tung Oil/Linseed Oil: Thin the first coat heavily, often 1 part thinner (like boiled linseed oil or mineral spirits) to 2 or 3 parts oil.
- Water-Based Polyurethane: Usually, you do not need to thin water-based finishes, but check the manufacturer’s directions. If needed, thin with distilled water.
Application Technique: Working Thin and Evenly
This is where confidence comes in. Don’t panic about perfect coverage on the first go. Thin coats build up much stronger and smoother than one thick, goopy coat.
- Stir Gently: Open the can and stir the contents gently for at least two full minutes. If pigment settled, it needs to be completely remixed.
- “Flow” the Finish: Dip your brush about one-third into the finish. Apply the thinned sealer coat evenly, working with the wood grain across the entire tabletop.
- Use Long, Thin Strokes: Lay the finish down quickly, then use the tip of your brush to gently smooth out any pooling or thick spots. Work fast, as thinned finishes dry quickly!
- Check for Bubbles: After coating an entire section, watch it for about 30 seconds. If you see small bubbles or “holidays” (thin spots), use the brush lightly to pop or smooth them before they cure.
- Wait: Set the table aside in a clean, dust-free environment to dry completely. Drying times vary significantly by product, temperature, and humidity. Always check the can for the recommended recoat time (usually 4 to 24 hours).
Step 4: Intermediate Sanding and Subsequent Coats
After the first coat dries, the wood grain might feel rough, like it has tiny hairs sticking up. This is called “grain raising,” and it’s totally normal. We need to smooth this out before applying the durable topcoats.
The Scuff Sand
Once the first coat is rock hard (usually after 24 hours for an oil finish or a few hours for water-based), you must lightly sand it.
- Use a very fine grit—either 320 or 400 grit sandpaper.
- Sand very lightly, just enough to knock down the raised grain and dull the sheen. You are not trying to sand through the finish; you are just smoothing the surface texture.
- Wipe meticulously with a tack cloth after this scuff sand. This light sanding between coats creates “tooth,” allowing the next layer to grip the previous one firmly, resulting in superior adhesion and a smoother overall surface.
Applying the Build Coats
Now you move into the actual protective coats. These coats are typically applied at full strength (unthinned), following the manufacturer’s recommended application technique.
For an ultra-durable finish on a dining table, aim for a minimum of three full coats. For maximum resistance, four to five coats are ideal.
- Apply the second coat thinly, brushing or wiping evenly over the entire surface, following the grain.
- Allow this coat to dry completely, referencing the specific time on the can (often 4–8 hours for water-based, 12–24 hours for oil-based).
- Repeat the light scuff sanding (using 320/400 grit) and tack-cloth wipe-down after this coat dries as well.
- Apply the third (and subsequent) coats using the same smooth technique. The finish should start looking deeper and glossier after the third coat.
Step 5: The Final Curing and Care
Congratulations! You’ve applied the final coat. Now you have to practice the hardest skill in finishing: patience.
Understanding Dry Time vs. Cure Time
The can will tell you when the finish is “dry to the touch” (you can usually recoat after this). However, most sealers do not reach their maximum hardness and chemical resistance until they have fully cured.
- Touch Dry: Minutes to a few hours.
- Recoat Dry: Usually 4–24 hours.
- Full Cure: This is crucial for a dining table. Water-based polys often take 7 days; oil-based polys and varnishes can take 21 to 30 days to reach 100% hardness.
During the first two weeks of the full cure time, treat your table gently. Avoid placing heavy, hot, or wet items directly on it, as curing finishes are still vulnerable to denting and marking.
Cleaning and Long-Term Maintenance
Once fully cured, maintenance is simple.
Cleaning Dos and Don’ts:
- DO:
- Wipe up spills immediately with a damp, soft cloth.
- DO:
- Use cleaners specifically labeled as safe for wood finishes (pH neutral).
- DON’T:
- Use abrasive cleaners, scouring pads, or silicone-based polishes, which can build up and become impossible to remove or refinish over.
- DON’T:
- Place hot trivets or dishes directly on the surface; use coasters and placemats for high heat sources.
If your oil-based table begins to look dry after several years, you can usually restore its luster by applying a very thin maintenance coat of the same oil product, lightly scuff-sanding first, as practiced in Step 4. Film finishes (polyurethane) usually require sanding down to bare wood before recoating successfully after several years.
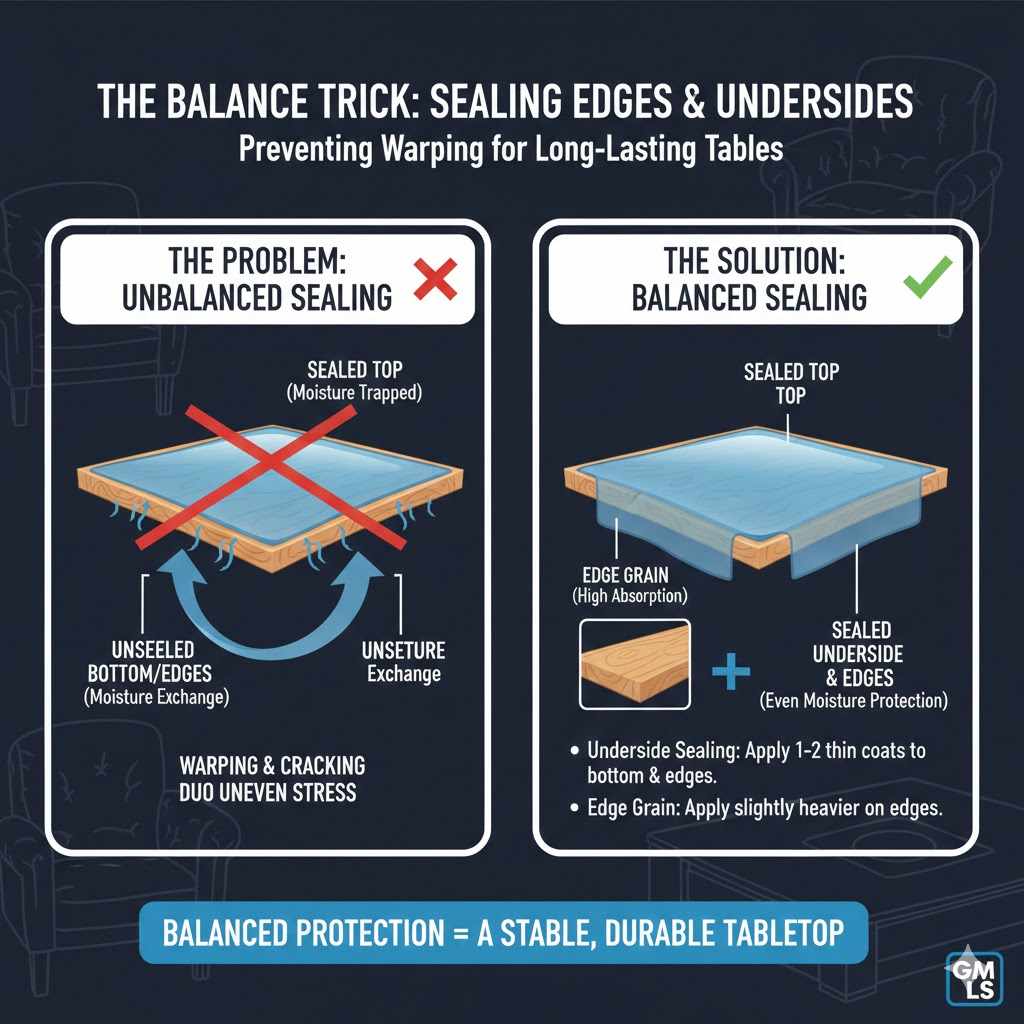
Sealing Table Edges and Undersides (The Balance Trick)
When you seal the top surface of a table, you are effectively trapping the moisture inside the wood differently than sealing the bottom. If you only seal the top, the exposed underside (which can still absorb or release moisture with environmental changes) will react differently, which can lead to warping or cracking along the edges—especially on large slab tops.
To counteract this environmental stress, always try to seal both sides, even if one side isn’t the primary use surface.
The Sealing Ratio Trick
For stability, you should try to apply nearly the same amount of finish to the bottom side as you do the top side, though the bottom side may not need the full layer count if it sees little wear.
- Underside Sealing: Apply 1–2 thin coats to the underside of the tabletop and along all four vertical edges (aprons/skirts).
- Edge Grain is Vulnerable: The short-grain edges of the boards (the actual rim of the table) wick moisture like a sponge. Ensure these areas receive slightly heavier application, or use a slightly thinned coat right on the edges to force the finish deeper.
By balancing the moisture transfer rate across all surfaces, you ensure your sealed table remains flat and strong for years to come. This simple, often overlooked step separates a good job from a lasting, professional result.
FAQ: Beginner Questions About Sealing Wood Tables
Q1: Can I use simple varnish from a can, or do I have to use polyurethane?
A: Varnish and polyurethane are very similar! Polyurethane (poly) is generally a specific type of varnish that contains synthetic resins known for superior toughness against water and abrasion. For a dining table that needs high protection, stick to labeled “polyurethane.” Simple decorative varnish might not hold up as well to heat and spills.
Q2: What should I do if I get a drip or run in my finish coat?
A: If you catch it while wet, smooth it gently with a clean brush. If it has dried and is noticeable, you must wait until it is fully cured. Then, carefully sand the high spot down using very fine (400 grit) sandpaper until it is level with the surrounding finish. Wipe away dust, and then apply a final, thin topcoat over that patched area only.
Q3: My water-based polyurethane is turning white in spots after just a few days. Why?
A: White hazing spots usually mean moisture is trapped. This happens if you clean the table with a damp cloth before the finish has fully cured (see Step 5). Water trapped under the film finish causes it to revert partially back to its cloudy, milky state. Ensure you are letting the finish fully cure before wiping with anything but a perfectly dry or tack-cloth-damp rag.
Q4: How do I know if my raw wood is smooth enough before sealing?
A: A good test is to lightly wipe the wood with a damp paper towel or cloth. If it feels noticeably fuzzy or rough after it dries, you still have raised grain or dust that needs more fine sanding (usually 220 grit or higher) followed by a thorough wipe down with a tack cloth.
Q5: Should I use a pre-stain wood conditioner before applying the sealant?
A: A pre-stain conditioner is essential ONLY if you are staining the wood first to promote even color absorption. If you are applying a clear sealer (like clear poly or natural oil) directly to raw wood, a conditioner is not necessary, though a thinned-down first coat (as described in Step 3) serves a similar “opening” function.
Q6: Can I use spray lacquer instead of brushing polyurethane?
A: Yes, lacquer works very well and dries quickly, providing a hard finish. However, lacquer requires several thin coats and specialized application techniques to prevent “blushing” (turning white from moisture). For absolute beginners wanting maximum control and ease of repair, brushing polyurethane or using wipe-on poly is generally less intimidating.
Conclusion: Finishing Touches and Lasting Craftsmanship
Learning how to seal a wood table is one of the most rewarding skills a homeowner or DIYer can master. It transforms a raw piece of wood into a durable, heirloom-quality item ready for life’s messes. Remember the fundamental structure we followed: preparation is paramount, application must be thin and consistent, and patience during the curing phase is non-negotiable.
By thoroughly cleaning your surface (sanding up to 220 grit), choosing a protective product like polyurethane, applying it in multiple, light layers (always scuff-sanding lightly between coats!), and allowing weeks for that final cure, you’ve created a finish that looks fantastic and performs flawlessly.
Stand back and admire your work. You didn’t just cover your table; you built lasting protection into it. That solid, beautiful table top is now ready for countless meals, projects, and memories. If you take care of your finish by wiping spills promptly, your table will stay protected and beautiful for many years to come. Happy crafting!