How to Use Steel Wool on Wood (0000 vs Synthetic Pads)
To use steel wool on wood, select the appropriate grade for your project. Gently rub the steel wool along the wood grain for the best results.
For more, see our woodworking calculators guide.
Steel wool is a versatile tool for woodworking projects. It effectively smooths surfaces, removes old finishes, and prepares wood for staining. Different grades of steel wool offer varying levels of abrasiveness, making it essential to choose wisely. Fine grades are ideal for delicate finishes, while coarser grades tackle tougher surfaces.
Proper technique ensures a flawless finish without damaging the wood. Always wear gloves and a mask to protect yourself from dust and splinters. Using steel wool can enhance the appearance of your wood pieces, allowing for a professional-looking result in your DIY endeavors.
Introduction To Steel Wool And Wood Finishing
Our Picks: Steel Wool & Synthetic Alternatives
Homax 0000 Steel Wool 12-Pad
The standard fine-grade steel wool for buffing closed-grain wood between coats or before a final oil/wax finish.
- Best for: Final burnishing on maple, cherry, birch and other closed-grain woods
- Why we picked it: Grade 0000 is the finest widely-sold grade, ideal for the last pass before finish
- Main drawback: Not recommended on open-grain wood before a water-based finish (rust-residue risk)

3M Synthetic Steel Wool Pads 0000
Zero-metal synthetic pad that cuts and buffs like steel wool with no rust-residue risk.
- Best for: Oak, ash, and any wood going under a water-based stain or poly
- Why we picked it: Eliminates the rust-freckling problem entirely
- Main drawback: Slightly less fine a burnish than true 0000 steel wool

Minwax Paste Finishing Wax
Classic paste wax for a final protective, hand-rubbed sheen after steel-wool buffing.
- Best for: Sealing a steel-wool-buffed finish on furniture
- Why we picked it: Pairs directly with the 0000 steel-wool buffing step in this guide
- Main drawback: Needs periodic reapplication, not a hard film finish

Walrus Oil Non-Woven Pads
Non-woven sanding/polishing pads sized for larger panels and tabletops.
- Best for: Bigger surfaces where a small steel-wool pad is slow
- Why we picked it: Same rust-free benefit as pad-style synthetics, bigger format
- Main drawback: Bulkier, harder to work into tight corners than steel wool
As an Amazon Associate, we earn from qualifying purchases.
Steel wool is a versatile tool for wood finishing. It comes in various grades. Each grade serves a different purpose in wood projects.
Using steel wool helps to smooth surfaces. It removes imperfections and prepares wood for finishing. The finer grades are perfect for polishing.
Steel wool also cleans wood. It removes old finishes and dirt easily. This helps to reveal the natural beauty of the wood.
Another benefit is that it can be used with oils and finishes. This enhances the wood’s appearance and durability. Steel wool helps to achieve a beautiful, professional look.
Choosing The Right Grade Of Steel Wool
Choosing the right grade of steel wool is essential for wood projects. Different grades serve various purposes. Here’s a quick overview of steel wool types and their uses:
| Grade | Use |
|---|---|
| Grade 0000 | Ideal for polishing and finishing wood. |
| Grade 000 | Good for removing old finishes without scratching. |
| Grade 00 | Useful for light sanding and cleaning wood surfaces. |
| Grade 0 | Best for heavy sanding and removing rough spots. |
Matching the grade to the wood type is crucial. Softwoods need finer grades. Hardwoods can handle coarser grades. Always test on a small area first. This ensures the right finish without damage.
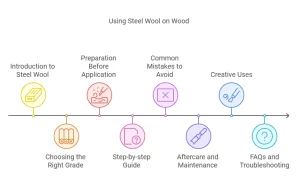
Preparation Before Application
Start by cleaning the wood surface. Remove any dust or dirt. Use a damp cloth for best results. Let the wood dry completely before using steel wool.
Always wear safety goggles to protect your eyes. Use gloves to avoid skin irritation. A dust mask can help prevent inhaling particles. Ensure the area is well-ventilated while working.
Keep a fire extinguisher nearby. Steel wool can create sparks. Avoid using steel wool near open flames or heat sources.
Step-by-step Guide To Using Steel Wool On Wood
Start with coarser grades of steel wool for heavy cleaning. This helps remove dirt, grime, and old finishes. Use a #3 or #4 grade for initial sanding. Apply light pressure to avoid damaging the wood.
After cleaning, switch to finer grades. Use #000 or #0000 grade steel wool for a smooth finish. This helps bring out the wood’s natural beauty. Always work with the grain of the wood for best results.
Make sure to wear gloves and a mask. Steel wool can create fine particles that irritate. Clean the surface with a damp cloth after sanding. This removes any steel wool fibers and dust.
Common Mistakes To Avoid
Applying too much pressure can damage the wood. Gentle strokes are more effective. Use a light touch to avoid scratches.
Skipping grades can lead to uneven surfaces. Always start with a coarser grade. Gradually move to finer grades for the best results.
| Grade | Purpose |
|---|---|
| Coarse | Removes rough spots and old finishes. |
| Medium | Prepares the surface for finer sanding. |
| Fine | Creates a smooth finish for staining. |
Steel Wool vs. Synthetic Pads: Avoiding Rust Residue
Steel wool sheds microscopic metal fibers as it wears. On closed-grain wood this mostly brushes away, but on open-grain species (oak, ash, mahogany) fragments can lodge deep in the pores. If that wood later gets damp — or you apply a water-based stain or finish over it — those trapped fibers rust from the inside out, showing up as small dark or orange freckling weeks or months later, often after the finish is already on.
Synthetic (non-woven) abrasive pads — sold as “synthetic steel wool” or generically as maroon/white non-woven pads — solve this at the source: they cut and buff similarly to steel wool but contain zero metal, so there’s no rust-residue risk at all. They’re also safe to use wet, won’t shed splinters, and can be rinsed and reused. The tradeoff is they don’t burnish quite as fine a sheen as true 0000 steel wool on a final coat — many woodworkers keep both on hand and reach for steel wool on tight-grain final passes, synthetic on everything going under a water-based finish.
| Situation | Best Choice | Why |
|---|---|---|
| Final buffing before oil/wax finish, closed-grain wood (maple, cherry, birch) | Steel wool #0000 | Finest burnish, no rust risk on closed pores |
| Prepping open-grain wood (oak, ash) for any finish | Synthetic pad | No metal fragments to trap in the grain |
| Scuffing between coats of a water-based poly/stain | Synthetic pad | Steel wool + water-based finish is the classic rust-residue combo |
| Removing old wax or buffing an oil finish | Steel wool #000/#0000 | Low moisture exposure, low rust risk |
Whichever you use, always vacuum or tack-cloth the surface thoroughly afterward — getting every loose fiber (metal or synthetic) off the wood before finishing is what actually prevents problems, more than which material you chose.
Aftercare And Maintenance
To keep your wood surface safe, apply a good finish. Use high-quality sealants or varnishes. This creates a protective layer that prevents damage.
Regular care is important. Dust the surface often to avoid scratches. Use a soft cloth or a microfiber cloth for this task.
Inspect the surface regularly. Look for any signs of wear or damage. If needed, touch up the finish immediately.
Keep the area dry. Moisture can harm the wood and the finish. Wipe up spills quickly to protect your surface.
Consider using coasters for drinks. They help prevent rings and stains on your wood. This small step goes a long way in preserving beauty.
Creative Uses Of Steel Wool In Woodworking
Steel wool can create unique textures on wood surfaces. Rubbing it lightly can give a soft feel. Use different grades for varying effects. Fine steel wool makes a smooth finish, while coarse wool adds depth.
For aging wood intentionally, steel wool works wonders. Mix it with vinegar to create a natural stain. This method darkens the wood, giving it an antique look. Apply the mixture with a cloth for best results.
Experiment with patterns by using steel wool. Try swirling or crossing the wool for interesting designs. Protect surrounding areas to avoid unwanted marks.
FAQs And Troubleshooting
Steel wool can effectively remove paint or smooth rough wood surfaces. Use fine grades for delicate finishes and coarser grades for tougher jobs. Always test on a small area first to ensure desired results without damage.
Dealing With Residue
Steel wool can leave fine particles on wood surfaces. Always wipe down the area with a clean cloth. Using a damp cloth can help remove any residue. Make sure to let the wood dry completely before applying any finish.
Repairing Mistakes
If steel wool scratches the wood, don’t worry. Use a fine sandpaper to smooth it out. Lightly sand the area until the scratch disappears. Always follow the grain of the wood. After sanding, clean the area and apply the desired finish.
Frequently Asked Questions
How Does Steel Wool Benefit Wood Finishing?
Steel wool is an excellent tool for wood finishing. It helps smooth surfaces, removes imperfections, and prepares wood for staining or sealing. The fine strands can easily reach into grooves and crevices, ensuring an even finish. Additionally, it can be used to polish existing finishes, enhancing their shine.
Can I Use Steel Wool On All Wood Types?
While steel wool is versatile, it’s not suitable for all wood types. Softwoods, like pine, can easily scratch or dent. Hardwoods, such as oak or maple, are better candidates for steel wool. Always test on a small, inconspicuous area first to ensure compatibility and desired results.
What Grade Of Steel Wool Should I Use For Wood?
Choosing the right grade of steel wool is crucial. For smoothing and finishing, use fine grades like #0000 or #000. Coarser grades can leave scratches and are better for heavy-duty tasks. Always select a grade that matches your project’s needs for the best finish.
How Should I Clean Up After Using Steel Wool?
Cleaning up after using steel wool is essential for safety. First, gather any loose steel wool fibers to prevent them from causing rust. Dispose of them properly. Vacuum the area to ensure no stray particles remain. This helps maintain a tidy workspace and prevents potential hazards.
Should I Use Synthetic Steel Wool Instead Of Real Steel Wool?
On open-grain woods like oak or ash, or any time you’re about to apply a water-based stain or finish, yes — synthetic (non-woven) pads avoid the rust-residue risk entirely since they contain no metal. On closed-grain woods like maple or cherry, and for a final buffing pass before an oil or wax finish, real 0000 steel wool still gives the finest burnish and the rust risk is low. Many woodworkers keep both on hand.
Conclusion
Using steel wool on wood can enhance your projects significantly. It’s versatile for cleaning, sanding, and finishing. Always choose the right grade for your task. Remember to follow safety precautions. With these tips, you can achieve a professional look in no time.
Embrace this technique and elevate your woodworking skills today!
Sponsored / affiliate links. As an Amazon Associate I earn from qualifying purchases. I may earn additional commission from eligible campaigns.