Woodblock Printing: 6 Steps, Best Wood & Tools (Not Linocut)
Woodblock printing carves a design into a block of real wood — shina plywood, basswood, or birch — then inks and presses it onto paper, unlike linocut, which carves into soft linoleum instead. Confusing the two means carving the wrong material or ruining registration on a multi-color print. This guide covers the 6-step process, the best wood for beginners, carving and inking technique, and exactly how woodblock printing differs from linocut.
Quick Answer
Woodblock printing carves an image into a block of wood — shina plywood and basswood are easiest for beginners — then inks the raised surface with a brayer and presses it onto paper by hand with a baren or with a printing press. A single-color print usually takes 2 to 4 hours from design transfer to a finished pull.
Woodblock Printing Process: 6 Steps From Wood to Print
Every woodblock print follows the same basic sequence, whether you’re carving a first test block or a multi-color edition.
- Choose your wood: Pick shina plywood or basswood for a smooth, easy-to-carve surface, or birch plywood for a sturdier block you’ll reuse many times.
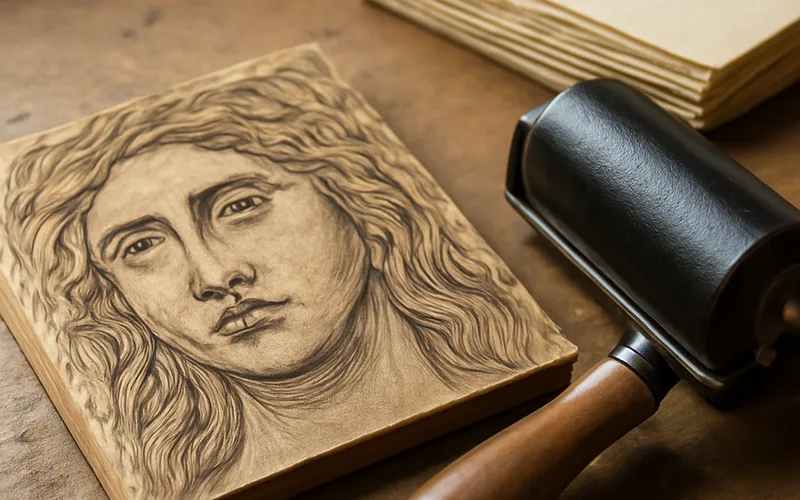
- Transfer your design: Trace or carbon-copy your artwork onto the sanded, sealed block, remembering that the printed image will come out mirrored in reverse.
- Carve the block: Outline first with a V-gouge, then clear the background with a U-gouge, leaving only the raised lines that will hold ink.
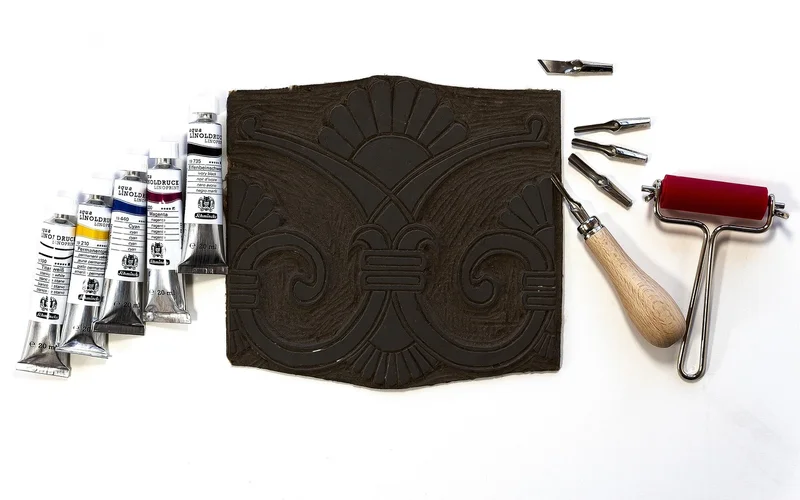
- Ink the block: Roll water-based or oil-based ink evenly across the surface with a brayer until it sounds tacky, not wet.
- Print the design: Press paper onto the inked block by hand with a baren, or run it through a printing press for consistent pressure.
- Peel, dry, and refine: Lift the paper straight up to avoid smudging, let the print dry flat, then adjust your carving or ink for the next pull.
The History Of Woodblock Printing
The history of woodblock printing is a captivating journey that began thousands of years ago in Asia. This artistic technique played a pivotal role in the spread of knowledge and culture, making it an essential part of human history.
Early Origins
The origins of woodblock printing can be traced back to ancient China, where the earliest known printed book, the Diamond Sutra, was created using woodblock printing in 868 AD. This innovation revolutionized the way information was disseminated and marked the beginning of a new era in printing.
Evolution Of Technique
Over time, woodblock printing techniques evolved, spreading to other parts of Asia and eventually to Europe. Japanese woodblock printing, known as ukiyo-e, reached its zenith during the Edo period, producing stunning and intricate prints that depicted scenes of everyday life, nature, and mythology.
Ukiyo-e Masters: Hokusai, Hiroshige & Moku Hanga
Japanese woodblock printing, called moku hanga, reached its golden age in the late Edo period, when artists like Katsushika Hokusai and Utagawa Hiroshige turned the craft into fine art. Hokusai’s “The Great Wave off Kanagawa” remains one of the most reproduced prints in the world, while Hiroshige’s landscape series helped popularize ukiyo-e (“pictures of the floating world”) across Japan. Unlike Western woodcut, moku hanga uses water-based inks instead of oil-based ink, giving Japanese prints their signature soft gradations and transparency.
📊 The Diamond Sutra, printed with wood blocks and dated to 868 CE, is the world’s oldest known dated printed book. — Source: Smithsonian Magazine, 2016
Woodblock Printing in Europe: Albrecht Dürer’s Legacy
Woodblock printing reached Europe by the 14th century and flourished during the Renaissance. German artist Albrecht Dürer elevated the technique with intricate, highly detailed prints, and Nuremberg publisher Hartmann Schedel’s 1493 Weltchronik (“Nuremberg Chronicle”) used roughly 2,000 individual woodblocks carved by about 100 artisans to illustrate its pages — one of the most ambitious woodblock printing projects of its era.

Materials And Tools
Printmaking wood blocks are essential materials for creating unique and detailed designs. These tools allow artists to carve intricate patterns onto the surface, providing a versatile platform for printing various artworks. Explore the possibilities of printmaking with high-quality wood blocks.
Wood block printing is a traditional craft that requires specific materials and tools for creating beautiful artwork. Here are the essential components to get started:
Types Of Wood Blocks
The real standards for hand-carved relief printing are shina plywood (the most popular choice — soft enough to carve easily while holding crisp lines), basswood/linden (a traditional soft, fine-grained option that is easy on tools), and cherry (harder, used for fine detail work). Pine and fir are usable but carve less predictably because their grain alternates between hard and soft growth rings. Note that MDF is not actually recommended for carving — it only shows up in printmaking as a shimming material to adjust press height, since it dulls tools quickly and produces furry, uninkable edges when carved. Shina and birch printmaking plywood is typically sold in thinner sheets (around 4–6mm) than standard hobby plywood, which helps keep fine carved lines from wobbling under pressure. For a broader look at wood species beyond printmaking, see our full guide to types of wood.
Essential Tools And Inks
To begin your wood block printing journey, you will need the following tools and inks:
– Carving tools: V-gouges, U-gouges, and knives to carve the design into the wood block.
– Brayer: A roller for applying ink evenly onto the block.
– Ink: Water-based or oil-based ink suitable for relief printing.
– Paper: Printmaking paper that can withstand multiple impressions.
– Baren: A tool for hand-pressing the paper onto the inked block for a clean print.
Remember, choosing the right materials and tools is crucial for achieving high-quality woodblock prints that capture your artistic vision.
Recommended Woodblock Printing Supplies
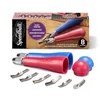
Speedball Linoleum Cutter Kit
A 2-handle carving set with 6 swappable blades, covering the V-gouges and U-gouges this article recommends for carving your design.
Best for: Beginners who want one kit that covers multiple cut widths
Why we picked it: A long-established, widely used brand in printmaking classrooms and studios
Main drawback: Blades need occasional sharpening or replacement with heavy use
Check Price on Amazon


As an Amazon Associate, Woodworking Advisor earns from qualifying purchases.
Preparing The Wood Block
Before you can start creating your beautiful printmaking masterpiece, it is essential to properly prepare your wood block. This involves a few crucial steps, including selecting the right type of wood and transferring your design onto it. Let’s take a closer look at each of these steps:
Selecting And Preparing The Wood
Selecting the right type of wood is vital for a successful printmaking project. Basswood is the most commonly used choice – it’s soft, has a fine, even grain, and carves cleanly, making it easy to get detailed work without excessive effort. Birch plywood is another popular option since it’s durable and sturdy for larger or repeated-use blocks. Pine also carves easily but often has knots and a pronounced grain that can show up in the finished print. Cherry and maple are harder to carve but hold very fine detail and last longer, so they suit experienced printmakers more than beginners. Note that linoleum is not wood at all – carving into linoleum is a related but separate technique called linocut, not woodblock printing.
| Material | Best For |
|---|---|
| Shina Plywood | Traditional standard – smooth, warp-resistant, holds the crispest lines |
| Basswood | Beginners – soft, even grain, carves cleanly |
| Birch Plywood | Larger or repeated-use blocks – durable and sturdy |
| Pine | Budget option – easy to carve, but knots/grain can show in prints |
| Cherry / Maple | Experienced printmakers wanting fine detail and a lasting block |
Once you have selected your wood, it is essential to prepare it before you can start carving. Begin by sanding the surface of the wood block with fine-grit sandpaper. This helps to smooth out any roughness and ensures a clean and even carving surface.
After sanding, it is recommended to seal the wood block with a coat of varnish or wood sealer. This helps to prevent the wood from absorbing moisture or ink, which could affect the quality of your prints. Apply the varnish or sealer evenly across the entire surface of the wood block and allow it to dry completely before proceeding. See our wood finishing guide for sealant options beyond basic varnish.
Transferring The Design
Once the wood block is prepared, it’s time to transfer your design onto it. Start by creating a printout or drawing of your design on a piece of paper. Ensure that the size of your design matches the dimensions of your wood block.
Next, place the printout or drawing face down on the prepared wood block. Secure it in place with tape to prevent any movement. Using a pencil or ballpoint pen, carefully trace over the lines of your design with firm pressure. This will transfer the design onto the surface of the wood block.
If you prefer a more advanced method, you can also use carbon paper or transfer paper to transfer your design. Simply place the carbon paper between the printout and the wood block, with the carbon side facing down. Apply firm pressure while tracing over the lines to transfer the design.
Once the design is transferred, remove the printout or drawing from the wood block. You should now have a clear outline of your design ready for carving.
By following these steps to prepare your wood block, you will be well on your way to creating stunning prints with your printmaking endeavor!
Woodblock Printing vs. Linocut: What’s the Difference?
Linoleum is not wood — carving into linoleum is a separate technique called linocut, and the two get confused constantly because the tools and process look nearly identical. The real difference comes down to the material under your gouge.

| Aspect | Woodblock Printing | Linocut |
|---|---|---|
| Material | Real wood (shina plywood, basswood, birch) | Linoleum sheet — not wood at all |
| Grain | Visible wood grain can show in the print | No grain — carves the same in every direction |
| Carving difficulty | Harder — grain can catch tools and split fine lines | Easier — softer, more forgiving for beginners |
| Durability | Holds up for hundreds of print pulls | Wears down faster, especially fine detail |
| Best for | Traditional, multi-block color prints (ukiyo-e, moku hanga) | Quick projects, beginners, classroom settings |
If you’re brand new to relief printing and want to test a design cheaply, linocut is a reasonable starting point. But if you want the durability, grain texture, and traditional look this guide covers, stick with real wood — shina plywood or basswood, never linoleum.
Carving Techniques
When it comes to the art of printmaking, wood block carving is an essential skill to master. The act of carving intricate designs onto a wooden block requires precision and expertise. In this section, we will delve into the various techniques involved in the carving process. Whether you are a beginner or an experienced artist, these techniques will help you create stunning wood block prints that truly stand out.
Basic Carving Methods
Mastering basic carving methods is the first step towards creating beautiful wood block prints. If you’re new to carving in general, our beginner’s guide to carving wood by hand covers grip, tool control, and safety in more depth. Here are some essential techniques to get you started:
- Choose the right wood: Use a dense and even-grained wood, such as birch or cherry, for your carving block. This will allow for clean and precise cuts.
- Plan your design: Before you start carving, sketch your design directly onto the block or use transfer paper for more complex patterns. This will serve as your guide throughout the carving process.
- Secure your block: Place your wooden block securely in a vice or clamp it onto a stable surface. This will prevent any unwanted movement while you carve.
- Start with the outline: Begin by carving the outline of your design. Use a V-gouge or a small chisel to make shallow cuts, gradually defining the shapes and lines of your composition.
- Remove excess wood: Once you have outlined your design, use gouges of different sizes to remove the excess wood around your image. Take your time and work patiently to achieve a smooth surface.
- Add details: With the bulk of the wood removed, it’s time to add intricate details to your design. Use small gouges or carving knives to create textures, patterns, and finer lines.
Advanced Carving Tips
For those looking to take their wood block carving skills to the next level, here are some advanced techniques to explore. For a broader skill-building path beyond printmaking, see our guide to learning wood carving.
- Create depth and dimension: Experiment with different carving depths to add depth and dimension to your design. Varying the depth of your cuts will provide a visually interesting and dynamic print.
- Embrace negative space: Don’t be afraid to incorporate negative space into your design. Leave sections of the block uncarved, and they will create interesting contrasts when inked and printed.
- Try multi-block printing: Instead of carving your entire design onto one block, consider using multiple blocks for different colors or layers. This technique allows for more complex and vibrant prints.
- Practice precision: Refine your carving technique by practicing on smaller and more intricate designs. The more you practice, the more control and precision you will develop.
- Experiment with tools: Explore different carving tools such as chisels, gouges, and knives to achieve various effects. Each tool has its unique characteristics that can enhance your carving style.
Carving techniques play a crucial role in bringing your wood block prints to life. From the basic methods to the advanced tips, honing your skills in this art form will enable you to create captivating and visually striking prints.
Inking And Printing Process
The inking and printing process is a crucial step in printmaking wood blocks. It involves applying ink to the carved surface of the wood block and transferring it onto paper or another surface. This process requires precision and skill to achieve the desired result. In this section, we will explore the steps involved in inking the wood block and different printing techniques.
Inking The Wood Block
To begin the inking process, the wood block must be carefully prepared. The surface should be clean and free from any debris or dust that could interfere with the ink transfer. Ink is then applied to a smooth, flat surface called an inking slab or plate.
Using a brayer, the ink is rolled out evenly onto the inking surface. The brayer should be rolled back and forth to distribute the ink smoothly and achieve the desired consistency. This ensures that the ink will evenly cover the carved areas of the wood block.
Once the ink is properly rolled out, the wood block is carefully pressed onto the inked surface. The ink is then evenly distributed onto the carved areas of the block. This process should be done with a gentle and consistent pressure to ensure that the ink transfers evenly.
Printing Techniques
There are various printing techniques that can be used to transfer the ink from the wood block onto the final surface. Two common methods are hand rubbing and using a printing press.
Hand rubbing involves placing the inked wood block face down onto the desired surface, such as paper or fabric. Pressure is then applied by rubbing the back of the block with a spoon, brayer, or a specialized tool called a baren. This technique allows for greater control and variation in the printed result.
Using a printing press is another popular technique in printmaking. The inked wood block is placed onto the bed of the press, and paper or another surface is carefully positioned on top of the block. The press is then operated, applying pressure to transfer the ink onto the paper. This method allows for consistent and precise printing results.
It is important to experiment and explore different techniques to achieve the desired effect in printmaking. Various factors such as ink consistency, pressure applied, and type of surface can affect the final result. By mastering the inking and printing process, artists can create unique and captivating prints with their wood blocks.
Registration Marks (Kentō) for Multi-Color Printing
When a design uses more than one color, each color typically needs its own carved block — and every block has to land in exactly the same spot on the paper. Traditional Japanese printmakers solve this with kentō, small L-shaped and straight notches carved into the corner and edge of each block that the paper is butted against for every pull. Skip registration marks on a multi-block print and the colors will blur or drift out of alignment between layers.
Troubleshooting And Refining
Printmaking with wood blocks offers a unique and timeless method of creating stunning prints. As with any craft, troubleshooting common issues and refining the printing process is essential for achieving exceptional results. In this section, we’ll explore the common issues and solutions that arise during printmaking with wood blocks, as well as how you can refine your prints to achieve the best possible outcome.
Common Issues And Solutions
When creating prints with wood blocks, several common issues can arise. Here are some typical problems and their solutions:
- Uneven ink distribution: Ensure that the ink is spread evenly across the block with a brayer before printing.
- Smudges on the print: Use a blotting paper to absorb excess ink and prevent smudging.
- Choppy or incomplete prints: Apply even pressure while pressing the paper onto the wood block to achieve a consistent print.
“Grain direction causes more ruined prints than dull tools ever will — carve across the grain instead of with it, and even a sharp gouge will tear instead of slice clean.”
Refining Your Prints
Refining your prints can elevate the quality and aesthetics of your wood block prints. Here are some tips for refining your prints:
- Experiment with different papers and inks to achieve the desired effect.
- Adjust the pressure applied when pressing the paper onto the block for varied textures and depth.
- Refine the carving of your wood block to create intricate and precise designs.
Exploring Creativity
Printmaking wood blocks provide an excellent avenue for artists to unleash their creativity. With endless possibilities for experimentation, artists can explore different techniques, mediums, and styles to create unique and captivating artworks. From experimenting with color and texture to incorporating mixed media, printmaking wood blocks offer a diverse range of opportunities for artists to express their creativity and produce stunning visual narratives.
Experimenting With Color And Texture
Printmaking with wood blocks allows artists to experiment with color and texture in exciting ways. By using various inks and pigments, artists can create stunning visual effects, from bold and vibrant hues to subtle and nuanced shades. The natural grain and texture of the wood block itself can also be utilized to add depth and organic appeal to the printed images, resulting in dynamic and visually engaging artworks. This experimentation adds an element of surprise and uniqueness to each print, captivating both the artist and the audience.
Incorporating Mixed Media
Mixed media provides an opportunity to add depth and complexity to printmaking wood block projects. Artists can incorporate elements such as collage, stenciling, and hand-painted details to enhance the visual impact of their prints. Blending different materials and techniques not only expands the creative possibilities but also adds layers of meaning and narrative to the artwork. The combination of traditional wood block printing with modern mixed media applications results in innovative and compelling pieces that push the boundaries of artistic expression.
Preservation And Display
Preserving and displaying printmaking wood blocks is essential to maintain their artistic value and longevity.
Preserving Wood Blocks
- Store wood blocks in a cool, dry place away from direct sunlight.
- Avoid placing heavy objects on top of the blocks to prevent damage.
- Regularly clean the wood blocks with a soft, dry cloth to remove dust.
- Consider using a protective varnish or sealant to prevent chipping or fading.
Displaying And Selling Your Art
- Use high-quality frames to showcase the wood block prints.
- Create an appealing display at art galleries or craft fairs.
- Promote your work online through social media or e-commerce platforms.
- Offer custom framing options to attract potential buyers.
Frequently Asked Questions For Woodblock Printing
What Is Printmaking With Wood Blocks?
Printmaking with wood blocks is a traditional art form where designs are carved into wood surfaces to create prints. This process involves inking the carved block and transferring the image onto paper or fabric.
How To Create Wood Block Prints?
To create wood block prints, start by sketching your design on the wood block. Then, use carving tools to carefully remove the unwanted wood, leaving behind the raised design. Apply ink to the block and press it onto paper to transfer the image.
What Materials Are Needed For Wood Block Printing?
To get started with wood block printing, you will need wood blocks, carving tools, ink, brayer, paper, and a flat surface for printing. Quality materials are essential for achieving crisp and detailed prints.
Can Beginners Learn Wood Block Printing?
Yes, beginners can learn wood block printing with practice and guidance. Start with simple designs and gradually progress to more complex patterns. Online tutorials, workshops, and experimenting with different techniques can help improve your skills.
What’s the Difference Between Woodblock Printing and Linocut?
Woodblock printing carves into real wood, while linocut carves into linoleum, a soft material with no wood grain. Linoleum is easier to carve and better for beginners, but wood holds up to more printings and is the traditional choice for fine art editions like ukiyo-e.
How Long Does Woodblock Printing Take?
A simple single-color design usually takes 2 to 4 hours from carving to a finished print, including design transfer and inking time. Multi-block color prints with kentō registration can take several days, since each color needs its own carved block and drying time between layers.
Do You Need a Printing Press for Woodblock Printing?
No. A baren, or even the back of a wooden spoon, can hand-burnish enough even pressure for a clean print. A printing press just makes pressure more consistent and saves effort on larger editions or thicker paper.
Conclusion
As you delve into the world of printmaking wood blocks, creativity knows no bounds. Embrace the rich history and tactile experience of this art form. Unleash your artistic vision through the versatile medium of woodblocks, sure to captivate both creators and admirers alike.