Laminate Flooring Installation Tools Needed: Must-Have Tools for Installing Laminate Floors
The tools needed for laminate flooring installation include a saw, hammer, crowbar, tapping block, jigsaw, and underlayment. Additional tools such as gloves, a floor gap fixer tool, and a flooring installation kit may also be helpful.
Installing laminate flooring can be a cost-effective way to update the look of your home. However, to ensure a smooth and successful installation, it’s essential to have the correct tools on hand. The must-have tools for laminate flooring installation include a saw for cutting planks to size, a hammer and crowbar for removing existing flooring, a tapping block for clicking the planks firmly into place, and a jigsaw for more precise cuts.
A good underlayment is also a must to provide stability and a smooth surface. Other tools such as gloves, a floor gap fixer tool, and a flooring installation kit can make the process easier and more efficient. With the right tools, you can create a beautiful and durable laminate floor in your home.
Essential Tools Needed
To install laminate flooring, there are essential tools that you need including a jigsaw, hammer, tapping block, crowbar, underlayment, measuring tape, and a saw to cut the floorboards to length. You can purchase laminate flooring installation kits that include all the necessary tools for the job.
Are you planning to install laminate flooring yourself? Before you start, make sure you have all the essential tools needed for a successful installation. Having the right tools will make the process simpler and quicker, and ensure that your new flooring looks great. Here’s a breakdown of the must-have tools for laying laminate flooring.
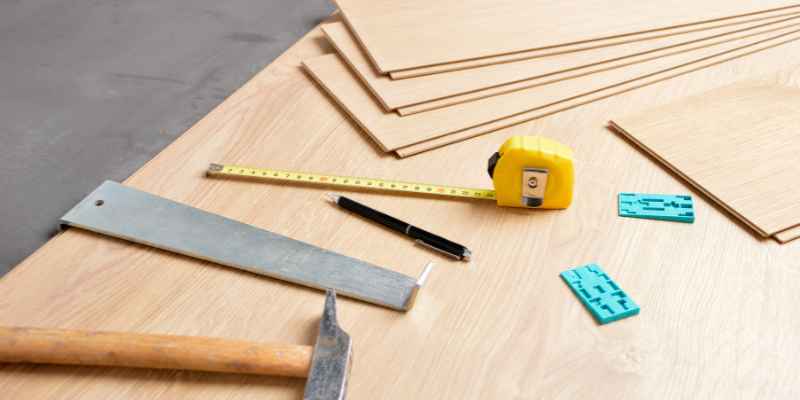
Measuring Tape and Pencil
A measuring tape and pencil are essential tools for getting accurate measurements of your room, which is crucial when it comes to ordering the right amount of flooring. You’ll also need a pencil for marking where you need to make cuts on the planks.
Spacers for Expansion Gaps
When installing laminate flooring, it’s important to leave expansion gaps around the edges of the room to allow the floor to expand and contract with temperature changes. Spacers are essential for ensuring that you leave the correct amount of space for expansion.
Circular Saw or Jigsaw
You’ll need a circular saw or jigsaw to cut the laminate flooring to fit around door frames, corners, and other obstacles. A circular saw is best for cutting straight lines, while a jigsaw is ideal for curved cuts.
Tapping Block and Pull Bar
A tapping block and pull bar are necessary for securely fitting planks together. The tapping block helps you fit the planks snugly, while the pull bar helps you lock the planks in place.
Rubber Mallet
A rubber mallet can be used to gently tap the planks into place without damaging them. You can also use it to help snap the planks together.
Combination Square
This is a useful tool for ensuring that you make accurate, square cuts when you need to trim your laminate flooring.
Sliding T-Bevel
This tool is ideal for marking angles accurately when you need to cut the planks to fit around obstacles. It’s designed to help you mark a precise angle on the laminate so that you can make an accurate cut.
In conclusion, having the right tools for laying laminate flooring is essential for a successful installation. You will need a measuring tape and pencil, spacers for expansion gaps, circular saw or jigsaw, tapping block and pull bar, rubber mallet, combination square, and sliding T-bevel to get the job done right. With these essential tools, you’ll have everything you need to ensure your new flooring looks fantastic.
Other Tools And Kits
Installing laminate flooring requires various tools and kits such as a jigsaw, hammer, crowbar, tapping block, and underlayment. Other essential tools include a solid tapping block, pull bar, floor gap fixer, and a laminate flooring installation kit. These tools ensure that your laminate flooring is installed perfectly.
Aside from the essential tools needed in installing laminate flooring, there are other tools and kits that can make the process easier, faster, and more efficient. These tools and kits can supplement the essential tools and help achieve a professional-looking finish.
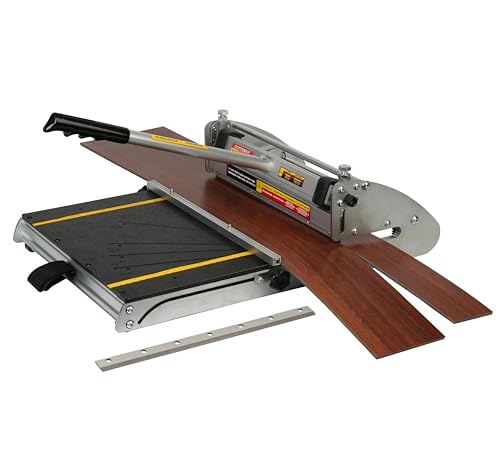
Laminate Flooring Installation Kit
A Laminate Flooring Installation Kit usually includes a pull bar, tapping block, and spacers. These tools are used to connect the laminate flooring planks and ensure that the joints are even and tight.
Laminate And Wood Flooring Installation Kit
A Laminate and Wood Flooring Installation Kit includes a lot of tools needed for installing laminate or wood flooring. Aside from the pull bar, tapping block, and spacers that come with laminate flooring installation kits, this kit also includes a saw, a hammer, and a measuring tape.
Floor Installation Kit
A Floor Installation Kit is a more comprehensive kit and includes nearly every tool needed to install different types of flooring. It includes spacers, tapping block, pull bar, and a saw. This kit also includes a utility knife, a rubber mallet, and a pry bar.
Pro Installation Kit
A Pro Installation Kit includes several heavy-duty tools, making it ideal for professional installers. It includes a tapping block, pull bar, spacers, a pry bar, rubber mallet, and a saw. This kit also includes knee pads and gloves to make the installation process easier on the installer.
Vinyl Flooring Installation Kit
A vinyl flooring installation kit usually includes a similar set of tools like the laminate installation kit. It includes a pull bar, a tapping block, and spacers, but the tools are designed with a vinyl floor in mind. It may include a hand roller used to ensure that the vinyl adheres to the subfloor.
Floor Gap Fixer Tool
A Floor Gap Fixer Tool is designed to repair gaps, uneven edges, and buckling in the laminate flooring. This tool works by clamping the boards together and closing the gaps. It includes suction cups, a rubber mallet, and foam padding.
Hardwood Flooring Jack Tool
A Hardwood Flooring Jack Tool is a specialized tool designed to lift and install hardwood floorboards with ease. It is adjustable and sturdy enough to be used in the tightest of spaces.
Tapping Block For Vinyl Plank Flooring
A Tapping Block for Vinyl Plank Flooring is a specially designed block that helps in the installation of vinyl planks. It is used to tap the boards together without damage done to the surface during installation.
Vinyl Plank Flooring Installation Kit
A vinyl plank flooring installation kit is similar to the laminate flooring installation kit. It includes a tapping block and spacers, but the pull bar is replaced with a set of knives designed to make precise cuts.
In conclusion, the tools and kits mentioned above can help make the installation of laminate and other types of flooring easier and more efficient. It’s best to invest in the right type of tools, which can save time and effort in the long run.
Preparing For Installation
When preparing for laminate flooring installation, it is important to have the necessary tools on hand. This may include a jigsaw for cutting boards, a hammer and tapping block for securing the planks, and an underlayment for moisture protection. Home improvement stores offer installation kits with all the tools needed for a successful installation.
Before installing laminate flooring, it is essential to prepare the room properly. This includes determining the amount of laminate flooring needed, identifying the direction of the flooring, measuring the room, preparing the subfloor, installing underlayment, and maintaining proper expansion space. By following these steps, you can ensure a smooth and successful installation.
Determining the Amount of Laminate Flooring Needed:
To determine the amount of laminate flooring needed, measure the length and width of the room and multiply the two numbers to get the total square footage. It’s always recommended that you add 10% extra to your total square footage, this will allow for any cutting and fitting that needs to be done. The extra flooring may come in handy in case of any mis-cuts or errors.
Identifying the Direction of the Flooring:
Deciding on the direction of the flooring will depend on personal preference and the shape of the room. A general rule of thumb is to lay the flooring parallel to the longest wall in the room as this will make the room appear larger.
Measuring the Room:
Accurate measurements are essential for getting the best outcome in laminate flooring installation. The right measurement will help ensure that you purchase the correct amount of flooring, keep waste to a minimum, and finish the job smoothly without any issues. Use a measuring tape to get precise measurements of the room’s width and length, and don’t forget to measure any angled walls or alcoves.
Preparing the Subfloor:
Before installing the laminate floor, it’s essential to prepare the subfloor. Depending on the kind of subfloor, either a smooth or level subfloor, or one that needs extra work may be required. If your subfloor is uneven, you will need to install an underlayment to create a flat surface. Any bumps, cracks, or unevenness should be fixed with a floor levelling compound.
Installing Underlayment:
Underlayment is essential as it acts as a moisture barrier and sound reducer. Be sure to follow the manufacturer’s instructions carefully when installing underlayment. Prepare your underlayment sheets by measuring and cutting them down to fit your room. The underlayment should be laid perpendicular to the direction of the flooring.
Maintaining Proper Expansion Space:
Laminate flooring expands and contracts with changes in temperature and humidity. It’s essential to leave an expansion gap of at least ¼ inch between the flooring and the wall to account for this movement. If the expansion gap isn’t maintained, the flooring may buckle, warp, or even separate.
In conclusion, preparing for laminate flooring installation is crucial to achieve a perfect flooring finish. By following the steps outlined above, you can guarantee a successful installation that will last for years to come.
Cutting And Installing Laminate Flooring
To install laminate flooring, you will need tools like a jigsaw, hammer, tapping block, and crowbar to firmly click the floor into place. Other essential tools include a measuring tape, underlayment, and flooring glue. It’s important to have a complete tool kit to have a smooth and easy installation process.
Cutting and installing laminate flooring can be a simple DIY project with the right tools. In this section, we will go over the necessary tools and steps needed to successfully cut and install laminate flooring for a beautiful, durable finish.
Cutting Laminate Flooring to Size
The first step in a laminate flooring installation is to measure the length and width of the room and calculate the amount of flooring needed. When it comes to cutting laminate flooring to size, a few essential tools are required.
A circular saw or jigsaw is needed to make straight and rounded cuts on the laminate boards. It is important to properly adjust the blade depth to avoid chipping or damaging the flooring. In addition, a measuring tape, pencil, and straight edge are necessary tools for marking and measuring the cuts.
Making End Cuts
In addition to cutting the laminate boards to size, end cuts must also be made to fit the boards together seamlessly. An end cutting tool, such as a miter saw or a handsaw, is needed to make precise end cuts on the boards. Be sure to measure accurately and mark the cuts before sawing.
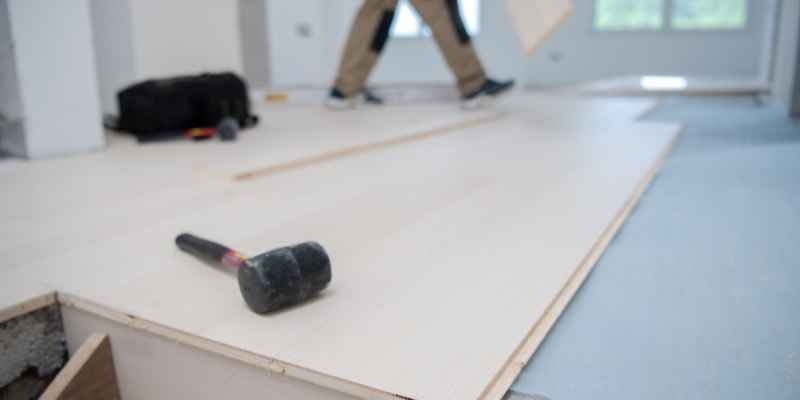
Installing Laminate Flooring
Once all the cuts are made, it’s time to begin laying the laminate flooring. Ensure that the subfloor is clean, level, and dry before beginning the installation process.
A few key tools are needed for installing laminate flooring, including a tapping block, pull bar, and spacers. These tools will help secure the boards in place and create an even and stable surface. A rubber mallet and a utility knife are also helpful for trimming and adjusting the boards.
In conclusion, cutting and installing laminate flooring does not have to be a daunting task. With the right tools and a little bit of patience, a beautiful and durable floor can be achieved. Happy renovating!
Frequently Asked Questions For Laminate Flooring Installation Tools Needed
What Tool Do I Need To Lay Laminate Flooring?
To lay laminate flooring, you will need basic tools such as a pencil for drawing sawing lines, a hammer, a crowbar, and a tapping block. An indispensable tool is a jigsaw for cutting boards to length or sawing round shapes.
You can also use an installation kit that includes materials like a saw, gloves, and various types of flooring clamps and tapes. Installing laminate flooring is relatively easy and can be done by yourself.
What Is Required To Install Laminate Flooring?
To install laminate flooring, you will need basic materials such as underlayer, flooring, laminate glue, adhesive, barrier sheeting, and more. You also need hand tools such as a jigsaw, hammer, crowbar, and tapping block. You can install the flooring yourself as it doesn’t require glue, grout or mortar.
Planks can be cut with a hand saw, circular saw or flooring cutter.
Can I Install Laminate Flooring Myself?
Yes, you can install laminate flooring yourself. You will need basic hand tools such as a hammer, crowbar, tapping block, and a jigsaw. Additionally, it is important to measure your room, prep the floor, install underlayment, and be mindful of expansion space.
You can find installation kits at various retailers to help make the process easier.
What Needs To Be Installed Under Laminate Flooring?
To install laminate flooring, you will need basic materials such as underlayment, barrier sheeting, adhesive, and molding. However, to do the job efficiently, you will require several tools including a hammer, crowbar, tapping block, jigsaw, and sawing lines. You can easily lay DIY laminate floors with minimal tools, without involving grout or mortar and without the need for professional assistance.
Conclusion
To sum up, installing laminate flooring requires proper planning and the right tools. From measuring the room to cutting the laminate boards, each step should be done with care. Having the necessary hand tools like a hammer, crowbar, tapping block, jigsaw, and installation kit, including underlayment and barrier sheeting, will help make the whole process easier and faster.
Whether you are a DIY enthusiast or a professional, using the right tools will ensure that your project is a success. So, grab your tools and get ready to transform your flooring into a beautiful and practical space.