
Live Edge Wood Slabs at Home Depot: A Woodworker’s Guide to Crafting Unique Furniture
Hey there! If you’re anything like me, you’ve probably wandered through the aisles of Home Depot, eyes wide, dreaming up your next woodworking project. There’s something magical about finding the perfect piece of wood to bring your vision to life. And when it comes to live edge wood slabs, Home Depot has become a go-to spot for many DIYers and seasoned woodworkers alike. These slabs, with their natural, rugged edges, are like a canvas straight from nature, ready to be transformed into stunning furniture or decor. In this article, I’m going to share everything I’ve learned from my own adventures with live edge wood slabs at Home Depot—why they’re special, how to choose them, and how to turn them into pieces you’ll be proud to show off. Let’s dive in!
What Are Live Edge Wood Slabs?
Let’s start with the basics. Live edge wood slabs are pieces of lumber that keep the natural, irregular edges of the tree they came from. Unlike standard boards, which are cut into neat, straight rectangles, live edge slabs showcase the tree’s organic shape—bark, knots, and all. It’s like bringing a slice of the forest into your home. When I first saw a live edge slab, I was hooked. The raw beauty, the unique grain patterns, and the way each slab tells its own story—it’s hard not to fall in love.
At Home Depot, you’ll often find these slabs in the lumber section, typically sourced from woods like walnut, oak, or acacia. They’re cut from the log in a way that preserves at least one natural edge, giving you that rustic, one-of-a-kind look. Whether you’re making a coffee table, a shelf, or even a headboard, these slabs add a touch of nature that’s impossible to replicate with processed lumber.
Why Choose Live Edge Wood Slabs from Home Depot?
You might be wondering, “Why Home Depot? Can’t I just go to a local sawmill?” Sure, sawmills are great, but Home Depot has some unique advantages that make it a fantastic option, especially if you’re just starting out or want convenience. Here’s why I keep going back:
- Accessibility: Home Depot stores are everywhere. No matter where you live in the USA, there’s likely one nearby. This means you can see and touch the slabs before buying, which is a big deal when you’re picking out something as unique as live edge wood.
- Variety: They stock a range of sizes and wood types. From smaller 2-foot walnut slabs to larger 8-foot pieces, there’s something for every project.
- Affordability: Compared to specialty lumber suppliers, Home Depot’s prices are often more budget-friendly. For example, a 2-inch thick walnut live edge board might cost around $75-$200, depending on size, which is a steal compared to custom-cut slabs.
- Convenience: Many of their slabs are pre-planed and kiln-dried, saving you time and effort. Plus, you can grab tools, finishes, and other supplies in the same trip.
I remember my first trip to Home Depot for a live edge slab. I was nervous about picking the “right” one, but the staff were super helpful, and I walked out with a gorgeous walnut slab that became the centerpiece of my dining room.
How to Choose the Perfect Live Edge Slab at Home Depot
Picking out a live edge slab can feel overwhelming, especially with so many options. But don’t worry—I’ve got you covered with some tips I’ve learned from trial and error.
Check for Quality
Not all slabs are created equal. When you’re at Home Depot, take a close look at the wood. You want a slab that’s free from major cracks or defects unless you’re planning to use epoxy to fill them for a cool effect. I always check for:
- Moisture Content: The slab should be kiln-dried to prevent warping. Home Depot’s slabs are usually ready to go, but it’s worth asking an employee to confirm.
- Grain and Color: Look for interesting grain patterns or unique markings. Walnut slabs, for example, often have rich, dark tones with swirling patterns that make your project pop.
- Stability: Avoid slabs with deep cracks or loose bark unless you’re prepared to stabilize them with epoxy or remove the bark entirely.
Consider Size and Shape
Think about your project before you buy. A coffee table might need a wider, shorter slab (say, 12-16 inches wide and 4 feet long), while a dining table could require something longer, like 8 feet. Home Depot’s selection includes slabs in various dimensions, so measure your space and bring those numbers with you. I once bought a slab that was too big for my car—lesson learned! Always check the dimensions and have a plan for transport.
Budget Wisely
Live edge slabs at Home Depot are generally affordable, but prices vary by size and wood type. For example, a 2-inch thick, 8-foot walnut slab might run you around $200-$300, while a smaller 2-foot piece could be under $100. Set a budget beforehand, and don’t forget to factor in the cost of finishes, tools, and hardware.
Inspect Both Sides
One mistake I made early on was only looking at one side of the slab. Flip it over! Sometimes the “back” has an even more stunning grain pattern. Also, check for flatness. A warped slab can be a headache to work with, especially for beginners.
Preparing Your Live Edge Slab for Your Project
Once you’ve got your slab, it’s time to get it ready. This is where the real fun begins, but it’s also where you need to be careful to avoid mistakes. Here’s how I prep my slabs:
Acclimating the Wood
Even though Home Depot’s slabs are usually kiln-dried, it’s a good idea to let them sit in your home for 1-2 weeks. This helps the wood adjust to your home’s humidity, reducing the risk of warping later. I learned this the hard way when a slab I rushed to finish started to twist slightly after a few months.
Removing Bark (Optional)
Some folks love the look of bark on live edge slabs, but it can flake off over time, especially on tables or countertops that get a lot of use. If you want to remove it, use a rounded chisel to gently peel it off in small sections. I find this process oddly satisfying—it’s like unwrapping a gift from nature. After removing the bark, sand the edges lightly for a smooth finish.
Sanding for a Smooth Surface
Sanding is key to getting that professional look. Start with a coarse sandpaper (like 80-grit) to remove rough spots, then work your way up to finer grits (120, 220, and even 400 for a super smooth finish). I use an orbital sander to save time, but hand-sanding works too. Be careful not to over-sand the live edge; you want to keep those natural contours.
Filling Voids with Epoxy
If your slab has cracks or knots, epoxy can be your best friend. I love using clear or tinted epoxy to fill voids—it adds a modern touch and makes the slab stronger. Mix the epoxy according to the instructions, pour it into the cracks, and let it cure for at least 24-48 hours. Sand it down afterward for a seamless finish.
Finishing Your Live Edge Slab: Bringing Out the Beauty
Finishing is where your slab goes from raw wood to a showstopper. The right finish protects the wood and highlights its natural beauty. Here’s how I do it:
Choosing the Right Finish
There are a few options, depending on the look you’re going for:
- Polyurethane: This is my go-to for a durable, glossy finish. It’s great for tables or countertops that will see heavy use. Apply 2-3 thin coats, sanding lightly between each.
- Tung Oil: If you want a more natural, matte look, tung oil is fantastic. It soaks into the wood and enhances the grain without looking too shiny.
- Epoxy Resin: For a high-gloss, modern look, a full epoxy pour over the entire slab is stunning. It’s more work, but the results are worth it.
At Home Depot, you can find all these finishes in the paint or hardware section. I usually grab a can of polyurethane and a few foam brushes for easy application.
Application Tips
- Clean First: Vacuum or wipe down the slab to remove all dust. Any leftover particles can ruin your finish.
- Apply Thin Coats: Thick coats can lead to drips or uneven drying. I learned this after my first project ended up with a sticky mess!
- Let It Cure: Give each coat plenty of time to dry—usually 4-6 hours for polyurethane, longer for epoxy. Check the product label for specifics.
Maintaining the Finish
Once your project is done, keep it looking great with regular care. Dust it weekly, and avoid placing hot or wet items directly on the surface. I use coasters and placemats on my live edge dining table to protect the finish, and it still looks as good as the day I finished it.
Project Ideas for Live Edge Wood Slabs from Home Depot
The possibilities with live edge slabs are endless. Here are some ideas to spark your creativity, along with tips for each:
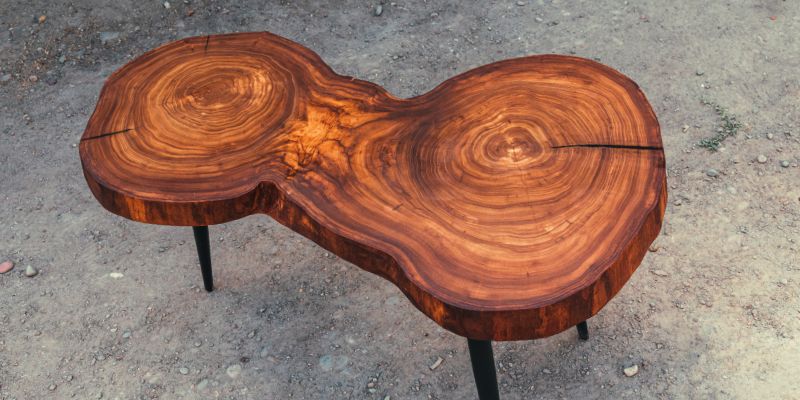
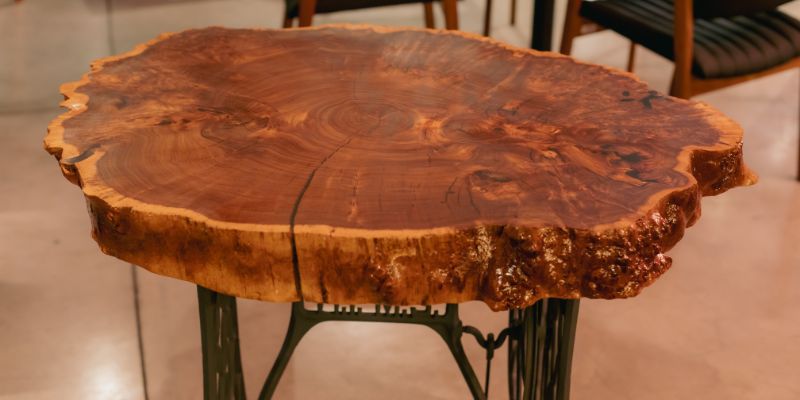
Coffee Table
A live edge coffee table is a classic. Choose a 4-6 foot slab, sand it smooth, and attach simple hairpin legs (available at Home Depot). I made one for my living room, and it’s always a conversation starter.
Dining Table
For a larger project, go for an 8-foot walnut slab. You’ll need a sturdy base—think metal or thick wooden legs. This is perfect for a rustic or modern dining room.
Floating Shelves
Smaller slabs (2-4 feet) are great for floating shelves. Mount them with heavy-duty brackets for a minimalist look. I have a set in my office holding books and plants, and they add so much character.
Countertop
Live edge slabs make stunning kitchen or bathroom countertops. Acacia slabs from Home Depot are a popular choice for their durability and unique color variations. Just make sure to seal them well to protect against spills.
Headboard
For a bedroom upgrade, use a wide slab as a headboard. Sand it, finish it with tung oil, and mount it directly to the wall or your bed frame. It’s a simple way to add a rustic touch.
Here’s a quick table to help you choose the right slab for your project:
| Project | Recommended Slab Size | Wood Type | Tips |
|---|---|---|---|
| Coffee Table | 4-6 ft long, 12-16 in wide | Walnut, Oak | Use hairpin legs for a modern look; sand thoroughly for a smooth top. |
| Dining Table | 6-8 ft long, 36-48 in wide | Walnut, Maple | Ensure slab is flat; pair with a sturdy base to support weight. |
| Floating Shelves | 2-4 ft long, 8-12 in wide | Acacia, Oak | Use heavy-duty brackets; keep bark for a rustic vibe or remove for clean. |
| Countertop | 6-10 ft long, 24-30 in wide | Acacia | Seal with multiple coats of polyurethane for water resistance. |
| Headboard | 5-6 ft long, 24-36 in wide | Maple, Cherry | Mount securely; use tung oil for a natural finish. |
Tools and Supplies You’ll Need from Home Depot
To make your live edge project a success, you’ll need some tools and supplies. Luckily, Home Depot has everything you need. Here’s my go-to list:
- Sander: An orbital sander (like a DEWALT or Bosch) makes sanding faster and easier.
- Chisel: A rounded chisel for removing bark.
- Epoxy: For filling cracks or creating a river table effect.
- Finish: Polyurethane, tung oil, or epoxy resin, depending on your preference.
- Brushes or Rags: Foam brushes for polyurethane or lint-free rags for oil finishes.
- Measuring Tape and Level: To ensure your slab is cut and mounted correctly.
- Safety Gear: Don’t skip the safety glasses and dust mask—sanding creates a lot of dust!
Pro tip: If you don’t own all these tools, Home Depot offers tool rentals, which can save you money on one-off projects.
Common Challenges and How to Overcome Them
Working with live edge slabs isn’t always smooth sailing. Here are some issues I’ve run into and how to handle them:
Warping
If your slab warps after you bring it home, it might not have been properly dried. To prevent this, always check that the slab is kiln-dried before buying. If warping happens, you can try flattening it with a router sled, but it’s tricky for beginners. I’d recommend exchanging it if possible.
Bark Falling Off
Bark can look great, but it’s prone to flaking. If you want to keep it, seal it with epoxy to hold it in place. Otherwise, remove it with a chisel for a cleaner look.
Cracks or Voids
Small cracks can add character, but large ones need filling. Epoxy is your best bet—mix it, pour it, and sand it smooth. I once turned a cracked slab into a stunning river table by filling the gaps with blue-tinted epoxy.
Uneven Surfaces
For projects like tables, you need a flat surface. If your slab isn’t level, use a router with a flattening jig or take it to a professional for planing. Home Depot sometimes offers flattening services, so ask at your local store.
Why Live Edge Wood Slabs Are Worth the Effort
There’s something deeply satisfying about working with live edge wood. Each slab is unique, and the process of turning it into furniture feels like a collaboration with nature. I’ll never forget the first time I finished a live edge coffee table—it wasn’t perfect, but it was mine, and it brought so much warmth to my home. Home Depot makes it easy to get started, with affordable slabs and all the tools you need under one roof. Whether you’re a beginner or a pro, the result is always a piece that tells a story.
Conclusion
Exploring live edge wood slabs at Home Depot has been a game-changer for my woodworking journey. From the moment I pick out a slab to the final coat of finish, every step feels like an adventure. These slabs aren’t just wood—they’re a way to bring nature’s beauty into your home, whether it’s through a rustic coffee table or a sleek countertop. With Home Depot’s variety, affordability, and convenience, anyone can dive into this craft and create something truly special. So, next time you’re at Home Depot, swing by the lumber section. Pick up a slab, let your imagination run wild, and start building something you’ll love for years to come. Trust me, once you go live edge, you’ll never look back!
FAQs
What Types of Live Edge Wood Slabs Does Home Depot Offer?
Home Depot typically stocks walnut, oak, and acacia live edge slabs. Sizes range from 2 feet to 8 feet long, with widths varying from 8 to 48 inches. Walnut is popular for its rich color, while acacia offers unique light and dark tones. Check your local store for availability, as it can vary.
Do I Need Special Tools to Work with Live Edge Slabs?
You don’t need fancy tools, but a sander, chisel, and measuring tape are must-haves. An orbital sander speeds up the process, and a rounded chisel helps with bark removal. Home Depot sells or rents these tools, so you’re covered either way.
How Do I Prevent My Live Edge Slab from Warping?
Make sure the slab is kiln-dried before buying—Home Depot’s slabs usually are. Let it acclimate in your home for 1-2 weeks before working on it. Store it flat and avoid extreme humidity changes to keep it stable.
Can I Leave the Bark on My Live Edge Slab?
You can, but bark often flakes off over time, especially on high-use items like tables. If you love the look, seal it with epoxy to keep it in place. Otherwise, remove it with a chisel for a cleaner, low-maintenance finish.
How Much Do Live Edge Slabs Cost at Home Depot?
Prices depend on size and wood type. A 2-foot walnut slab might cost $75-$100, while an 8-foot slab could be $200-$300. Smaller acacia or oak slabs are often cheaper. Check Home Depot’s website or visit a store for exact pricing.
Is It Beginner-Friendly to Work with Live Edge Slabs?
Absolutely! Live edge slabs are forgiving because their natural imperfections are part of the charm. Start with a simple project like a shelf, and use pre-planed slabs from Home Depot to make it easier. With basic tools and patience, anyone can create something beautiful.