Box Joint Spacing Calculator for Clean Finger Layouts
For a box joint, pick a whole finger count that fits the board width, then set finger width to board width ÷ count; if it does not divide cleanly, round to the nearest whole count and split the leftover as equal end offsets. Bad layout gives loose corners, skinny end fingers, or a joint that will not assemble. This guide shows how to turn any measured board width into a cut-ready layout for hand work, jigs, table saws, and router tables.
How is this calculated?
Press Calculate to see the math with your numbers.
What this box joint spacing calculator does


This calculator turns a measured board width into a box joint layout that can actually be cut. It uses board width, desired finger width, and stock thickness, then reports the exact finger width, total segments, cut depth, and whether the layout keeps equal end pins for symmetry.
It supports box/finger joints and dovetails, but the box joint side is the one that matters here. It lays out from one edge so both mating boards match, which keeps the corner from drifting when the second part is cut.
Inputs it needs
The key input is board width, measured across the edge that will be joined. Desired finger width is the target, not a promise, because the board width has the final say. Stock thickness and mating thickness matter too, since they guide cut depth and the look of the finished corner.
A small sanding allowance belongs in the setup when the goal is a flush corner after glue-up. That extra depth gives room for cleanup without leaving the fingers too short.
What the output should tell you
The useful output is not just a spacing number. It should tell you the exact finger width after the width is divided, how many total segments are used, whether the ends stay symmetrical, and what cut depth to set on the dado stack or router bit.
It should also warn when the chosen finger width does not match a real cutter. A computed layout is only a plan until the blade or bit can cut it cleanly.
How do you space box joint fingers evenly?
Space box joint fingers by measuring the board width, choosing a target finger width, then converting that target into a whole number of equal segments across the width. If the width does not divide cleanly, use the nearest whole count that keeps both ends balanced and the joint symmetrical.
That is the real layout problem. A box joint is strongest and best-looking when divided into a whole number of equal fingers, and the calculator’s job is to keep the corners even instead of forcing the last finger to absorb the error.
Measure from the actual joined edge
Measure the board width across the same edge that will receive the joint. Small measurement mistakes here show up as a cumulative error across the full layout. On short parts, the error may be hard to notice. On wider drawer sides, it becomes obvious fast.
Convert target finger width into a whole count
Start with the target finger width, then divide board width by that number. If the result is close to a whole number, use it. If it lands between counts, pick the nearest count that keeps the outer pins equal and avoids a skinny edge finger.
Choose the nearest balanced layout
A balanced layout usually keeps a finger at each edge for symmetry. That leaves solid outer pins, which are easier to register during cutting and easier to align at assembly. If the leftover space is small, split it evenly at both ends rather than hiding it on one side.
What finger width works best for your stock thickness?
Match finger width to stock thickness, visual scale, and the cutter you already own. For small boxes, 1/4 inch fingers usually look right on 1/4 inch stock. For medium drawers, 3/8 inch is a common fit. For heavier casework, 1/2 inch fingers suit 1/2 inch stock well.
The best choice is not only about thickness. A wide finger on thin stock can look clumsy, while a narrow finger on thick stock can look busy and weak. The cutter must also match the plan, or the spacing will be wrong before the first cut.
1/4 inch stock and small boxes
With 1/4 inch stock, a 1/4 inch target finger width usually keeps the joint proportional. Smaller boxes often look better with tighter spacing, but only if the cutter and jig can hold that pattern accurately. Too many tiny fingers invite layout drift.
3/8 inch stock and medium drawers
For 3/8 inch stock, 3/8 inch fingers often give a good balance between strength and appearance. This size is common for drawer parts where the joint should read as a deliberate feature, not a heavy border.
1/2 inch stock and heavier casework
For 1/2 inch stock, 1/2 inch fingers often suit the scale of case sides and utility boxes. This size gives enough glue area without crowding the edge with too many pins. It also works well with a cutter that matches the layout closely.
How do you set up a box joint jig from the calculator?
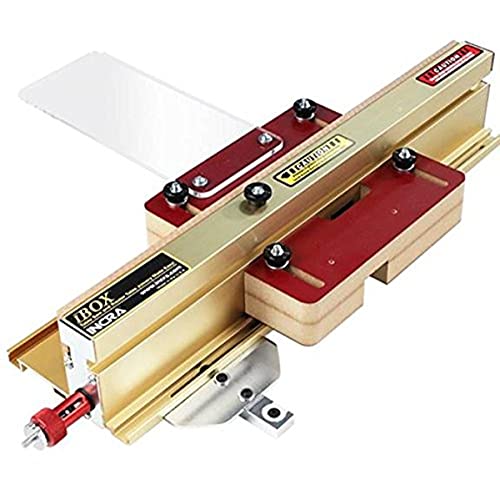
Set up the jig by matching the dado stack or router bit to the computed spacing, then indexing from the same reference edge on both mating boards. Use the calculator output for finger count, exact finger width, and cut depth, then verify the setting with a scrap test joint before cutting real parts.
This step matters because a layout can be correct on paper and still fail at the machine. If the cutter width does not match the computed spacing, the joint will come out too loose, too tight, or off-center.
Use a real cutter that matches the layout
Choose a dado stack or straight bit that matches the planned spacing as closely as possible. The calculator advises matching finger width to a real cutter you own for a reason: the machine defines the cut, not the sketch.
Keep the same reference edge on both boards
Mark from one edge only, then keep that edge against the jig or fence for both mating boards. That keeps the corner from stepping out of line. When the reference changes mid-process, the pattern usually shifts and the outside pins stop lining up.
Make a scrap test before the real parts
Cut a test joint in scrap of the same thickness before any final parts. It shows whether the fit is loose, tight, or dead on. It also reveals whether the bit, fence, or jig stop is producing the exact cut width the layout expects.
- Measure board width across the joined edge.
- Choose a target finger width that fits the stock thickness and the cutter you own.
- Let the calculator convert that target into a whole finger count.
- Check whether the layout keeps equal outer pins.
- Set cut depth to stock thickness plus sanding allowance.
- Cut a scrap joint and adjust before the final pieces.
Why do box joints come out loose or tight?
Box joints come out loose or tight when the cutter size does not match the layout, when small errors add up across the full width, or when the outside pins are not centered the same on both boards. The usual fix is to recheck the actual cut width, then retune the jig with scrap.
Even a tiny mismatch matters because the joint repeats that error many times. One off-cut can shift the entire pattern. If the fingers are correct in theory but the machine cut is wider or narrower, the fit will drift immediately.
Cutter width is not always exact
A router bit or dado stack may not cut the exact width assumed by the layout. That is why the calculator should be treated as the starting point, not the final answer. The test cut reveals the real width and shows whether the bit needs a small offset.
Outer pins can drift if the layout is not centered
Asymmetrical outer pins cause the ends to look uneven and can make assembly awkward. A symmetric layout with a finger at each edge is easier to read and easier to register. If the leftover width is split poorly, the joint looks lopsided even when it fits.
One-off error repeats across the whole joint
Box joints multiply a small error across every finger. That is why cumulative error matters more here than on a simple butt joint. If the first slot is off, the rest usually follow it, and the final board width no longer lands where it should.
Cut-ready spacing table for common board widths
This table shows how a target finger width turns into an exact layout. The exact finger width is the board width divided by the chosen finger count. When the count does not land cleanly, the nearest whole count is chosen so the ends stay balanced and the outer pins remain solid.
| Board width | Stock thickness | Target finger width | Finger count | Exact finger width | Solid outer pins? |
|---|---|---|---|---|---|
| 6 in | 1/4 in | 1/4 in | 24 | 1/4 in | Yes |
| 7 in | 3/8 in | 3/8 in | 19 | 0.368 in | Yes |
| 8 in | 1/2 in | 1/2 in | 16 | 1/2 in | Yes |
| 10 in | 1/4 in | 1/4 in | 40 | 1/4 in | Yes |
| 12 in | 3/8 in | 3/8 in | 32 | 3/8 in | Yes |
| 300 mm | 12 mm | 12 mm | 25 | 12 mm | Yes |
| 250 mm | 10 mm | 10 mm | 25 | 10 mm | Yes |
| 180 mm | 6 mm | 6 mm | 30 | 6 mm | Yes |
How to read the table when exact divisibility is impossible
If the board width does not divide neatly, choose the count that keeps the exact finger width closest to the target size. Then split the leftover evenly so both outer pins stay equal. That approach avoids the thin end finger that often appears when the count is forced without rebalancing the layout.
Metric layout with tolerance
Metric work follows the same rule. Measure the board width, choose a target in millimeters, then divide by a whole count. If the exact width lands a little off, accept a small change in finger width rather than breaking symmetry. The best calculators version includes imperial and metric units for this reason.
How much glue surface does a box joint have?
Box joints usually offer far more glue surface than a simple butt joint because each finger adds two long side faces plus the end grain interface. More fingers increase total contact area, which is one reason the joint holds well when fitted correctly and clamped without forcing.
That extra area matters most where the corner sees pulling and twisting, such as drawers and small cases. A box joint can be overkill for tiny decorative boxes, but it is still useful when the parts need reliable alignment and a clean corner after glue-up.
When box joints are worth the setup time
Use a box joint when the corner needs both strength and repeatable alignment. It is a good fit for boxes, drawers, and casework where the ends will be seen. For very small parts, the setup may cost more time than a simpler joint is worth.
When a simpler joint is the better call
If the part is short, lightly loaded, or hidden, a box joint may be more than needed. A butt joint or another simpler corner can be enough. The calculator helps here too, because it makes clear when the layout starts looking too busy for the part size.
Frequently asked questions
How do I space box joint fingers evenly?
Measure the board width, divide by a whole finger count, and use the resulting exact finger width for the layout. If the width does not divide cleanly, pick the nearest count that keeps the ends balanced. Equal outer pins and a consistent reference edge keep the corner aligned.
What is the formula for box joint spacing?
A basic formula is board width divided by finger count. The practical version adds symmetry: choose a whole count, then place any leftover as equal end offsets. That keeps the layout centered and avoids a skinny outer finger that would be weak or awkward to cut.
How many fingers should a box joint have?
There is no fixed count. The right number depends on board width, target finger width, and cutter size. The calculator’s goal is to find the nearest whole count that fits the part while keeping the outer pins equal and the joint visually balanced.
Should box joint fingers be an odd number?
Not always, but odd segment counts help when the goal is bilateral symmetry with a finger at each edge. That arrangement keeps the outer pins solid and makes the layout easier to read. If the count is even, check carefully that both ends still match.
What finger width works best for 1/2 inch stock?
For 1/2 inch stock, 1/2 inch fingers are a strong starting point. They match the scale of the material and usually cut cleanly with a matching dado stack or router bit. If the board width forces a small adjustment, keep the change even on both ends.
How do I set up a box joint jig from a calculator?
Use the calculator output for exact finger width, total segments, and cut depth, then set the jig to a real cutter that matches that spacing. Mark from the same reference edge on both boards, cut scrap first, and only then cut the workpieces.
Sponsored / affiliate links. As an Amazon Associate I earn from qualifying purchases. I may earn additional commission from eligible campaigns.
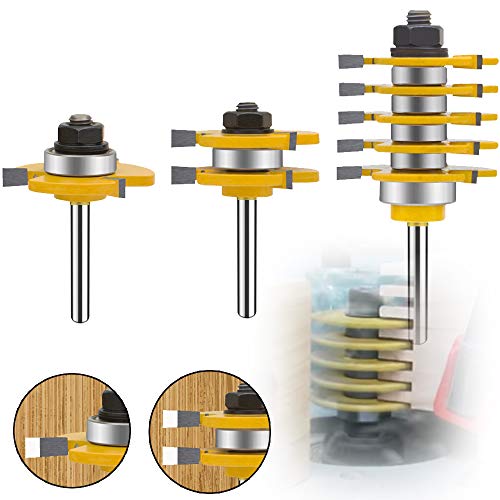 LEATBUY-TECH 1/4 Inch Shank Router Bit Set & 5 Finger Joint 3Pcs, Tongue and Groove Wood Milling Cutter Drilling Carbide Tool For Door Table Cabinet Shelve(1/4-5 Finger)
 TAIWAIN Router Bit Set 1/2 Inch Shank 5PCS Cabinet Panel Wood Milling Cutter Router Bits Sets Woodworking CNC Router Bits Sets Cutting Tool for Drawer Door Surfacing (K2-D)